
Calculated Fields
Overview
In this chapter, you will learn how to perform a variety of calculated field functions. You will also learn how to transform, manipulate, retrieve, encapsulate, or derive a new field from existing data. Lastly, you will be able to use calculated fields to create rich, customized reports using only simple field configurations without coding or programming.
Objectives
By the end of this chapter, you will be able to:
- Create calculated fields that manipulate dates and text, evaluate conditions, work with data from related objects, and perform arithmetic calculations.
- Use a combination of calculated fields to solve complex business requirements.
- Describe the security features that control the creation of, and access to, calculated fields.
- Explain the performance considerations when creating a calculated field.
Calculated Fields Overview
Calculated fields are field definitions that you configure to manipulate, transform, retrieve, and derive values based on existing data. You can use calculated fields to:
- Perform date calculations and formatting.
- Perform arithmetic calculations.
- Manipulate text with concatenate, substring, and formatting functions.
- Convert currency fields.
- Derive range bands from numeric or currency fields.
- Determine if a condition is true or not.
- Drill down and look up levels and values in hierarchies and organizations.
- Sum, count, and aggregate information across related instances.
- Look up values in related objects.
How To Use Calculated Fields
You can use calculated fields in a variety of ways. Use calculated fields in reporting to deliver data that is otherwise unavailable on the primary business object of the report. As an example, you may need to generate a Social Security number excluding dashes. You can use a Concatenate Text calculated field function to link together the numbers extracted using the Substring Text function.
Additionally, you might need a business process condition rule requirement to determine whether an employee's one-time retention bonus requires the vice-president's approval. Using a True/False Condition calculated field function, you can evaluate if a worker's bonus is greater than or equal to a percentage threshold to initiate the approval.
Use Calculated Fields in Reporting
You can add calculated fields to a custom report. For example, you can create a Date Difference calculated field to determine how far an employee's performance review is overdue.
You can also use calculated fields to create custom prompts or filters that affect the report output. For example, you can create a True/False Condition (Boolean) calculated field to display workers with a regular or full-time status and exclude contract workers.
Additionally, you can use calculated fields to access data on the primary business object (PBO). For example, you can make data accessible from a related business object (RBO) on the PBO for use in report types, report functions, and in other calculated fields.
Use Calculated Fields in Business Processes
You can control condition steps in a business process. For example, you can create a Text Length calculated field to determine how many letters are in a new hire's name. You can then add a condition to the Hire business process generating a custom name tag if the new hire's name is more than 20 characters.
Use Calculated Fields in Integrations
Use calculated fields with connectors and in reports that collect data for document transformation. You can also use calculated fields in an integration using Workday Enterprise Integration Builder (EIB). For example, you can use a Format Text calculated field to format employee first names to uppercase. Doing so aligns with the needs of the external system in the integration.
Use Calculated Fields to Schedule Recurring Processes
You can use calculated fields to determine dynamic runtime parameters for recurring scheduled processes. For example, you can run a specific report for each day (from two months ago through today) using an Increment or Decrement Date calculated field. This calculated field function establishes the date parameters.
Characteristics of Calculated Fields
There are three factors that characterize calculated fields.
- Workday calculates the value of the field based on existing data such as other Workday-delivered fields, other calculated fields, or available custom fields.
- Workday determines the value of a calculated field at runtime so that the system captures real-time data for the calculation. However, keep in mind that your tenant does not store calculated field values.
- Workday associates calculated fields with a business object. The business object determines what data to use in a calculated field and where to use the calculated field. Then, the calculated field becomes a new field on the business object.
Tip
: Consider performance when you configure calculated fields. For example, if you build a report that uses a calculated field referencing many different calculated fields, that calculation will significantly impact the runtime for that report.Based on Existing Data
Existing data within the Workday tenant is the basis for calculated fields. The system does not store a calculated field's value. Instead, the system pulls the value from existing fields at runtime. Changes to the underlying objects and fields you use in the calculation do not affect calculated fields. When values in the Workday tenant change, any derived calculations automatically include the new values.
Calculated at Runtime
All calculated fields resolve at runtime. Workday derives the value based on other Workday-delivered fields, calculated fields, and available custom fields. Calculated fields resolve at runtime because the values of the other fields that make up the calculation of the calculated field vary. When you run the report or execute the condition rule that uses the calculated field, Workday retrieves these field and object instance values.
Associated with Business Object
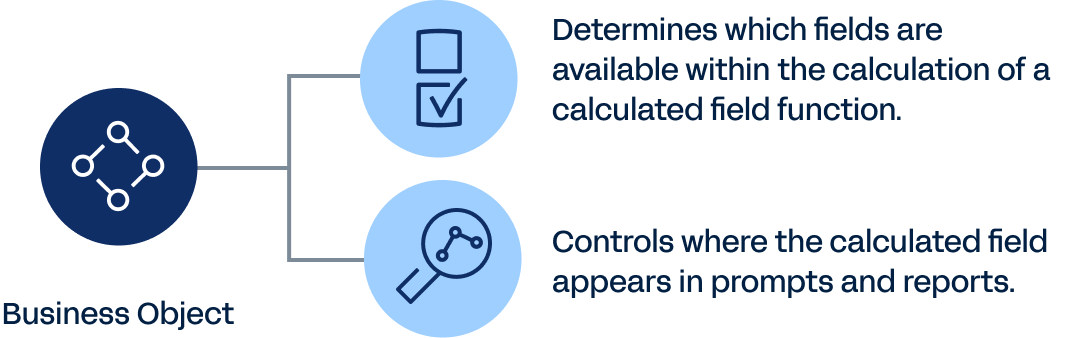
A business object determines which fields are available within the calculation of a calculated field function. Any calculated field you create for a business object appears and behaves just like any other Workday-delivered field for that business object. The business object also controls where the calculated field appears in prompts and reports.
The existing fields for the Worker business object are the basis for a calculated field built on that business object. That calculated field becomes a new field on the Worker business object. Wherever you use fields on the Worker business object, use that calculated field.
System-Wide vs. Report-Specific Calculated Fields
You create system-wide calculated fields with the
Create Calculated Field
or Maintain Calculated Fields
tasks. Workday automatically enables these system-wide calculated fields across the system.You can also create calculated fields with limited scope. You create these report-specific calculated fields directly from within the report definitions.
System-wide Calculated Fields
The benefits of using system-wide calculated fields include:
- Availability throughout Workday, not just in reports.
- Availability in multiple reports.
- Possibility of reuse in other reports and processes avoiding duplicated calculated fields.
Report-Specific Calculated Fields
Report-specific calculated fields function in the same way as system-wide calculated fields, except report-specific calculated fields:
- Are only available in a single report definition.
- Do not appear in the list of system-wide calculated fields when you run theMaintain Calculated Fieldsreport/task.
The benefits of report-specific calculated fields include:
- Reducing clutter in the tenant as you use these fields in only a single report or integration.
- Allowing report authors to define calculations without having to coordinate with others.
Creating Report-Specific Calculated Fields
Follow these steps to create report-specific calculated fields for a given custom report definition:
- From a field prompt in the report definition, select theCreate Calculated Field for Reporttask to add a report-specific calculated field to your report column, prompt, filter, or sort.
- From a report's Related Actions, you can select:
- Calculated Field for Report > Create.
- Calculated Field for Report > Maintain.
- Use theMaintain Calculated Fields for Reporttask for a given report to access the add, edit, and delete options.
A warning message displays if you create a report-specific calculated field that you do not reference in the report. It will do so, even if you associate it with and define it for the report.
Maintain Report-Specific Calculated Fields
The
Maintain Calculated Field for Report
task works the same as the Maintain Calculated Fields
report/task for system-wide calculated fields. However, results display by custom report. The output only shows report-specific calculated fields in that report. You can edit, delete, and add report-specific calculated fields from this task option.Convert Report-Specific and System-Wide Calculated Fields
For a report-specific calculated field you want to use in a different report, do not create an additional calculated field. You can convert system-wide and report-specific calculated fields to suit your reporting needs.
To convert a report-specific calculated field to a system-wide calculated field (for reference in other custom reports), follow these steps:
- Access theConvert Calculated Field for Reporttask.
- Select the report that references the calculated field.
- Select the business object associated with the calculated field.
- Select the field.
- SelectOKandDone.
To convert a system-wide calculated field to a report-specific calculated field (no longer available in other custom reports), follow these steps:
- Access theConvert Calculated Fieldtask.
- Select the report that references the calculated field.
- Select the business object associated with the calculated field.
- Select the field.
- SelectOKandDone.
Note
: If you use a system-wide calculated field in anything other than a report (including business process conditions or calculated fields), it cannot convert to report-specific. You can convert it if you are using it in the report to which you want to tie it.Create a Calculated Field
The basics for creating a calculated field involve running the
Create Calculated Field
task and configuring the Calculation and the Additional Info tabs accordingly. You can follow these steps:- To create system-wide calculated fields, use theCreate Calculated Fieldtask.
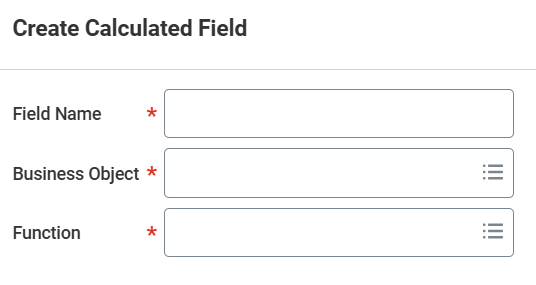
- Run theCreate Calculated Fieldtask:
- Enter the name for the calculated field.
- Select a Workday-delivered business object.
- Choose a function type.
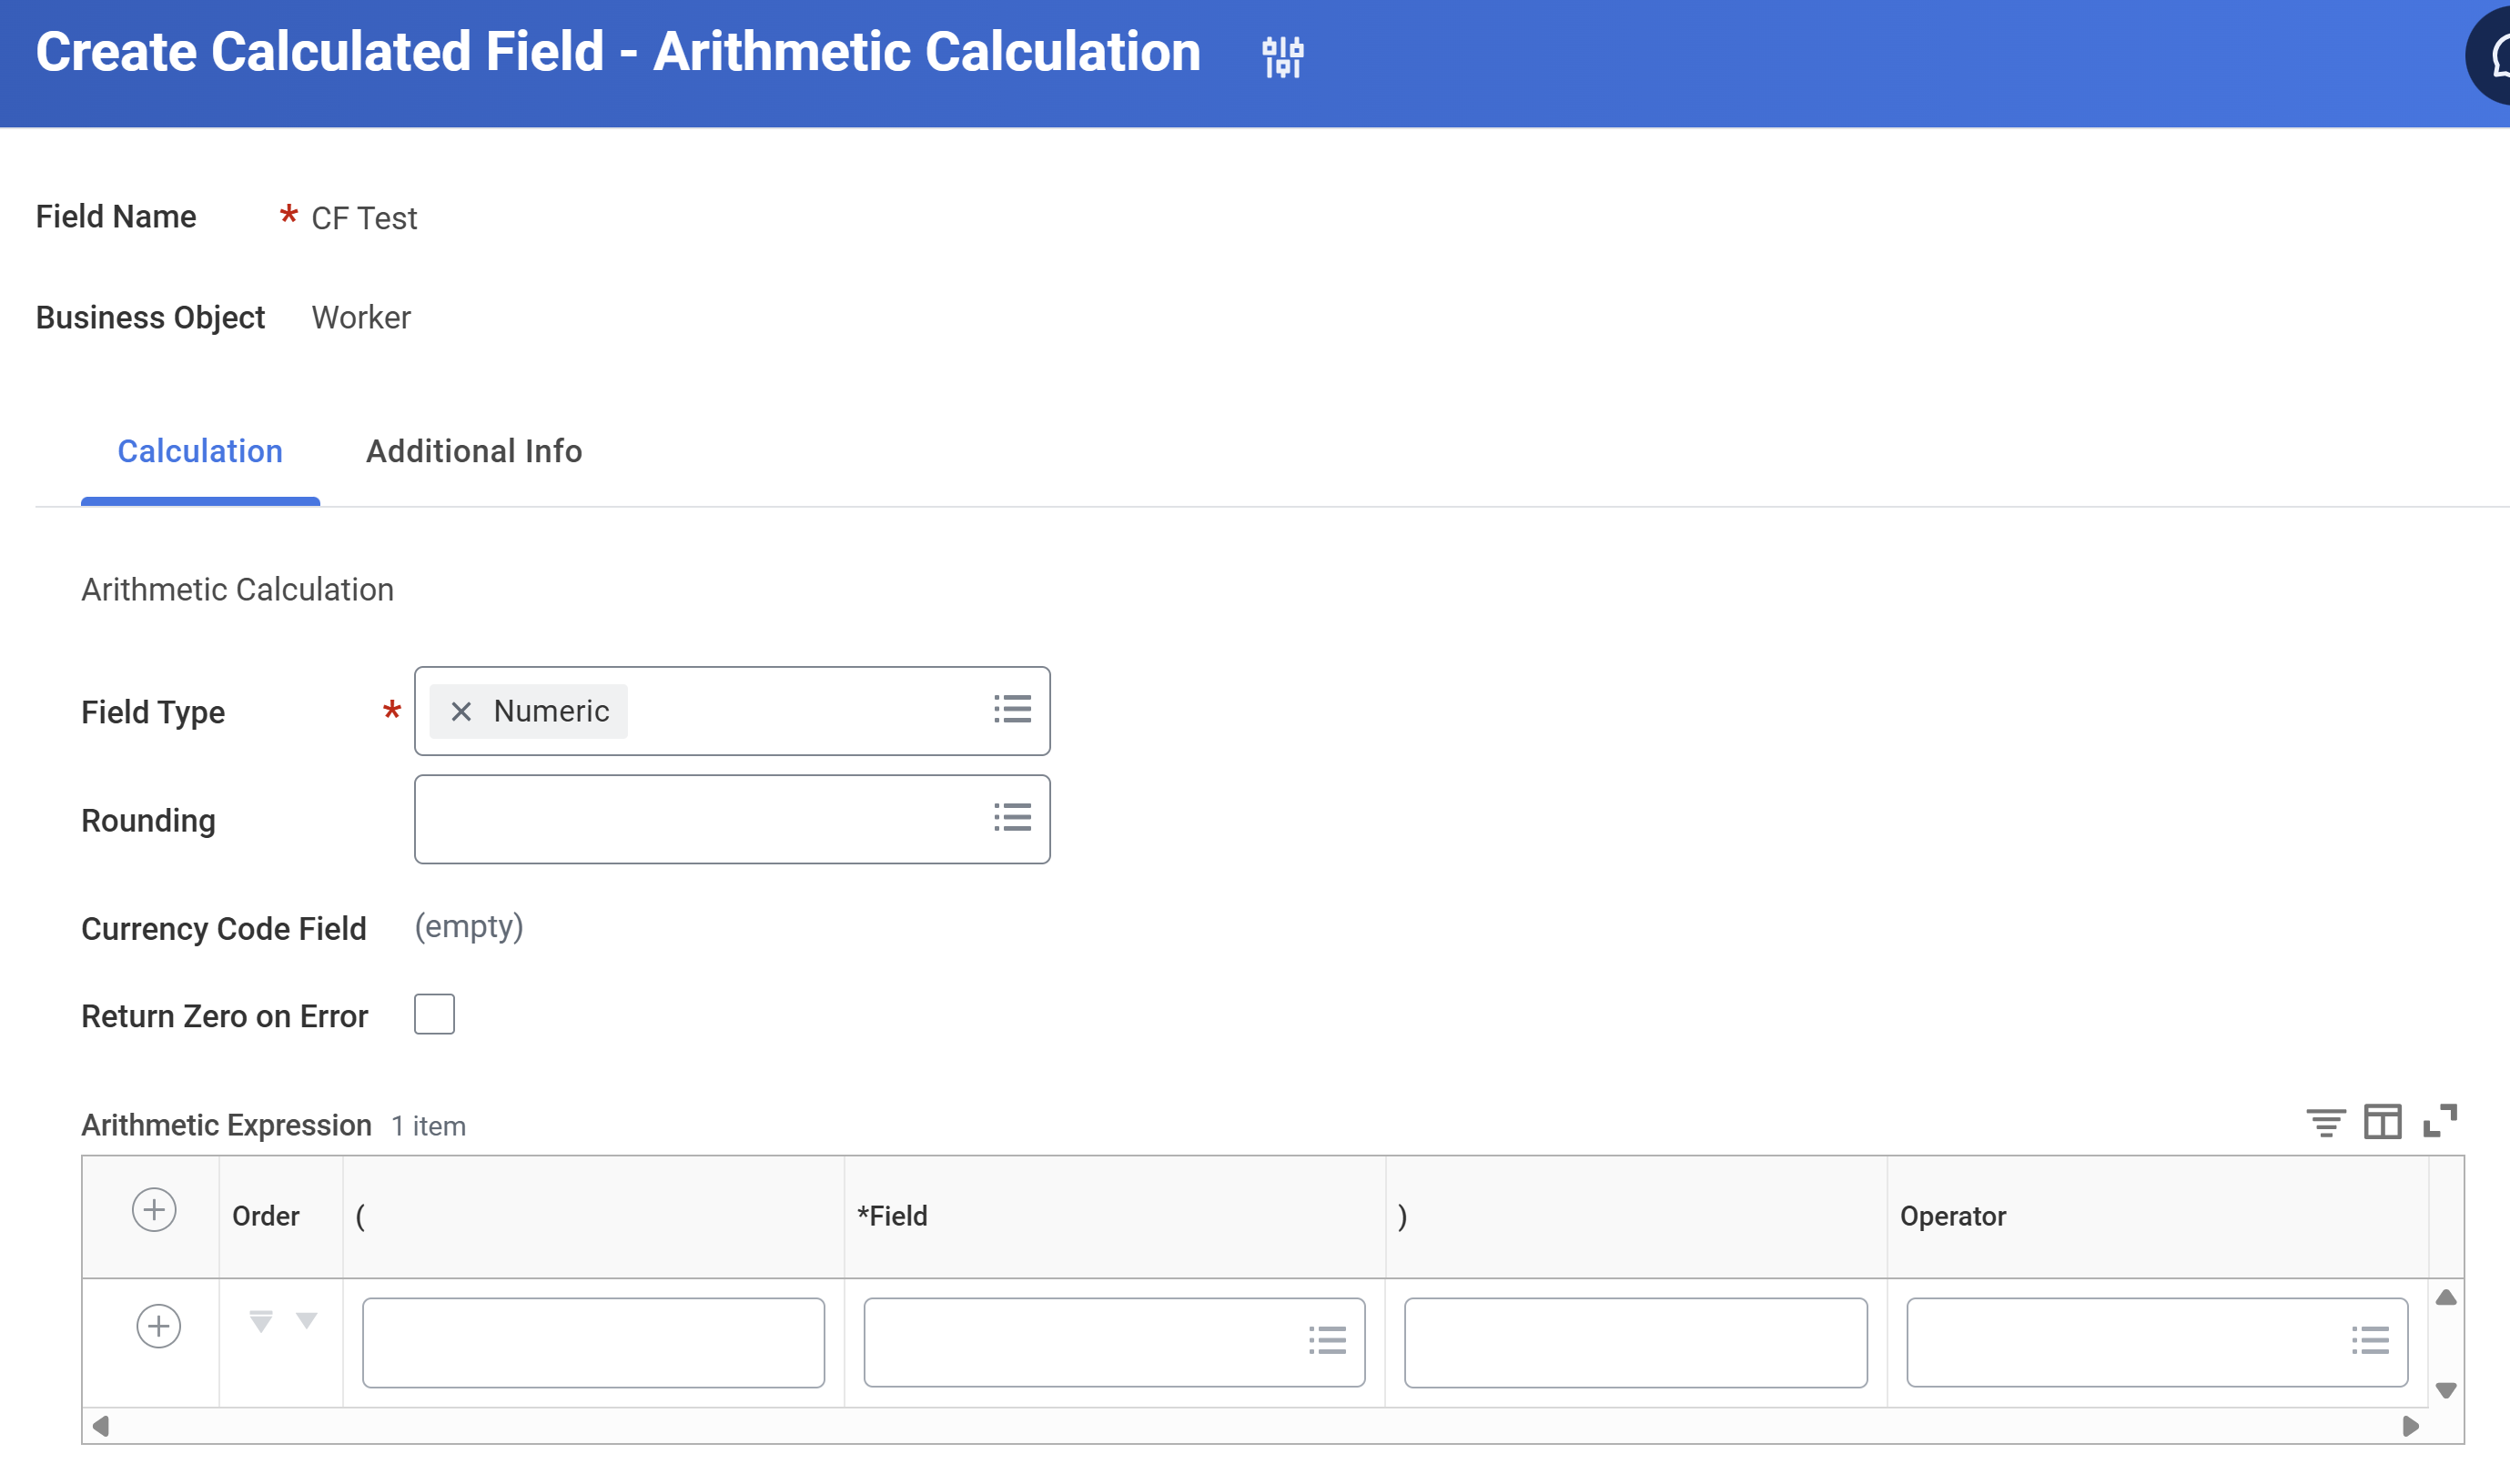
- In the Calculation tab, specify the calculated field's parameters. Parameters vary depending on the calculated field function selection.
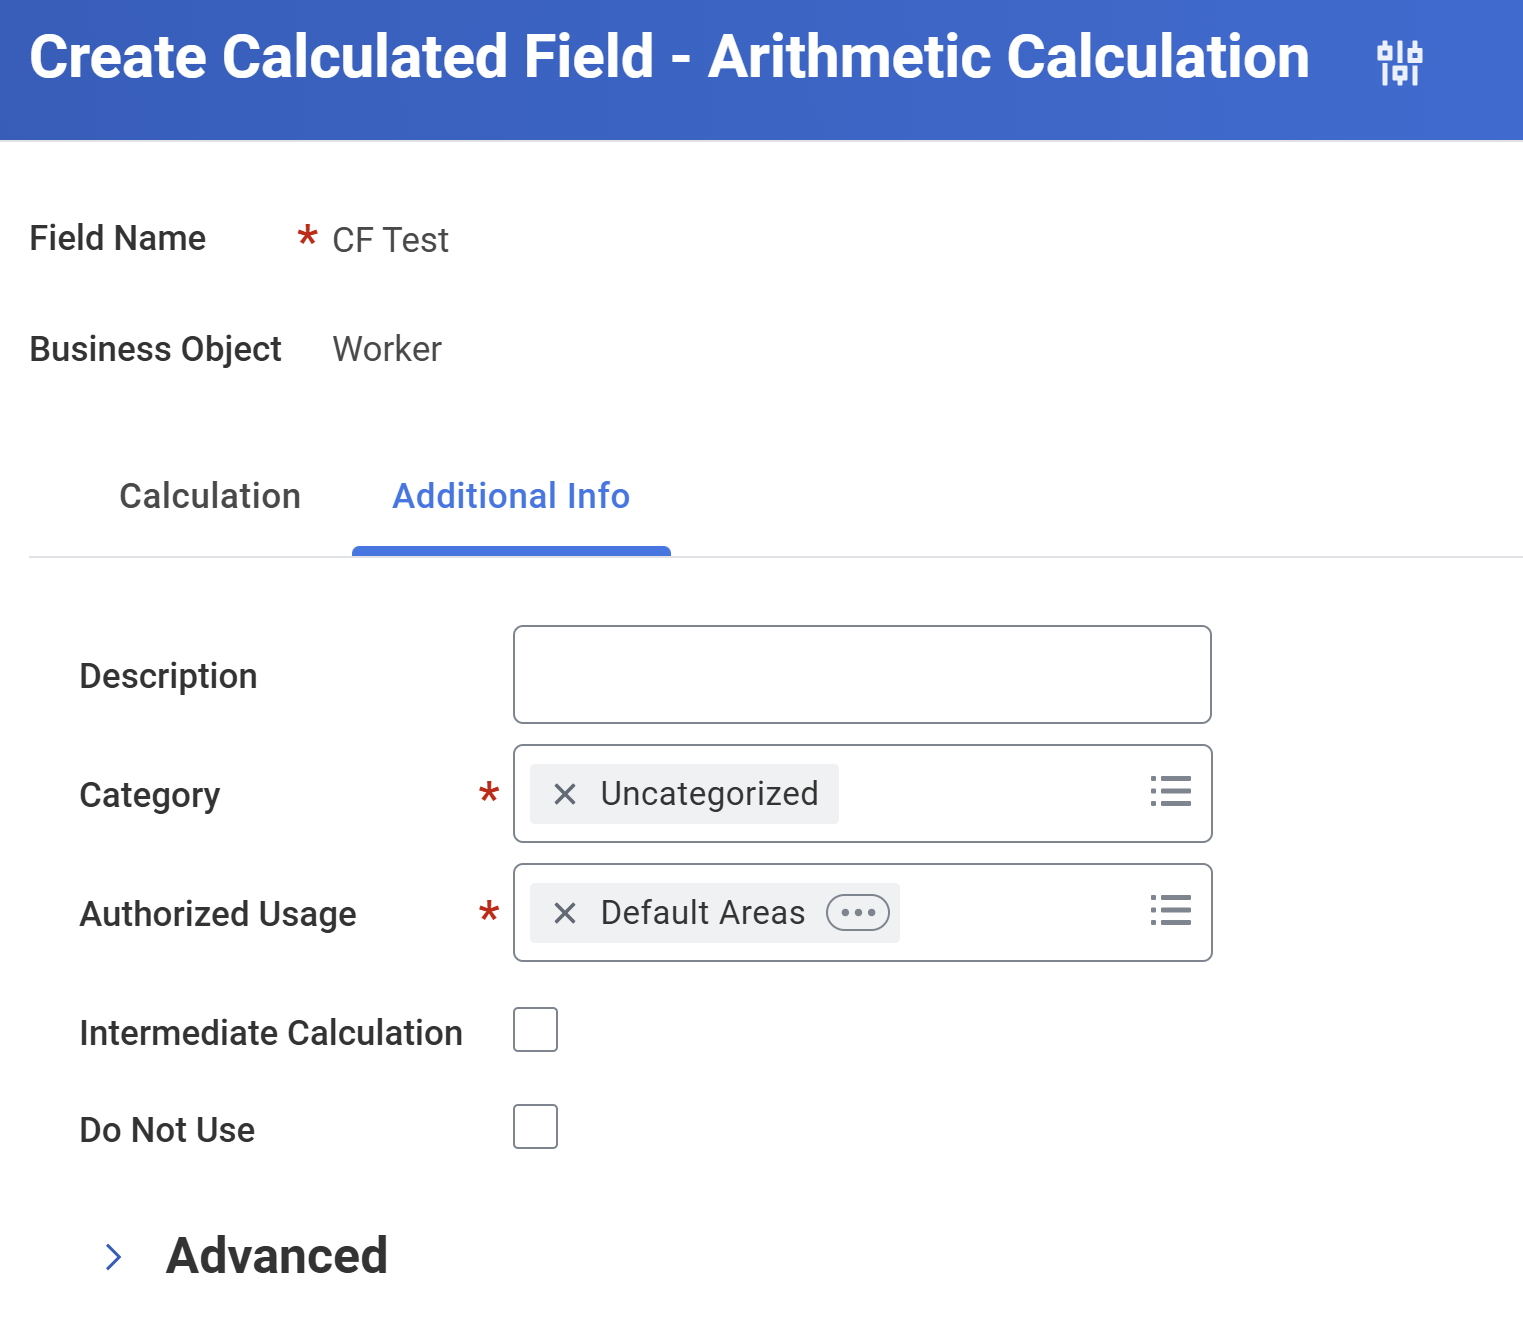
- In the Additional Information tab, specify information necessary to organize, document, locate, and reference the calculated field.
Initial Information
At the prompt, enter a field name, select the business object, and the function. The business object choice determines two major outcomes:
- What fields are available within the calculation? If you choose the Employee business object, all class report fields on the Employee business object are available for use in your calculated field.
- Where can you use the new calculated field? If you choose the Employee business object, your calculated field is available anywhere you use fields on Employee. The calculated field is a new field on the Employee business object and has the same access rules and characteristics as the other fields on Employee.
Calculation Tab
In the Calculation tab, you specify the parameters of the calculated field. The parameters you configure here vary depending on the calculated field function you select.
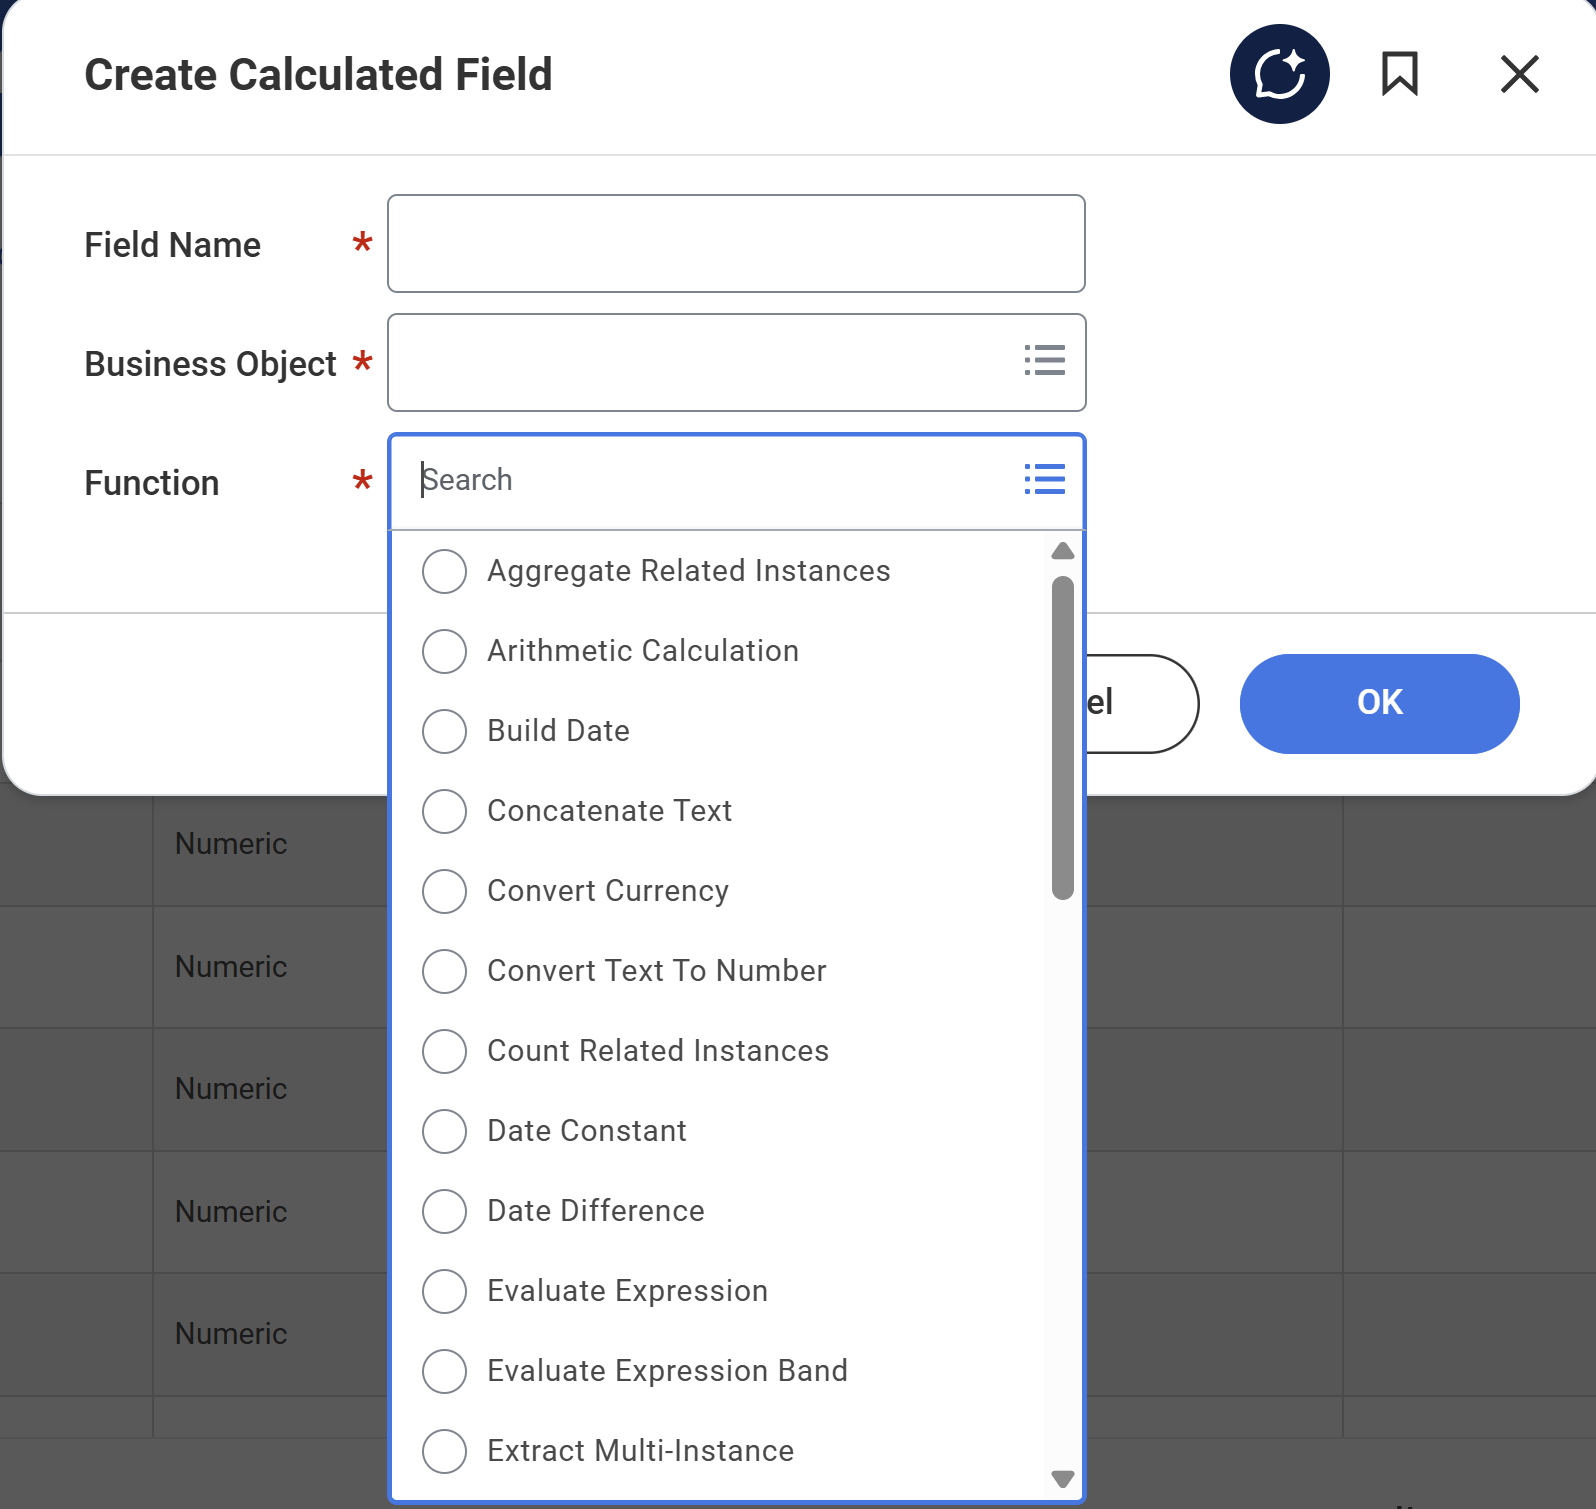
Additional Information Tab
Use the following fields, as necessary, in the Additional Information tab to provide specifics about your calculated field. These fields help organize, document, locate, and reference your calculated field.
Term | Definition |
|---|---|
Description | Helps you and other users to track the purpose of each calculated field. |
Category | Helps users locate calculated fields by category in field prompts. "Uncategorized" is the default. |
Authorized Usage | Allows customers to restrict the areas within Workday where the calculated field will display in prompts. Use "Default Areas" as it is the default. For example, add Benefits Eligibility, Calculation Engine (Payroll/Absence), and Compensation Eligibility in addition to "Default Areas" if needed. |
Intermediate Calculation | Drives whether the calculated field shows in main field prompts or not. If checked as Intermediate, it does not show in main prompts and shows up in the "Other" category. If you do not select Intermediate, it shows in main field prompts under the "All" or designated Category. Intermediate calculated fields are searchable and usable. This checkbox only dictates where the field shows in field prompts. |
Do Not Use | Appends the "Do Not Use" label to your calculated field name to indicate not to use this field anymore. Use fields shown in the main field prompt only (All or By Category) and do not use fields found under Other > Do Not Use Fields. Note: You cannot delete Calculated fields when they are in use. Mark as "Do Not Use" in development or if you plan to deprecate use. |
Advanced Options
The system collapses the Advanced section in the Additional Info tab by default. You can expand this section to access available options.
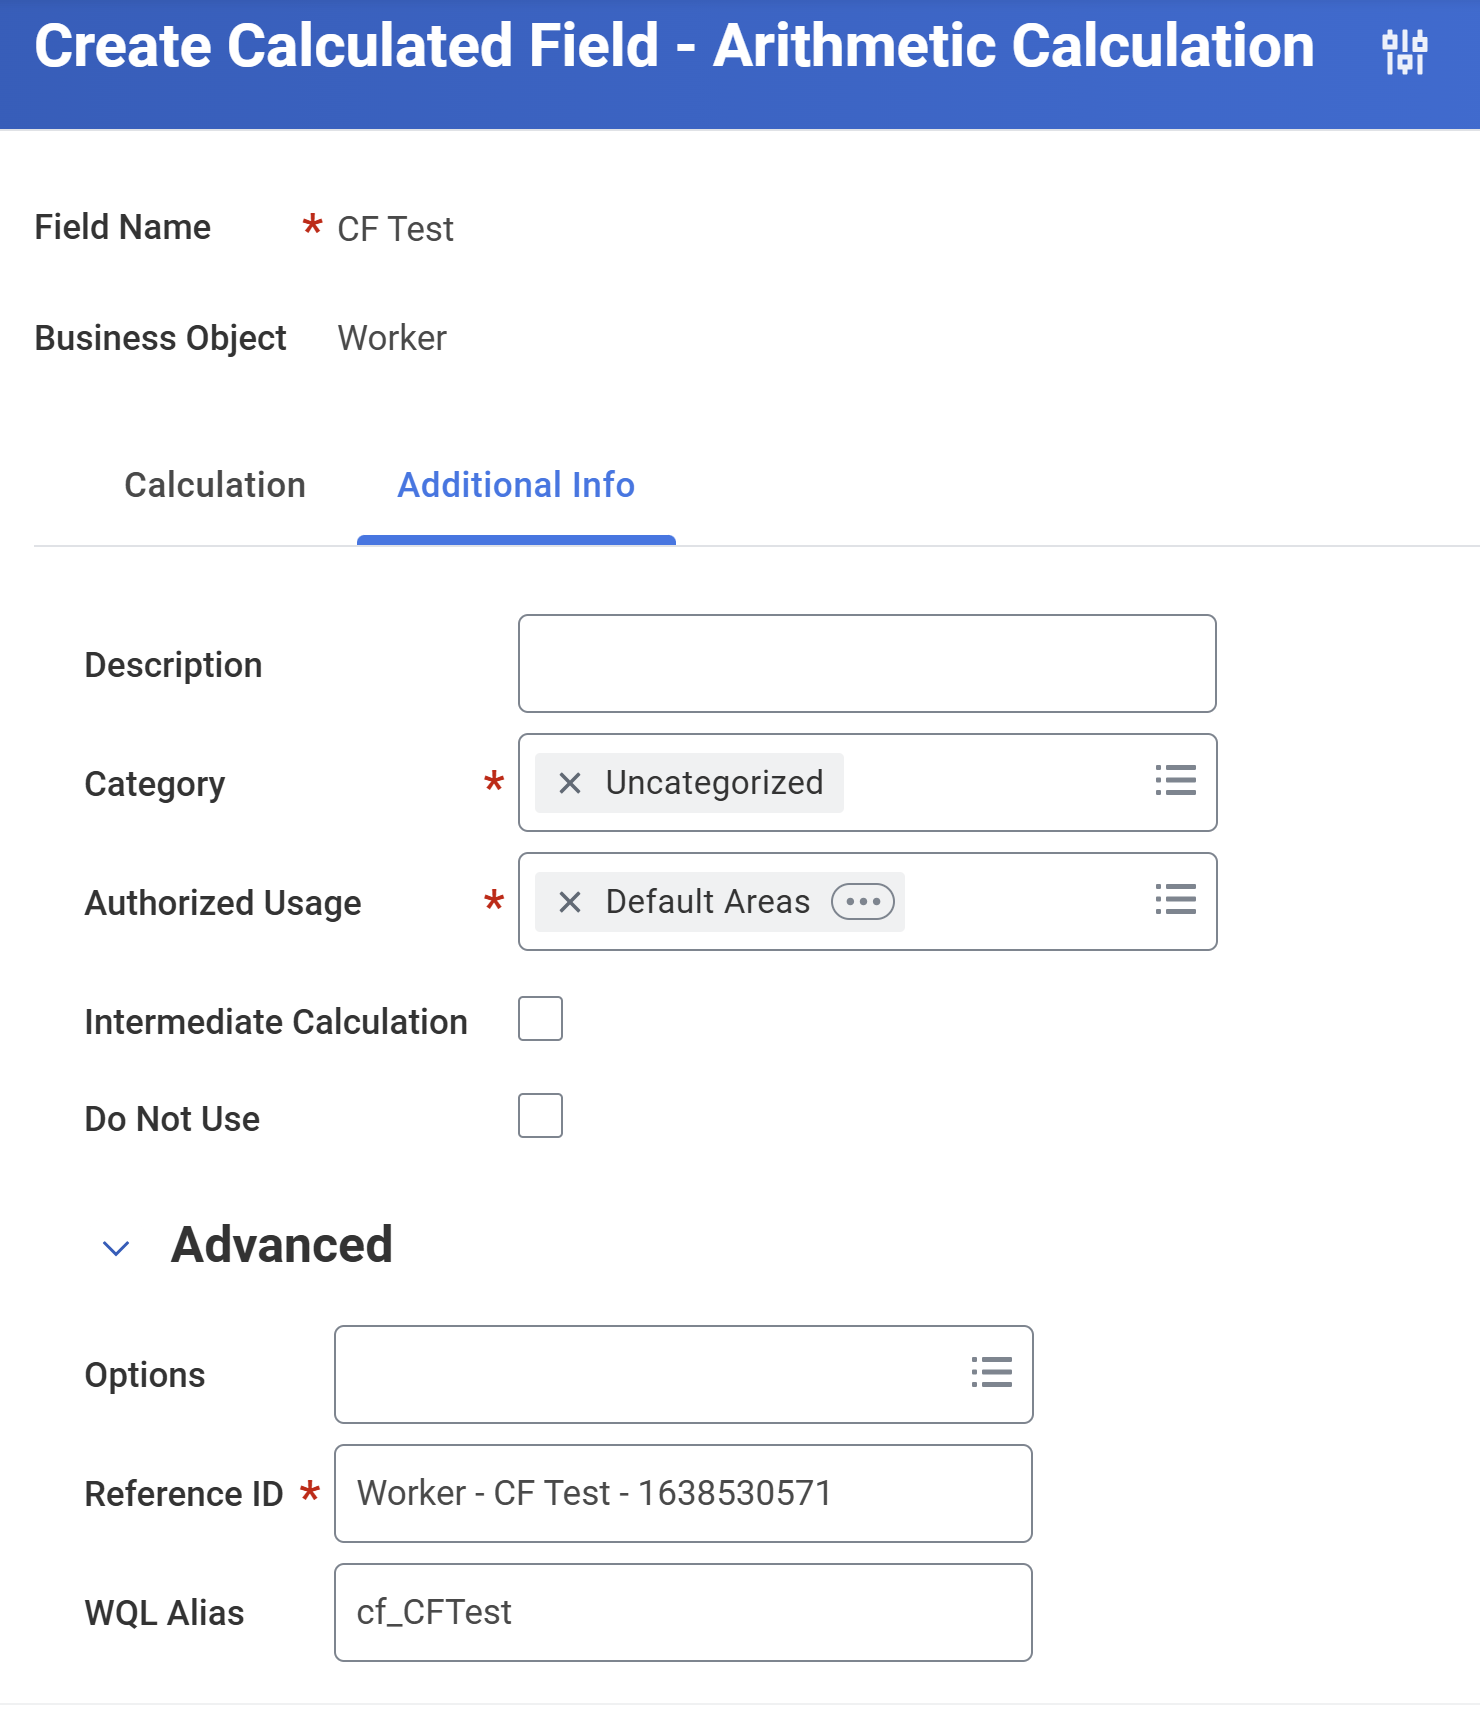
Resource | Definition |
|---|---|
Options |
|
Reference ID |
|
Copy a Calculated Field
To copy an existing calculated field, use its Related Actions to select
Calculated Field
> Copy.
When you copy an existing calculated field, the new field must use the same business object and function as the original field.Naming Conventions
The best practice when creating calculated fields is to adhere to a set naming convention for your organization. You can include information in the name of the calculated field to easily identify details such as organization, calculated field function, report author name, and report name.
Example
: Company-CF-RPT-Date Difference-MD-Phase1-Months since last pay increaseAlternatively, you can name your calculated fields like any other field in Workday. You can include the details in the Category and Description sections of the Additional Info tab.
Example
: Months since last pay increaseMake sure your organization has a set naming convention and method of organizing your calculated fields and reports. Adhere to these conventions to avoid redundancy.
Access to Calculated Fields
Security Permission to Create Calculated Fields
To create, edit, or delete system-wide calculated fields, you must belong to a security group authorized for the Custom Field Management domain. To ensure control and consistency, and avoid duplicate field definitions, limit access to that domain to key individuals in your organization.
The following domains control who can access and create calculated fields:
- Custom Field Management (for system-wide calculated fields)
- Private Calculated Fields Management (for report-specific calculated fields)
Access to Values for a Calculated Field
Users with access to the underlying secured fields can access the values for calculated fields. Underlying secured fields are Workday-delivered report fields or custom fields, not calculated fields.
Domains secure Workday-delivered report fields and custom fields. Users with access to a domain can access any calculated field built using the underlying fields in that domain. Therefore, underlying secured fields determine security access to a calculated field definition.
You can view the security for a calculated field along with the underlying secured fields and security configurations. Using the calculated field's Related Actions, select Calculated Field > View Security Groups to access the underlying secured fields and configured security groups.
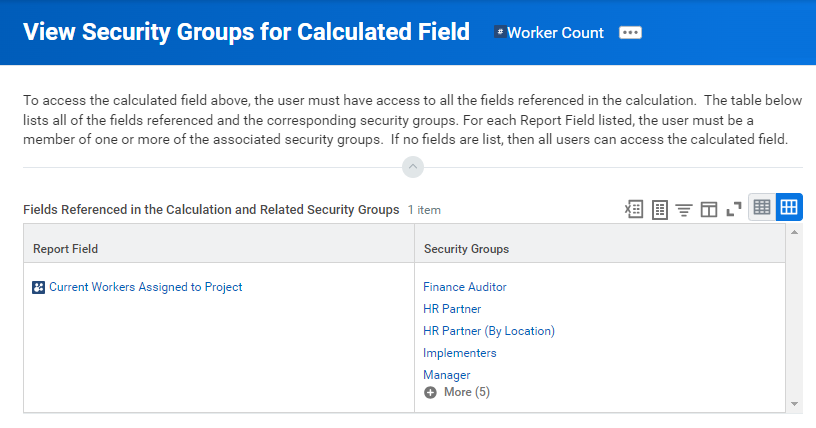
To determine which domain or domain security policies to configure, use the calculated field's Related Actions. Select Security > View Security to access the underlying domain's or domains' security policies.
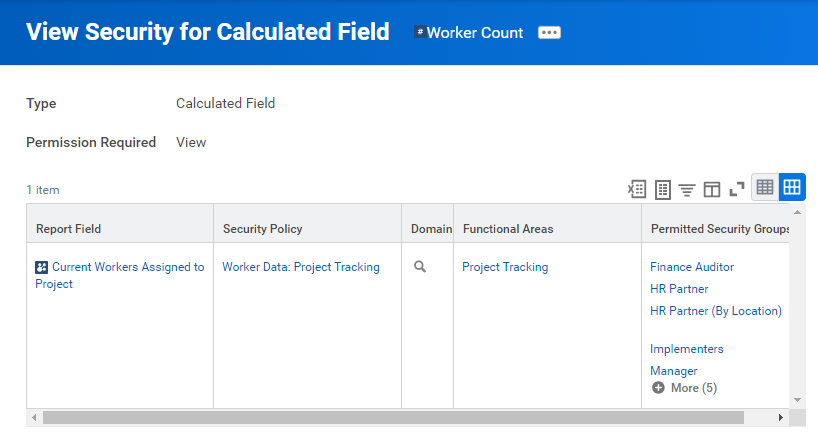
Maintain Calculated Fields Report
You can use the
Maintain Calculated Fields
report as a control center for managing system-wide calculated fields. With this report you can:- View all the system-wide calculated fields in the tenant.
- Create a new calculated field using the Add New button.
- Edit a calculated field using the Edit button or using a field's Related Actions to select Calculated Field > Edit.
- Delete a calculated field using the Delete button or using the field's Related Actions to select Calculated Field > Delete. You cannot delete calculated fields already in use until you remove all references within Workday for that calculated field. View the Where Used tab in the calculated field definition to determine calculated field instances in your tenant.
- Copy a field using its Related Actions to select Calculated Field > Copy.
- Check all the security requirements to access a field by using its Related Actions to select Calculated Field > View Security Groups. The security of the Workday-delivered (or custom) fields determines the list of security groups that can access that field.
You can also run the following tasks directly from the search box to edit, create, and delete calculated fields:
- Create Calculated Field
- Edit Calculated Field
- Delete Calculated Field
Use the
cf:
prefix in the search box to locate a calculated field by name.Global Calculated Fields
Global calculated fields exist on the Global business object. The Global business object contains the fields that are global in nature and can be Workday-delivered fields and calculated fields you define. Fields associated with the Global business object are available for use with any business object and are visible to all users. They can represent constants such as 1, 23, single space, is true, and USD.
They can also represent variables that vary over time such as today, last day of this month, and current user.
To create additional global fields, select Global as the business object when creating a calculated field. Global fields display in their own Global field prompt category.
Example
: A global calculated field that returns a date field value of one year before the variable value of Today (review the image below).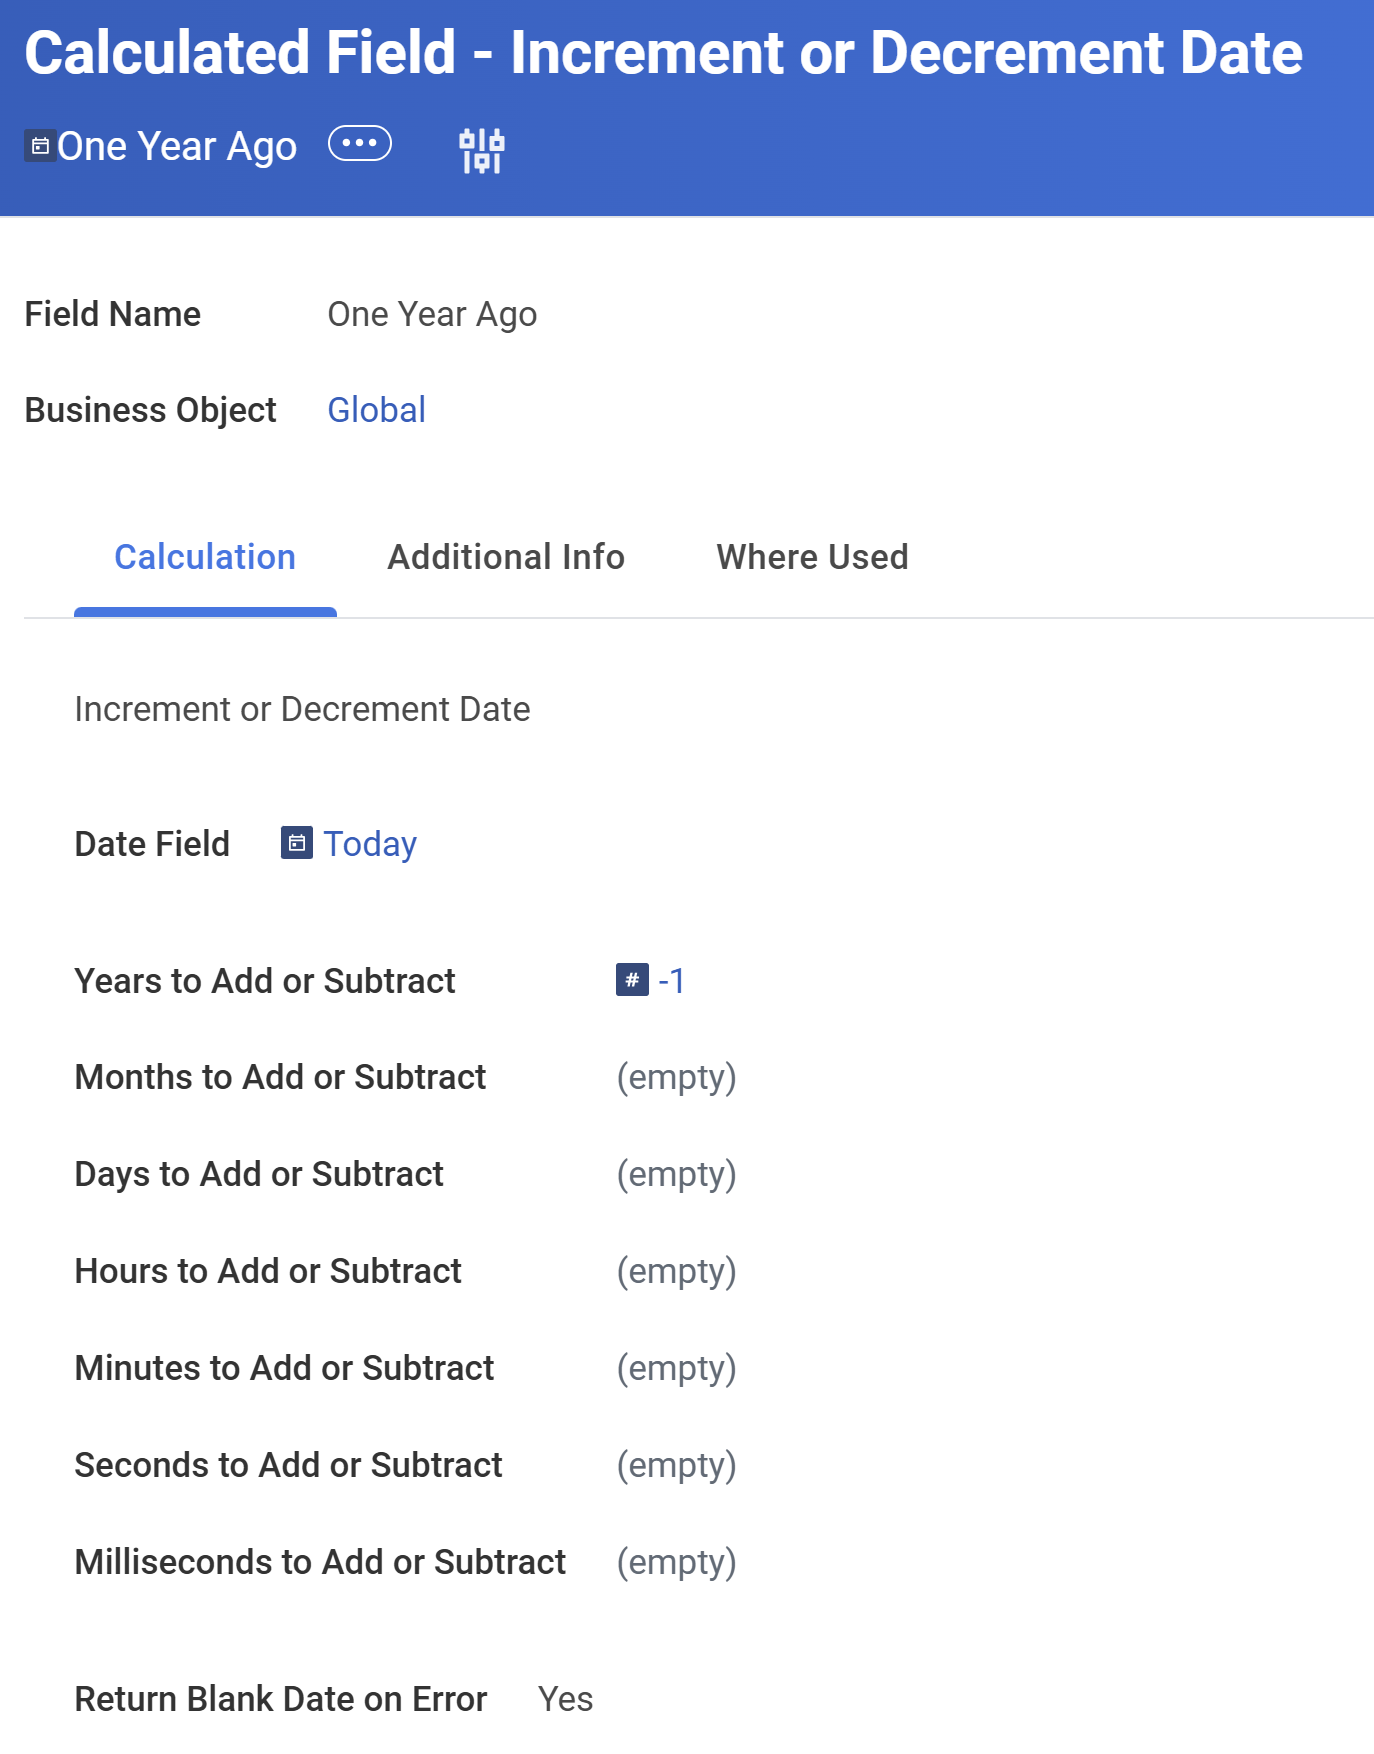
Increment or Decrement Date
The Increment or Decrement Date function computes a date that's a specific number of days, months, or years before or after the date field. You can also add or subtract time to or from a date field that captures time data. The Increment or Decrement Date function calculates a date that is a specific number of:
- Years
- Months
- Days
- Hours
- Minutes
- Seconds
- Milliseconds
This function returns a Date field type. In the example below, we add one year to the Credit Verification Date field to derive a credit verification renewal date.
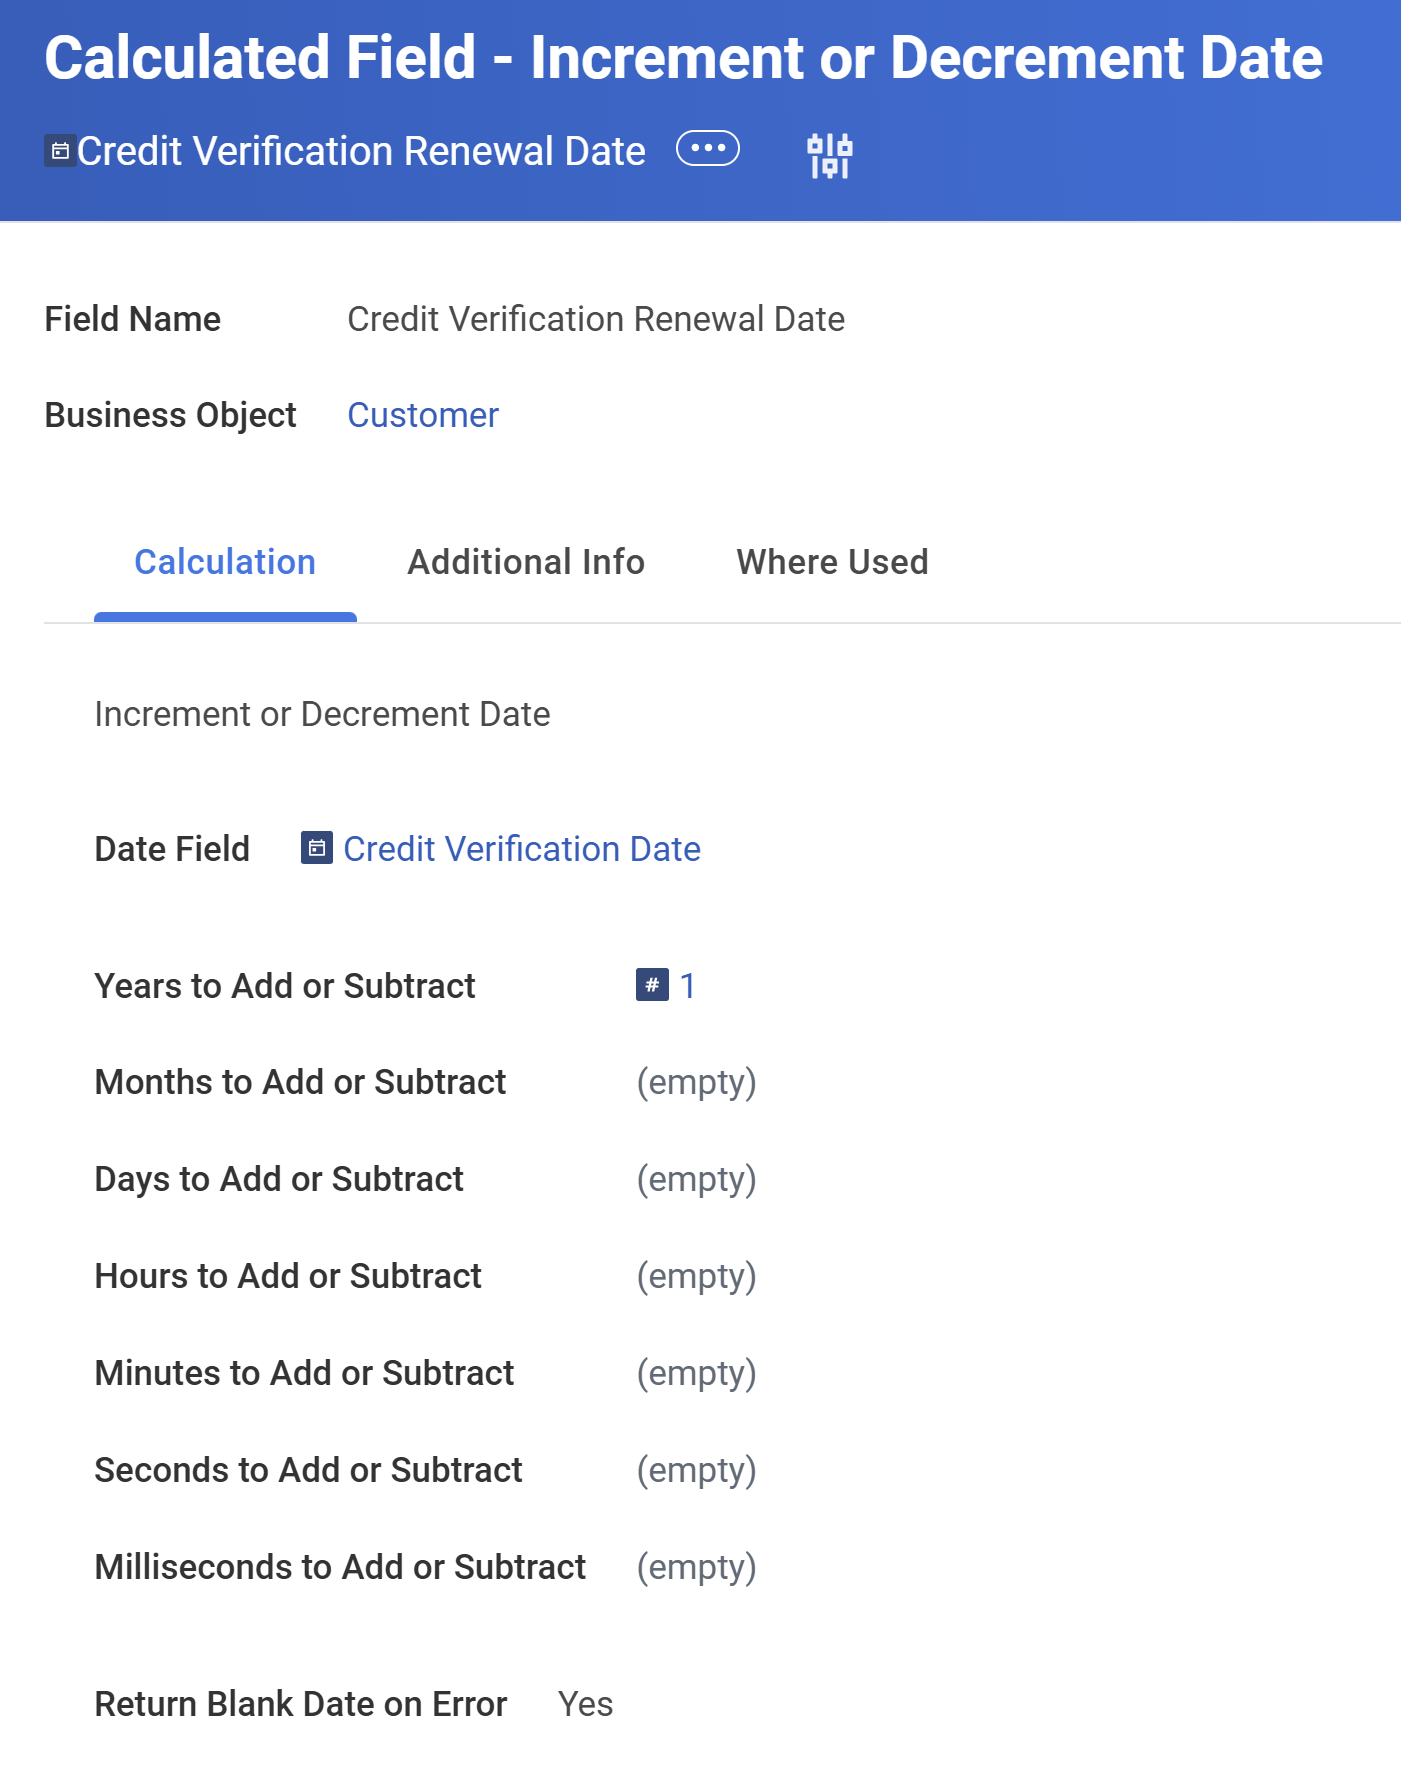
You commonly use the Increment or Decrement Date calculated field function with variable Global date fields such as Today and Report Effective Date. This function is also useful for change detection. It allows you to derive a date/time field; you can them compare the value of another field as of a time period. For example, today versus two years ago.
If the date field you are using is blank for an instance, a runtime error occurs. However, if you select the Return Blank Date on Error option, the suppressed error returns a blank date. Best practice is to make sure to check this box every time you create an Increment or Decrement Date field.
Other examples of incrementing and decrementing dates using calculated fields include:
- Calculate two months from now for use in a report filter to select the employee certifications that expire in the next two months.
- Dynamically calculate the "First day of the month, three months ago" for use as a parameter for scheduling a recurring report.
- Subtract one millisecond from the date/time that a business process event completed to access the value of a field before the business process change.
- Use a pair of calculated fields that return all customers without current credit verifications from the last year. Then, create a report that shows all the overdue customer credit verifications.
Date Difference
The Date Difference function computes the number of years, months, days, hours, minutes, or seconds between two dates. The calculation subtracts the end date from the start date. If the calculation requires a date constant, it must exist before you create the calculated field. The system rounds the results down to the nearest whole number depending on the value returned. This function returns a numeric field type.
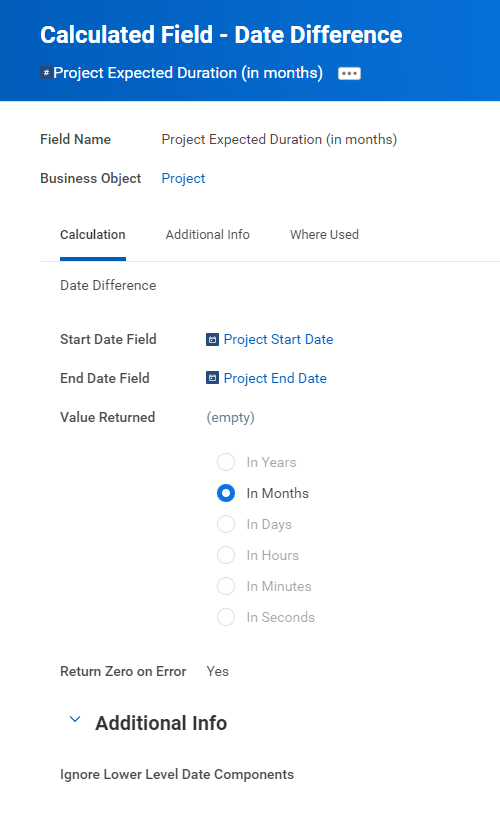
By default, the year difference calculation (In Years) considers the month and day in computing the number of years. By default, the month difference calculation (In Months) considers the day.
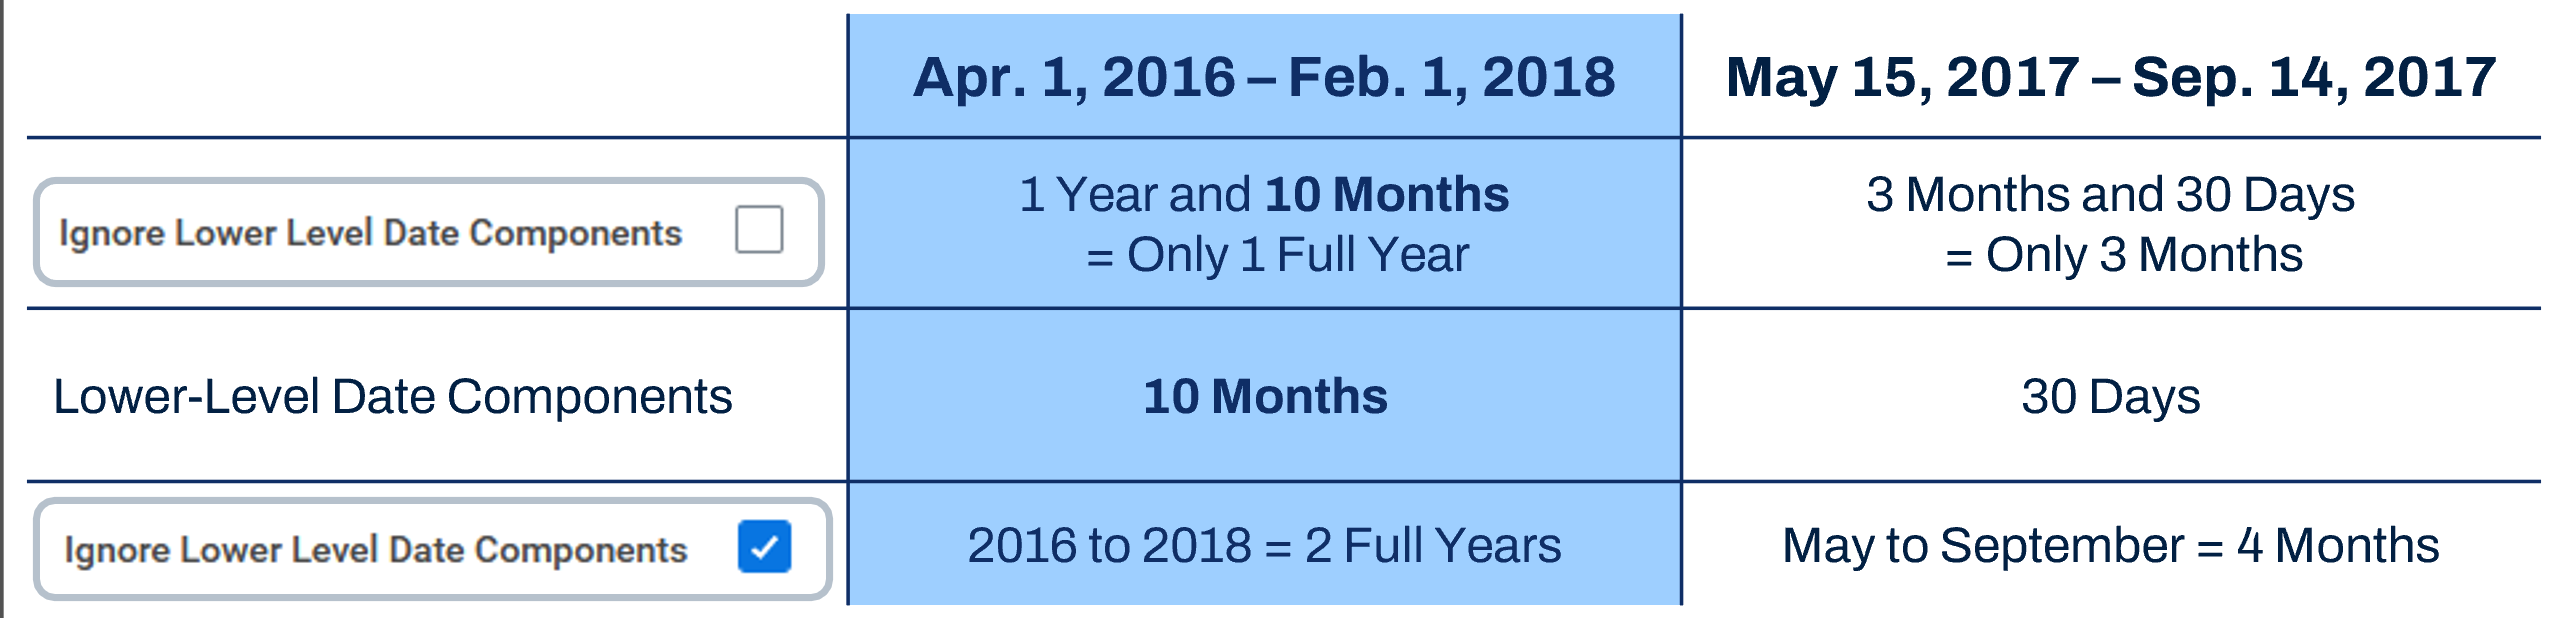
Select the Ignore Lower-Level Date Components checkbox if you want the system not to consider the lower-level components in the date difference calculation. For example, the year difference between April 1, 2016 and Feb. 1, 2018 results in one year if you do not select the Ignore Lower-Level Date Components checkbox. If you do select the checkbox, the result is two years. The difference in months between May 15, 2017 and Sept. 14, 2017 results in three months if you do not select the Ignore Lower-Level Date Components checkbox. If you do select the checkbox, the result is four months.
Here are examples of calculating the difference between two dates:
- Days remaining before an employee returns from leave.
- Number of months that a position is unfilled.
- Number of backdated months in an expense report or forward-dated from the current month.
Substring Text
The Substring Text function extracts the specified portion of text within a field. You can use it to extract a substring from a text or single-instance field. You can base substrings on fixed positions or delimiters allowing you to search a string forward or backward.
For example, you use a report for an integration to another system. You need to extract only the Cost Center Name from a field that contains both Cost Center Number and Name.
In the example, the Cost Center Number is always five characters long followed by the Cost Center Name:
12345CostCenterName
. Use a fixed position substring type to extract just the name from the field. Start at position six in the field and go forward, left to right, to the end of the field: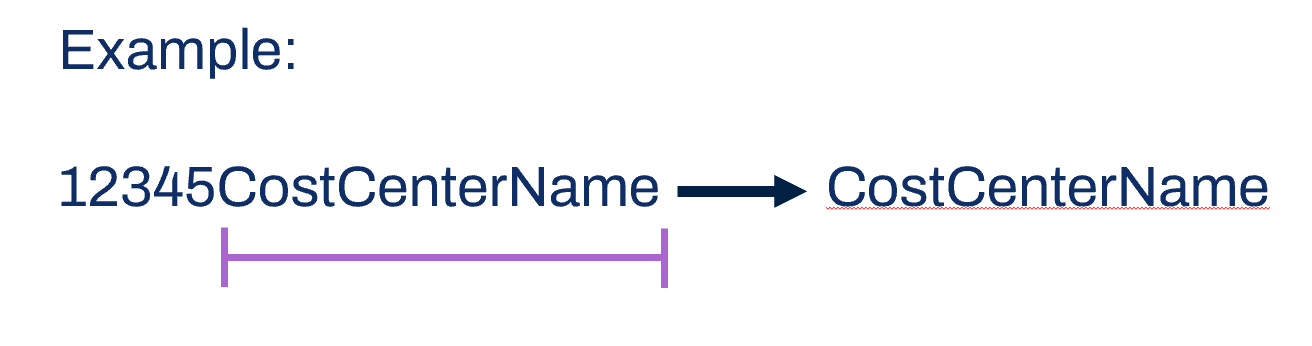
You can also use a delimiter substring type to convert text that contains a special character, such as a dash, forward slash, or even a blank space.
The following are examples of the different delimiter substring types:
Before Delimiter Examples (Forward):
Before Delimiter | Original String | Returned Substring |
|---|---|---|
- | ABC-XYZ | ABC |
BC | ABC-XYZ | A |
/ | 07/04 | 07 |
After Delimiter Examples (Forward):
After Delimiter | Original String | Returned Substring |
|---|---|---|
BC | ABC-XYZ | -XYZ |
W | ABC-XYZ | |
/ | 07/04 | 04 |
After Delimiter Examples (Backward):
After Delimiter | Original String | Returned Substring |
|---|---|---|
- | 802-555-1212 | 1212 |
- - (blank space) | Senior Clerk (Pleasanton) | (Pleasanton) |
- - (blank space) | Sales and Marketing 7283 | 7283 |
Between Two Delimiters Examples:
Start Delimiter | End Delimiter | Original String | Returned Substring |
|---|---|---|---|
[ | ] | ABC-[XYZ] | XYZ |
( | ) | 2010 Actuals (Global Modern Services (USA)) | Global Modern Services (USA |
Convert Text to Number
The Convert Text to Number function enables you to extract a number that currently exists as a text field and convert it to a numeric data type. Once you convert a field to a numeric data type, you can use it in arithmetic operations and operations that require a numeric source field. For example, you can convert the Date of Birth - Year text field to a numeric field. You can then use that numeric field to create a Lookup Range Band calculated field that returns the worker's generation (e.g. Millennial, Generation X, Boomer) using the worker's birth year.
The Convert Text to Number function includes an option to return zero if the result is not valid, instead of displaying a runtime error message.
Count Related Instances
The Count Related Instances function dynamically counts related instances on a related business object. The instances can be all for a certain field or only instances that meet a condition. If adding a condition, define the condition on the related business object. If a condition is not pre-existing in the tenant, you can use the True/False Condition calculated field to create the condition. This function counts only instances you have security access to view.
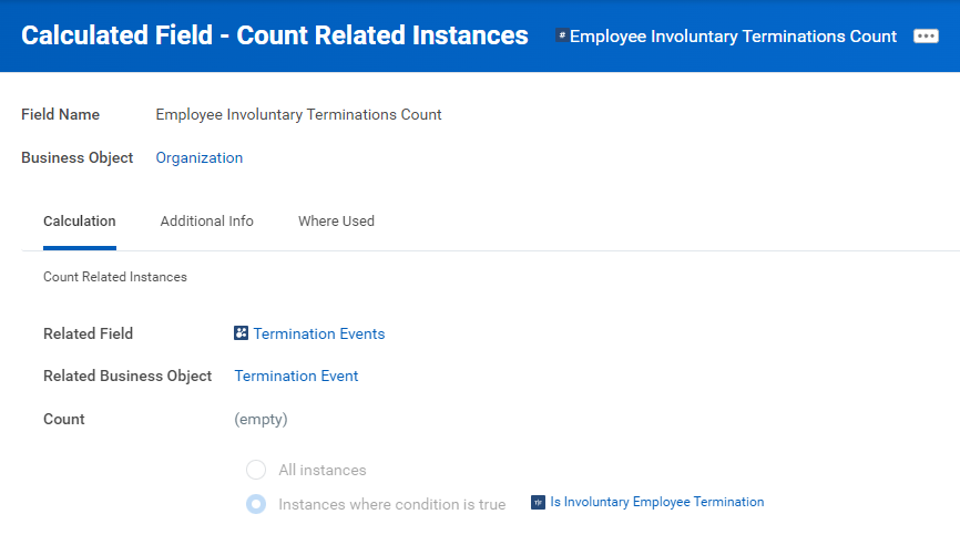
The following diagram outlines how the Count Related Instances function works:
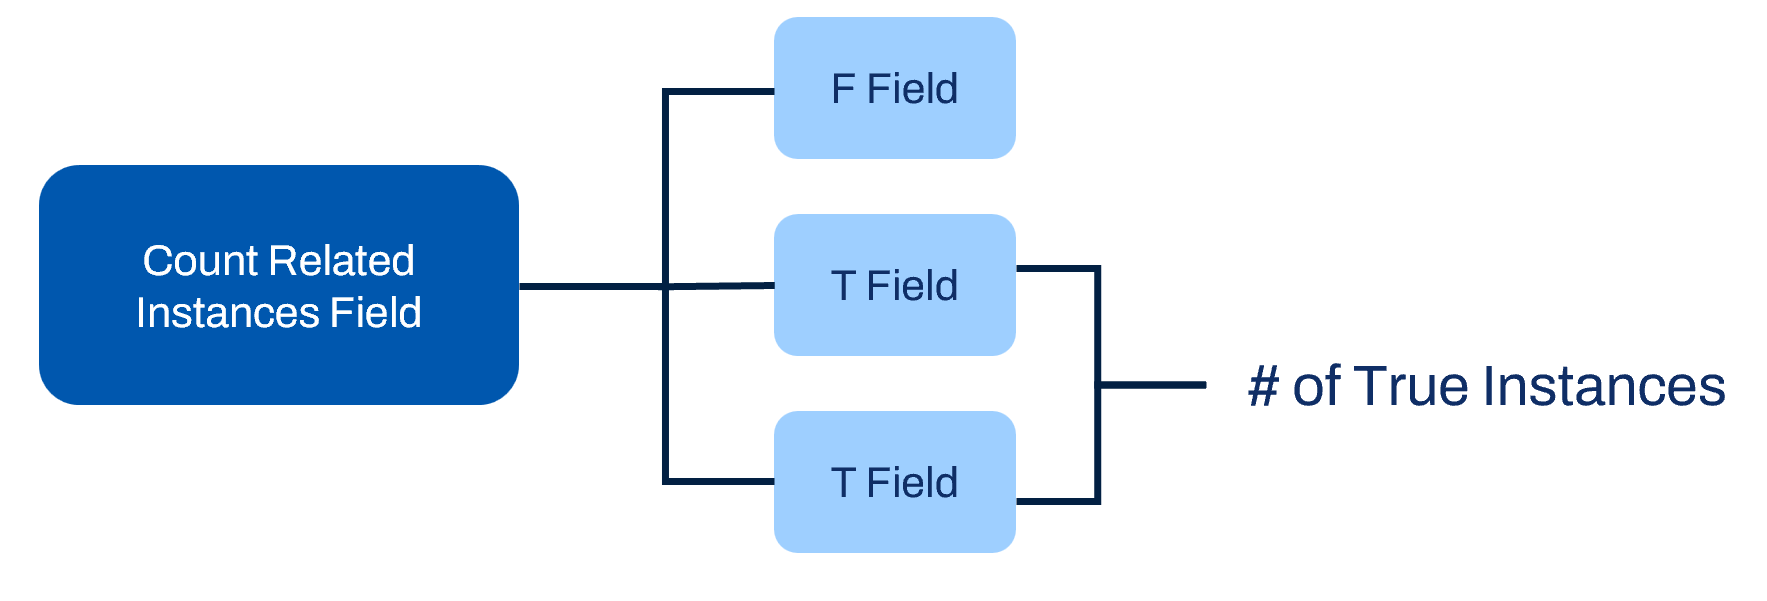
Examples of Count Related Instances include counting the number of:
- Sick days occurring on Monday or Friday during the last year for each employee.
- Employee hires during the last year by location.
- Open positions in an organization.
- Expense lines per employee.
- Training-related expense reports.
- Completed amortization line installments as of a prompted date.
- Approved expense reports for any given worker.
Sum Related Instances
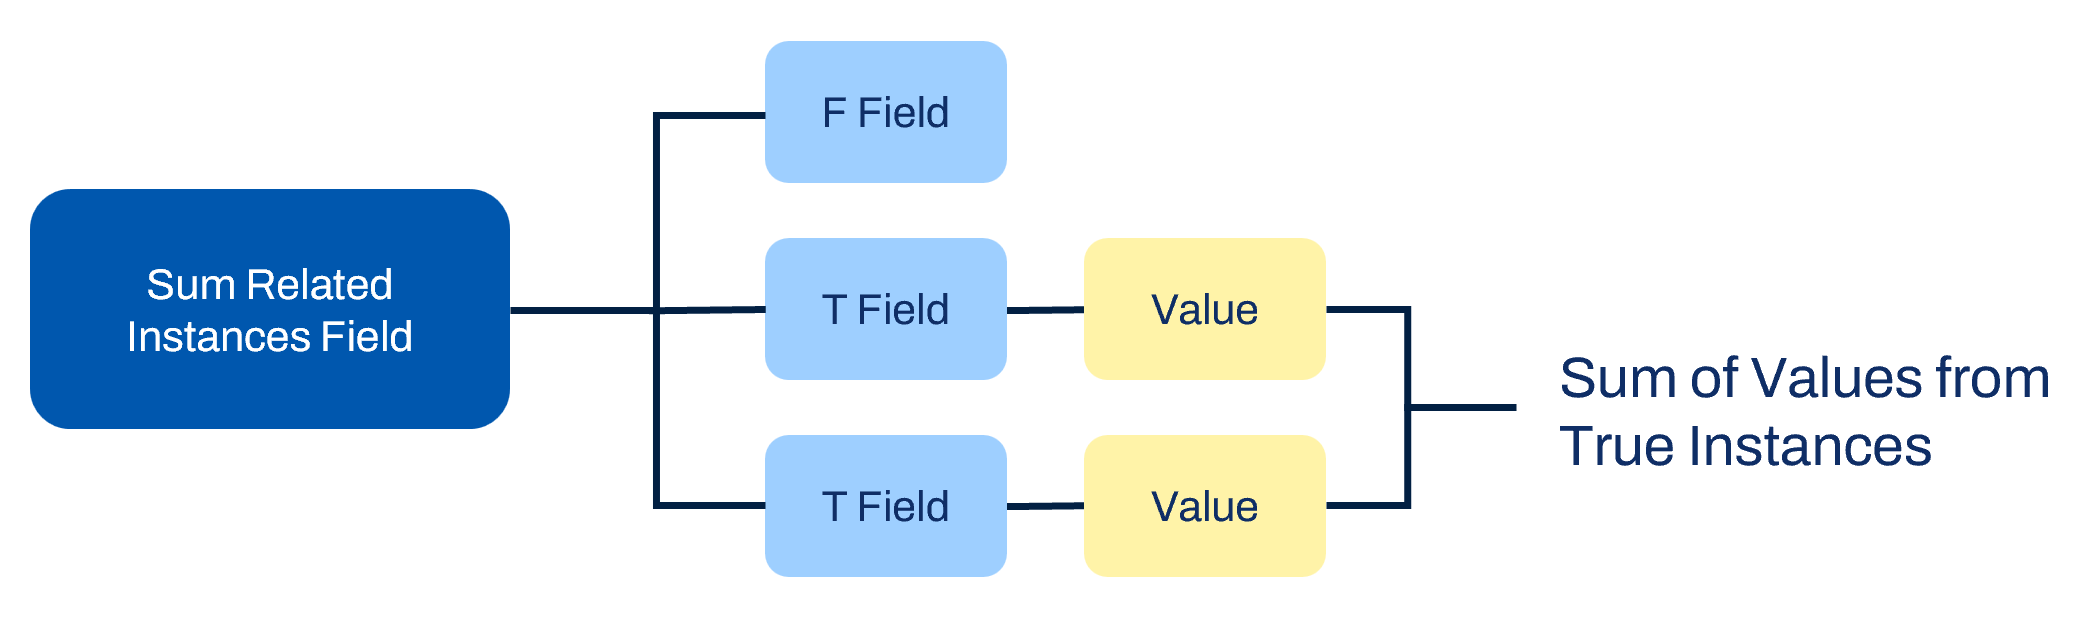
The Sum Related Instances function dynamically sums related instances on a related business object. This function works with numeric and currency fields. All instances must use the same currency code for the system to generate the sum of currency fields.
The summed instances can include all instances of a certain field or of fields that meet a condition. If adding a condition, you must define the condition for the related business object. If a condition does not pre-exist in the tenant, you can use the True/False calculated field to create the condition. This function counts only instances you have security access to view.
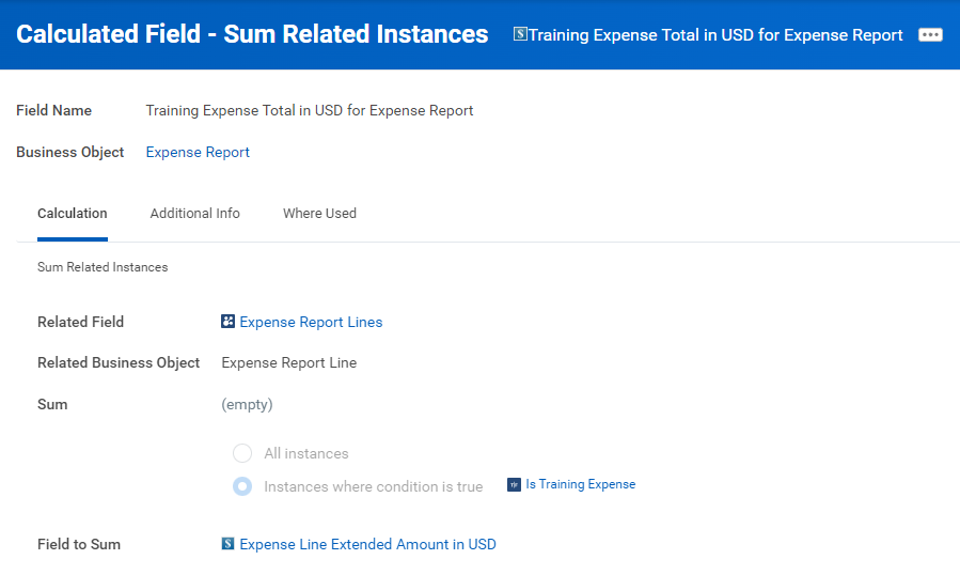
The diagram below outlines how the Sum Related Instances function works:
Examples of Sum Related Instances include the sum of:
- Performance review ratings for each organization for use in a calculation to find the average.
- Expense line items for meals in an expense report to compare against an approval limit.
- Taxable invoice lines to calculate the VAT amount for each supplier invoice.
Arithmetic Calculation
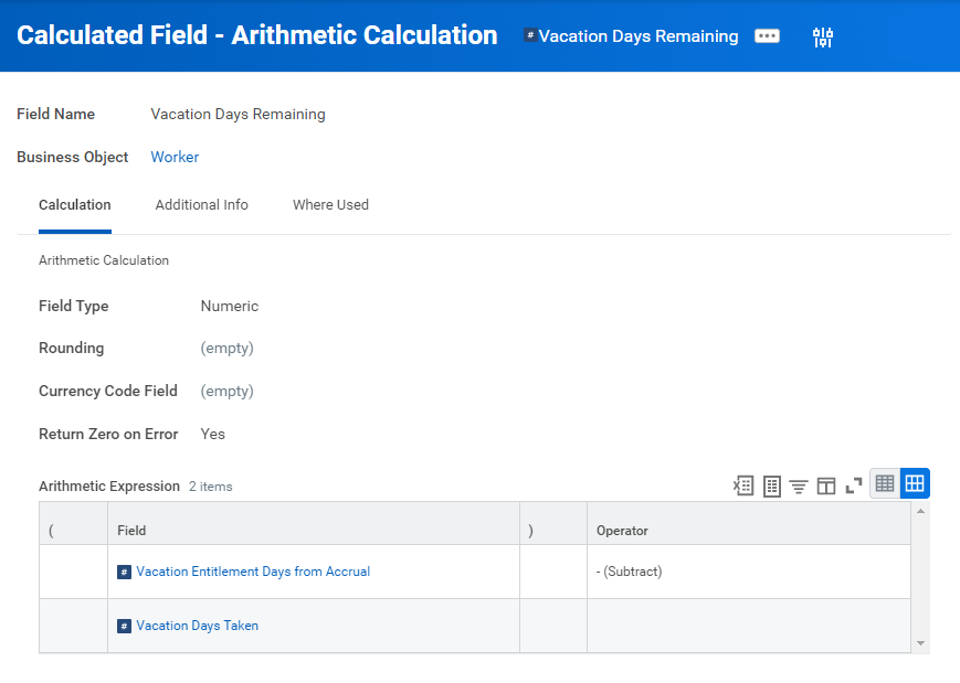
The Arithmetic Calculation function uses numeric and currency field types. This function performs simple arithmetic.
- Addition (+)
- Subtraction (-)
- Multiplication (*)
- Division (/)
If the arithmetic calculation requires numeric constants, they must already exist in the system. You can use parentheses, when necessary, to specify the evaluation order of the calculations. If you use a currency field, all values must have the same currency type.
If the field tries to divide by zero, a runtime error returns. If you select the Return Zero on Error option and division by zero occurs, the error suppresses, and a zero amount returns.
Note
: Consider using parentheses to make your calculation run accurately. Arithmetic Calculation fields use the standard order of operations in its calculations: Parentheses, Exponents, Multiplication, Division, Addition, Subtraction (PEMDAS).Examples of using an Arithmetic Calculation include:
- Calculating an employee's hourly, daily, weekly, or monthly rate.
- Calculating 20% of an employee's salary to compare against the employee's bonus amount.
- Calculating an employee's salary difference from this year compared to last year.
- Determining revenue per headcount in a given year/quarter/month.
- Finding the average cost of meal per attendee on an expense report.
- Calculating total projected salary through the end of the year/quarter/month.
- Identifying revenue recognition for projects by percentage complete.
- Calculating the average daily ending balance of a journal.
- Calculating the number of days in a fiscal period plus one.
Convert Currency
To perform an arithmetic calculation on currency fields, the fields included in the calculation must use the same currency. Workday delivers many fields that return amounts in a specific currency, like USD, or in the base currency for a company. For currency fields without a Workday-delivered conversion, you can use the Convert Currency calculated field function to determine the equivalent value of field in a different currency.
All monetary fields have an associated currency code. You can also convert the source currency to the user's preferred currency. Enter the global variable Users Preferred Currency in the Target Currency Code Field prompt. The value can vary from user to user, and each user can change their preferred currency using the
Change Preferences
task.To convert currencies, use the
Maintain Currency Conversion Rates
task to set up conversion rates for all valid Source Currency/Target Currency/Currency Rate Type combinations. Complete this setup before using this calculation function. If no conversion rate exists at runtime, the function returns an error.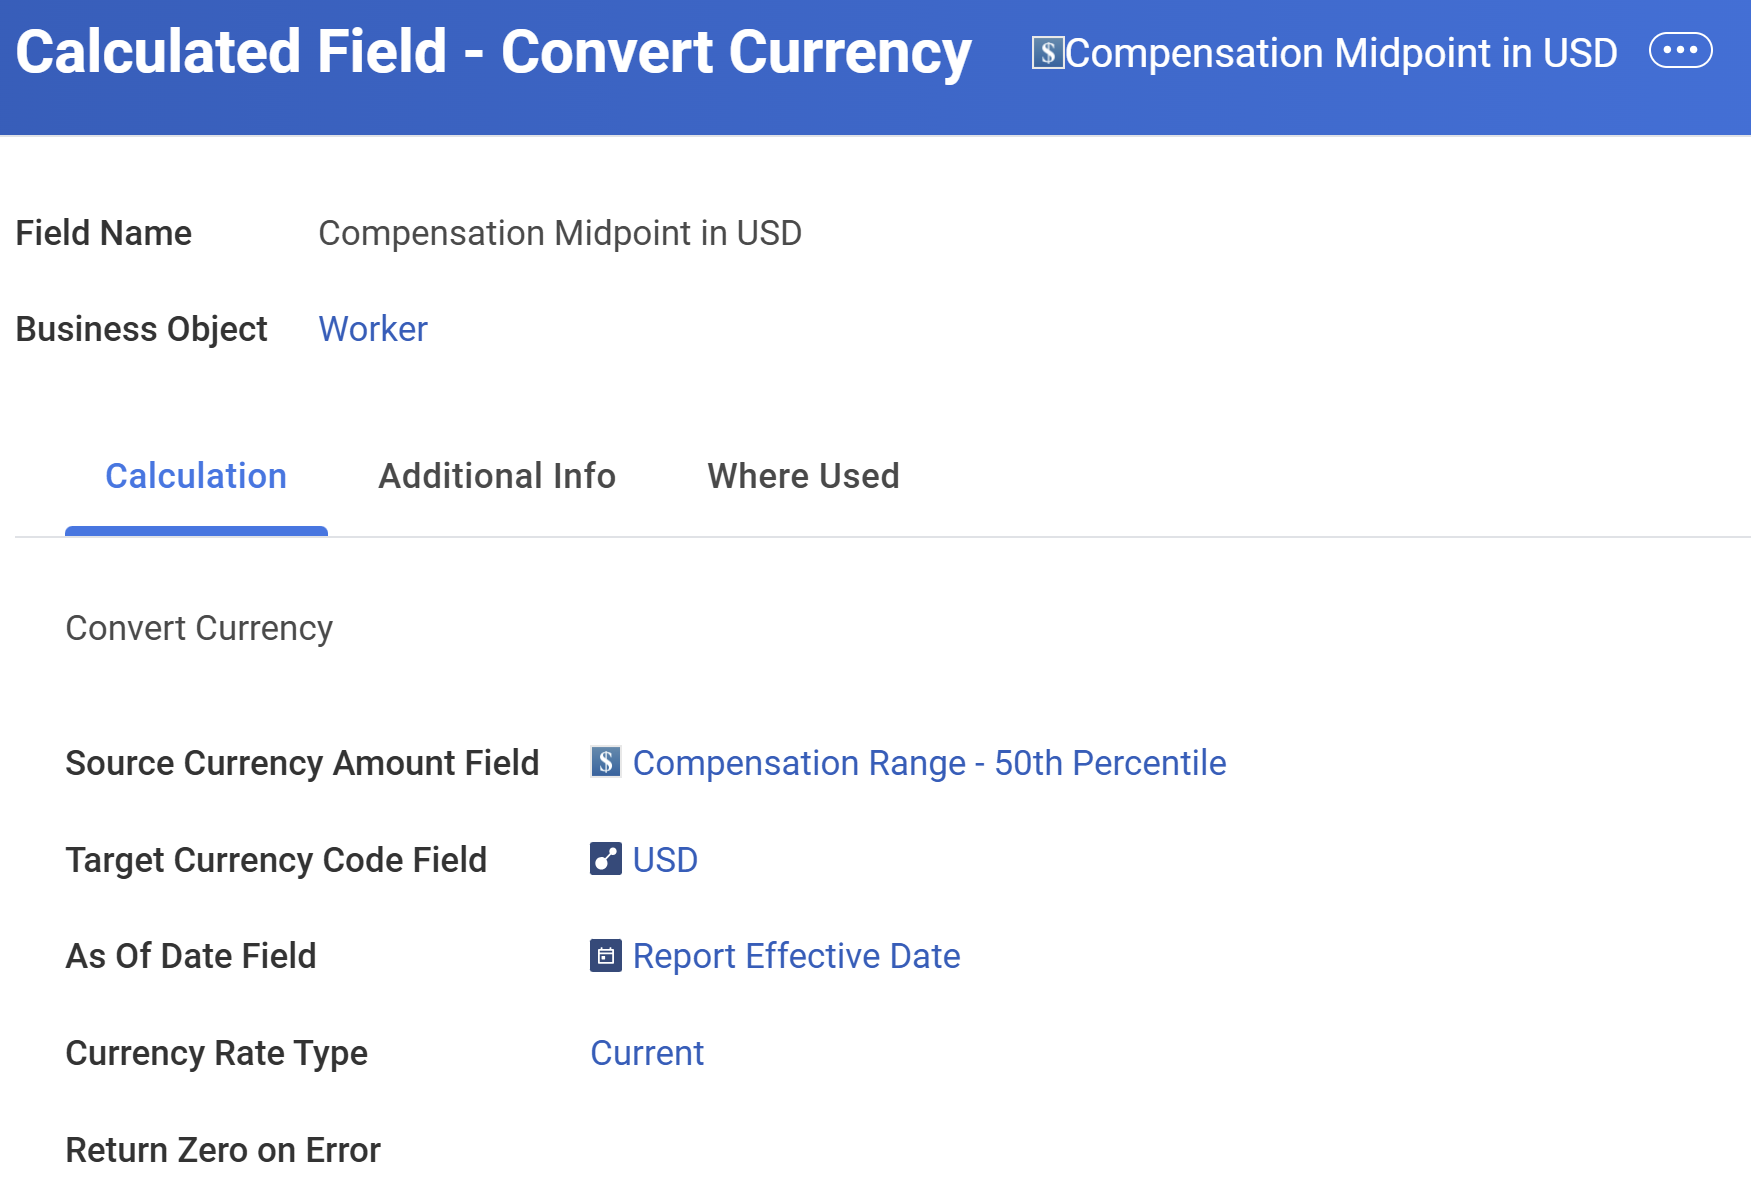
When the report or condition that uses this calculated field runs, the system evaluates the Currency Rate Type and As Of Date. The appropriate exchange rate calculates and returns. If the As of Date Field has a blank value at runtime, the resulting value is zero and a runtime error returns. If there is no data for the combination of Source Currency Amount Field, Target Currency Code Field, and Currency Rate Type, the resulting field is zero. A runtime error returns.
Examples of converting currencies include:
- Displaying an employee's annual salary in euros, regardless of its current currency type.
- Determining all employee bonuses in U.S. dollars, using the exchange rate from the end of last year.
- Converting an expense report total to a common currency (such as USD) for business process approval rules based on an amount.
- Converting Canadian employee benefit contributions into USD for consolidated reporting with U.S. benefit data.
Constant Fields
Workday reporting uses three types of constant fields on the Global business object:
- Numeric Constant
- Text Constant
- Date Constant
Each constant represents a static value that you can use in reporting and calculations. These fields are useful in Evaluate Expression calculated fields. You can access and use them in the same way as a Global field, including in reports and calculated fields.
Numeric Constant
Use Numeric Constant fields when you need a constant numerical value for reference, such as in a mathematical equation. These numeric values are Workday-delivered fields but you can create additional numeric constants as required.
Text Constant
Use the Text Constant calculated field value when you need a constant text value for reference, such as in capturing measurements.
For example, in this scenario you generate a report that evaluates and categorizes employee salaries as low, medium, or high. Workday does not deliver these category markers. But, you can build each of these text strings as Text Constants. Then, you can use these text constants with other report data to assign these terms meaning.
Date Constant
Use the Date Constant calculated field when you need a constant date value for reference. You can also use when you need a specific date to compare other dates against. For example, you can create a field that compares how many days an employee works before a company-wide, January 1, 2021, review date. In this example, that date constant value needs to exist in the system.
True/False Condition
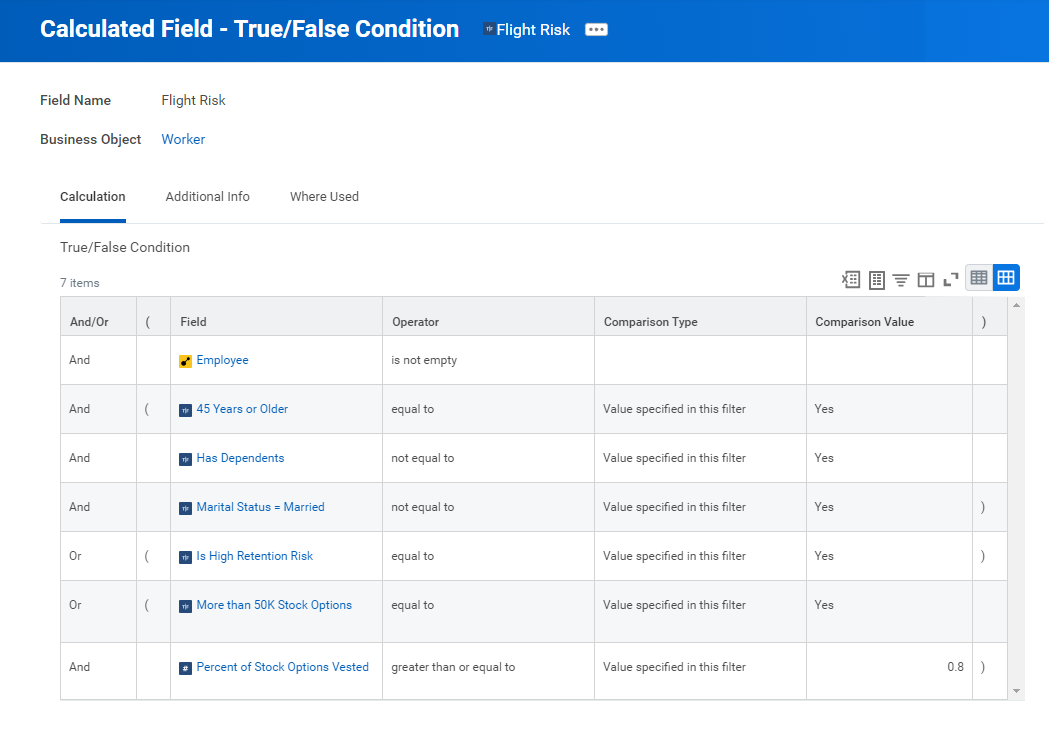
The True/False Condition calculated field function determines if a condition is true or not. The return is a Boolean type field that you can use in custom reporting, condition rules, and as a condition for other calculated fields. You can use parentheses, when necessary, to group the conditions for evaluation.
Important
: When using True/False fields, put conditions that exclude the greatest number of instances first for optimal report performance.Examples of True/False Condition calculated fields include:
- A field that indicates if an employee is highly compensated.
- A field that confirms if an employee is enrolled currently in a Health Savings Account (HSA).
- A field that verifies if an employee has one year of service or less.
- Grouping expenditures and revenue into various categories (with Evaluate Expression).
- Grouping expense reports by approval status and date (with Evaluate Expression).
Reminder
: Where possible, remember to use filters or subfilters in reports instead of calculated fields for optimal report performance.Evaluate Expression
The Evaluate Expression calculated field function groups and transforms data. This function evaluates a series of conditions and returns the value associated with the first condition that is true. At runtime, the function applies the default value and then starts testing conditions starting with the first condition defined. If a condition is true, Workday sets the corresponding return value and does not test any subsequent conditions. Otherwise, Workday tests the second condition, and if true, sets the corresponding return value, and so on.
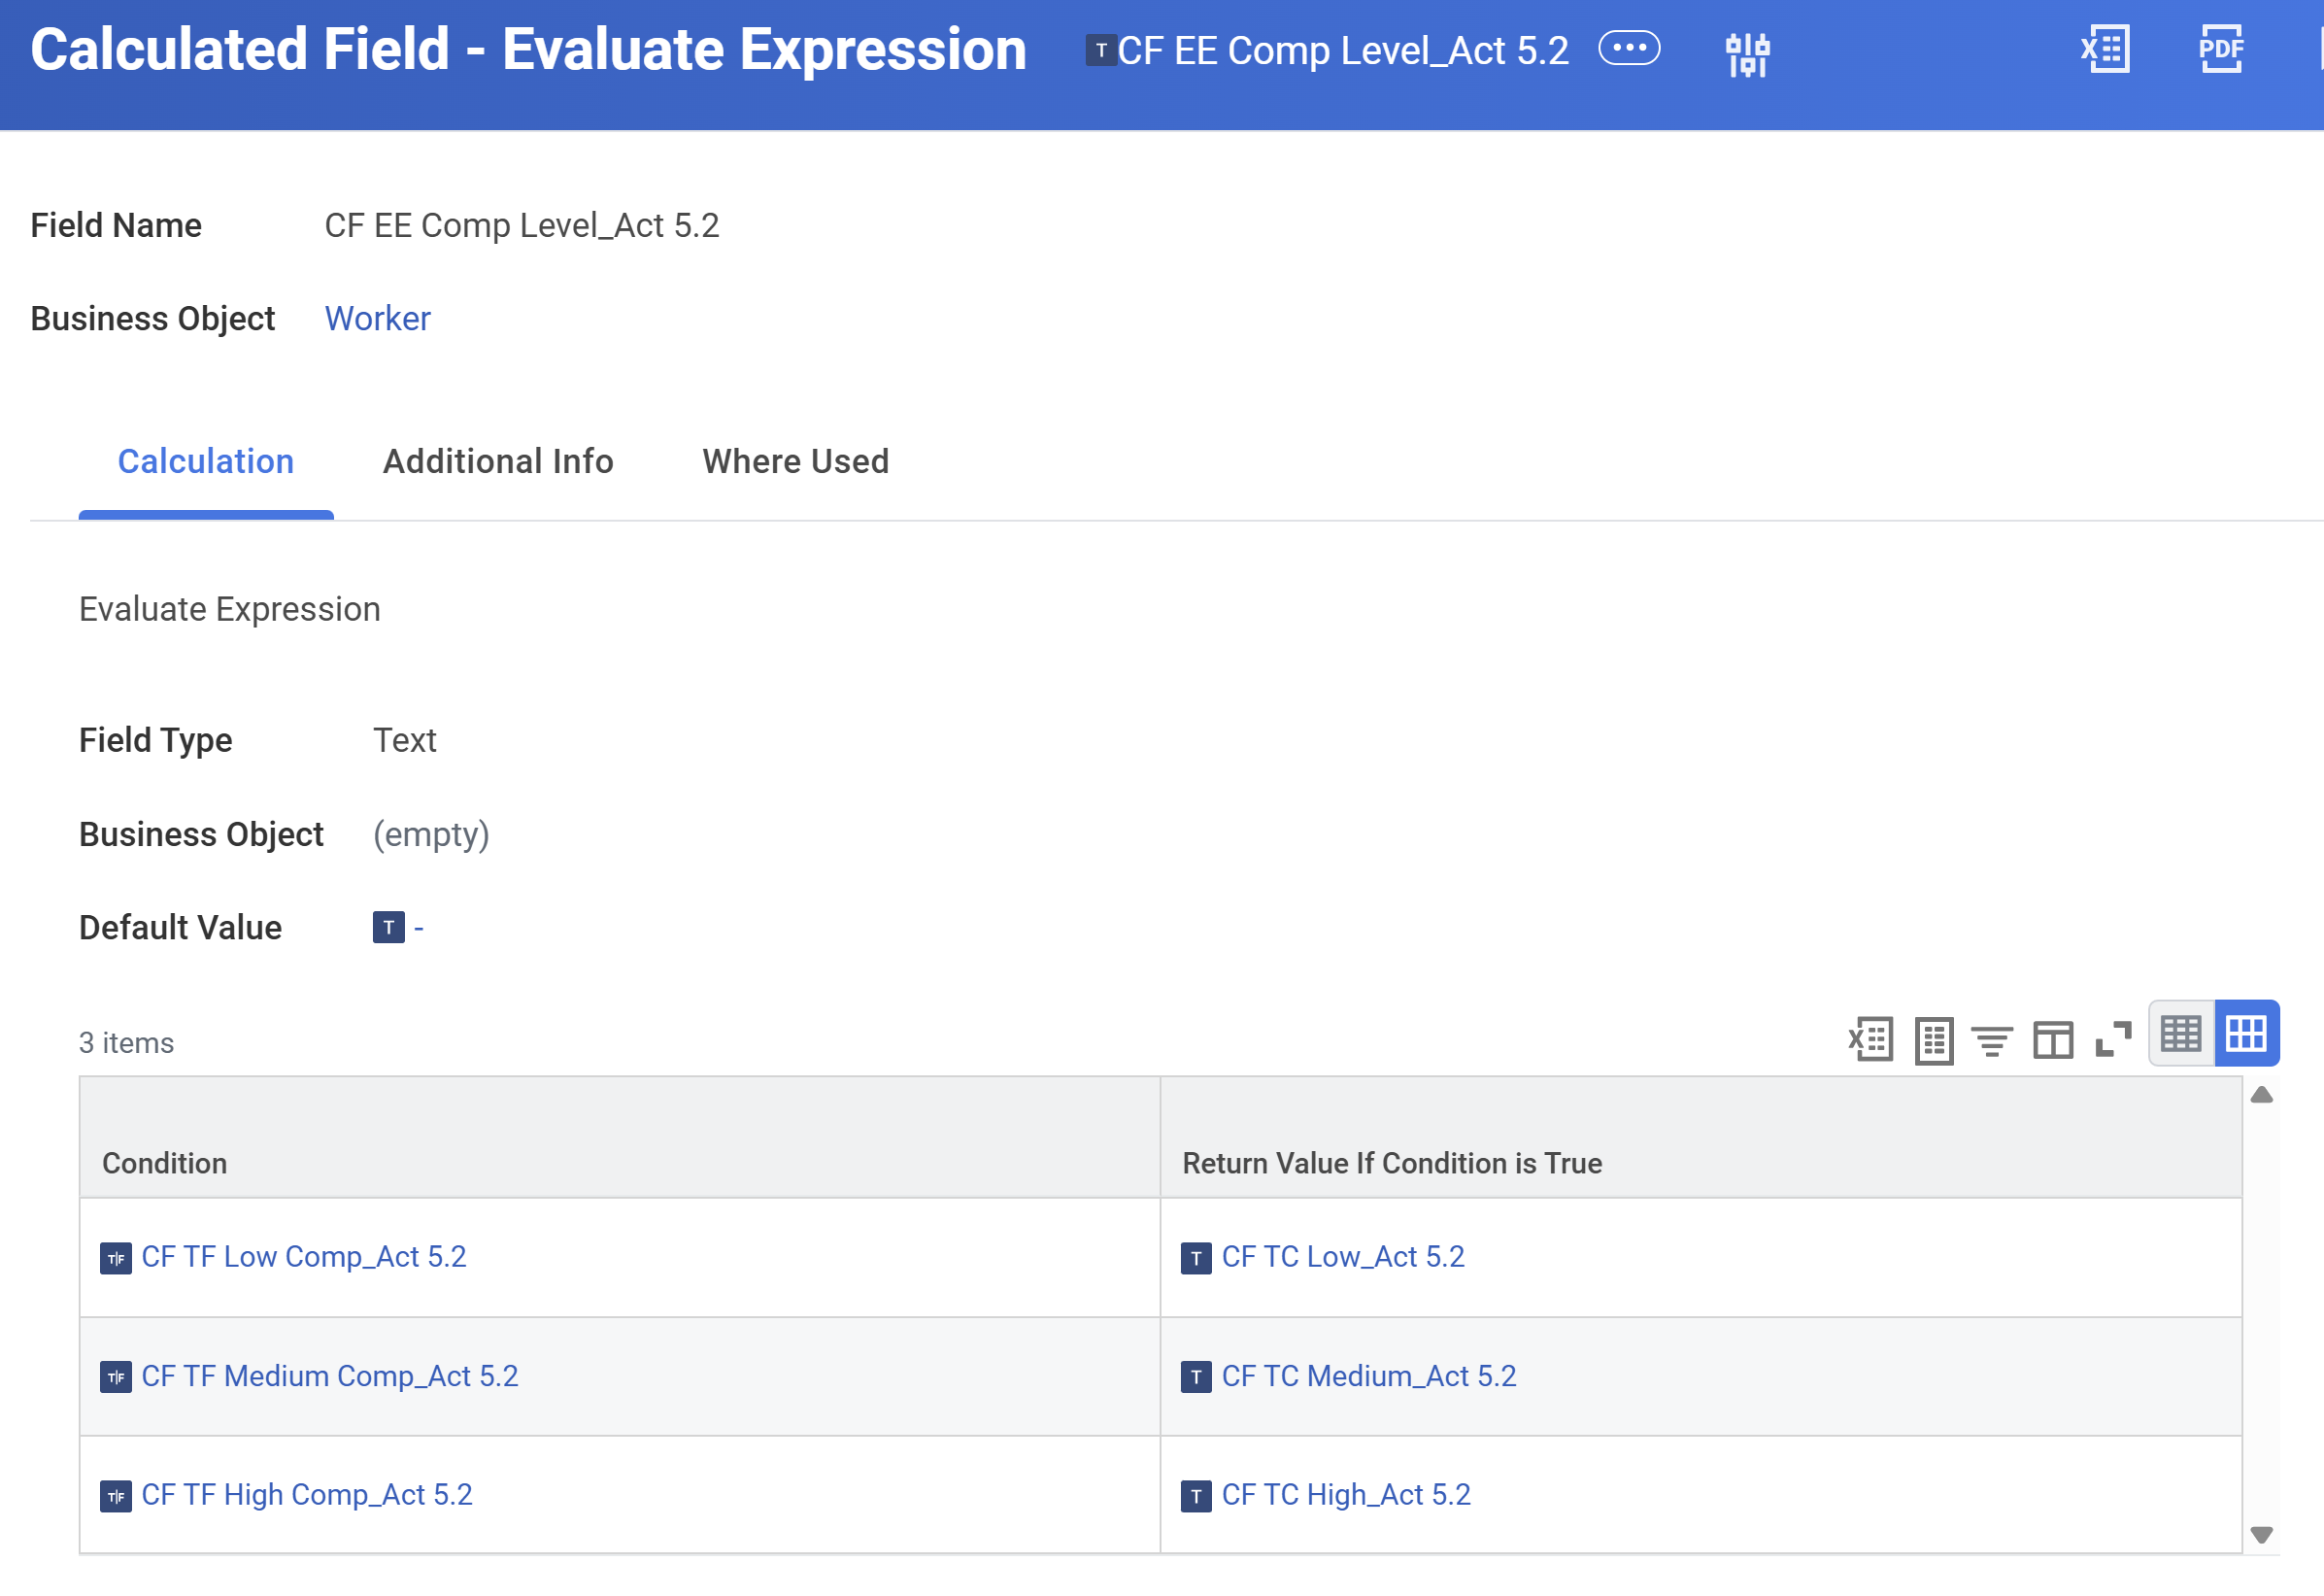
The evaluated conditions must be a Boolean field that returns a true or false value at runtime. If you use Evaluate Expression, you can capture information that evaluates existing data across different fields and returns values in one calculated field. Also, with an Evaluate Expression function, don't forget to place the most likely conditions first to optimize report performance.
Examples of grouping data include:
- Evaluate employees and group by employment status such as active, leave, terminated, or contractor.
- Evaluate employees and return a management status such as management or staff.
- Evaluate a list of expenditures and group them into categories.
- Evaluate journal data to categorize spending such as employee burden, contingent labor, travel and expense, or goods and services.
Calculation Hierarchy
View Calculation Hierarchy
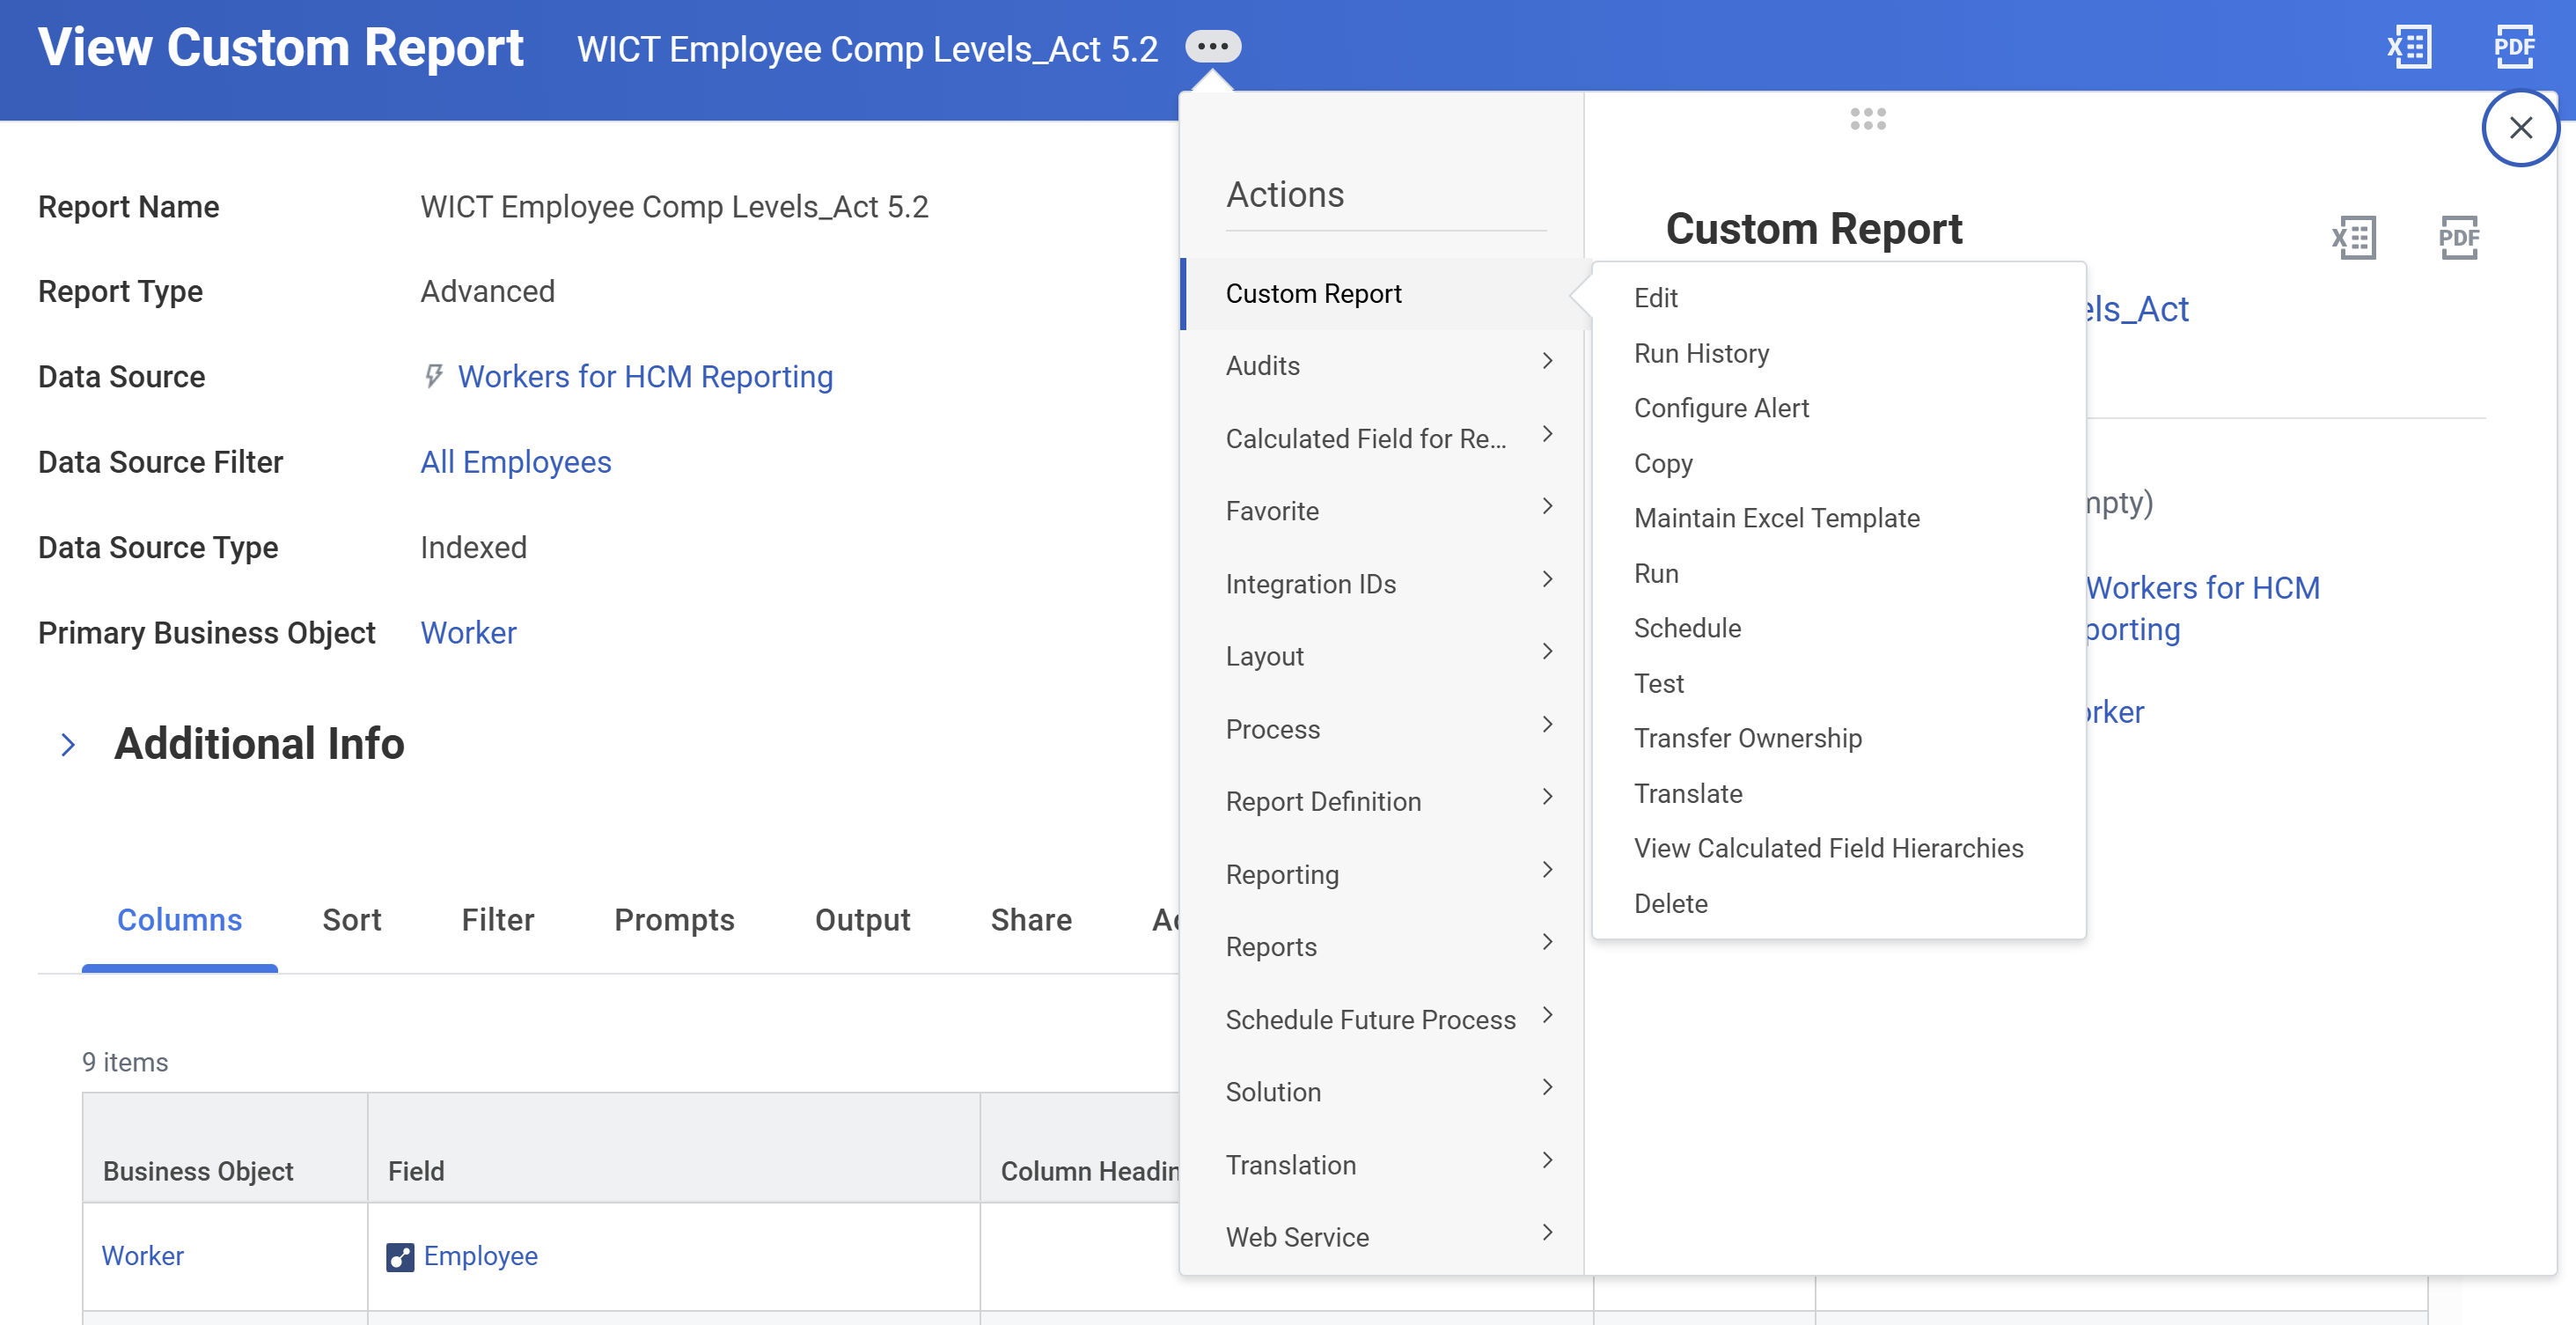
The View Calculation Hierarchy feature allows you to explore all underlying fields in a calculated field. Access the View Calculated Fields Hierarchies action from the Related Actions of a report definition.
Calculated Field Usage Hierarchy
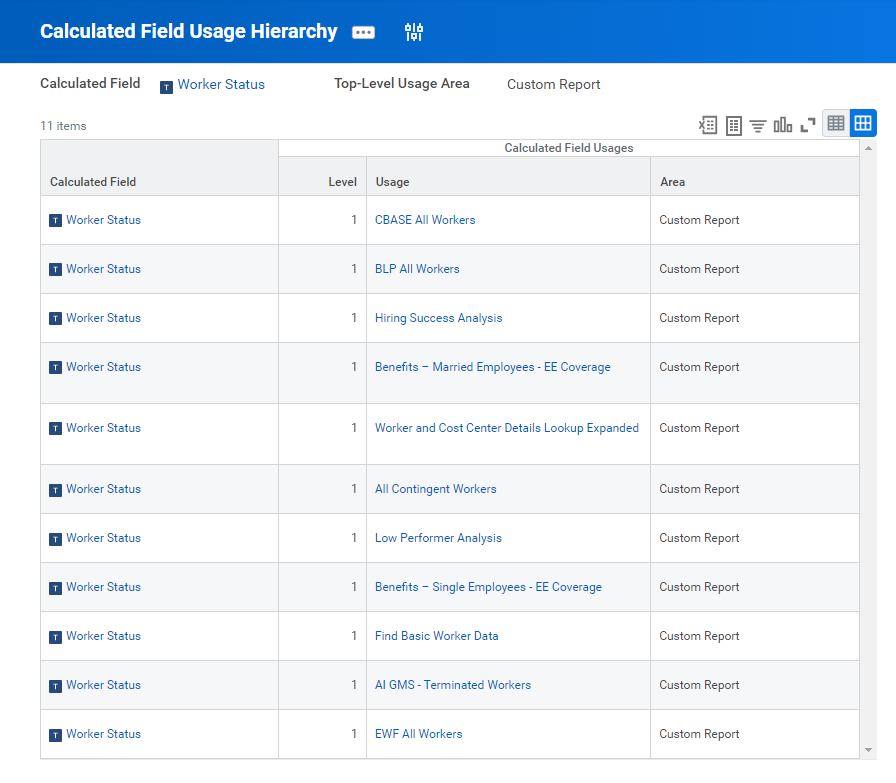
Calculated Field Usage Hierarchy
is a Workday-delivered report that assesses the impacts of changes to a calculated field you use in reports.This report provides you useful information such as:
- The number of instances that use a particular calculated field across your tenant.
- The nested level in which a calculated field exists.
- The usage details for calculated fields, such as the areas referenced.
Planning Your Calculated Fields
In the current scenario, you need to categorize employee compensation into levels of low, medium, and high. The following graphic represents the design process for this scenario.
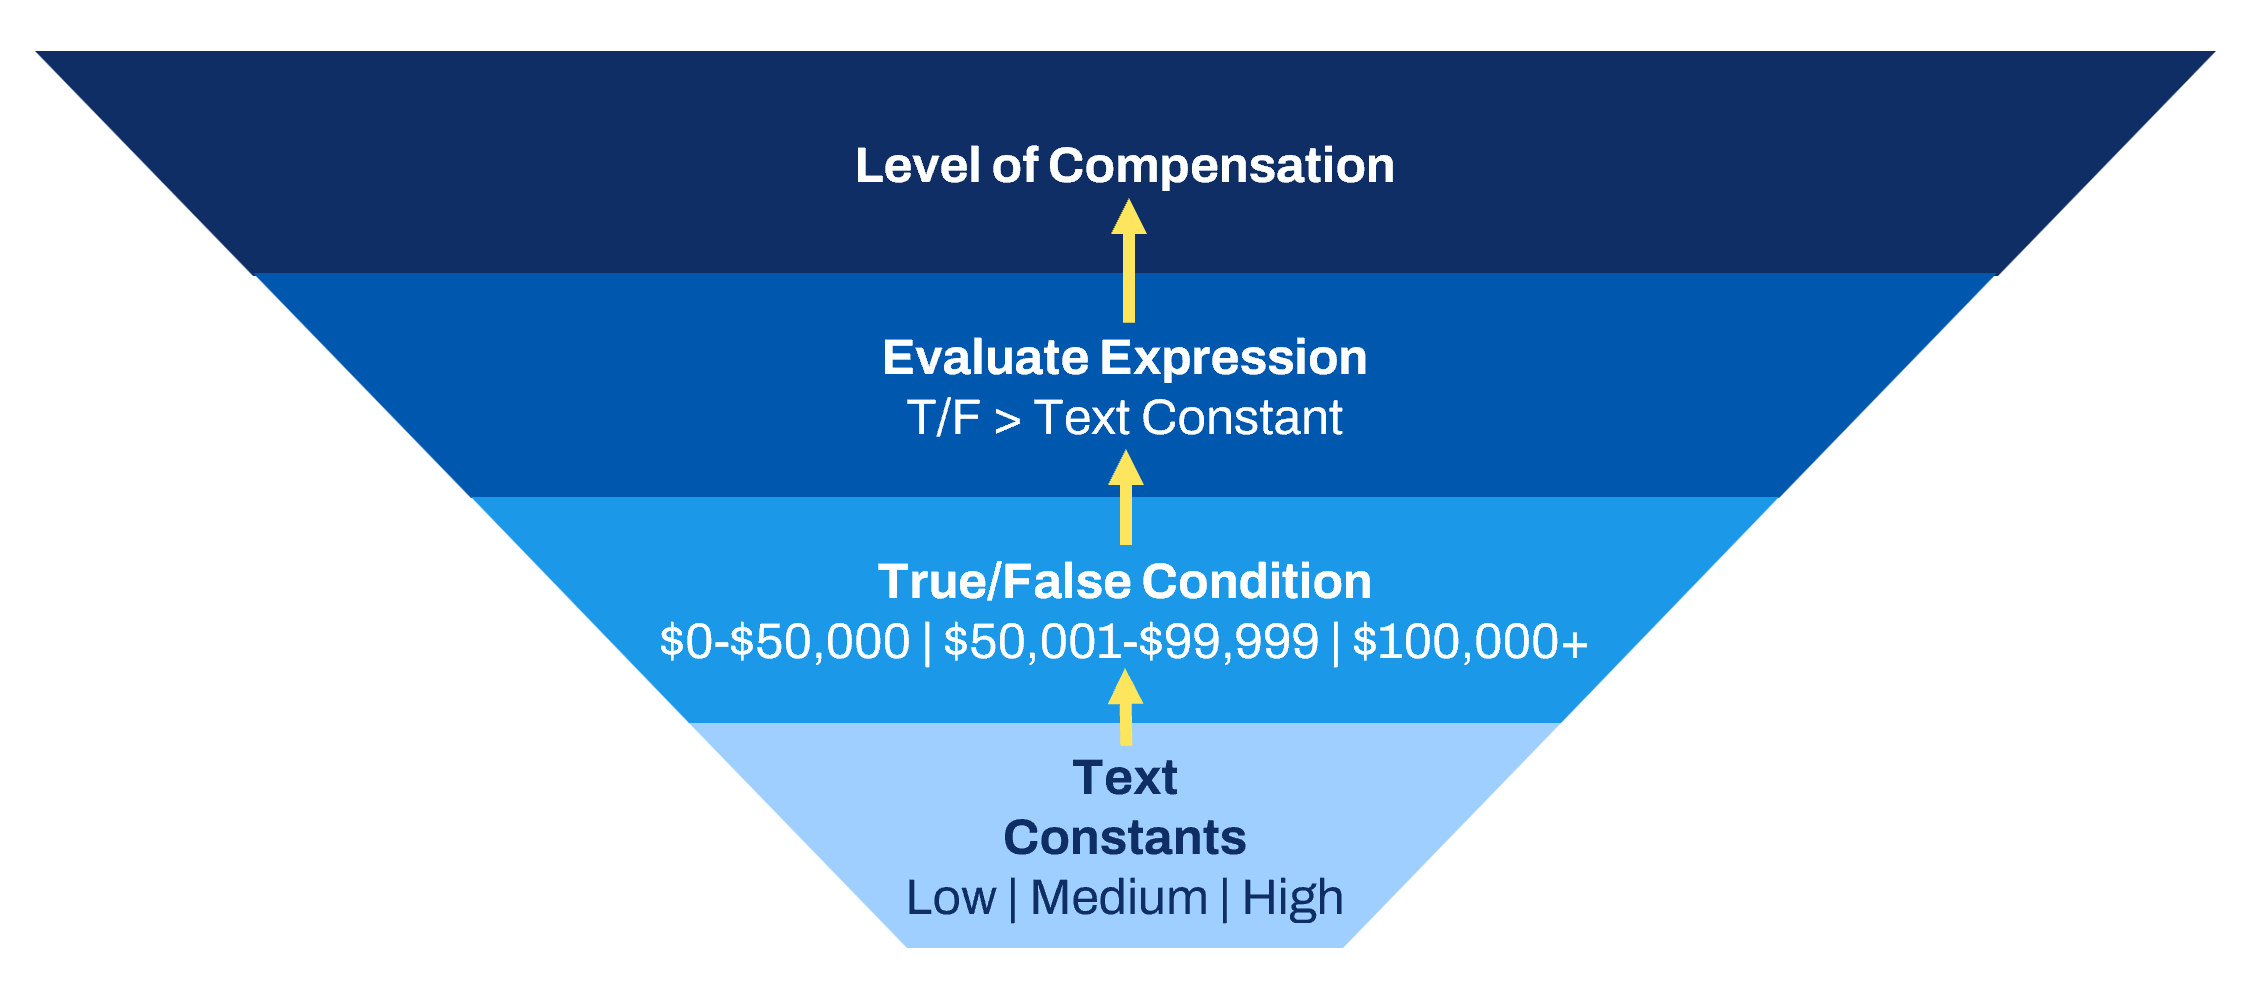
- Create the Text Constant values to return in the report output.
- Create True/False Conditions to group compensation amounts into individual categories.
- Create an Evaluate Expression calculated field to evaluate an employee's compensation against the True/False Condition categories.
- Return the Text Constants.
Tip:
In Workday, you have the flexibility to create calculated fields within calculated fields using an available prompt as you build. You have a choice to build the individual components as you go or build the calculated field from the bottom up.Lookup Range Band
The Lookup Range Band calculated field function accesses a specific value and determines where it falls in relation to a set of defined ranges. This function is like the Evaluate Expression function, except it only evaluates numeric or currency fields. This function returns a single-instance field type that corresponds to the range band (the range of values) in which the source field falls. The calculated field returns a blank instance if the value of the field does not meet a defined band.
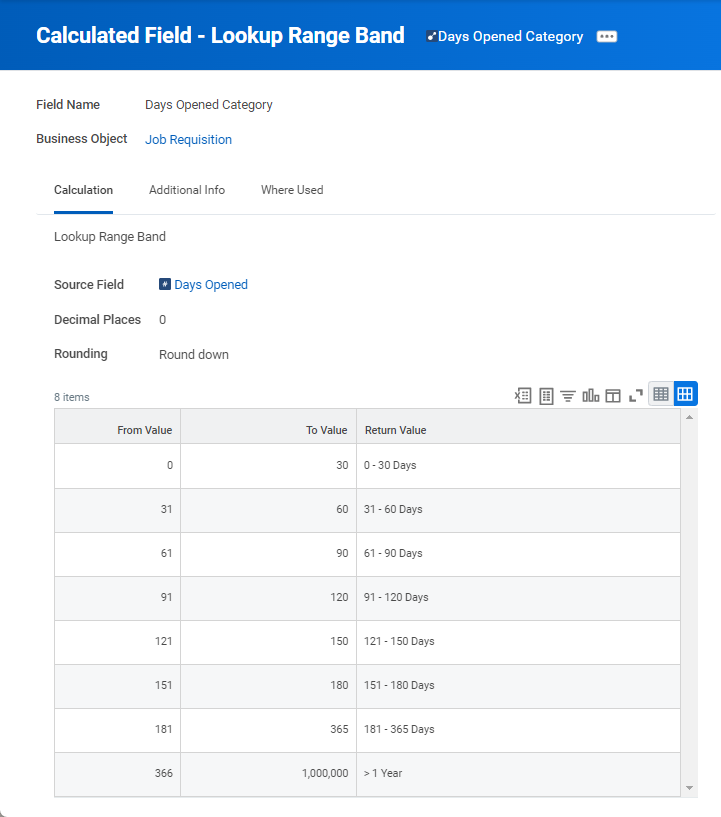
Example uses for this field type include:
- Salary increase percentage
- Length of service
- Days overdue
- Aging of customer and supplier invoices
Evaluate Expression Band
You can use the Evaluate Expression Band calculated field to specify values for True/ False (Boolean) conditions and return instances.
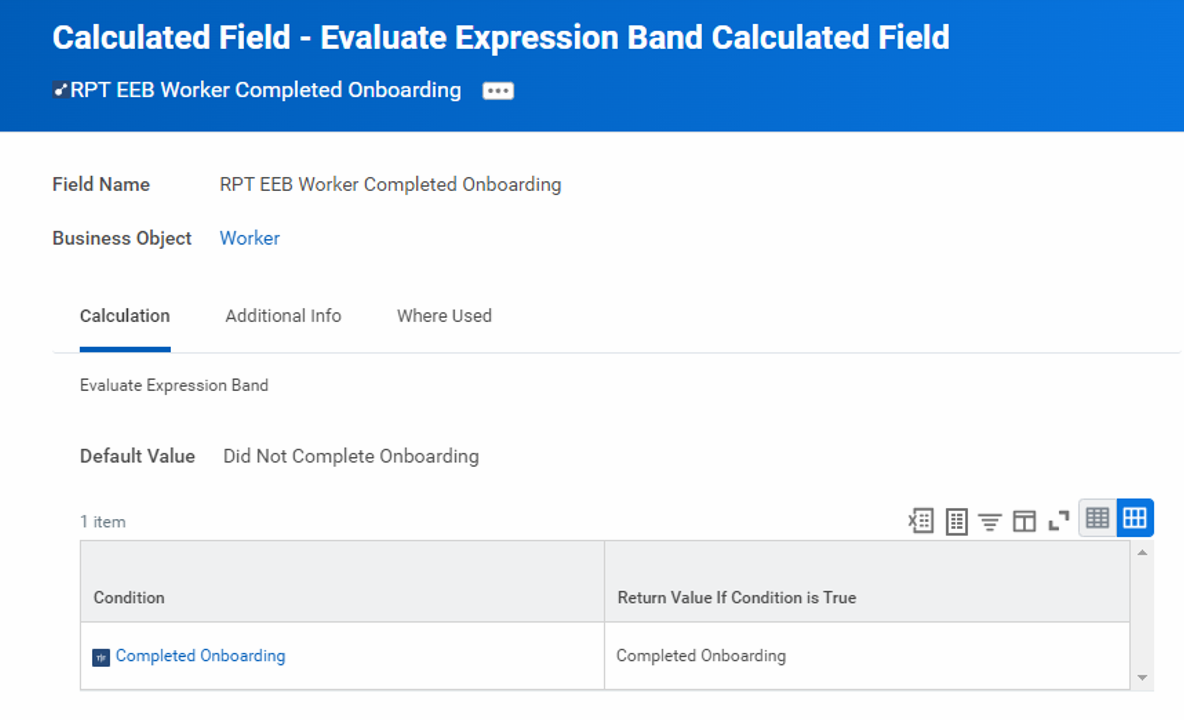
Evaluate Expression Band works like the Evaluate Expression calculated field in that it evaluates a series of True/False conditions. However, Evaluate Expression Band always returns a single instance type field whose values are defined when creating the field.
In the example below, the Evaluate Expression Band calculated field determines whether the worker completed onboarding. The system will identify the True conditions - "Completed Onboarding." If any instance does not meet any of the True conditions, those instances will default to a specified value - "Did Not Complete Onboarding."
Evaluate Expression vs. Lookup Range Band vs. Evaluate Expression Band
You may notice that Evaluate Expression, Lookup Range Band, and Evaluate Expression Band functions return similar report outputs. While these two calculated fields perform similar functions, there are some key differences.
Calculated Field | Functions |
|---|---|
Evaluate Expression |
|
Lookup Range Band |
|
Evaluate Expression Band |
|
Lookup Related Value
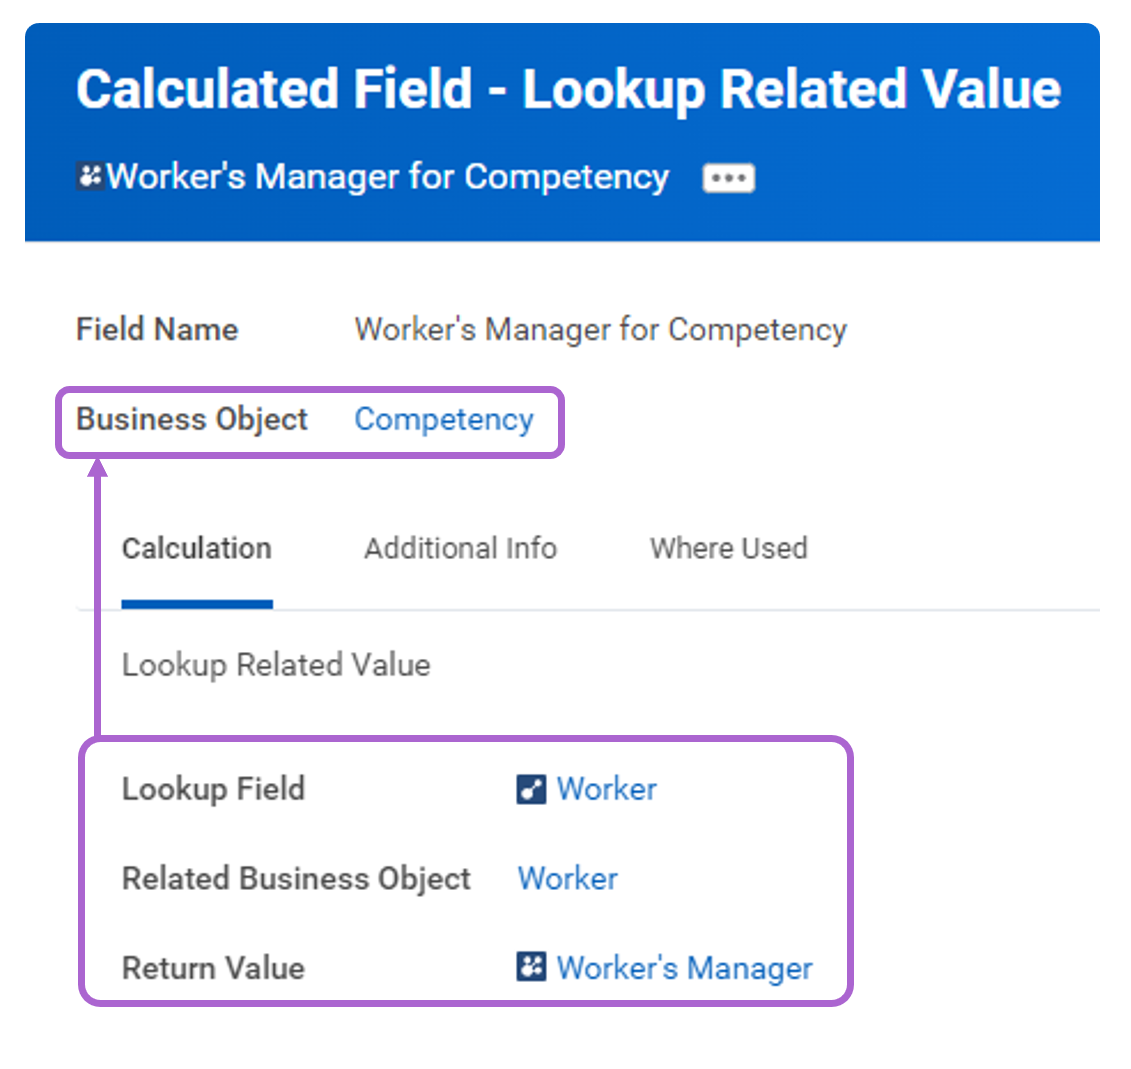
The Lookup Related Value function retrieves a value from a field on a related business object. This function promotes that value from the related business object to the primary business object. Once the value is available on the primary business object, you can use it for a calculation, condition rule, or reporting.
Here are some examples of looking up a value on a related business object:
- Promote the value of Worker's Manager from the Worker business object to the Competency business object for a matrix report using Competency as its primary business object.
- Make a field from Worker available to a compensation event condition rule.
- Promote a field from a related business object to the primary business object to make it available for grouping and totaling on an advanced report.
- Promote a field from a related business object to a primary business object to use it in combination with a field on the primary business object to create a calculated field.
To use the Lookup Related Value calculated field function, there must be a 1:1 relationship between the primary business object and related business object.
In the example below, we use the Lookup Related Value function to create a new field on the Competency business object. The new field retrieves the Worker's Manager from the Worker business object and relates it back to the Competency business object. We can now use the value in Worker's Manager in a report that uses the Competency business object.
Using the Business Object Details Report
The two business objects in a Lookup Related Value calculated field must have a 1:1 relationship. You can use the
Business Object Details
report to determine whether the relationship between your two objects is 1:1 (single instance) or 1:M (multi-instance).When designing needed calculated fields, you can use the
Business Object Details
report to research the relationships between business objects. The image below demonstrates how valuable this report can be when planning and configuring the Lookup Related Value calculated field function in advanced and matrix reports.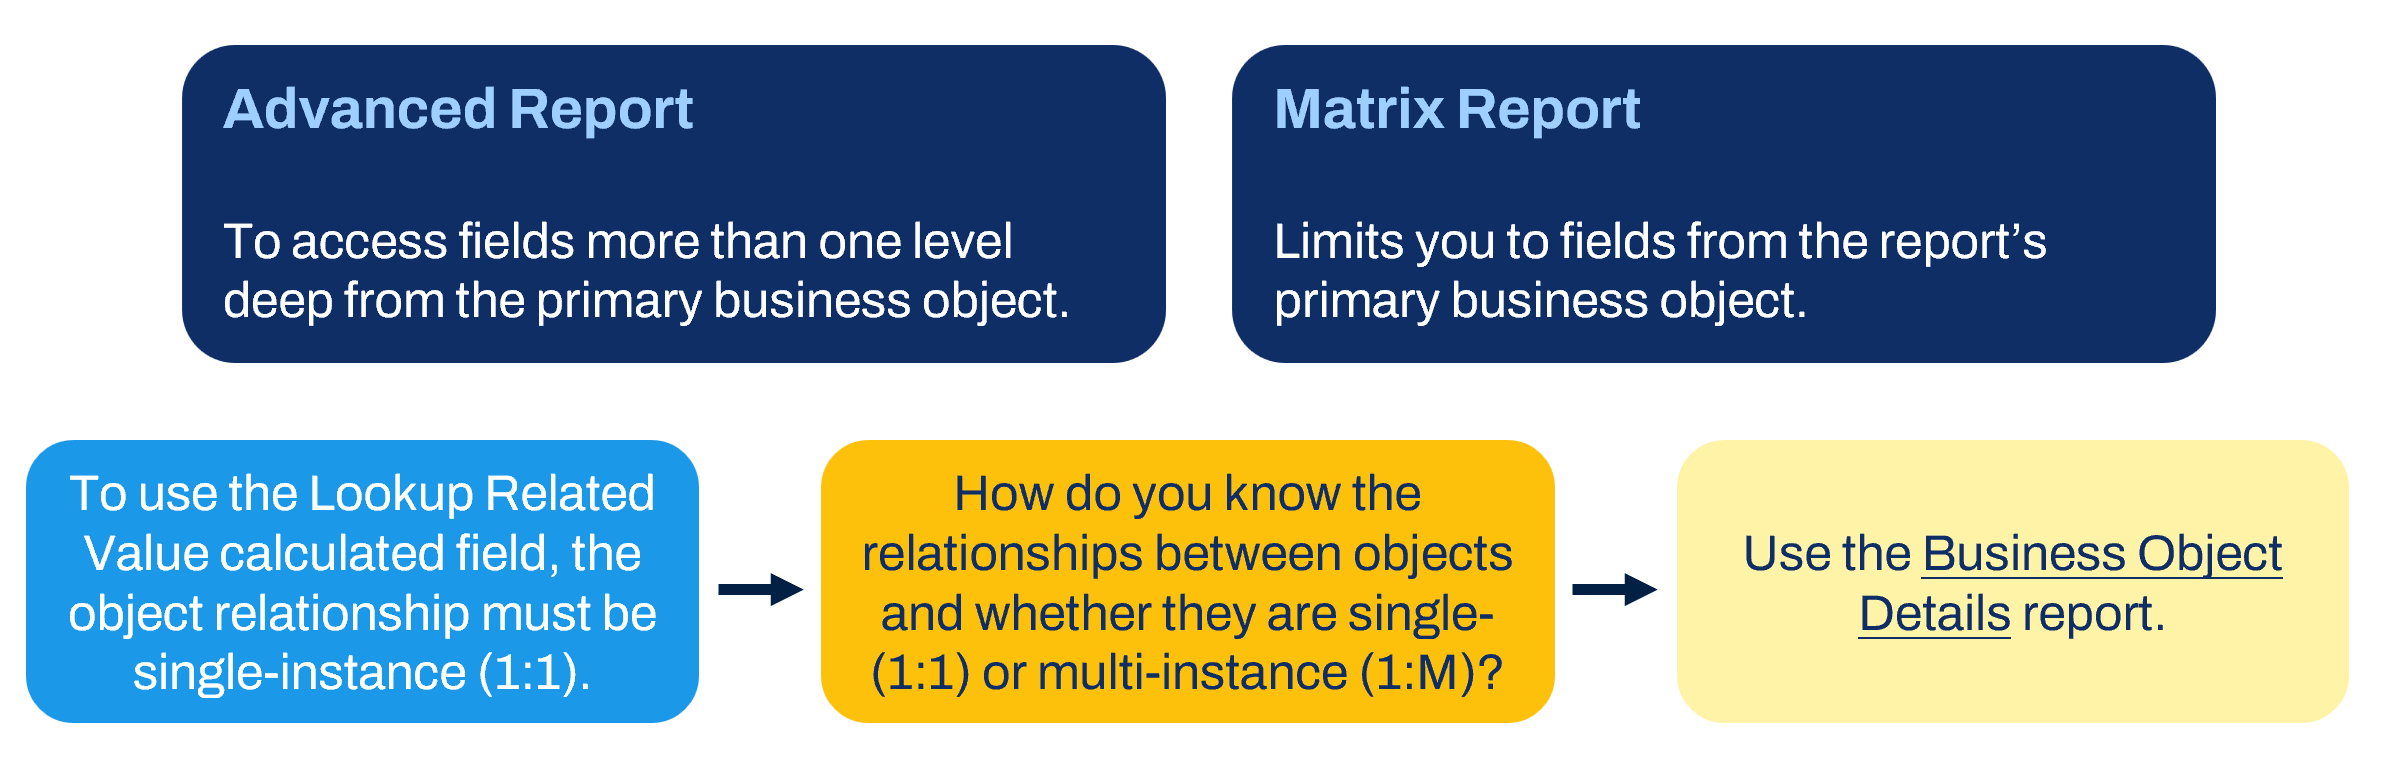
Extract Single Instance
The Extract Single Instance function returns a single instance from a group of related instances on a related business object. The single instance is one of many from a multi-instance field that has a 1:M relationship with the primary business object. Use the Extract Single Instance function to retrieve the last, first, or "nth" instance from a set of instances that meet a specific condition. Depending on the condition, the field will return one or zero values. The sort field and direction enable you to select the occurrence that meets your needs.
Examples of Extract Single Instance uses include:
- First Master's degree an employee receives.
- Last complete performance review for an employee in 2022.
- Second time-off request of 2023.
- Last Payroll Result completed.
- Oldest unapproved expense report for a worker.
Use the Extract Single Instance function when using the Lookup Related Value. Do so on a business object that has a one-to-many (1:M) relationship with the calculated field's business object. The function creates a one-to-one (1:1) relationship. Then, use the Lookup Related Value function to extract the value.
How Extract Single Instance Determines Return Value
The Extract Single Instance calculated field function determines return value as follows:
- Advanced Report - Accesses related business object instances associated with the multi-instance field you specify.
- Applies Conditions - Applies a condition to the instances by the source field. You can configure the conditions from theCreate Calculated Fieldtask when creating the Extract Single Instance calculated field.
- Sorts the Data - Sorts any related business object instances that satisfy the condition in ascending or descending order.
- Select Single Instance - Identifies and extracts the first, last, or "-nth" occurrence of the instances sorted.
For example, the following represents a list of expense reports for one worker.
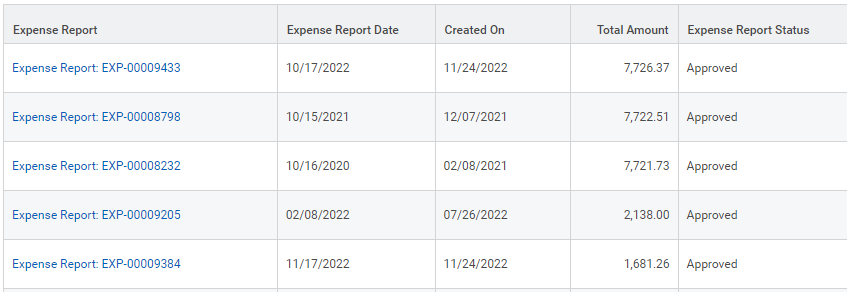
If you want to extract the oldest approved expense report, you can use an ESI field and reference the following data:

Remember to use the most specific and targeted source field to extract an instance from. To optimize performance, your report should only process the minimal number of instances.
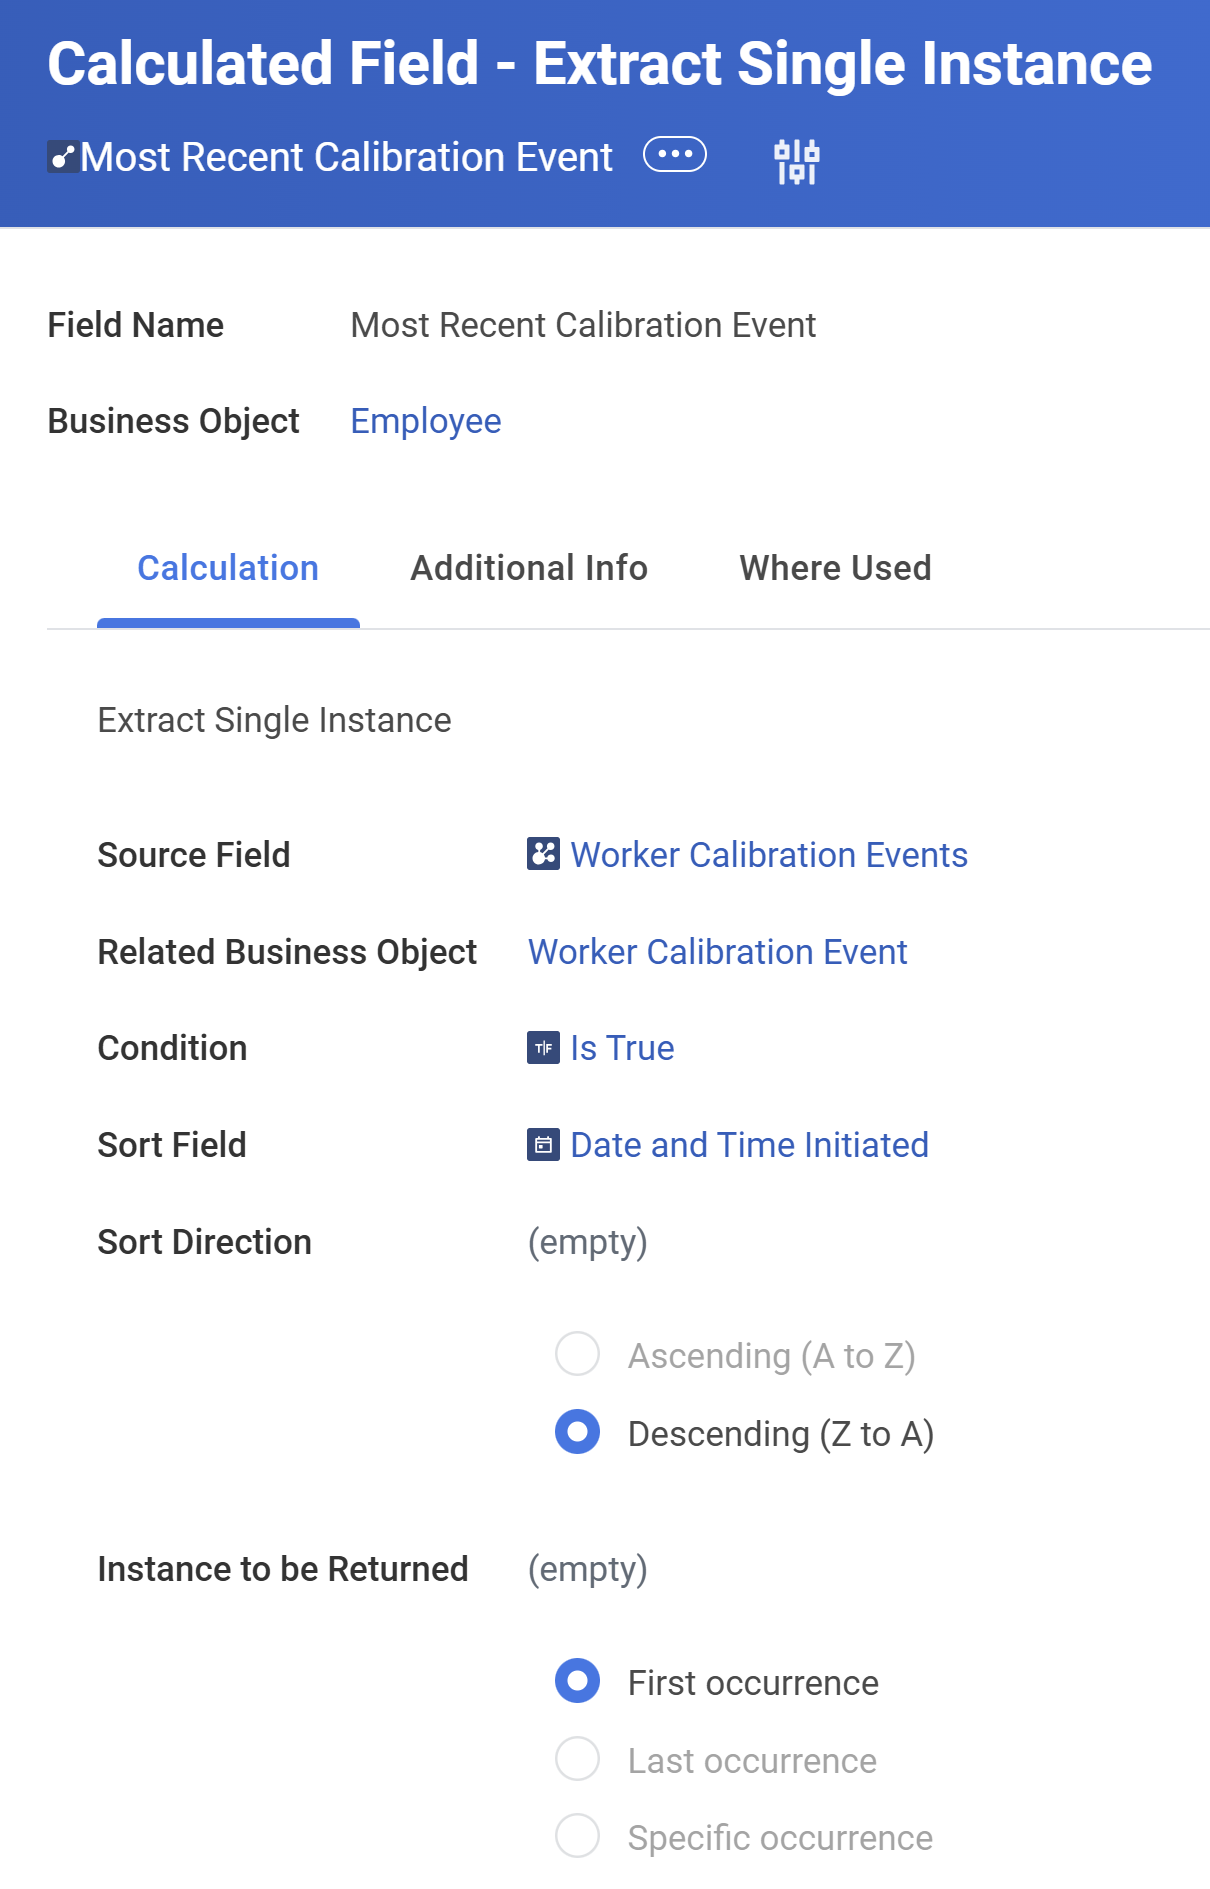
When creating an Extract Single Instance calculated field, you must specify the sorting options that determine which instance to extract. In the following example, the calculated field will return the most recent worker calibration event for each employee.
Condition
In the Condition field, specify the filter condition for instances on the related business object. Doing so narrows down results. If you do not need a condition, select a global field like "Is True" to accept all instances of that field.
Sort Field
The sort field determines the value the system uses to sort the instances. In this case, the values sort by date and time initiated. The Sort field is a required field. If the condition eliminates all but one field, or you do not need a sort, use a global field like "Any Field" to return the instance.
Sort Direction
Choose the direction in which to evaluate the instances. To optimize performance, the field should evaluate the fewest possible instances. For example, if you sort by date and want to return the most recent instance. Start from the latest value and select the first available instance. Doing so is quicker than starting with the first or earliest date and selecting the last value available.
Instance to be Returned
Finally, you specify the instance to return - first occurrence, last occurrence, or specific occurrence.
Extract Multi-Instance
Extract Multi-Instance extracts specific instances from a multi-instance field. The calculated field returns zero, one, or multiple instances based on the number of instances that satisfy the condition.
Examples of the Extract Multi-Instance calculated field include:
- Trainings each employee completes within the last 12 months.
- Current enrollment elections for an employee.
- Invoices currently due, but unpaid.
- Accounts with negative balances.
- A specific set of companies for bursting report output.
- Projects that are both high-risk and have a status of open.
The following breaks down how the Extract Multi-Instance calculated field function determines its return value:
- Selects operation type determining how many source fields you will select.
- Accesses the related business object associated with the multi-instance field you specify.
- Applies the condition to the instances selected by the source fields Make sure to define the condition on the related business object before creating the Extract Multi-Instance calculated field.
- Identifies and extracts instances that meet criteria and operation type.
Extract Multi-Instance Operation Types
The Extract Multi-Instance function extracts data in several ways:
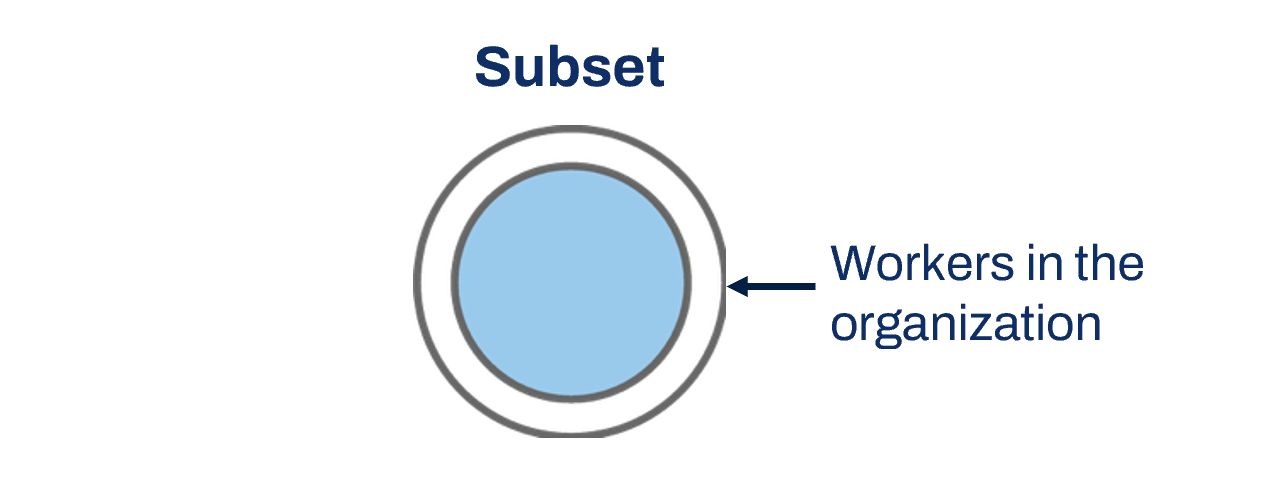
- As a subset, it filters instances from the specified source field (Source Field 1) and returns the results. For example, return workers in the organization who are "high potential."
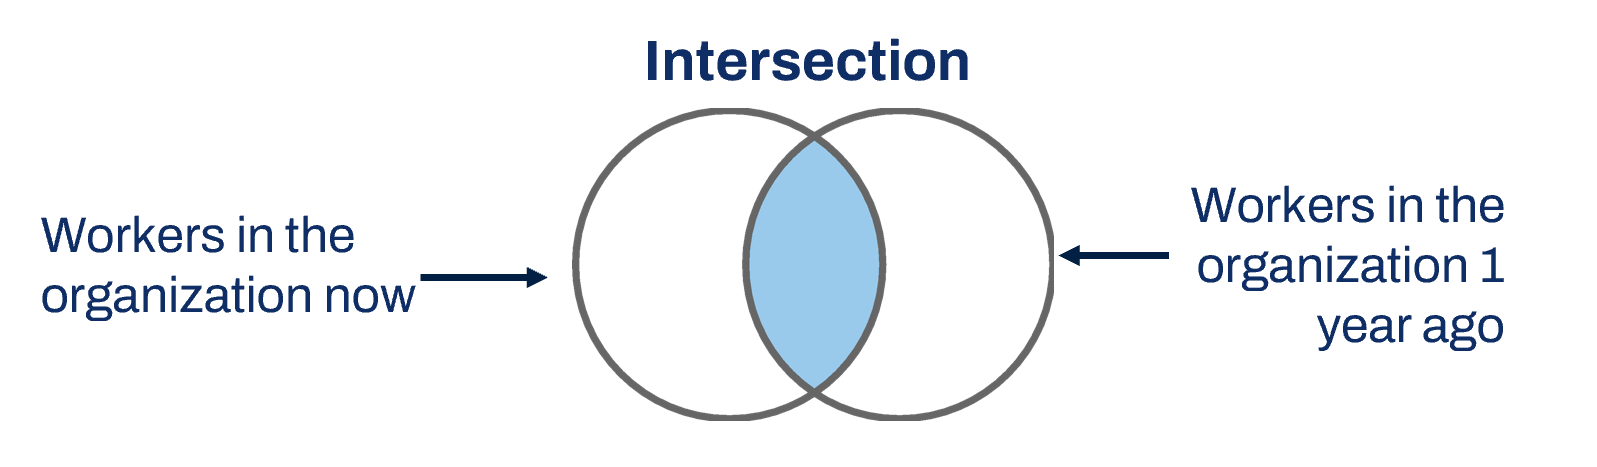
- As an intersection, it evaluates the filtered instances from both fields (Source Field 1 and Source Field 2) and returns only the instances that are common to both fields. For example, return workers who are in the organization now and were in the organization one year ago.
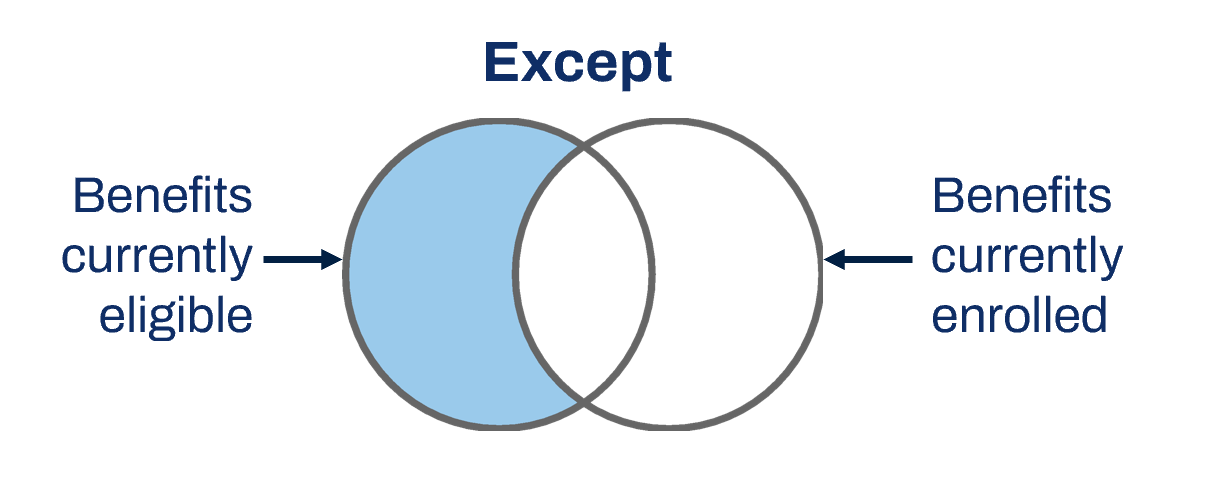
- As an exception, it evaluates the filtered instances from both specified source fields (Source Field 1 and Source Field 2) and returns the instances from the first field minus the instances from the second field. Except is useful for exception reporting. For example, return a list of benefits in which an employee is currently eligible, but for which the employee is not currently enrolled.
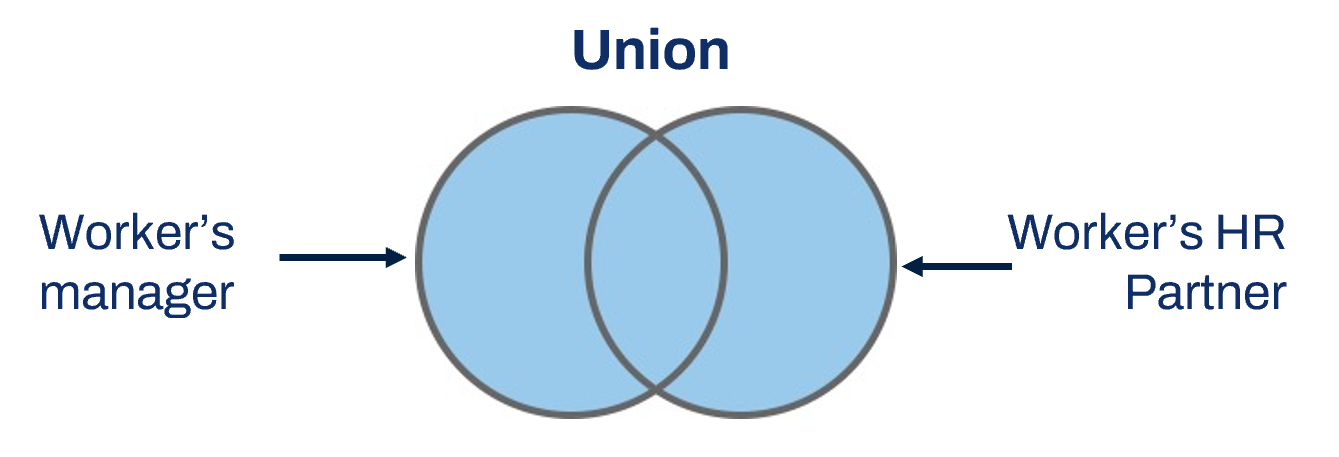
- As a union, it combines the filtered instances from both specified source fields (Source Field 1 and Source Field 2) and returns the results. For example, return a list for each employee consisting of their manager and HR Partner.
In functions using two source fields, both source fields must be on the same business object.
Chapter Summary
Key Takeaways:
- Consider performance when creating fields that evaluate conditions.
- Fields on the Global business object are viewable on any report by all users.
- Use the Date Difference function to return the amount of time between two dates.
- Use the Increment or Decrement Date function to compute a date that is a specified amount of time before or after an existing date field.
- Use the True/False Condition calculated field to return a Boolean value you can use in other calculated fields.
- Use Evaluate Expression fields to evaluate a series of conditions and return the value associated with the first true condition.
- Use the Lookup Related Value calculated field to look up the value of a field from a related business object and promote it to the primary business object.
- Use the Extract Single Instance calculated field to return a single-instance field from a related business object.