
PMD Scripting
Overview
PMD Scripting provides a way for you to make your app's pages dynamic. Instead of using hard-coded values, you can write an expression that will be calculated and displayed at runtime.
Objectives
By the end of this chapter, you will be able to:
- Use predefined PMD functions.
- Create custom functions in a script module and use them in a PMD file.
- Add an event handler to a widget.
- Write error handlers to catch client-side and server-side errors.
Advanced PMD Scripting
PMD Functions
PMD functions perform data manipulations, calculations, comparisons, and validations. You can insert many of these function calls to a PMD script to manipulate the data before it displays in a widget.
Like scripting, new capabilities are being added to PMD functions. Check the developer site and documentation for the most up-to-date list of available functions.
Deconstructing an Expression
"<% data.description %>"
In the above expression,
data
is a root variable. When Presentation Components sees data
, it searches for the variable in the page's binding context. Here is another sample expression:"<% empty queryParams.showWorkers ? list:emptyList() : workers.data %>"
This expression could be read as: "If the showWorkers queryParam is empty, then call the list package emptyList() function. Otherwise, display the response of the
GET /workers
operation."The table explains the components of the above expression:
Component | Description |
|---|---|
"<% … %>"
| Expression markers, or binding wrappers |
empty, ?, :
| Operators |
queryParams
| Implicit variable |
list:emptyList()
| PMD packageName:functionName |
workers
| Root variable pointing to the data from an endPoint |
PMD Scripting Limitations
The following is a list of limits to keep in mind when using PMD Scripting:
Limit | Maximum Value or Recommendation |
|---|---|
Call Frames | Number of levels in a program stack execution, such as recursive function calls. Maximum of 25. |
CPU Time | CPU time consumed for each script execution has a maximum of 5 seconds. This does not include endpoint invocation and widget API calls. |
Levels of nested script modules | Maximum number of nested script modules: 2
Example: script1 includes script2, which includes script3. If script3 also includes a script, that exceeds the limit and triggers a validation error. |
Memory usage | Workday Extend allocates memory to accommodate each script execution. For more information on memory management best practices, refer to the Developer Documentation: Concept: PMD Best Practices. |
Script Size | 100KB is the script size limit in a PMD file |
Script Modules
A script module is a
.script
file containing PMD scripts, which you can define a single time and invoke multiple times from different PMDs of a custom app.When you create a script module, consider these guidelines:
- The script module name must start with a letter, and must contain only letters, numbers, and underscores.
- Use a naming convention that aligns with the data model or script functionality.
- Example: If a script module contains functions working withemployeeImages, useemployeeImagesas part of the script module name.
- The script file has a maximum size of 100 KB. Consider chunking your script modules in an organized, logical manner.
- The script module must return a map object containing properties that export static variables and functions of the script module. Example:{ "property1": someFunction, "property2": someStaticVariable }
- Predefined app variables (like routeParams, endpoints, and pageVariables) are not available within a script module.
- However, PMDs can pass predefined variables as input parameters to a script of a script module.
- If a PMD passes a predefined variable to a script, its function declaration within the script module must use a different input parameter name.
After creating a script module, you can invoke its exported scripts from within a PMD file.
- First, you need to add theincludeproperty to your PMD page, to load the script modules onto the page.{ "id": "myPmdPage", "include": [ "scriptModule1Name.script", "scriptModule2Name.script" ], ... }
- Next, you can invoke a script from a script module using the following syntax:<scriptModuleName>.<property>(<parameter>)
The following PMD example includes a script module called
date.script
, and then invokes the getDaysBetween
function from date.script
:{ "id": "simpleDateCalculationPage", "include": [ "date.script" ], "script": "<% var updateBetween = function() { if (empty startDate.value || empty endDate.value) { between.value = ''; } else { /* date is the script module name. daysBetween is the exported property from date.script. */ var days = date.daysBetween(startDate.value, endDate.value); between.value = days + ''; } }; %>", "presentation": { "pageType": "EDIT", "body": { "type": "fieldSet", "children": [ { "type": "fieldSet", "title": "Calculate Days Between Two Dates", "collapsible": true, "initializeCollapsed": true, "children": [ { "type": "date", "label": "Start Date", "id": "startDate", "onChange": "<% updateBetween(); %>" }, { "type": "date", "label": "End Date", "id": "endDate", "onChange": "<% updateBetween(); %>" }, { "type": "text", "label": "Days Between", "id": "between", "enabled": false } ] } ] } } }
Event Handling with PMD Scripting
Use PMD Scripting with event handlers to perform data manipulations, calculations, and validations as users interact with edit pages.
Example: Using an
onChange
event handler, you can invoke a deferred endpoint to validate the user selection, adjust the data format, perform calculations, and set the values of other widgets.To use an event handler, specify the event name as a tag attribute whose value is the script. This sample dropdown uses an onChange event handler that populates a text widget:
{
  "type": "dropdown",
  "label": "Select a country:",
  "id": "countryList",
  "idKey": "ISO_3166_1_Alpha_3_Code",
  "displayKey": "name",
  "values": "<% countries.items %>",
  "onChange": "<%
    countryCode.value = !empty self.value ? self.value[0] : '-none-'
  %>"
},
{
  "type": "text",
  "enabled": false,
  "id": "countryCode",
  "label": "Country Code:"
}
Event handlers on an edit page can reference the self variable to refer to the widget that triggered the event. You can use the
self
variable to refer to the widget conveniently within the context of the event handler. The above example uses the self
variable instead of repeatedly using the tag ID countryList
.Note
: Ensure that the widget includes the id attribute. In general, Workday recommends that you include the id attribute in your widget and tag definitions, especially for debugging purposes and widget interactions.Depending on when the events trigger, event handlers can reference the widgets on the page. In general, event handlers can access widget values when they've become available on the page.
Page Load Events
This diagram illustrates the order of PMD Scripting events when an edit or view page loads:
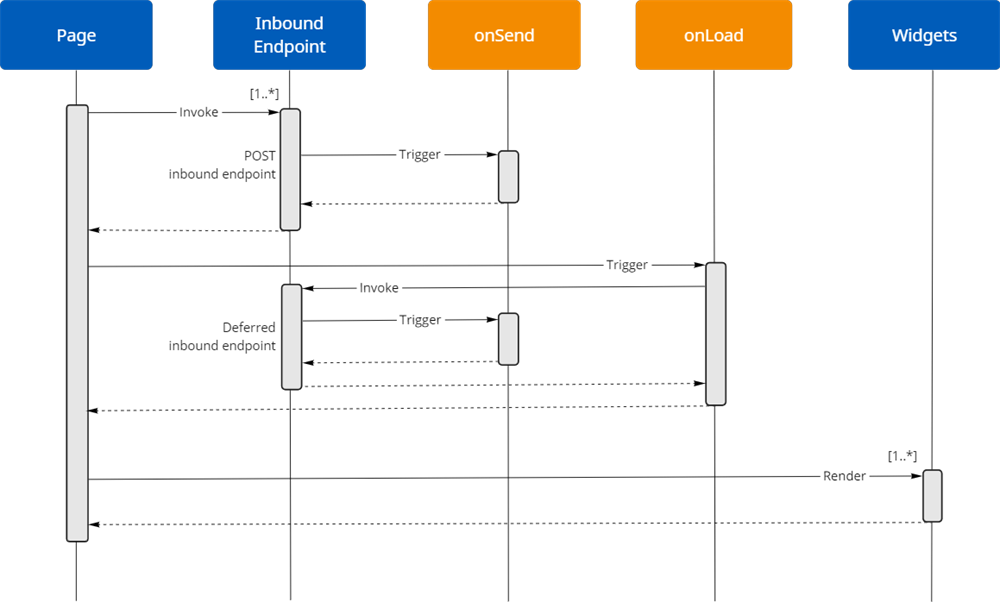
The 1..** notation on the diagram indicates the one-to-many invocations on a page with multiple endpoints and widgets.
If a page has multiple inbound endpoints, the page concurrently invokes inbound endpoints unless there's endpoint dependency.
If an endpoint depends on another endpoint, the page invokes the endpoints in the specified order.
An event handler on a view page can't reference the widgets on the page. In general, tag attributes and values on a view page can't reference other widgets.
The onLoad and onSend events during page load can't access the widgets because these events trigger before the PMD tag processing. Use these events for massaging and preparing the inbound data before starting tag processing.
Widget Events
This diagram illustrates the PMD Scripting events that can trigger from the widgets:
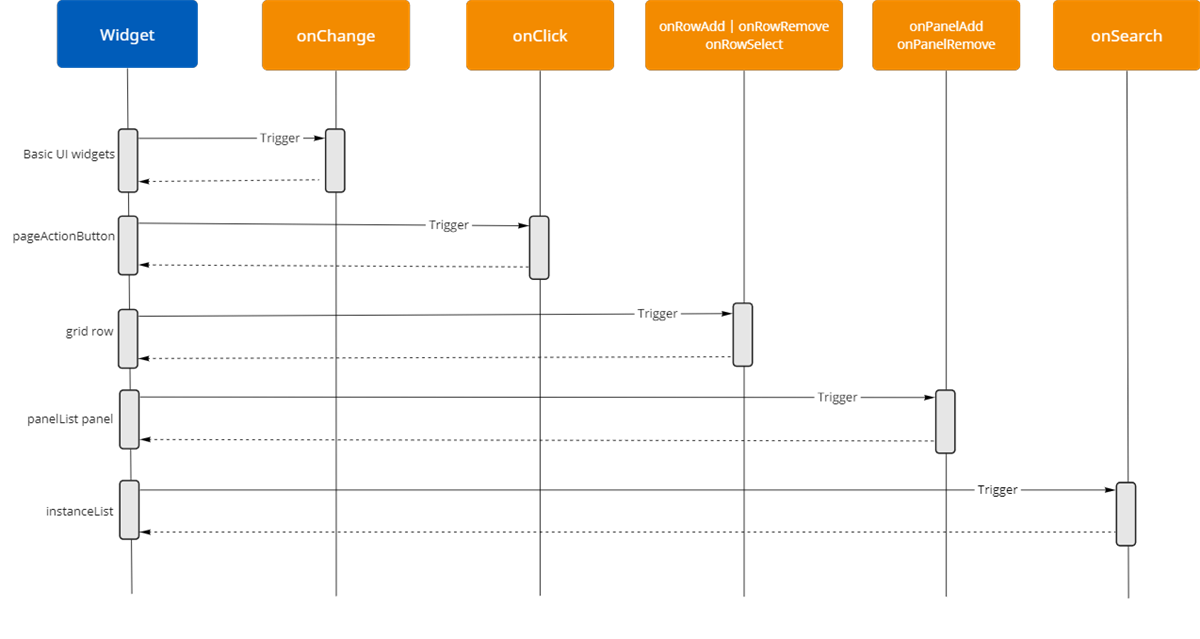
- TheonChangeand other widget events trigger during user interaction. These events can access all widgets on the page using the available widget methods.
- AnonChangeevent handler on a widget can access acellTemplatewidget in a grid by referencing the cellTemplate id. Example:cellTemplateTagId.value.
- onRowAdd,onRowRemove, andonRowSelectevent handlers can access a cell in the grid row by referencing the column id. Example:row.childrenMap.columnId.
- TheonSearchevent on theinstanceListcan access the widgets within the current row in agridor current panel in apanelList.
- All widget event handlers can invoke a deferred endpoint, which can trigger the onSend event. In this case, an onSend event handler can access the widgets on the page.
Page Submit Events
This diagram illustrates the order of events when a user clicks the OK button on the edit page:
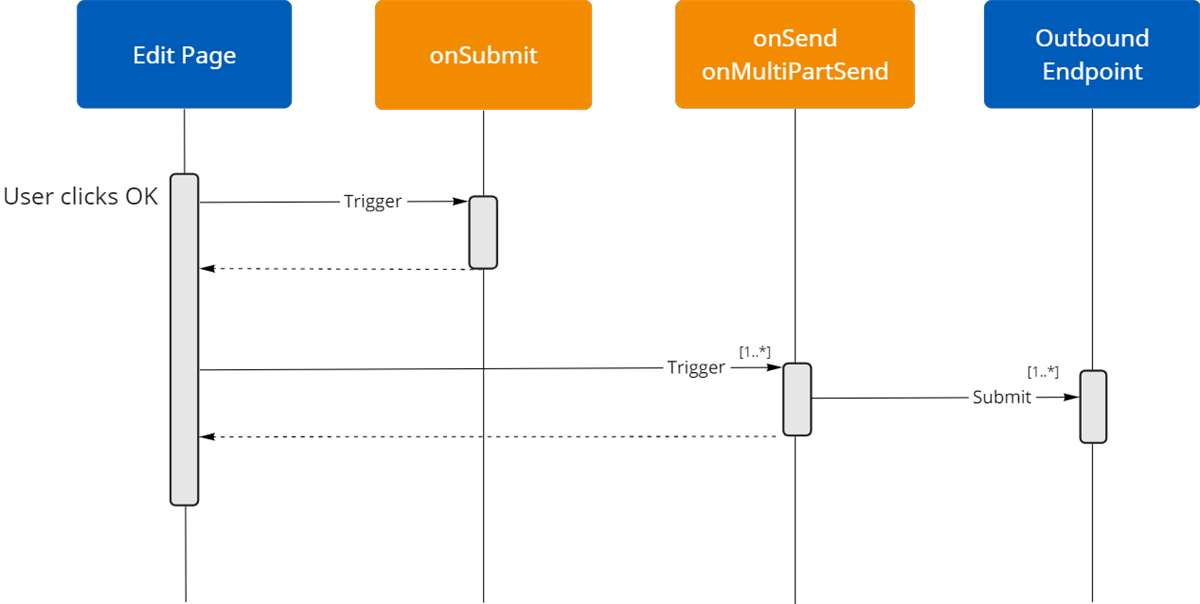
- The 1..** notation on the diagram indicates the one-to-many invocations on an edit page with multiple endpoints. The page submits outbound endpoints in their order of placement in the PMD code.
- TheonSubmit,onSend, andonMultiPartSendevent handlers can access the widgets on the page. Note that although the event handlers can set the widget values, the page won't display the new values after the user clicks OK to submit the page.
Exceptions and Validation
Page Load Warnings and Errors
If you want to throw warnings or errors when a user enters a page, you can do the following:
{
  "presentation": {
    "applicationExceptions": [
      {
        "type": "applicationException",
        "severity": "WARNING",
        "message": "a warning"
      },
      {
        "type": "applicationException",
        "severity": "ERROR",
        "message": "an error"
      }
    ]
  }
}
These exceptions will not prevent users from submitting the page.
Use Built-in Widget Attribute for Validation
Presentation Components can throw a validation errors on widgets.
- Each widget has attributes that control how it functions.
- Some attributes provide built-in controls for validating the data entered by users.Note: Check if the widget has attributes that control data input first before creating custom validations.
Widget | Attribute | Validation |
|---|---|---|
Most widgets | required | Enforces a user to enter a value. |
Currency or Number | minimumValue | Enforces a minimum value entered by the user. |
Currency or Number | maximumValue | Enforces a maximum value entered by the user. |
Outbound Endpoint Validation Error
Exception mechanisms and validations allow you to define better error handling and error messages for your users.
A detailed error message provides a clear path to start troubleshooting:
- Define what action or input to perform in a field type.
- Define the warning message so a user can resolve it.
Dynamic Validation Error
A more flexible way to validate a widget's value is to write PMD scripting code to test for errors. This code triggers either the user changing the value of the widget or selecting the OK button. Use the following PMD scripting events to test for errors.
- onChange: Triggers validation on user-changing value in widget.
- onSubmit: Delays validation until user has selected the OK button. This is helpful when validation checks span many widgets.
The code snippet below shows a text widget on an edit page. As the user types in a value for the field, if the text widget displays an error message only if the widget's current value is "N/A".
{
  "type": "text",
  "id": "textId",
  "label": "Expense Description",
  "onChange": "<%
    if (textId.getValue() == 'N/A') {
      textId.setError('N/A is not valid value');
    } else {
      textId.clearError();
    }
  %>"
}
Use PMD scripting to place validations for widgets that trigger either errors or warnings:
- Errors are messages a user cannot ignore (outboundEndPointsnot called).
- Warnings are messages a user can select OK and ignore (outboundEndPoints will be called with OK).
Important
: Warnings display as alerts in the user interface, as displayed in the image.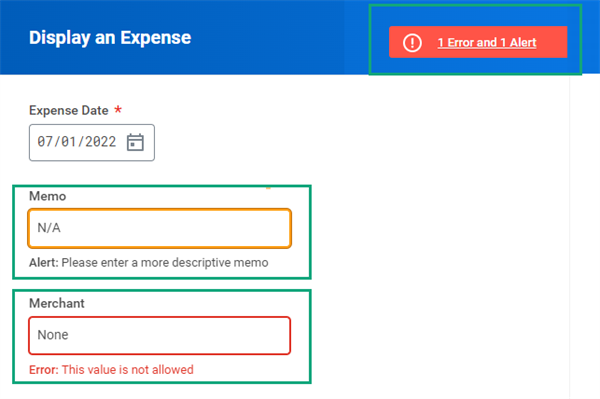
Error and Alert Messages
In the above example, the
onChange
will test if the value provided is N/A. If so, it will set an error on the widget and prevent the outbound endPoints
from being called. Include an else clause to clear the validation error when a user changes the value to one that is acceptable.Term | Return type... | Description |
|---|---|---|
setError(String error) | void | Sets the validation error. |
clearError() | void | Clears the validation error. |
setWarning(String warning) | void | Sets the validation warning. |
clearWarning() | void | Clear the validation warning. |
Depending on the nature of the validation, it may make sense to delay the check after the user selects the OK button. For example, to make sure the user has not selected an invalid combination of location and
sportsEquipment
, add the following to the onSubmit
event:"onSubmit": "<% if ( location.getValue() == 'Chicago' && sportsEquipment.getValue() == 'Ping Pong Tables' ) { sportsEquipment.setError( 'Chicago does not have ping pong tables' ); } %>"
The
onSubmit
will not be called if the page has errors or warnings present. This requires the use of the onChange
to clear errors once the user has modified their selections, such as location or sportsEquipment
, in the above sample. Otherwise, the onSubmit
will not be called again.Regex
The regex (regular expression) is a syntax for matching and extracting parts of a string. The validate package has a match function to test a string against a regex.
- The first argument requires the regex.
- The second argument requires the string to be validated.Important: It will return true if the given string matches the regex string, or if either the regex or comparison string is empty.
Parameter | Description |
|---|---|
regex | A regex (Java style) string. |
comparisonString | A string to match. |
For example:
{
  "type": "text",
  "id": "memo",
  "label": "Memo",
  "onChange": "<%
    if (!validate:match('^[a-z0-9]+$', memo.getValue())) {
      memo.setError('Lowercase or numbers only please');
    } else {
      memo.clearError();
    }
  %>"
}
Displaying API Error Messages
When an
outboundEndPoint
returns an error, Presentation Components will sometimes throw a page error depending on the status code error. View the developer site for full details regarding status code errors.Here is a list of common status codes:
HTTP Status Codes Errors | What they mean... |
|---|---|
301
| Moved permanently. |
302 | Found. |
303
| See other. |
307
| Temporary redirect. |
400
| Bad request. |
401 | Unauthorized. |
404 | Not found. |
407 | Proxy authentication required. |
408 | Request timeout. |
500 | Internal server error. |
503 | Service unavailable. |
Important
: At the time of publication of this manual, Error 400 is not a status code that will trigger a page error automatically. However, it is an error that is frequently encountered by new developers.You can force Presentation Components to treat a status error code it would normally ignore as a page error by adding a
failOnStatusCode
attribute to an outbound
EndPoint
.{ "name": "postExpense", "baseUrlType": "WORKDAY-EXPENSE", "httpMethod": "POST", "url": "/entries", "failOnStatusCodes": [ { "code": 400 } ] }
Error Response
When an outbound
endPoint
returns an error, Presentation Components will display a generic page error, based on the status code. The API response often includes detailed error messages. The following snippet shows a sample error object returned by the Workday REST APIs:{ "error": "An error summary.", "errors": [ { "error": "An error message detail.", "code": "S21" } ] }
In order to have Presentation Components display these detailed error messages to the user, add the following
responseErrorDetail
object to the outboundData
object.{ ... "outboundData": { "responseErrorDetail": { "errorSummary": "<% error %>", "errors": "<% errors.map(item =>; { item.error }); %>" }, "outboundEndPoints": [ ... ] } ... }
Let's take a closer look at the attributes in the
responseErrorDetail
object:- errorSummary: A string binding of the field in the response object that contains the summary of the error. In this case,
- errors: A list binding of the error detail collection.
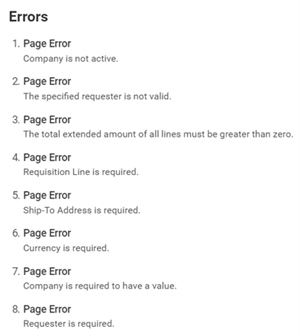
Now when your users run into an error on the PMD page, they'll see an error button (it looks like a red exlamation mark). Selecting this button opens a popup like the one shown below, which lists out all the errors that occurred on the page.
Page Errors