
Page Flows
Overview
With page flows, you can create sequences of pages that guide users through multi-step transactions. In this chapter, you will create page flows to control how users navigate your app.
Objectives
By the end of this chapter, you will be able to:
- Construct a page flow in the AMD file.
- Explain the structure of a flowDefinition.
- Create a page flow with conditional transitions.
Introducing Page Flows
A page flow is a sequence of pages that guides users through a multi-step process or transaction. By defining page flows, you can specify different ways your users can navigate across the pages in your app.
Examples of when you would use a page flow:
- Instead of displaying a single page with many widgets, break up the widgets and spread them across several pages. Make the process of data entry more palatable for the user.
- Define the pages of the application so that they guide the user through a process, much like the wizard approach seen in many applications.
- Define multiple navigation patterns using the same set of edit pages.
Page flows most often consist of edit pages, although they can end with a view page or confirmation page.
Important
: Presentation Component flows are NOT equivalent to Workflow/Orchestrations.Visualizing a Flow
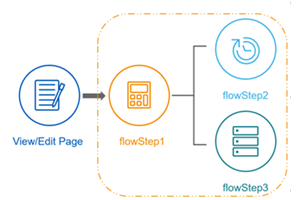
Flow Composition
Page flows are defined in the AMD file.
To create a page flow, you need the following:
- One or more definitions in theflowDefinitionsarray
- One or more steps in theflowStepsarray
- AflowStepthat contains a pointer to anidin thetasksarray, which points to a specific page
In the following example, the
flowStep
has an attribute called taskId
that is referencing the task id
of expenseEdit
. The task corresponds to the expenseEdit
page.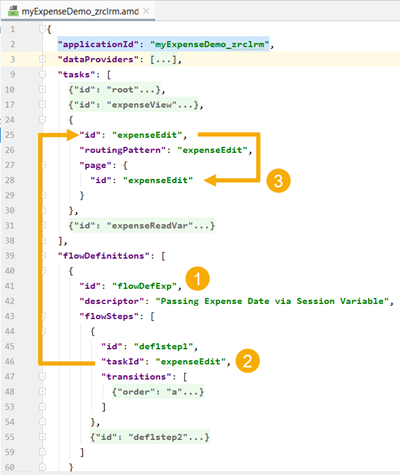
Flow Steps Point to a Task ID - Task IDs Point to a Page
Important
: The code shown above is not complete AMD code. We collapsed some sections and we cut some code out at the bottom of the screen, leaving only the pertinent areas.Flow Transitions
Edit pages have OK and Cancel buttons. If the app has a
flowDefinition
, when the user selects OK, the app determines the next page based on the transition in the flowStep. The flow transition has the attributes: condition
, order
, and value
. Here is a description of those attributes.Transition Attribute | Description | Example |
|---|---|---|
order (optional) | A flowStep can contain a transitions array, allowing the step to have many transitions . Transitions are made unique via the order attribute, i.e. one transition can be order
a while a second transition can be order
b . | If I have multiple transitions , order a
will come before order b , order b will come before order c , and so on. |
value
| The value contains the id of a flowStep that you want to transition to, i.e., it tells the app which page to go to next. | In the following example, the value is def1step2 , which corresponds to the second flow step, which will display the page named expenseReadVar . |
condition | If you set the condition to true , you are essentially hard-coding the app to go to the page identified in the next flowStep .A condition can also contain an expression, i.e., you can use the PMD scripting in the condition. When writing the script for your condition, you could access data in a query parameter to determine which page to display next. | If a page receives a query parameter named name , and you need to direct the user to different pages if the name were empty or not, your condition would be:
<% !empty(queryParams.name) %> |
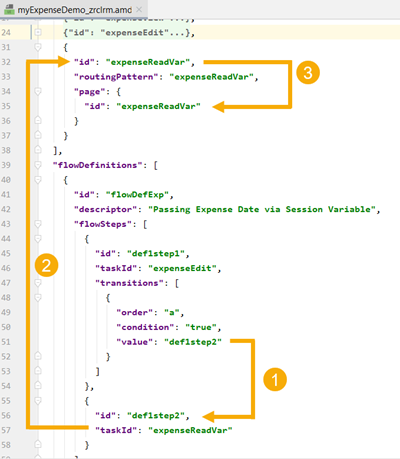
Flow Transition Points to the Next Flow Step - The Flow Step Points to a Task ID and Page
Entering and Exiting a Flow
Flows usually start with a view page that is not included in a flow. For example, you have a button on a view page. The button, when selected, takes the user to an edit page. Presentation Components realizes that this edit page is the first step of the flow and will therefore start the flow. Being part of the flow, the OK and Cancel buttons will now act as Next and Back buttons.
To exit a flow, a best practice is to use set the
pageType
attribute to a value of confirm
. This attribute is placed under the presentation
tag on a View page. A pageType
of confirm
will replace the standard OK and Cancel buttons. You will see a page with a Done button instead.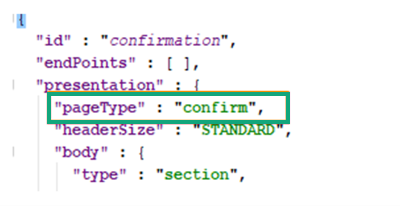
Ending a flow - "pageType" : "confirm"
When a user selects the Done button, they will be redirected to the entry point of the flow.
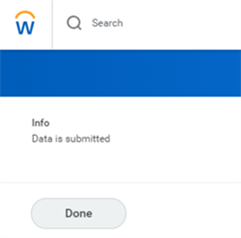
Rendered "pageType" : "confirm"
Advanced Flow Definitions
Flows are the mechanism that Presentation Components uses to direct users through a process. Here are a couple of cases where you would use a flow:
- The app needs a multistep edit form.
- The app guides the users through a sequence of steps.
Review of Flows
In the AMD, there are two elements related to flows:
tasks
- Defined in an array.
- Represent the pages in the app.
- Created automatically by PSDT.
flowDefinitions
- Defined in an array.
- Represent the order of pages a user must navigate to complete a process (flowSteps).
- Created by the developer.
A step in a flow refers to a
task
, which refers to a page
.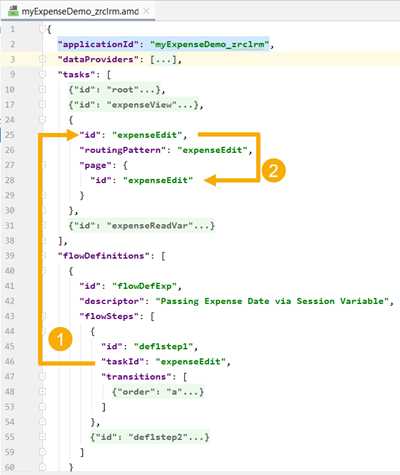
Flow Steps Point to Tasks who Point to Pages
Flow Transitions
Flow Transitions Overview
Every
flowStep
has a transitions
array. The transition
defines which step
, and therefore which page
, the user goes to when they select OK. A flowStep
can consist of many transitions
. Presentation Components evaluates the transitions
depending on their alphabetic order
. If you have two transitions
, order a will come before order b, order b will come before order c, and so on. The order
property is required, even if there is only one item in the transitions
array.Simple Transitions
The
transition
has a condition
. If set to true
, the user goes to the next step. In our example below, we have only one transition with a default value of true
. When the user selects OK on the first page, the flow goes to def1step2
, which points to the expenseReadVar
page.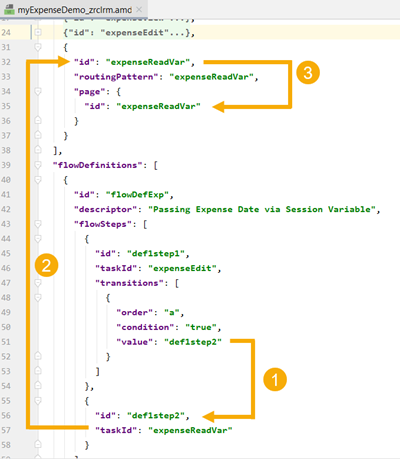
Flow Transition Points to the Next Flow Step - The Flow Step Points to a Task ID and Page
Non-Linear Transitions
The
flowSteps
do not have to be linear. You can write expressions in the condition
. The image below displays a flowStep
with multiple transitions
. The order
a
condition
will be evaluated first. If that condition
is true
, the flow goes to the def1step3
flowStep
. If the order
a
condition
evaluates to false
, the flow goes to the def1step4
flowStep
.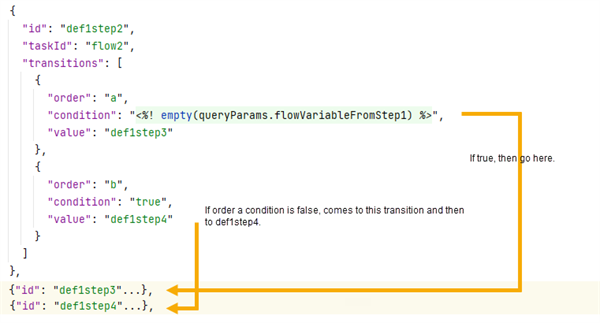
Non linear transitions with text markup.
Self Transitions
Self transitions will resolve the issue of the read-only grid not automatically refreshing after entering new merchants. A new
flowDefinition
will perform the following:- The first step will make the flow start by referencingmerchantGrid.
- The second step, namedself, will also referencemerchantGrid.
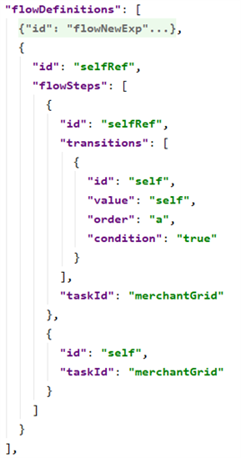
flowDefinitions
Self-transitioning flows can make it challenging for the user to exit the flow. Consider this scenario: a user enters data on the page and then clicks the
OK
button. The flow will redraw the page after having called outbound endpoints. If the user clicks the Cancel
button, the flow will take them to the last page they viewed which is the page they are on. There are a few approaches that can be taken to improve the user experience including adding a:- button widget on the page that will take the user to another page, for example the app's home page.
- cancelOverrideattribute at the presentation level to control the routing when theCancelbutton is pressed.
Example: If the desired behavior is to land the user on the Home page when they click
Cancel
, use the following code:"presentation" : { "cancelOverride": { "taskId": "root" }, "body": { ... } }