
Model Component Business Objects and Security Domains
Overview
In this chapter, we will create Model Component Business Objects and Security Domains. We will also bring data into our app with REST API calls.
Objectives
By the end of this chapter, you will be able to:
- Create model component business objects.
- Create and configure model component security domains.
- Use REST API calls in a PMD file.
- Create and configure grid widgets.
Introduction to Model Components
Data Components
Data components fall into the larger model component category.
With model components, you can create data logic and security components that are:
- Standalone.
- Related to other business objects.
- Native to the Workday Stack.
Within the data category, we have business objects and attachment objects.
Business objects are defined in App Builder. You can choose to create and define the business object using JSON in the code window, or define the business object name, fields, and other details using the visual editor.
You can create new objects and store app data in business objects. You can also create complex data models by relating objects to each other and other Workday-delivered objects.
When you create a business object, Workday automatically creates report data sources and REST API endpoints.
Attachment objects also fall into the data components bucket. Attachment objects allow you to store file data and images.
Logic Components
In the logic component category, you will find orchestrations and business processes.
Business processes, authored in JSON, are part of the model component category.
Business processes allow you to create new processes extending the delivered Workday business process framework.
You can process app data, capture approvals, trigger orchestrations, and create reports and audits around created business processes.
Orchestration components also drive logic capabilities.
Workday orchestrations allow you to create real-time, event-driven processes that interact with Workday and external systems.
Security Components
Security domains allow you to extend the configurable security model while also leveraging existing security groups and roles.
Author security domains using JSON in App Builder.
Important
: When you create new security domains for your Workday Extend apps, Workday recommends that you use the same naming conventions as Workday-delivered security domains. Refer to the documentation on the Developer Site for more details.App Component Lifecycle
Apps with model components can only be installed on Implementation, Sandbox, or Production tenants after the model components of the app deploy to the tenant as part of Workdays Weekly Service Update.
Important
: You must promote your app before a weekly deadline for new or updated model components.For the most up to date information on this time line, visit the Developer Site and search for "Promotion Deadlines."
Updates to Model Components After Promotion
Once your app has been promoted, you are only able to change certain attributes associated with your model components.
Make sure to visit the Developer site and search for "Updates After App Promotion" for an up-to-date list of allowed changes.
Common Key Values Across Model Components
This table displays the common key vales used across app components.
Key | Description |
|---|---|
id | Provides identity to components in an app. Maintains identity of elements across updates to an app. Integers only. |
name | Must be unique for each model component type within an app. Propagates to any technical names used in the tenant - Web Service or WQL aliases. |
label | Propagates to everything displays in the tenant to the end user. Must be unique. |
Security Domains
Security domains extend Workday's configurable security model to secure your app data. You can leverage existing security groups and roles to simplify access controls and provide page level security.
Defining and configuring a security domain is the recommended first step in building out your model components.
Important
: You will be required to identify a default security domain when creating your model component business objects.Tip
: Use standard Workday security domain naming conventions when defining new domains in App Builder:- Set-Up: (Insert Name)
- Self-Service: (Insert Name)
- Manage: (Insert Name)
- Audit: (Insert Name)
- Reports: (Insert Name)
- View: (Insert Name)
Reference the Developer documentation for additional information.
Security Limitations
There is a limit of 10 security domains per app.
When mapping out security requirements for your app, it is important to consider if you are using contextual security. If you are, you can add any security group to the security domains of your app.
If you have not applied contextual security, you can only add public groups or unconstrained groups to the security domains of your app.
If you want to apply contextual security to a
SINGLE_INSTANCE
field or attachment, set the "secureByTarget": "true"
attribute on the field.Business Objects
Workday Delivered vs Workday Extend Business Objects
This table compares Workday-delivered versus Workday Extend business objects.
Type | Workday-Delivered | Workday Extend |
|---|---|---|
Instance Type | Single instance, multi-instance | Same |
Field Types | Boolean, Currency, Date, Decimal, Instance/Reference, Text, Attachments | Same |
Field Level Security Domains | Yes | Yes |
Report Data Sources | Yes | Yes |
Available in Condition/Validation Rules | Yes | Yes |
Audit Trail | Yes | Yes |
Effective Dated | Some | No |
APIs | GraphQL, REST, SOAP | GraphQL, REST |
Translatable | Yes | No |
Purging | Yes | Yes |
Masking | Yes | No |
Tip
:
In your tenant, you can access the View Business Objects Available to Extend report to see which Workday-delivered business objects you can reference in your Extend app.Derived Fields
Derived fields are fields on a Workday Extend business object that you derive from other fields in the business objects of your app.
For example, imagine you have an Organization business object with a single-instance field called logo. You want to prompt users to upload a new logo if the existing one is too old. You could add a derived field to the Organization business object that stores a Boolean value for whether the logo was uploaded before 2020.
In the JSON for your business object, add derived fields as a sibling array to the standard fields array. Each derived field has the following properties:
Property | Description | Example
|
|---|---|---|
id | A number uniquely identifying this field within the derivedFields array. (If you are using Visual Mode, this property will be created for you.) Required. | 1 |
name | The name of the field. Must be camelCase and begin with a lowercase letter. Cannot contain special characters. Required. | logoUploadedBefore2022 |
label | A human-readable version of the field name. Must start with an uppercase letter or number. Only supports alphanumeric, space, hyphen, and colon characters. | Logo Uploaded Before 2022 |
type | The data type of the derived field's value. Accepts TEXT, DECIMAL, INTEGER, BOOLEAN, DATE. Required. | BOOLEAN |
expression | A PMD expression used to derive the field's value. Must reference at least one field from the same Extend business object or a related Extend business object in your app. Accepts logical, arithmetic, comparison, and string-based operations. For a full list of supported operations, check the Developer Documentation: Reference: Derived Fields. Required. | logo.uploadedDate.toYear().toNumber() > 2022
|
description | A human-readable comment explaining what this derived field represents. | This logo is old and might be outdated. Ask the user to upload a new version. |
When using derived fields, keep in mind:
- Extend uses Workday configurable security to secure derived fields, and generates a REST API for all derived fields in an Extend business object.
- If you use a related business object in an expression, the related business object must be a target of the primary business object. Extend supports only a single-level hop between objects.
- In your expression, you can chain function calls together as long as the final value meets the field type requirement. Example: Imagine your derived field's type isDECIMAL. You can usedateField.toString()to return text, while thelength()function accepts text as the calling type. You can chain these function calls together asdateField.toString().length().
Audit Trail
Standard audit trail report capabilities are available with Workday Extend business objects. It is important to fully understand reporting and audit expectations before you begin building out your app architecture and data model.
If your data model requires seeing details of each previous version of an object, your data model will require separate instances for each object version and needs to be part of your design considerations.
Business Object Limitations
This table displays business object limits.
Description | Limit |
|---|---|
Number of Instances | 10 million per tenant (shared across all Extend business objects and attachment objects in the tenant) Report: Extend Object Instance Count (secured by the Manage: App Manager domain) |
Number of Fields | 50 per business object |
Number of Derived Fields | 40 per business object |
Number of Fields You Can Index
| 5 per business object (in addition to SINGLE_INSTANCE fields that Extend indexes automatically) |
Number of SINGLE_INSTANCE and MULTI_INSTANCE fields | 10 per business object |
Restricted Field Names
Workday reserves a list of keywords that you cannot used as field names with business objects.
You can't use these case-sensitive keywords as a field name for any field on a business object:
- attachmentContent
- contentType
- descriptor
- displayID
- filename
- fileLength
- id
- wid
- workdayID
You can't use these case-insensitive keywords as a field name for any field on a business object:
- select
- from
- where
- limit
- order
- having
- group
- by
- asc
- desc
- as
- and
- or
- not
- is
- null
- empty
- in
- datasourcefilter
- entrymoment
- effectivemoment
You can't use these case-sensitive keywords as a field name for
SINGLE_INSTANCE
fields or fields with "enableIndex": true
on a business object:- offset
- bulk
- search
- sort
- type
- view
- name
For the most up-to-date version of this list, check the Developer Documentation: Reference: Reserved Field Names on Business Objects.
Business Object API Requests
Each business object you create generates an API. The business object API supports these HTTP methods:
- GET
- POST
- PUT
- PATCH
- DELETE
All the fields defined in the business object can be used in request bodies.
REST API endpoint information for your business object can be found using the App Manager report in your tenant once your app has been deployed to a tenant.
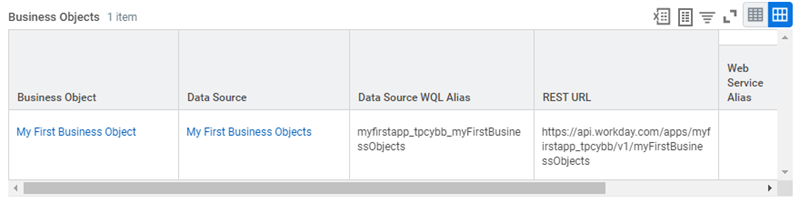
App manager business object REST URL
REST vs SOAP
If you are familiar with Workday Integrations or Workday Studio, you are aware of Workday SOAP APIs. SOAP is an acronym for
S
imple O
bject A
ccess P
rotocol. SOAP is the original protocol used by web services. SOAP is an XML-based protocol.REST is an acronym for
Re
presentational S
tate T
ransfer. REST is a more current protocol used by web services.REST:
- UsesJavaScriptObjectNotation, or JSON.
- Is lightweight.
- Is faster to parse.
- Uses less bandwidth.
- Has more browser support.
REST is used by many of the prominent web service providers.
Payload Differences of XML versus JSON
The following table illustrates the payload differences between XML and JSON. Both examples represent a list of employee names.
In the XML example, notice all the opening and closing tags and how they add to the overall weight of the payload. Then notice how much lighter the JSON example is in comparison.
Format | Example
|
|---|---|
XML |
|
JSON |
|
Workday Extend makes use of REST web services and JSON for the payloads; you will also be using JSON to build your Workday Extend apps.
Important
: While Workday Extend apps are written using JSON, you are able to leverage data formatted in XML with orchestrations. Orchestrations are real time event-driven processes.REST API Explorer
The REST API Explorer is a resource that documents Workday-delivered endpoints. It also provides an interactive interface that you can use to test out endpoints by sending requests to a tenant.
Navigating the REST API Explorer
The REST API Explorer groups endpoints into categories (e.g., Expense). Each category has a unique base URL (e.g.,
https://api.us.wcp.workday.com/expense/v1
). You can see the full list of categories in the sidebar.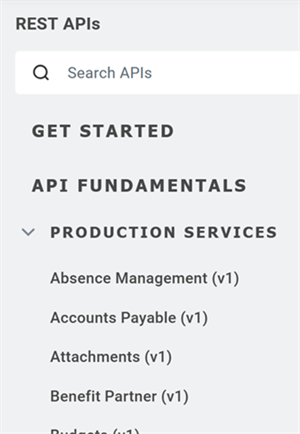
You can drill down into a specific category to see a list of collections for that category. Entries is an example of a collection. Within a collection, you can see the actual API operations available, like
GET /entries/{ID}
. The image below shows the API methods available for the Expense Entries category. You can easily identify if the operation is a GET, PUT, POST, DELETE, or PATCH. You can also see a list of parameters available for use with that operation, indicated by the curly brackets in the operation name. For example, the
GET /entries/{ID}
operation requires an ID
path parameter.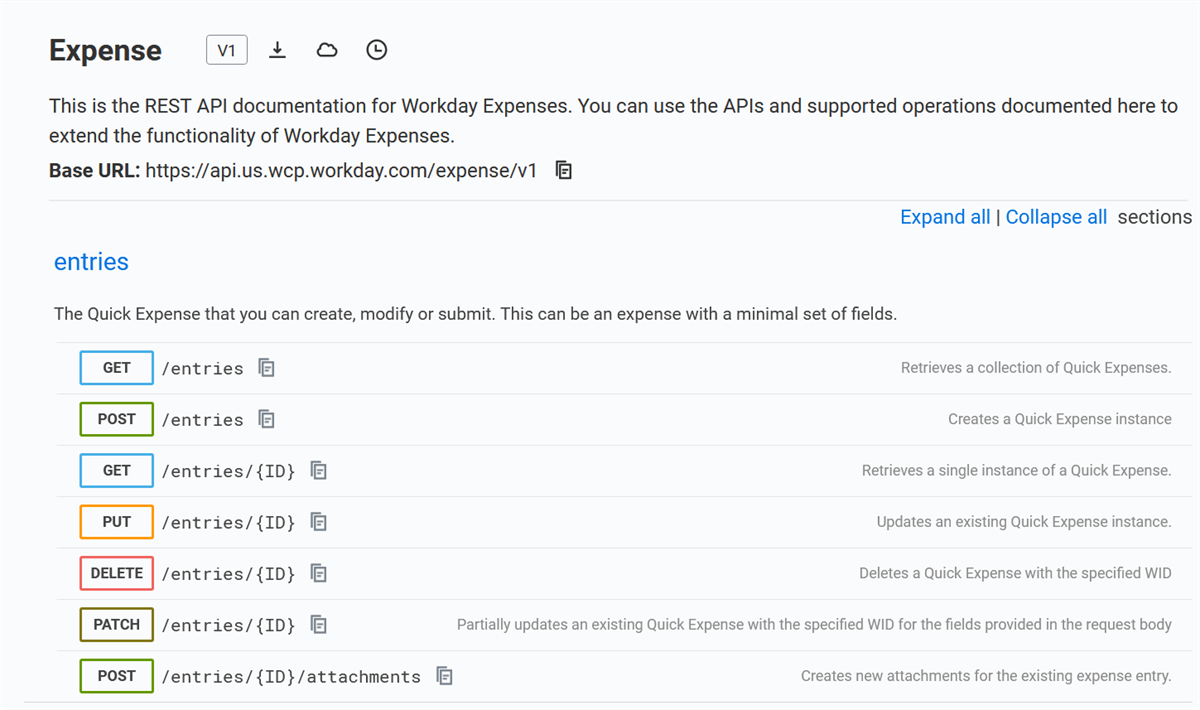
You can expand an operation, like
GET /entries
, to test the operation directly from within the REST API Explorer. These operations affect the data in your tenant, so be careful not to edit or delete any data you still need!When you're ready to use the operation in your Workday Extend app, you'll need to use the endpoint URL. To determine the full URL for an operation, start with the base URL for the category and then append the URL for the operation. For example, the full URL for the
GET /entries
operation is https://api.us.wcp.workday.com/expense/v1/entries
.Testing Using the REST API Explorer
The REST API Explorer allows you to test operations. Before testing, you must authenticate by signing into your Workday tenant. Authentication uses the API Gateway.
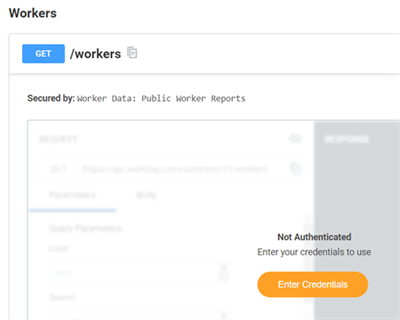
REST API Explorer is not Authenticated
After authenticating, the screen will display the details of the operation, including:
- Request Parameters
- Request Body Schema
- Response Status Schemas
The page will display different sections depending on the API operation you selected. In the following image, the initial page shows query parameters. You can enter values into the Parameters tab, such as specifying 100 for the Limit parameter.
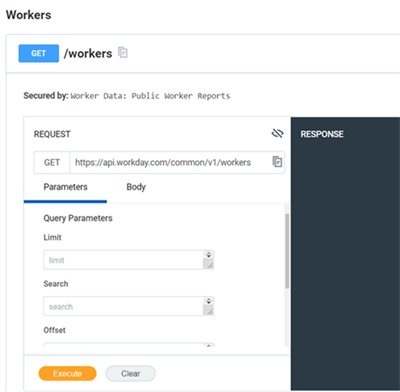
REST API Explorer Authenticated and Ready to Test an Operation
Below the parameters is an Execute button. After executing an operation, Workday returns data to the response section. In the following image, the
GET /workers
response contains a total
attribute with a value of 469, which means that there are 469 workers in our tenant.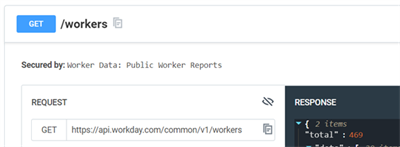
Testing API to Get All Workers
The response also includes a
data
array containing the actual workers, or rows of data. In JSON, arrays start at index 0
. To access the first item in the data
array, use data[0]
.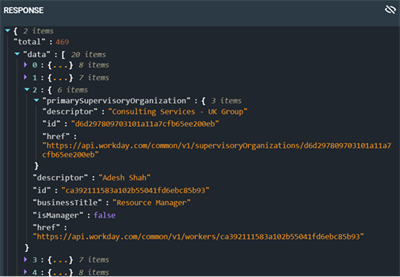
API Response is Zero-Based
Note
: All the Workday REST API methods return data in JSON format.
The REST API Explorer does not allow you to upload or download files. If you need to test that type of functionality, use Postman or another third-party tool.API Method Limits
Most API operations have a
limit
parameter. If you called the GET /workers endpoint, the response shows 469 workers in the tenant. However, the response will not contain all 469 workers. The response would stop at worker 19, as displayed here.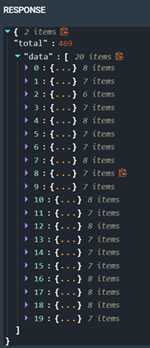
API Response Only Shows 20 Workers
Since JSON uses zero-based numbering, the worker at array index 19 is really the 20th item in the array. In other words, API operations are limited to 20 items by default. (Notice the "20 items" at the top of the
data
array.)What happens if you want to review all 469 workers? You may try to enter 469 into the
limit
parameter. However, the response now gives a different message: "Invalid request: limit parameter invalid: must be between 1 and 100."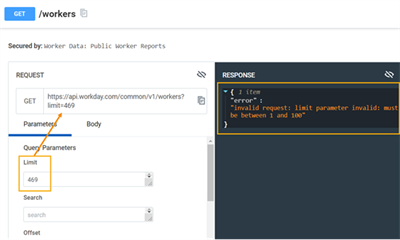
Entering an Invalid Limit Parameter
In other words, the
limit
parameter has a maximum value of 100. So how do you view workers past the first 100? You use the offset
parameter. For example, if you put 100 in the limit
parameter and 100 in the offset
parameter, the endpoint will skip over the first 100 workers and give you the next 100 workers (worker 100 through worker 199) in the response.If you put 400 in the
offset
, and 100 in the limit
, then you would be able to view the last 69 workers. In essence, you will have to page through the data, retrieving limit
objects at a time.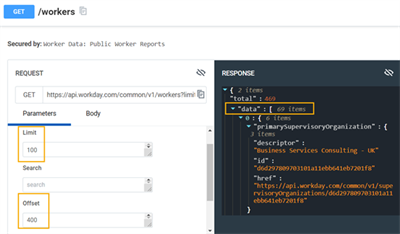
Requesting to See the Last 69 Workers
These limits are important to remember. Later, you will create a
grid
widget and populate it with an API call. If you notice only 20 rows, you should think back to this discussion.Request Parameters View
When you are looking at an operation, if you scroll down after the Request-Response area, you will see other views containing valuable information. The first is the Request Parameters view. Here you can get more information like the data type and a description of the parameter. These parameters are for the Expense GET /entries operation:
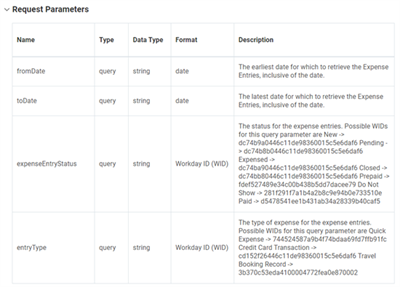
Sample Request Parameters Documentation
Request Body Schema
For methods like PUT or POST, you may want to look at the Request Body Schema section. Here you see a sample request body. This body is not well-formed JSON, due to the inline comments (
//
). But it does provide information about what each field represents, each field's data type, and which fields are required.The following request body schema is for creating a new mobile expense. You can see that the date the expense was incurred is a required attribute.
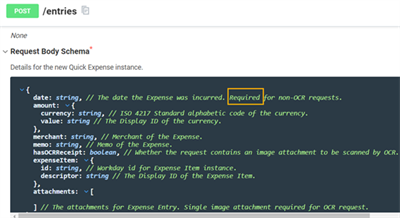
Sample Request Body Schema Documentation
Response Status Schemas
Response status schemas include the HTTP codes you can expect when making an operation call. Generally, a status code of 200 means the request was processed successfully, and a status code in the 400s means an error occurred.
These responses are possible when calling the POST operation to create a mobile expense:
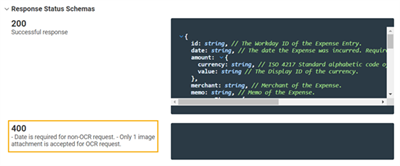
Sample Response Status Schemas Documentation
Methods to Update Data
PUT or POST operations change data. You will use the Body tab for operations that change data. You could build your request body by calling a GET, which returns well-formed JSON. Then, copy the GET response to the Body of your PUT or POST, and make the necessary edits before you select Execute.
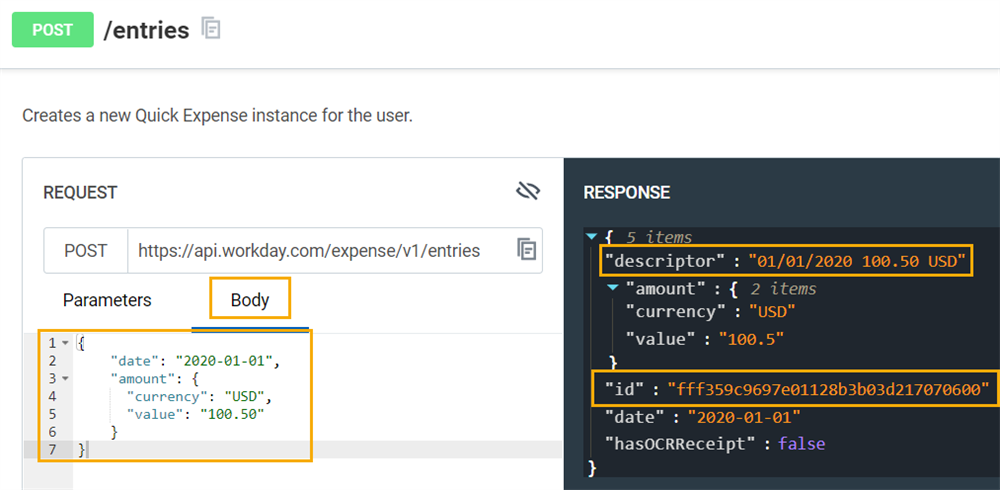
Successful Expense API POST Example
Looking at the response from the POST, it is important to note the following:
- A WID (id) for the new mobile expense was returned.
- Adescriptorfor the new mobile expense was returned. In this case, thedescriptoris an automatically created calculated field. It is a concatenation of the individual attributes passed in the request body.
The REST API Explorer will also show responses for unsuccessful requests. Sometimes, errors occur due to invalid formatting in the response body. In the following example, the double-quotes were left off of the date attribute, resulting in the response errors displayed to the right.
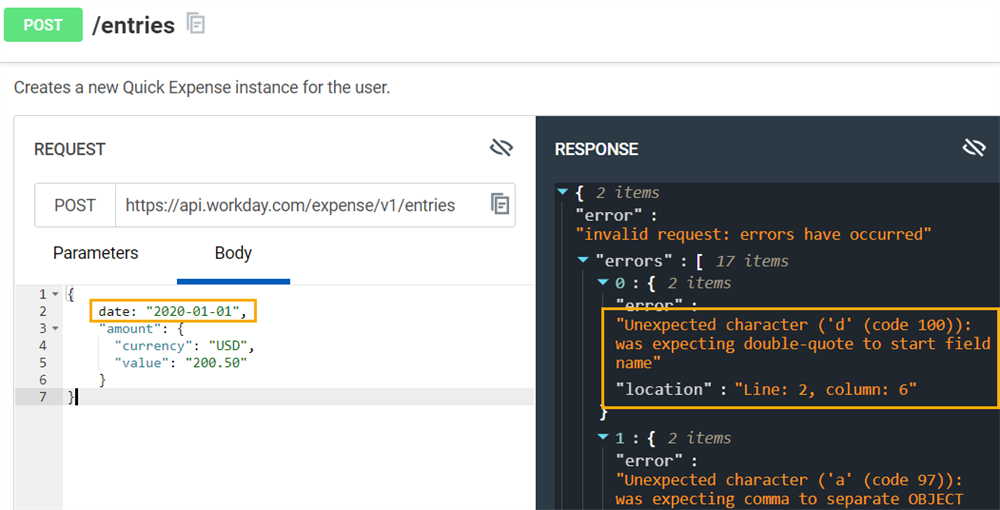
Unsuccessful Expense API POST Example
Outbound Endpoints
Another way to create an edit page is by adding an
outboundData
object to the PMD file.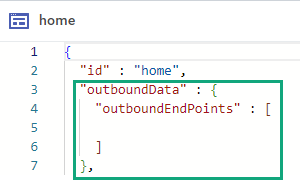
Default outboundData Object on an Edit Page
However, the existence of the
outboundData
object is not enough to make the page function as an edit page. Widgets will not be editable. Here is the code for a text widget:{ "type": "text", "label": "Hello World!", "value": "Welcome from Workday!" }
When we run the page, the text widget is not editable, even though we specified the page was an Edit page by adding the
outboundData
object.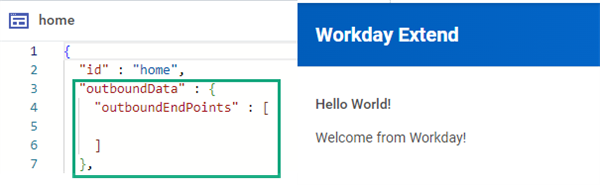
outboundEndPoints view only - missing dummy value
To make the page editable, you need to define something in the
outboundEndPoints
array. For example:{ ... "outboundData": { "outboundEndPoints": [ { "type": "outboundVariable", "name": "dummy", "values": [] } ] } ... }
Now, widgets on the page are editable.
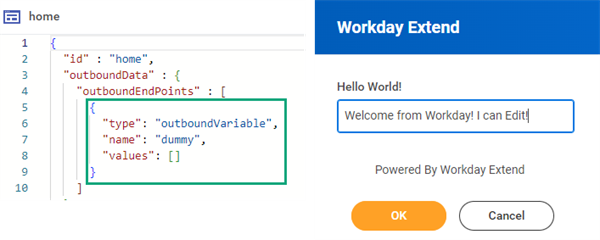
outboundEndPoint with dummy variable makes the PMD an edit page.
Edit pages will have OK and Cancel buttons. Workday Extend automatically defines these buttons.
By default, the user will enter data and select OK. The
outboundEndPoint
submits the data to a REST API. If successful, the user will return to the prior page. If the user selects Cancel, the outboundEndPoint
does not submit the data. To achieve different page navigation results, you can create a page flow to control how the user moves between pages in your app.Your
outboundEndPoints
are given a name
so that your widgets can communicate with the correct outboundEndPoint
. Like endPoints
, outboundEndPoints
can reference a dataProvider
that has been defined in the AMD.Attribute | Description |
|---|---|
name | A unique name that can be used in code references |
url
| A resource URL |
baseUrlType
| The base URL for the API. The name here relates to a corresponding name in your dataProviders array in the AMD. |
authType
| The authorization for this API call. The value here relates to a corresponding id in the authTypes array in the SMD. |
httpMethod
| For specifying what REST method you want to call, like PUT or POST. The default, if not specified, is POST. |
headers
| Optional. Include if required by the endpoint. |
Note
: Use the httpMethod
key to define the type of REST method you want to call. By default, the outbound endpoint defaults to a POST method. Also, Presentation Components apps do not require the use of the headers array, unless you need to pass some specific information to the REST service.In order to build an
outboundEndPoint
, you will need to know the structure required by the API. The REST API Explorer is always your source for determining API structure. For example, the Expense /entries PUT operation requires a Workday WID in the URL path. Notice that the Path Parameters section includes a required ID field. The value of this ID replaces the {ID}
part of the request URL.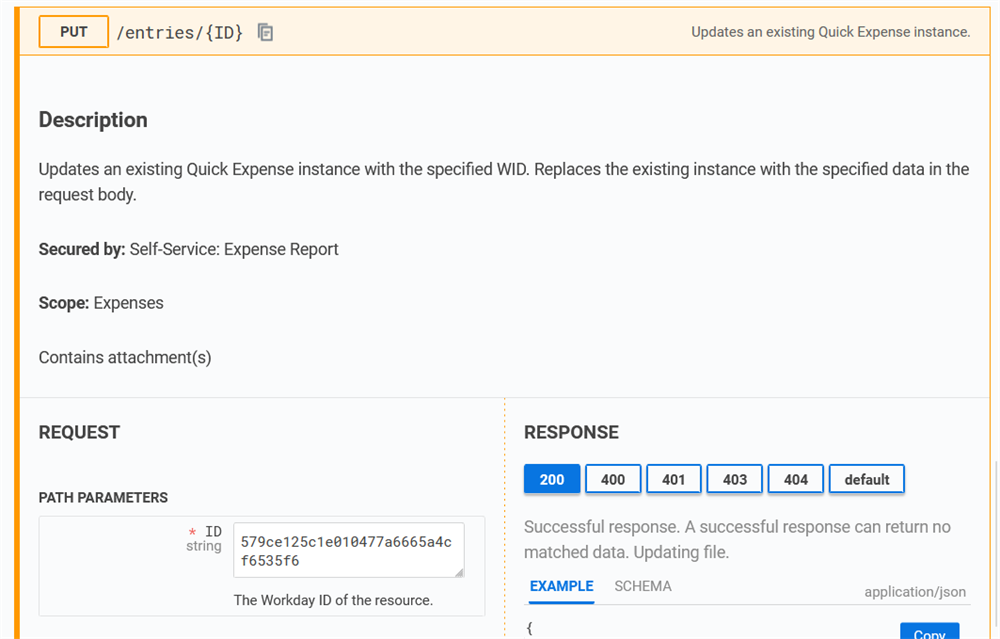
Learn API Details from the REST API Explorer
In your PMD file, you can use PMD scripting to insert an ID value using a PMD expression. For example, the code snippet below shows how you might call the Expense
PUT /entries
operation using the ID of an expense selected from an instance list widget:"outboundEndPoints": [ { "name": "putExpense", "baseUrlType": "WORKDAY-EXPENSE", "url": "<% `/entries/{{expenseSelectWidget.value[0]}}` %>", "authType": "sso", "httpMethod": "PUT", "onSend": "<% ... %>" } ]
Payload Structure
When making a request to an API that accepts a payload in the body, it is imperative to understand how the structure of that payload should appear. Many APIs will even require a request's body to contain a payload (ex: PUT and POST). Use the payload to typically set the values of fields on an instance. The data type of those fields will dictate the structure and values of your JSON.
{
  "fieldNameText": "my text here",
  "fieldNameDate": "2022-09-22",
  "fieldNameDecimal": 12.99,
  "fieldNameInteger": 12,
  "fieldNameBoolean": false,
  "fieldNameCurrency": {
    "value": 12.99,
    "currency": "USD"
  },
  "fieldNameSingleInstance": {
    "id": "WID of obj here"
  }
}
Inbound Endpoints
The most common root variable used in PMD expressions is
endPointN
ame
. You can use the endpoint's name
as a pointer to the endpoint's response object."endPoints": [ { "name": "expenseData", "baseUrlType": "WORKDAY-EXPENSE", "url": "/entries", "authType": "sso" } ]
If you need a reference to the actual endpoint object itself, use
endpoints.endPointName
(e.g., for the endpoint object above, endpoints.expenseData
).endPoint Attributes
Attribute | Description |
|---|---|
deferred | If true, page doesn't call the endpoint on page load. Can use to retrieve data after initial page load, e.g., when the user interacts with a page action button. |
exclude | If true, the page doesn't call the endpoint. Allows invoking an endpoint on certain conditions. |
isCollection | If true, retrieve data for all available rows in a single response.
Note : Don't use isCollection with extremely large data sets. It can overwhelm the system as it fetches the entire data upfront, which will slow down your page. |
Writing Expressions Against an Endpoint Response
A common use of expressions is to set values in widgets to display data on a page. Imagine you have a PMD page with an inbound endpoint named
worker
. The endpoint returns the following data:{ "primarySupervisoryOrganization": { "descriptor": "4300 Payroll (For BFT use)", "id": "31fd8a267e4b4375aa8ff594033193cf", "href": "https://api.workday.com/common/v1/supervisoryOrganizations/31fd8a267e4b4375aa8ff594033193cf" }, "organizations": [ { "descriptor": "4300 Payroll (For BFT use)", "id": "31fd8a267e4b4375aa8ff594033193cf", "href": "https://api.workday.com/common/v1/supervisoryOrganizations/31fd8a267e4b4375aa8ff594033193cf" } ], "location": { "descriptor": "San Francisco", "id": "d13a7c46a06443c4a33c09afbdf72c73" }, "descriptor": "1099 Analyst_500.1", "dateOfBirth": "1962-07-25", "supervisoryOrganizationsManaged": "https://api.workday.com/common/v1/workers/ad3b6e21b21b100301e6c888e90816da/supervisoryOrganizationsManaged", "primaryWorkAddressText": "2489 Razorback Way, Allgood, AL 35013", "id": "ad3b6e21b21b100301e6c888e90816da", "primaryWorkEmail": "TestWorkEmail@workday.com", "businessTitle": "1099 Analyst", "isManager": false, "href": "https://api.workday.com/common/v1/workers/ad3b6e21b21b100301e6c888e90816da", "yearsOfService": "5" }
Here are some expressions written against the response, including the values that the expression would return:
Expression | Value |
|---|---|
<% worker.primaryWorkEmail %>
| "TestWorkEmail@workday.com" |
<% worker.isManager %>
| false |
<% worker.location.descriptor %>
| "San Francisco" |
<%
worker.organizations[0].descriptor
%>
| "4300 Payroll (For BFT use)" |
Limitations
There are a few limitations to keep in mind when calling endpoints on your app pages.
Each endPoint has a maximum of 25,000,000 byte response data. If your endPoint hits this limit, processing will stop, you will receive a
RestResponseRooLargeException
error in the logs, and an internal server error (500) will present for that page.If an endPoint does not retrieve data in 24 seconds, a timeout error will occur.
Pages as a whole have a 60 second timeout. This can become an issue when you start dealing with multiple endPoints on a page.
Data Providers
Up to this point, you have hard-coded the full REST URL on each of your pages. To make your data calls more repeatable and allow for quicker development, you can define a data provider to use with your inbound and outbound endpoints.
A data provider is a key-value pair that connects an API URL with a unique name. You can define a data provider in your app's App Metadata (AMD) file. For example, the following AMD file includes a data provider called COMMON, which points to the URL
https://api.workday.com/common/v1
.{ "appProperties": [], "tasks": [], "dataProviders" : [ { "key": "COMMON", "value": "https://api.workday.com/common/v1" } ], "applicationId": "mealOrder_tpcybb" }
Once you've defined a data provider in your AMD file, you can use it in your PMD files by adding a
baseUrlType
attribute to your endpoints. Your endpoint determines the full URL to call by combining the baseUrlType
attribute and the url
attribute. For example, the following endpoint will send a request to https://api.workday.com/common/v1/workers
.{ "name": "getWorkers", "baseUrlType": "COMMON", "url": "/workers", "authType": "sso" }
Using data providers makes your code easier to read, because you can quickly see which API operation your endpoint is calling.
Data providers also make maintaining your code easier. If your API URL changes down the line, you only need to update it in one place (your AMD file), and then the new URL will be used everywhere you use the data provider.
Data Providers and Model Component Business Objects
The
dataProvider/endPoint
pattern works well with model component business objects.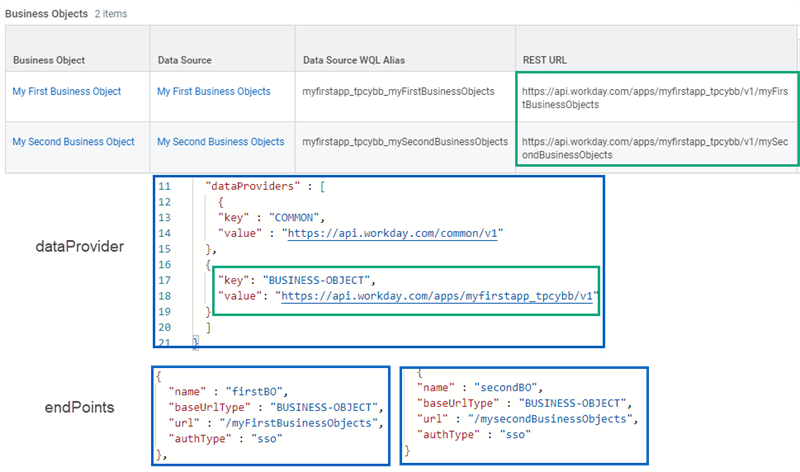
Multiple business objects can use the same baseUrl in the .AMD
Every business object you define will have the same
baseUrl
. Create the dataProvider
once in the .AMD
and reference it throughout your app for the calls to the different model component business objects.Grids
The grid widget displays data in a table format comprised of rows and columns. Grids can be used on view and edit pages. A grid on an edit page enables users to add, modify, and delete row data.
To populate the grid rows with data, set the following grid attributes:
- rows: A list containing the data for the grid rows.
- You can use an endpoint, script, or function that returns a list.
- If you use an endpoint, you will likely use the formendPointName.datato access the list of objects returned by the endpoint.
- rowVariableName: A variable name that represents the data element on the row.
- When you define the grid columns, userowVariableNameto reference the fields within the data element for a given row.
- To reference a field value to display in acellTemplate, useyourRowVariableName.theFieldName.
Next, you define the columns that make up the grid. Columns will contain instructions on the label to display in the grid header as well as the data to display on the grid row.
The example below shows how to create a grid widget using data from the
requisition
endpoint. This grid has one column, but you can add additional columns.{ "type" : "grid", "rows": "<% requisition.data %>", "rowVariableName": "requisition", "columns": [ { "type": "column", "columnId": "requesterIdCol", "label": "Requester ID", "cellTemplate": { "type": "text", "value": "<% requisition.requester.id %>" } } ] }
Grids also allow you to update data. When updating data, keep the following in mind:
- By default, updates for eachgridrow are submitted individually. If 10 rows change, 10 calls to the API are made.
- Grids have anisArrayOutBindingthat you can use to POSTgriddata in a single request.
Variables for accessing elements in a collection
Some widgets, such as a
grid
, allow developers to specify an implicit variable name. These implicit variables refer to the current row of data in a collection. These variables act as an iterator, pointing to the current row. Below are the implicit variables defined for each widget that is associated with a collection of data.Widget Type | Variable Name Attribute |
|---|---|
loop
| as |
grid | rowVariableName |
panelList | panel |
facetList | facetVariableName |
instanceList | as |
URL Parameters
There are two types of parameters a developer can access from the URL loading the page.
- Route Parameters
- Query Parameters
Query Parameters
Query parameters are key-value pairs that pass additional data into a page at the end of the URL. A "
?
" separates the URL from the first parameter. For example, in the URL
www.workday.com/home/55?user=David
, you are passing a query parameter named user with a value of David.You can pass multiple query parameters into a URL by separating them with the ampersand (
&
) character. For example, the URL
www.workday.com/home/55?user=David&location=Atlanta
contains two query parameters: user
and location
.The receiving page can access the query parameter's value using the
queryParams
global variable. In the example below, the text widget will display the value of the user
query parameter ("David").{ "type": "text", "label": "Query Parameter", "value": "<% queryParams.user %>" }
Note
: To use a business object field as a query parameter, you have to set the enableIndex
attribute for that field to true
. (Exception: you do not need to apply enableIndex
to SINGLE_INSTANCE
fields. Workday Extend indexes those fields automatically.)Workday Extend can index up to 5 regular fields on Extend business objects or attachments.
Security Note
: Be careful when exposing app data in your URLs. Query parameters can be manipulated by users in their browsers, which can be a security risk. It is a good idea to sanitize your query parameter values before using them, to avoid unintended consequences.Route Parameters
Route parameters appear as part of the URL path. For example, in the URL
https://api.workday.com/common/v1/workers/1234/inboxTasks
, the worker's ID (1234) is a route parameter.You can use route parameters to persist parameter values on a page after a user navigates back to it from a page flow.
Example: A page starts a flow and needs to persist parameters after the user navigates backwards either by:
- Clicking Cancel during the page flow.
- Clicking the Back button on the browser.
- Completing the page flow.
To use a route parameter, you first need to update the task's
routingPattern
in the AMD file. For example, if your app has a page that navigates to a viewWorker page for a particular worker, you might update your task definition to the following:{ "id": "viewWorker", "routingPattern": "viewWorker/{workerId}", "page": { "id": "viewWorker" } }
Next, you need to add in a route parameter to the places in your app that link to the viewWorker page. In a button widget, you can use the
taskReference.parameterBindings
attribute to specify a value for your workerId
route parameter:{ "type": "button", "action": "LINK", "label": "View Worker", "taskReference": { "taskId": "viewWorker", "parameterBindings": { "workerId": "<% currentWorker.id %>" } } }
Finally, on the viewWorker PMD page, you can use the
routeParams
predefined variable to access the value of the workerId
route parameter:{ "type": "text", "id": "workerParam", "label": "The workerId path parameter value is...", "value": "<% routeParams.workerId %>" }
Micro Pages
Micro pages are created by adding a
"micro": true
attribute to the presentation
object.{ "id": "workdogCreate", "outboundData": { ... }, "presentation": { "micro": true, "title": { ... }, "body": { ... }, "footer": { ... } } }
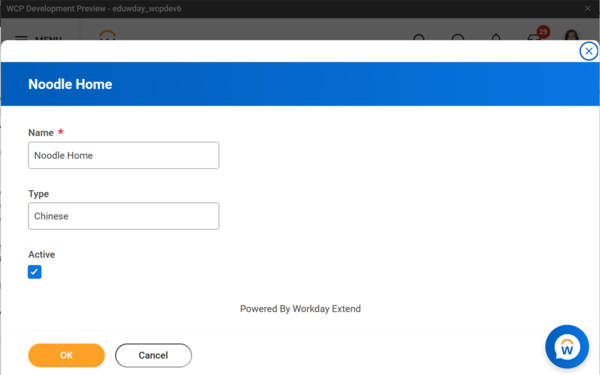
This will render the page as a pop-up window. For example, the following images show the same edit page rendered normally (without a
micro
attribute) and as a micro page (with "micro": true
).
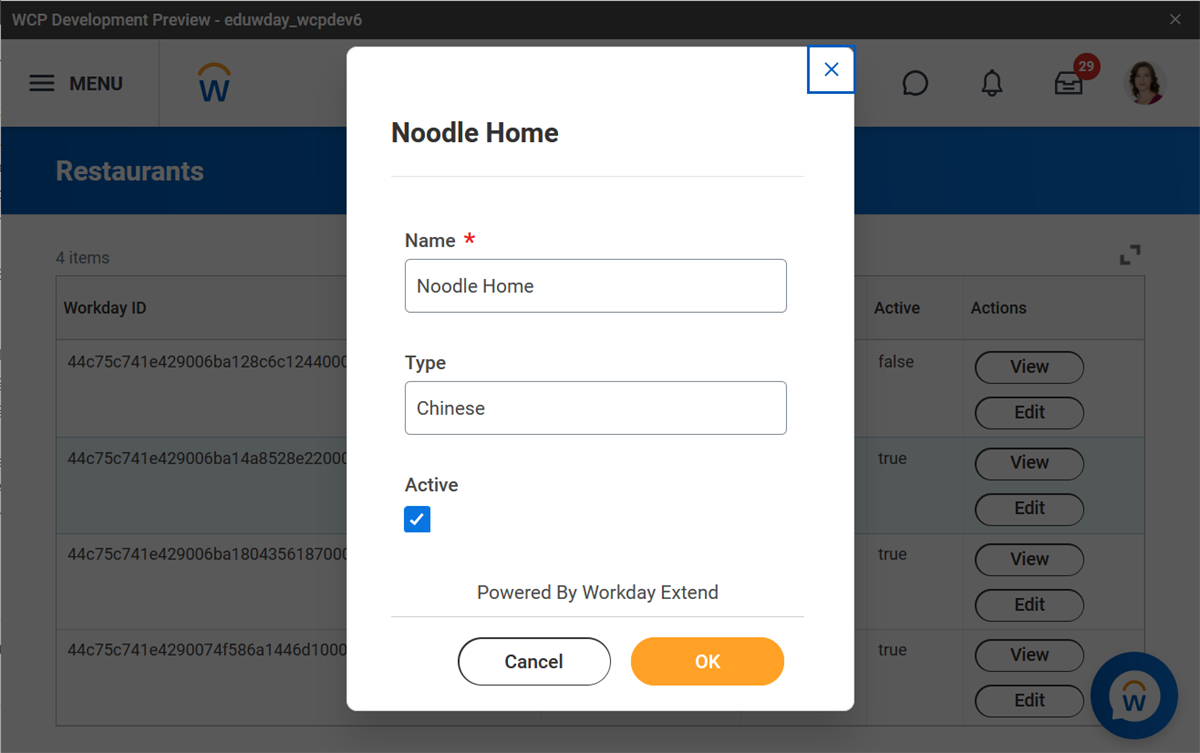
This development pattern lends itself well to an edit flow.
Note
: Micro edit flows can only start from a view page.Tip
: The Developer site has additional information on attributes to include in follow on pages for flows using the micro page pattern.