
Campus Engagement Framework
Overview
One of the most important functions of the Workday Student system is to provide the ability for institutions to communicate, or engage, with students and prospective students. The campus engagement framework provides a flexible set of tools to help you recruit students, communicate deadlines, enforce holds, request information, and more. In this chapter, you will explore the campus engagement framework and examine some of the key configurations involved.
Objectives
By the end of this chapter, you will be able to:
- Define the campus engagement framework.
- Identify student audiences.
- Identify engagement items.
- Define engagement plans.
- Analyze email analytics for engagement plans.
The Campus Engagement Framework
Workday Student uses campus engagement, a framework for your institution to communicate with your prospective and matriculated students.
Components of Campus Engagement
There are many functional components that make up the campus engagement framework: engagement items, engagement plans, student appointments, student audiences, student documents, student holds, and student notes. Review the table below for a high-level review of all the components.
Component | Definition |
|---|---|
Engagement Items | The communication items that are being sent to students and prospects, their parents, guardians, or other proxies. |
Engagement Plans | The plans for sending coordinated communications to students and prospects, their parents, guardians, or other proxies. |
Student Appointments | The feature that enables your students to schedule appointments with their advisors using Workday. |
Student Audiences | The primary method of defining groups of prospects and students for campus engagement. |
Student Documents | The feature that gives you the flexibility to send documents to students for review as and when needed. |
Student Holds | A block you place on processes, such as registering for classes or receiving financial aid. The hold is in place until the student resolves the reason for the hold. |
Student Notes | The feature that allows you to capture and communicate important information, such as conversations and decisions, to others in the institution. |
Student Notifications | Notifications sent to students and prospects in daily digest or push notification form. |
Student Recruiting and Admissions
The campus engagement framework is used across Workday Student but it serves an especially important role for student recruiting and admissions. The campus engagement framework provides a way for your institution to communicate with your prospective and matriculated students, and to record these communications. These types of communication can include:
- Emails you send as part of a campaign to recruit a set of student prospects.
- Invitations to recruiting events.
- Mobile push notifications of holds on student accounts.
- Printed letters sent to admitted applicants.
You will use campus engagement to create emails to send to prospective students and keep them informed. You can use these emails for:
- Inviting or confirming attendance to recruiting events.
- Letting students know when events cancel or move.
- Keeping students informed of important dates or application requirements they must meet.
You will also create engagement plans to specify who will receive which email items. Engagement plans also determine the schedule of when prospects receive specific email items, and to which address you should send them. Additionally, you can create student notes to help you track conversations with prospective students, making sure your admissions counselors are keeping up with the needs of your prospects.
Student Audiences
One of the first things to understand when discussing prospect engagement is student audiences. Student audiences are the primary method of defining groups of prospects and students for campus engagement. Once created, you can then use the student audience to specify who will receive an engagement item. You can also reuse student audiences for other engagement plans and in other areas of Workday Student.
There are two methods of creating student audiences: via a saved search or by using a custom report. Now, explore each of these methods.
Student Audiences from Saved Searches
The first method of creating a student audience is via a saved search. You can create a saved search from a Workday-delivered search report, such as
Find Students by Academic Record
or Find Student Prospects.
You can use the report to specify the criteria for your student audience. These reports have search facets that allow you to narrow the results to a targeted population and allow you to save your search parameters.For example, on the
Find Student Prospects
report, as shown in the following image, you can use the report's facet filters to identify a specific subset of student prospects. Once you have selected the appropriate facet filters, select Save to name your saved search. After you save your search parameters, you can use the Create Student Audience
task to identify that saved search as a student audience.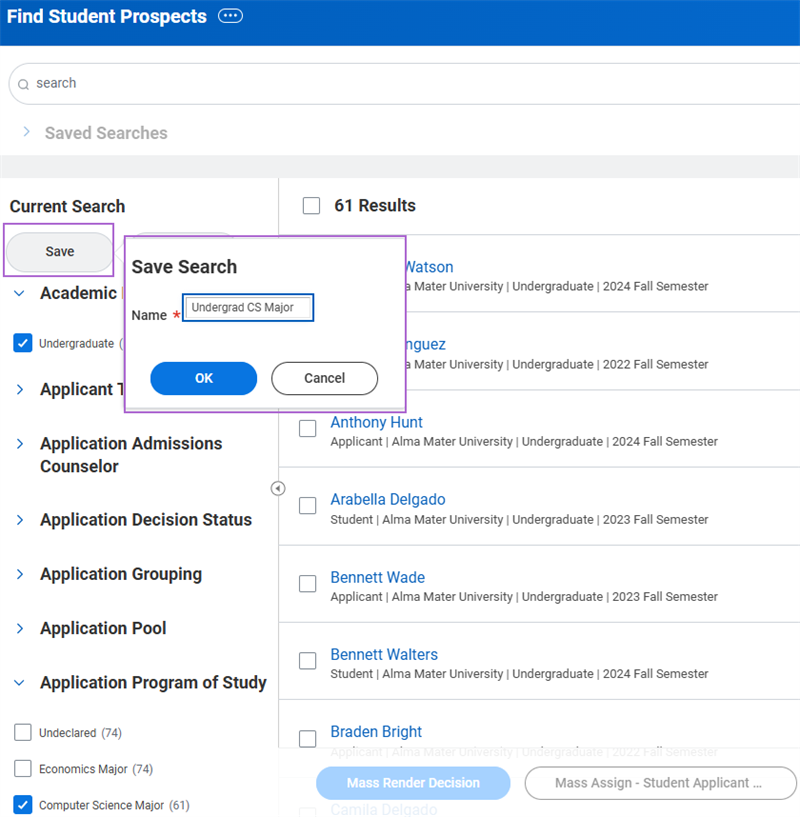
Once you designate a student audience, use it to create an engagement plan to send communications to that particular group of recipients.
Using the saved search method provides a relatively quick way to create a student audience. However, the system limits you to using the facet filters included on the search report to narrow down your desired population. If you wanted to use criteria not included in these filters, you may need to use a custom report to identify your population. And, although saved searches are simpler to create, you cannot share a saved search.
Student Audiences from Custom Reports
Another, more versatile method of creating student audiences involves using custom report definitions. To create a student audience with this method, first create a custom report that returns the specific audience you want to target. You can use either a simple search, or advanced report type, along with targeted filters, to make your student audience as broad, or specific, as you want.
After you have created the report, use the
Create Student Audience
task to identify that report as a student audience. You can then add the student audience to an engagement plan so that Workday can send communications to that particular group of recipients.The following table outlines which data sources you can use for the Workday Student Recruiting and Workday Admissions engagement categories:
Category | Use For | Allowed Data Sources |
|---|---|---|
Student Recruiting | Event - Invitation Plans and Ad Hoc | Student Applications Student Prospect Records Student Recruitments |
Admissions | Plans and Ad Hoc | Student Applications Student Prospect Records Student Recruitments |
The custom report method of creating student audiences does require some knowledge of the Workday Report Writer tool, as well as the reporting framework in the system. However, this method provides a powerful and versatile way to create a student audience using nearly any criteria filters that you require.
Student Audience Maintenance
Whether using a saved search or custom report, the audience dynamically updates as more students or student prospects are entered into your system. This means that once you create the parameters for the student audience, you do not need to maintain the parameters again. However, you do have the option to inactivate a student audience that your institution no longer requires, as well as reactivate a previously inactivated student audience. From the student audience's Related Actions, you can:
- Inactivate your student audience. Inactivating does not affect existing plans, but will prevent future plans from using your audience.
- Reactivate your student audience to allow use on future engagement plans.
Editing Student Audiences
There may be occasions when you need to edit an existing student audience. Use the
Edit Student Audience
task to make updates to an existing audience.Engagement Items
When communicating with prospects, you can divide campus engagement into two parts: engagement items and engagement plans. First, let's explore engagement items.
Engagement items are the communication items themselves. Engagement items can be SME messages, printed items, notifications, or emails.
Common examples of engagement items are an invitation email or an admission offer letter. You build these communication items in the system and mark them for specific purposes, such as student recruiting. You can then attach them to recruiting events or engagement plans, and the system will send them out in accordance with the configurations made.
Common usages of engagement items include:
- Student recruiting event communications (e.g., Invitations, schedule changes)
- Student prospect or application communications (e.g., Application requirements, document due dates)
- Student financials communications (e.g., Charges due, financial holds)
- Student records communications (e.g., Registration dates, academic plan changes)
SMS Messages
You can send engagement items via SMS messages to students. SMS, which stands for Short Message Service, is a text messaging service enabling users to send short text messages between mobile devices via a cellular network.
You must enable Workday Messaging to be able to send SMS messages. Enabling Workday Messaging in your tenant provides you with greater flexibility for sending engagement items and simplifies communication with students and applicants. View the SMS Compliance section on the
Edit Tenant Setup - Notifications
task. This section enables you to set up your SMS configurations and Terms and Conditions. For more information on how to configure Workday Messaging for Workday Student, go to Workday Community.Note
: At this time, Workday Messaging is only available for U.S. and Canadian mobile numbers.Printed Items
You can create customized, printed engagement items to use in an engagement plan. You can use printed engagement items as part of engagement plans, recruiting events, or even ad hoc communications. You can use the Workday Studio tool to create personalized print communications, such as mailing labels and letters, that include prospect names and addresses.
When you use printed engagement items, Workday notifies a designated mail coordinator when communications are ready to send. The mail coordinator is responsible for physically mailing off a given printed engagement item. When the schedule for a printed item is met, Workday sends a list of up to 1,000 eligible recipients to the mail coordinator's My Tasks. The coordinator then chooses to print the selected items, launching a background job that creates the PDF files.
Notifications
In addition to SMS messages and print engagement items, you can also send engagement items via notifications. Engagements can take the form of:
- Push Notifications
- Business Process Notifications
Now, explore each of these in more detail.
Push Notifications
You can engage with students using mobile push notifications for non-recruiting and admissions plans and ad hoc messages. When activated, these push notifications appear on a student's mobile device as an alert. You can create these notifications by using the
Create Student Message
task, just like email items.Note that push notifications are not available for Student Recruiting or Student Admissions purposes.
Business Process Notifications
You can use the business process notification functionality to include additional notifications that appear in a student's My Tasks. The system uses these for a variety of purposes. For example, you may create a To Do step to remind students to purchase a cap and gown when they apply for graduation.
Many business processes have prebuilt notification steps. Many financial aid and student financial business processes notify students of updates to their accounts or financial aid information. Another common use for business process notifications is in student holds. Student Hold business process definitions frequently include notifications to send to a student's My Tasks, letting them know about their hold and how to resolve it.
Email Items
Most of the student engagement items you create will be student emails. When creating a student email, identify the category (e.g., Admissions or Student Recruiting). This category determines what options are available in the Use For field. Your selection in the Use For field determines where the email will be available for use. The following table includes a description of the Admissions and Student Recruiting categories and the different Use For options for each.
Category | Use For | Description |
|---|---|---|
Student Recruiting | Event - Cancel Notice | Notifies a prospect of a recruiting event's cancellation. |
Student Recruiting | Event - Invitation | Invites a student prospect to attend a recruiting event. |
Student Recruiting | Event - Post-Event Follow Up | Engages with a prospect after they have attended a recruiting event. |
Student Recruiting | Event - Registration Confirmation | Notifies a prospect that they have successfully registered to attend a recruiting event. |
Student Recruiting | Event - Reminder | Provides pre-event reminders or event details for an upcoming recruiting event. |
Student Recruiting | Event - Reschedule Notices | Notifies a prospect of a schedule change for an upcoming recruiting event. |
Student Recruiting | Plans and Ad Hoc | Provides prospects or students communication relating to engagement plans and provides for quick one-time emails, push notifications, or printed communication. |
Admissions | Plans and Ad Hoc | Provides prospects or students communication relating to engagement plans and provides for quick one-time emails, push notifications, or printed communication. Push notifications are available for matriculated students only. |
Message Templates
You create emails using templates. There are two different message templates that exist in Workday: Email templates or Notification Designer templates. Next, you will explore each of these templates.
Email Templates
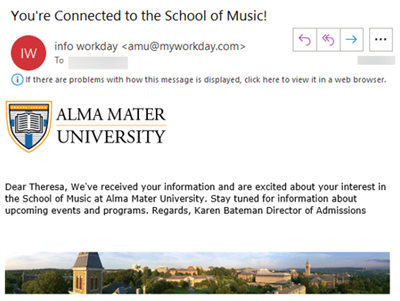
Email templates are the default templates that get sent with any message you create in Workday Student, unless you override it, when you create a message.
You can use these templates throughout Workday. Use the
Maintain Email Templates
task to maintain your active email templates.The following image is an example of a student email using a default email template:
Notification Designer Templates
You can use Workday Notification Designer templates as an alternative to standard default email templates. You can then use these templates to send notifications for specific Workday tasks, job alerts, and custom business processes. You can create multiple notification templates for each type of notification.
To use Notification Designer for student emails, you, or your administrator, will need to complete some initial configuration steps. You must:
- Enable Workday Drive and Notification Designer domains.
- Opt in to the Notification Designer Service using theInnovation Services Opt-Intask.
- Obtain and sign the Innovation Services agreement.
Once the initial configuration steps are complete, you can create and manage the layout, design, and content of a notification template. What is especially powerful about Notification Designer is that it enables you to craft personalized and engaging student messages. To configure a Notification Designer template, follow these steps:
- Create the Notification Designer template file in Workday Drive. Select a prebuilt notification layout or you can design your own.
- Design the template. You can insert images, dynamic and static buttons, rich text, social media links, and other content areas. You can also share the notification template with others, and collaboratively edit the template with other who have edit access.
- Publish the template. Publish the notification template so you can use it when sending notifications.
- Activate your template to make it available for selection across categories. Use theMaintain Notification Templatestask to maintain your active notification designer templates.
- Attach the template to the messages you create.
Calls to Action
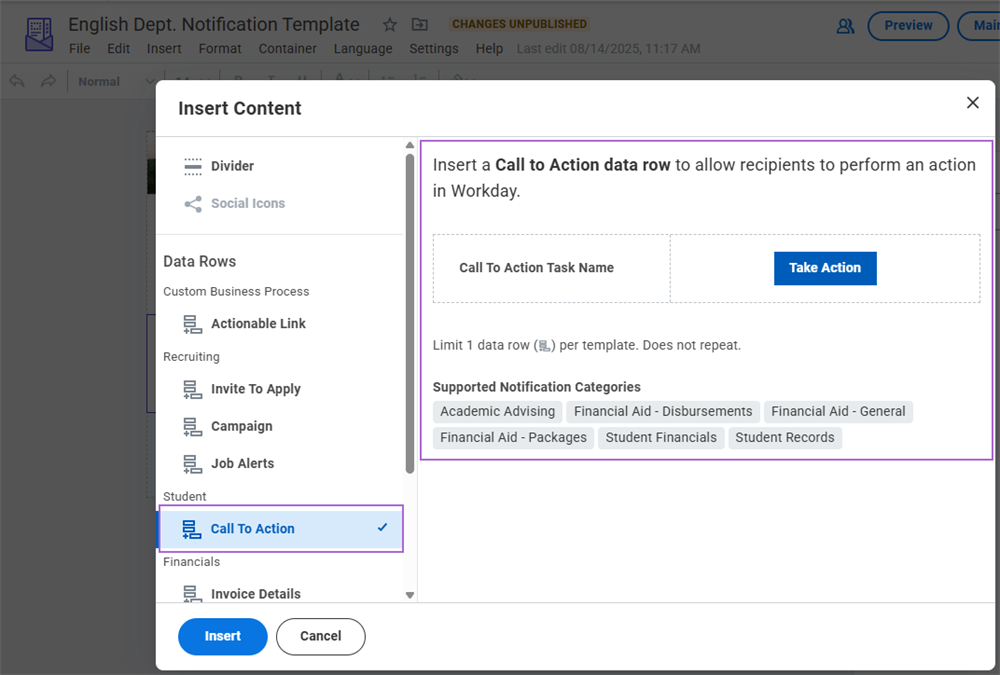
When using Notification Designer templates, you can include a call to action. For instance, you might create a call to action for students to make a payment, or view classes. When students get the message, they can select the corresponding button to complete the action. Calls to action makes it easier for you to prompt responses from students in a wider range of contexts.
Because this feature uses Notification Designer templates, you need to create, publish, and enable a Notification Designer template to be able to use it. To include a call to action, you need to complete these steps:
- Enable Notification Designer.
- Create and publish a notification designer template with a call to action row.
- Activate the Student notification types that can use your notification designer template via theMaintain Notification Templatestask.
You can include a call to action row for Academic Advising, Financial Aid, Student Financials, and Student Records functional areas as shown in the following image. Note that you can use the notification designer template for Admissions and Student Recruiting messages but you cannot include a call to action.
Composer Format
You can view your Notification Designer template design as you compose a message, helping you better visualize what the final message looks like. Composer Format for Student Messages lets you see the email as you create it, giving you a preview of what it will actually look like with graphics, colors, and text included.
You can also include conditional content in student messages that use the Composer Format message type. When you create a Composer Format message, you can tag portions of the message with student condition rules that are based on business objects that are eligible for the category of the student message.
Because this feature uses Notification Designer templates, you need to create, publish, and enable a Notification Designer template to be able to use it. After you have created, published, and enabled your Notification Designer template, use the
Create Student Message
task to use Composer Format. On the task, in the Message Type field, select Composer Format. Selecting Composer Format allows you to view a preview of the message. You can type in to the preview display to directly edit text, subject, display names, and reply to fields. You can use Composer Format to create a student message of any category.Creating Engagement Items
You can use the
Create Student Message
task to create new engagement items. When creating engagement items, there are several fields you need to be aware of. Keep in mind the following considerations when creating your engagement items.Name
Consider the naming convention that your institution wants to use for engagement items. Remember, there may be many engagement items in your system. Including the intended engagement plan use, academic period, or other information in the name may help you stay organized.
Category
You can select from a set of Workday-delivered functional area categories for your engagement item. This determines which options are available to select in the Use For field.
Use For
This field selection determines where in your system the engagement item is available. Remember, the options here depend on the Category you select. Pay close attention to the selections you make here to ensure that your engagement item is available in the correct context.
For example, selecting a Category of "Student Records" and a Use For of "Holds," only allows you to select that engagement item when configuring hold notifications. Selecting a Category of "Student Recruiting" and a Use For value of "Plans and Ad Hoc," enables the engagement item available for use in student recruiting engagement plans or ad hoc engagements.
Academic Unit
This field determines which academic units the engagement item is available for.
Contact Methods
This field determines what type of message the engagement item will be: email or mobile push notifications. If you select Email, an Email Format field appears. You can select either:
- Plain Text or HTML
- Rich Text
- Composer Format
Workday recommends that you use either the Composer or Rich Text format when creating emails. The Composer format enables you to select the Insert Data Field icon and the Rich Text format enables you to select the Insert tag icon to use report fields as email merge fields in your emails.
Once you make this selection and select OK, you can configure the body of your email item on the subsequent page.
Override Email Template
At the Override Email Template field, select either an email template or a Notification Designer template.
Engagement Plans
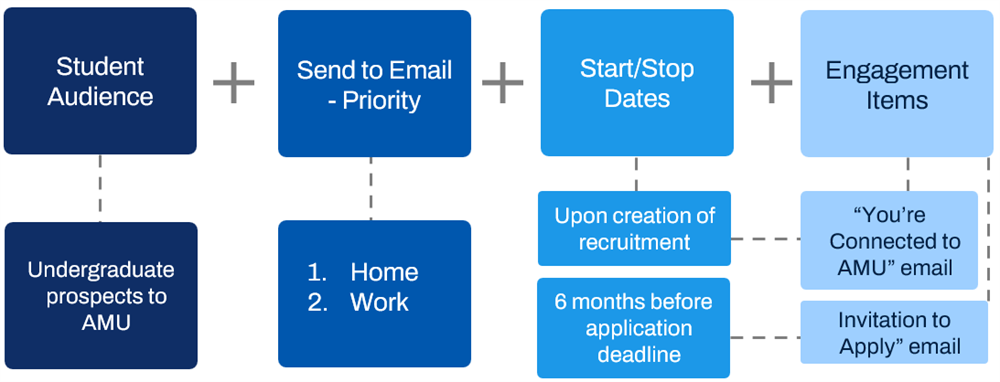
Engagement plans specify who receives a set of engagement items, when they receive them, and where they receive them. Each engagement plan includes information about which items to include in the specific engagement plan, whether they be email or printed letters. An engagement plan may contain one or more engagement items. The engagement plan identifies where to send the items. Typically, this is either the primary home address or the primary email address for the student or student prospects included in the audience. However, you also have the option of sending to secondary addresses or business addresses, if there are any listed. You can also indicate alternative addresses to send to if one is missing from the student or prospects record. The following images shows these components in an example AMU Undergraduate Email Campaign.
Creating Student Engagement Plans
To create engagement plans, use the
Create Student Engagement Plan
task. Remember, to build an engagement plan you need to have the following elements configured:- Engagement Items: Create each student message that you want to include in your engagement plan. You can have as many steps and engagement items in a plan as you want.
- Student Audience: Create a student audience either from a custom report or saved search.
When creating an engagement plan, you need to identify several components of the plan.
Component | Description |
|---|---|
Name | The name of the engagement plan. Consider a naming convention to identify the time and purpose of the engagement plan. |
Start/Stop Date | Determines when the engagement plan will be active. Start Date is a required field, but you can optionally predetermine a stop date for the engagement plan during creation as well. |
Category | Select from:
|
Academic Unit | Determines which academic unit this engagement plan is targeting. You can optionally select an academic level to narrow down your target audience here as well. |
Recipient Type | Determines who the recipient type of the engagement plan is. Multiple types can be selected. |
Student Audience | Determines which students will receive items in this engagement plan. |
Engagement Items | These are the messages that will send as part of your engagement plan. You can determine specific dates or time differentials between items to determine when to send each item. |
Scheduling Student Engagement Plans
When a student prospect is added to a student audience identified in an engagement plan, the plan kicks off. The student receives the items according to the configuration made on the engagement plan. This system-automated engagement plan delivery is based on the configurations made in the
Edit Tenant Setup - Notifications
task. In your training tenant, for example, Workday sets all system notifications related to student to deliver immediately. However, you also have the option to schedule engagement plans to evaluate on a schedule, or one-off basis, independently from the system default delivery configurations.You have two options when scheduling a student engagement plan:
- If you select Run Now, the engagement plan evaluates immediately and then evaluates again with the next tenant schedule run.
- If you set up a Daily Recurrence, your plan evaluates on the schedule you defined and will be excluded from the tenant schedule runs while the plan schedule is active.
To use this feature, you must configure the domain security policy for the Manage: Student Engagement Plan Schedules security domain.
Plans and Ad Hoc Engagement Items
When creating engagement items, you can select Plans and Ad Hoc, regardless of the email category. This selection makes the email available only for ad hoc emails or as part of an engagement plan.
You can create emails for the academic units you are assigned to. Workday ensures that recipients receive the same email only once, even if it is associated with multiple engagement plans or recruiting events.
Ad Hoc Emails and Messaging
In addition to scheduled email items for student recruiting, admissions, and registration, institutions often need to send one-off email items to remind or inform students of important events. To accommodate these needs, Workday Student provides the ability to easily send groups of students or student prospects ad hoc emails.
To send group ad hoc emails, configure the following security domain:
- Manage: Group Ad Hoc Communications
Once configured, use the
Find Academic Records
or Find Student Recruitments
reports to select multiple student or recruitment records. Doing so enables you to select the Send Message button, where you can indicate if the message should be an email, push notification, or both. When working within Student Financials, you can also send Ad Hoc emails via the Run Student Financial Processes by Student
report.When sending ad hoc emails in this way, the systems does not restrict you to using pre-existing email items. You can create the email content from within this task, providing a quick and efficient method of sending emails on an ad hoc basis.
Workday also enables you to communicate with groups of students without the need to set up engagement plans. Workday extends functionality available in creating student messages to individual and ad hoc group messaging, enabling you to send messages to a smaller subset of students.
To access this functionality, enable the proper security domains and configure them to allow users access:
- Manage: Group Ad Hoc Communications - Student Applications
- Manage: Group Ad Hoc Communications - Student Recruitments
- Manage: Group Ad Hoc Communications - Student Financial Aid Period Records
You must grant users the proper security access, and enable the domain security, for users to use this group ad hoc message functionality.
You can also configure the order that Workday emails ad hoc communications to applicants and students via the following tabs on the Maintain Student Engagement Settings task:
- Send to Email Priority - Applicant
- Send to Email Priority - Student
These tabs enable you to configure which email types Workday prioritizes when delivering ad hoc communications to applicants and matriculated students. If the applicant or student doesn't have an email address of the first type, Workday sends an email to the next type on the grid. Workday prioritizes applicants' home email addresses and students' institutional email addresses by default.
Engagement Rules
Occasionally, you may need additional control over which student prospects receive emails as part of an engagement plan. For example, you may have an engagement plan that sends a welcome email to all undergraduate student prospects. However, you also want to send an additional email to international student prospects containing information about their application and registration process. You can accomplish this by creating multiple engagement plans with different student audiences. However, this takes a lot of manual effort, and having many engagement plans for similar groups of students can cause confusion.
A better way to accomplish this goal is to use engagement rules. Using student condition rules, you can add another layer of control on your engagement plan steps. You can use these rules to identify a condition that must be met for a student prospect to receive a specific email item.
You can use the
Create Student Condition Rule
task to create these condition rules. To use student condition rules, you must:- Use the same business object as the custom report used for the student audience on the engagement plan.
- Identify the field and the specified value for your condition.
- Identify the student condition rule on the appropriate engagement plan step.
Email Analytics
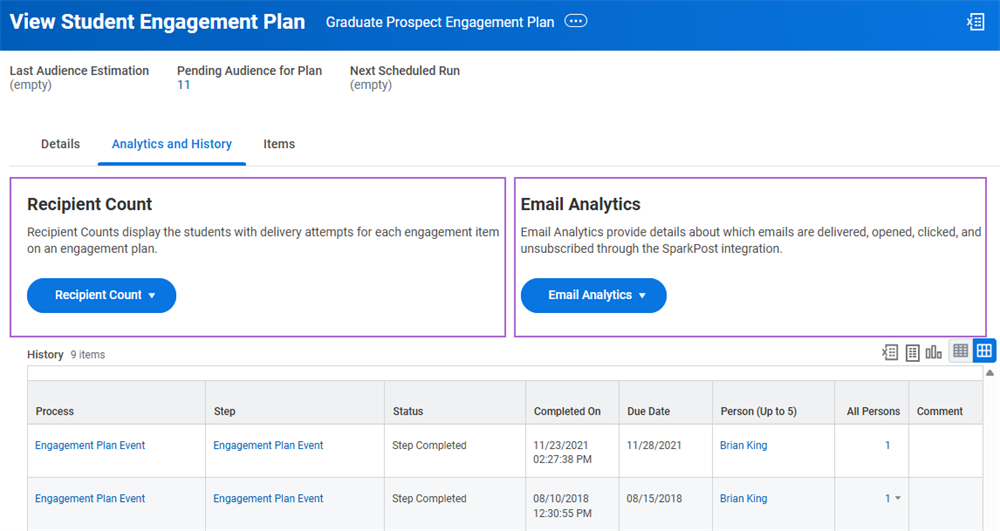
Workday offers a set of analytics tools that you can use to evaluate how your engagement plans are performing. You can access the delivered analytics in the
Find Student Engagement Plans
report. Select the Analytics and History tab to see a list of the historical data for your engagement plans. As shown in the following image, you can also use the Recipient Count and Email Analytics sections to view additional information about the engagement plan.These analytics help your institution see which email items are being sent, opened, clicked, or unsubscribed. You can use this data to help improve your communication with prospects and students. When you select email analytics as a delivery type for any Student or Learning notification type, you can track the delivery and engagement metrics on all email events sent for that notification type, including delivery, open, click, drop/bounce, and spam. For more information, please refer to Workday Community.
Engagement Plan Monitor
Occasionally you may have engagement plan failures that prevent you from distributing your engagement items successfully. You can use the
Engagement Plan Monitor
report to preemptively address these issues. This report displays all engagement plans with issues in your system. There are three levels of severity to be aware of:- Critical- The engagement plan will not work as intended with the current settings.
- Warning- The engagement plan will run, but there are issues you should be aware of.
- Informational- The engagement plan is running as intended, but there is an upcoming stop date on the plan or an item.
Some commonly occurring engagement plan issues that may display on this report can include:
- The run as user for the report used in the student audience is invalid.
- The report used in the student audience is marked as Temporary.
- The report used in the student audience has an included prompt.
- There is an invalid Mail Coordinator identified for print items.
Engagement Plan Failures
The Engagement Plan Monitor also enables you to view and troubleshoot plans that have failed to send communications to their intended audience. Additionally, you can use the
Maintain Student Engagement Settings
task to identify a set of security groups who receive a notification when an engagement plan does fail. This allows you to quickly alert your engagement administrators when an issue arises.Student Documents
Student Documents allow for centralized tracking and storage of documents. Documents from various areas of Workday, such as onboarding and financial aid verification, display on the student profile under the Personal tab. Use the
Maintain Student Documents
report to manually manage documents.Purge Student Documents
Workday delivers purgeable data types that enable you to purge student documents from your Workday tenant. For instance, you can purge questionnaire attachments, action item documents (attachments, external URLs, etc.), and application documents. This helps you comply with federal, state, and institutional policies related to document retention and purging.
Begin by creating a custom report to identify documents to purge. Then, run the
Purge Person Data
task and identify the reports. Select the areas of documents that you want to purge.You can also configure the
Manage Purge Setting Event
business process to enable students or administrators to manage a Do Not Purge flag on the Student. This flag ensures not to purge any of the student's data that you must retain for legal or other reasons.Chapter 2 Tasks and Reports
Below are the commonly used tasks and reports for the topics covered in this chapter.
Tasks:
- Create Student Audience
- Create Student Condition Rule
- Create Student Engagement Plan
- Edit Tenant Setup - Notifications
Reports:
- Find Academic Records
- Find Student Prospects
- Find Student Recruitments
- Find Students by Academic Record
Chapter 2 Summary
In this chapter, you learned how to engage student prospects by using and configuring the campus engagement framework. You identified student audiences and explored engagement items and plans.
Considerations
- What engagement items do you need for student prospects? Applicants? Leads?
- What engagement items do you need for your student recruiting events?
- Who will be responsible for maintaining engagement items?
- When do you want your engagement items sent out?
- Which prospects or students comprise the target student audiences for each of your engagement items?
- Will your institution use student notes?