
The Student Core Framework
Overview
Workday Student uses several key features across the student functional areas: student recruiting, admissions, records, curriculum management, advising, financials, and financial aid. In this chapter, you will examine several of these features, referred to collectively as the student core framework.
As part of the student core framework, you will look at the Student object in Workday. The Student object functions like a worker or employee business object and has some unique configurations and qualities. You will explore student eligibility rules and student condition rules. You will use these rules throughout the system to target specific groups of students for tasks and processes. You will also examine the configurations involved in granting access to student information to third parties like family and friends. Lastly, you will look at the student external site, which you can use throughout the Workday Student system as an interactive external portal for students and prospects.
Objectives
By the end of this chapter, you will be able to:
- Identify the details included in a student profile.
- Use the Unified Duplicate Management Framework.
- Describe eligibility rules and the ways they can be used in the Workday Student system.
- Create eligibility rules for use in Workday Student.
- Configure access to student data for friends and family.
- Configure the external student site.
Profiles in Workday Student
A profile is a composite view of a worker, job, group, or student. These profiles are configurable and offer a view into a variety of Workday objects. Workday delivers a wide variety of profile types, including:
- Academic Unit
- Admissions Counselor
- Candidate Profile
- External Student
- Instructor
- Job Profile
- Organization
- Project
- Student
- Student Prospect
- Tenant Setup
- Worker Profile
For a given profile type, there are several profile groups that can appear. Each profile type is configurable, allowing you to select which profile groups display. Some common profile group examples include:
- Summary
- Recruitment
- Application
- Contact
- Personal
- Education
- Financial Aid
- History
- Action Items and Holds
Configuring Profiles
For a given profile type, Workday chooses which profile layout to use as the composite view. You can configure each profile layout using the
Configure Profile
task. This task lets you see all the profile types in your system. This task also allows you to determine which of the Workday-defined profile sections, also known as profile groups, appears for a given profile type. You can set the order of the profile groups on the profile as well.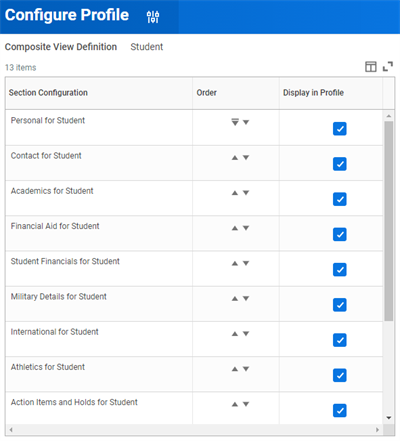
Note that even if you include a group in the configuration, the group only appears on the profile if the student meets the conditions for the group. For example, in the image above, you can see the checkbox selected for "Athletics for Student" group. However, for this section to appear on a student profile, the student must be a member of an athletics team.
Profile Group Configuration
The individual groups you choose to include on a profile type are configurable. Each group includes a number of available reports that can display on the profile. You can use the
Configure Profile Group
task to view and include the allowed reports for each profile group.These reports can include both Workday-delivered and custom reports. Custom reports must meet the following conditions for a profile group to include them:
- The report must use a data source and primary business object that corresponds to the profile group. For example, when creating reports for the student profile, use the Student, Academic Records, or Student Prospect Record business objects.
- You must share the reports with users and security groups as appropriate.
- Configure the report definition to include a filter that meets the prompt requirements. For the student profile, add a filter by student with the option to "Prompt the User for this Value."
The delivered and custom reports selected will appear in the relevant profile group. Note that you can secure each report included by a separate security domain. Be sure to check the security configurations for each report you want to include in a profile group.
Student Profile
Regardless of the Workday Student area you primarily work in, you will frequently interact with student information via the Student Profile. Let's explore some of the sections of the Student Profile.
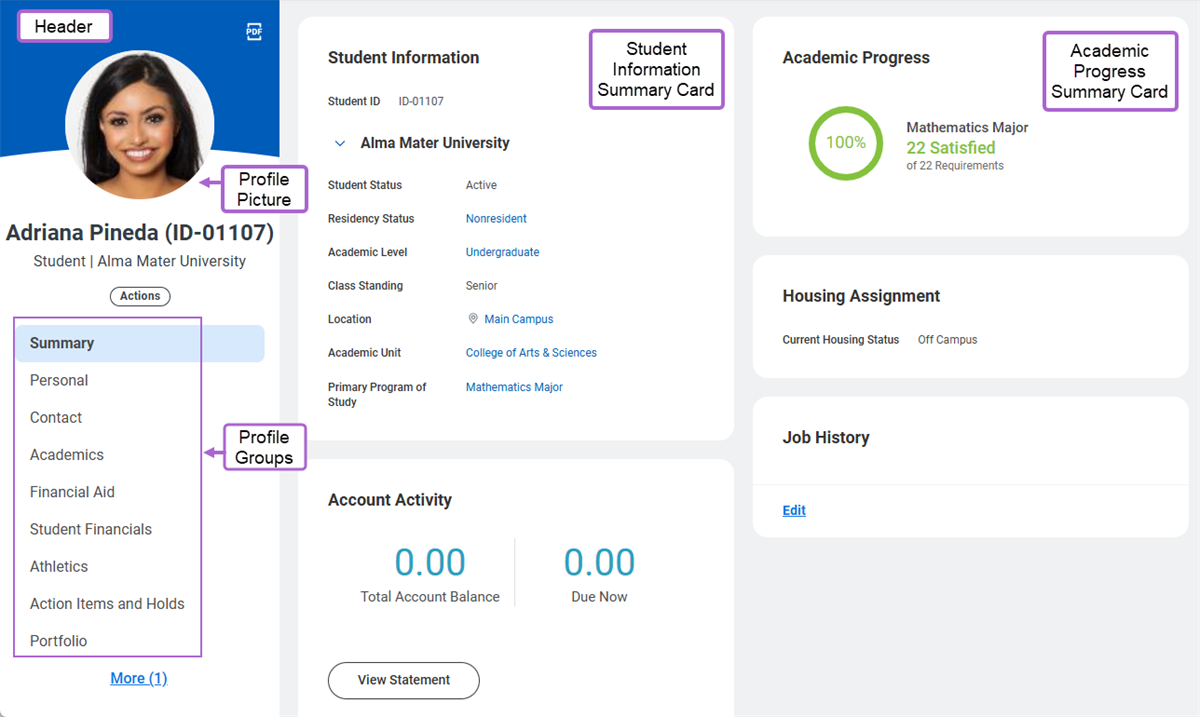
Header
The header section displays a student's profile picture and profile groups. There are several different profile groups, such as Summary, Personal, Contact, Academics, Financial Aid, and Student Financials.
Summary Profile Group
In the Summary profile group, Workday-delivered summary cards provide a quick glance into the student's information. This is the landing page of the student profile. Note that you cannot add custom reports to this particular profile group.
The summary cards behave similarly to normal reports that you can include in profile groups. However, the system restricts the sizing horizontally. Each card can have a separate security configuration, and some include buttons on the card itself, such as the Give Feedback button.
Note that you can configure profile summary cards using the
Configure Profile Summary
task.Student Information Summary Card
The Student Information card secures to the Student Data: Directory and Self-Service: Student Directory security domains. Each field secures individually, providing customers with the power to choose which pieces of information they consider to be directory information.
Academic Progress Summary Card
The Academic Progress card secures to the Manage: Academic Records and Self-Service: Academic Records security domains. This card provides an overview of the current academic progress of a current student and displays all current programs of study.
Profile Usage in Workday Student
Workday uses profiles across products. However, when working with the Workday Student system, there are several profiles that you will interact with more often than others. The profiles that you are most likely to use in Workday Student include:
- Academic Units
- Student Cohorts
- Admissions Counselors
- Programs of Study
- Course Definitions
- Student Prospects
- Students
Student Prospect Profile Data
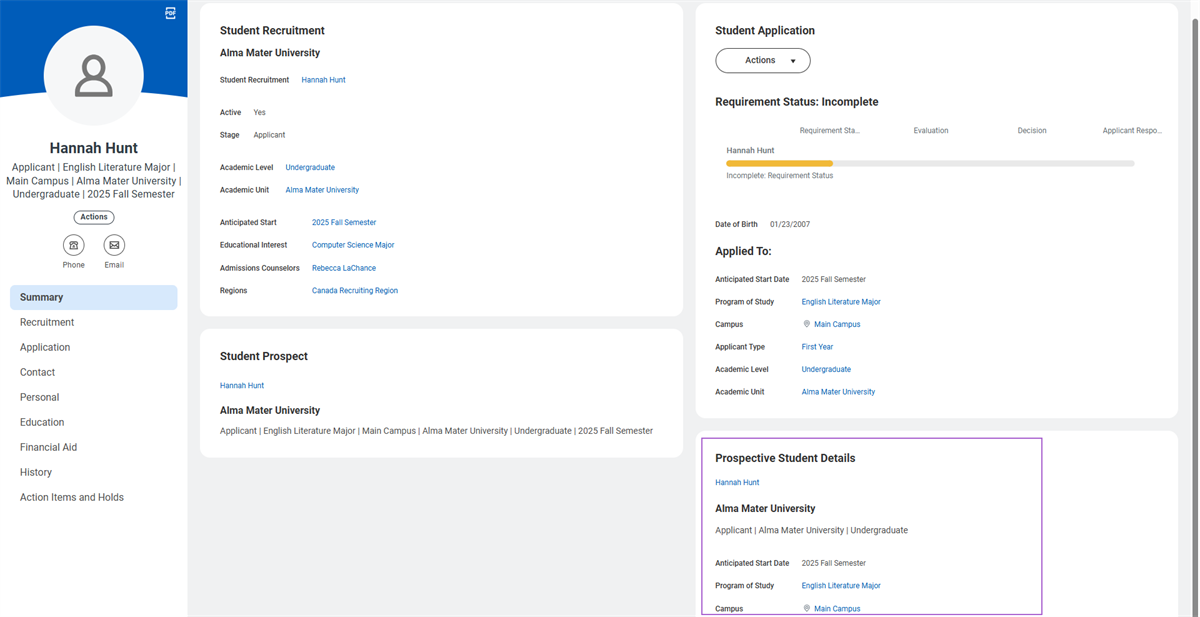
Workday has added data to student prospect profiles so that you do not have to flip between various reports to access critical information about student prospects and applications. This data addition will save you time and improve user experience.
Follow these configuration steps to add the Prospective Student Details profile card to student prospect profiles:
- Access theConfigure Profile Summarytask.
- In the Profile prompt, select either Student or Student Prospect.
- Add a row to the grid and select Prospective Student Details in the Card column.
- If you want to specify where a card displays relative to the other cards, change the order on the Prospective Student Details.
Special Student Populations
When managing the student population at your institution, some subsets of students require additional rules and configurations to comply with your institutional regulations. Common examples of these types of students include:
- Military members
- International students
- Student athletes
For these special student populations, you can build custom reports and dashboards to include on the student profile. These configurations help you track and manage your special student populations right from the regular student profile.
International Students Configuration Example
For international students, you might create a custom report to identify international students at risk of losing their status. This report might include columns such as:
- Student
- Program of study
- Cumulative GPA
- Class Standing
- Academic Standing
- Email address
You could also create an International Students worklet to grant quick access to relevant reports used for managing international student populations. These may include:
- International Students and Status
- Gender vs. Grades
- International Students at Risk of Losing Status
- Birth Country vs. Class Standing
International Students Designation Logic
You can configure conditional rules for designating international students by institution. To do so, create student condition rules. Next, access the
Configure International Student Logic
task and select these rules to determine the designation of International Students at your institution. Then, configure the Manage: Immigration status domain, enabling you to view the International profile group of a student profile.The
Configure International Student Logic
task is effective-dated. This enables you to change the condition rules used if business needs dictate a change in the logic to determine who is an international student. If you have custom reports configured to report on International Students, verify the results in existing reports are in alignment with the new International Student Logic.You can also maintain separate immigration data for a student associated with two institutions.
Student Hubs
Student Hubs are centralized platforms designed to enhance student engagement and streamline access to essential tasks and reports. These hubs provide students with a personalized overview landing page and navigation links. This enables students to navigate to their most frequent tasks and reports, and surfaces their relevant items in a timely manner. Workday delivers the following hubs:
- Academics Hub: Provides access to academic-related tasks and reports, such as course registration, academic history, and advising.
- Campus Engagement Hub: Centralizes student engagement items and analytics, allowing administrators to monitor trends and activities.
- Financials Hub: Offers access to financial tasks and reports, including financial aid and student financials.
- Student Config Hub: Provides administrators a centralized location to easily access setup and configuration tasks for:
- Academic Advising
- Curriculum
- Financial Aid
- Calendar Management
- Prospective Student
- Student Financials
Students can view tasks and reports relevant to their academic and financial needs through self-service domains. Students have access to the reports and tasks on each hub only if they have access to the domains that secure it.
Hubs can be configured as worklets on the Workday Home page, allowing easy access to frequently used tasks. Students can access these hubs directly from the Workday Home page.
Note
: Hubs are only available through a browser and not available through the Workday mobile app.Universal ID
Many university students work at their institution while they are completing their studies. You can manage student workers in the system as both students and as workers. Managing student workers can be a tricky process. You have to consider:
- Eligibility: A student must typically be in good academic standing with a specific GPA to be eligible to work on campus. Additionally, schedules often limit students to a small number of weekly or monthly hours they can work.
- Multiple Jobs: Student workers often work multiple jobs on campus. As such, you should be able to track the hours that they work at each position to ensure that they do not exceed the maximum limits.
- Seasonal Jobs: Many jobs on campus are short term, seasonal work. Each time you hire a student you have to fill out the same amount of paperwork, regardless of how short the expected terms of their employment or if the University hired the student in a previous term.
- Funding Sources: Funding for paying student workers typically comes from specific sources within an institution that the University monitors and administers to avoid going over budget.
One of the biggest issues with managing student worker populations is dealing with separate profiles and ID numbers for one person's student and worker capacities. Fortunately, Workday Universal ID feature helps curb this issue. This functionality combines the various roles of a student or worker in your university into a single person object. This means that a student worker:
- Is only one instance in Workday.
- Uses a single login for both academic and employment purposes.
- Has two active concurrent roles on the same Workday object.
- Has one set of personal information.
- Is automatically assigned to the Student as Self and Employee as Self security groups.
This functionality works the same way for full-time employees who wish to enroll in classes at their university of employment.
Unified Duplicate Management Framework
Workday delivers an option to manage duplicate person records, called the Unified Duplicate Management Framework. The Unified Duplicate Management Framework enables you to easily find, match, merge, and unmerge student prospect and student applicant records. You can also use the Duplicate Management Framework to merge matriculated students to workers. Additionally, you can merge and unmerge students and student prospects that have a Universal ID.
The framework enables you to:
- Eliminate confusion associated with multiple records for the same person.
- Simplify record management by having a single record for an individual.
- Increase efficiency by automatically merging duplicate records.
- Lower maintenance costs as a result of fewer records to manage.
Duplicate Management is an enterprise-wide framework. As such, you must opt in to use the framework via the
Opt-In to Duplicate Management
task. Opting in disables the previous Match and Merge feature (the earlier version match tool offered by Workday), so it is important to give careful consideration to the timing of the Opt-in for Duplicate Management.Note
: Match and Merge is the earlier version match tool that has fewer configurable options and is more restrictive than the Duplicate Management Framework. For this reason, Workday recommends using the Unified Duplicate Management Framework.Person Type Combinations
Workday Student supports the merges for many person type combinations in the Unified Duplicate Management Framework. The following are some of these person type combinations Workday supports:
- Student Prospect to Student Prospect
- Student Prospect to Matriculated Student
- Student Prospect to Worker
- Student Prospect to External Student
- External Student to Matriculated Student
- Matriculated Student to Worker
- Matriculated Student to Student Prospect and Worker
The Unified Duplicate Management Framework also enables you to merge student and prospect records that have in-progress and completed business process events. This includes student and prospect records that have in-progress Student Onboarding events. Workday supports the merge for these role combinations wherever applicable: student prospect to student prospect, student prospect to matriculated student, student prospect to worker, and matriculated student to worker.
Notably, you can merge a Student Application Change Decision Event or Student Application Change Published Decision Details Event in progress.
- If merged events have duplicate applications, Workday keeps the oldest.
- If the oldest application does not have a decision, Workday does not keep any published decisions or changes to those decisions.
- If there are no duplicates, Workday appends the application information from Source student prospect to Target student prospect (including in progress events).
Match Configuration
The Unified Duplicate Management Framework allows the configuration of match rules based on delivered data elements. When you configure the Duplicate Management match rules, match the previous Student Match Rules or enhance those rules. Matching or enhancing the previous rules ensures that no surprises occur in terms of expected match behavior. Also consider that the rules configured will apply across the system. Ensure that the match rules reflect all person types and use cases.
In the Unified Duplicate Management Framework, Workday delivers Match Criteria instead of more rigid rules:
- Address
- Date of Birth (cannot be a sole criteria, you must combine it with other criteria).
- Email
- Name - Basic (matches on First Name and Last Name only)
- Name - All (includes Middle Name, Prefix, or other name fields)
- National ID - Basic (uses the ID type and ID value fields)
- National ID - All (uses all ID fields including ID type, issue date, expiration date, and national ID value)
- Phone
- Previous Worker ID
- Previous Location
- Previous Manager
Workday evaluates all rules, and a record may match on more than one rule. Additionally, you can enable Automatic Merge. When enabling Automatic Merge:
- Workday automatically fires this rule when you enter a new prospect/applicant.
- If not automated, the system will fire the rule when the Duplicate management job runs, either manually or scheduled.
You can also:
- Configure Match Rules to individually enable or disable.
- Exclude Person Types from automatic merge.
- Elect to append data to Worker for nonmatching demographic data.
Note
: Match Rules are the same for all person types within the tenant. Ensure that all functional areas have reviewed and tested the configuration in a nonproduction tenant.Managing Duplicates
When managing duplicates within the Unified Duplicate Management Framework:
- You can unmerge merged records.
- You can flag possible duplicate records as do not merge.
- Prevention of Merges occurs when:
- The system prevents the merge for some person type of combinations.
- The system prevents the merge when the merge would cause the system to change data incorrectly.
- An in-progress event prevents a merge. Resolve the event before the merge.
- Both records have birthdates and they do not match.
To enable this feature, you must enable the Unified Duplicate Management Framework and:
- Enable the Duplicate Management functional area.
- Configure domain security.
- Set up match rules.
- Configure businesses processes.
- Schedule and run the Duplicate Management job.
- Run Manage Duplicates Records
Duplicate Match Framework Objects
Configure these domains in the Duplicate Management functional area before you opt in to Duplicate Management:
Domain | Definition |
|---|---|
Manage: Duplicate Records for a Person | Enables constrained and unconstrained access to identify and manage duplicate records. |
Manage: Duplicate Records for the Tenant | Enables unconstrained access to identify and manage duplicate records. |
Set Up: Duplicate Management | Enables administrators to set up match rules and schedule match jobs. |
The following are the commonly used duplicate management business processes:
- Education Test Result Data Load Event
- ISIR Data Load Event
- Student Application Fast Path Event
- Student Application Pre-Matriculation Event
- Student Prospect Update Event
The following are the commonly used duplicate management reports:
- Find Suggested Historical Student Matches
- Manage Duplicate Records
- Manage Merged Records
- View Scheduled Runs for Find Duplicates
The following are the commonly used duplicate management tasks:
- Manage Match Rule
- Resolve Suggested Historical Student Match
Student Privacy
One of the most critical aspects of managing a student population is protecting student information in the system. Institutions have access to sensitive information about students, such as financial information, country identifications, personal information, and academic data. As such, be aware of key factors contributing to your institutional student privacy policies and any configurations you need to make.
Third Party Access
Students may need their family members or other third parties to access their student information. For example, younger students frequently need their parent or guardian to make a payment or view financial aid package information on their behalf. You can grant access to student information and tasks for designated friends and family members.
Many countries have privacy requirements or regulations. For instance, The Family Educational Rights and Privacy Act, or FERPA, is the United States' federal regulation that determines how institutions manage, amend, and view student data. This law ensures not only that student data remains private, but also that parents have the right to access their children's educational records in certain circumstances. This gives some measure of control over the disclosure of personal information from the student's record.
To grant third-party access, you must first access the
Configure Privacy Release Authorization Waiver
task. Here you create a description and confirmation text for your institution to comply with FERPA regulations.Third Party Access Configuration
If you configure the privacy release authorization waiver in your system, you can designate third-party members access to student information. To do this, you first need to add them into the system via the Friends and Family tab from the student's Contact profile group. Here you identify:
- The relationship type, such as emergency contact, international agent, parent, or proxy.
- The relationship to the student, such as parent or legal guardian.
- Whether this person is a designated third-party user, which allows them to perform functions on behalf of the student.
- This person's contact information. They need a valid email address to access Workday.
After you add friends and family members to the system, use the
Manage Permissions for Third Party
task to determine which tasks the third-party members should have access to.Additionally, you can set up and manage third-party permissions that enable students to grant access to parents or other proxies to view their records, such as course registrations, grades, and unofficial transcripts by using this task.
Student Directory
The public student directory allows students to view public profile information of other students in the institution, such as contact information. If your institution chooses to allow it, students can manage their own privacy settings for the public student directory. A student can choose which information they wish to display in the public student directory.
To configure the public student directory, first access the
Configure Directory Information for Institution
task. This is where you select which information displays for students in the institution. You can also configure your own language and policy for the directory for your institution here.Administrators can then use the
Manage Privacy Settings for Student
task to configure which information appears on the directory for a given student.Students can also manage their own privacy settings, which override any administrator settings. Students use the
Manage My Privacy Settings
task to indicate whether they want to be included in the public student directory and, if so, what information displays. Administrators do have the option to remove this task from student self-service if they choose to. Removing this task removes the ability for students to manage their privacy settings. Student Notes
The student notes feature allows you to create a note and share it across multiple departments via the student record. For example, you can create a student note to document a conversation you had with a student prospect, reminding the student recruiting administrator to contact the prospect the following week. These notes help you record relevant attributes for your students and student prospects, giving your entire institution greater context and insight into your student population.
Use the
Add Student Note
task to create a student note. When you create a student note, it is visible in the History section of a student or prospect's profile.You can also link student notes together, which helps you to more easily reference previous notes and better organize your documentation of interactions with students.
Use the
Add Linked Notes
task to link student notes. You can access the task by either:- Selecting the new Add Linked Note button that appears when viewing a student note,
- Or accessing the Student Notes tab of the Related Actions menu of an existing note.
The student notes feature also allows you to create custom reports to capture metrics. You can use these notes to create custom reports involving conversations with students. These reports provide additional insight into what questions your students are having.
Purge Student Notes
Workday delivers purgeable data types that enable you to purge student notes from your Workday tenant. This helps you to stay organized and enables you to clean up a large volume of extraneous data.
Begin by creating a custom report using the Student Notes data source
.
Use the Purge tag to set up criteria for notes purge. Then, run the Purge Person Data
task. Identify the custom report to generate a list of the notes to purge. Then, use the Manage Purge Settings
task to configure which notes to set to Do Not Purge.Student Condition Rules and Student Eligibility Rules
Throughout the Workday Student system, you may face situations where you want to change data to a small subset of a larger student population. For example, you may need to make a change to only undergraduate students in a particular program of study. In another example, you may need to route a specific business process task only for international students. To make these kinds of configurations, use Student Eligibility Rules and Student Condition Rules. These two types of rules perform a similar function, enabling you to create a rule that identifies a specific population of prospects or students. Workday Student uses these two types of rules throughout the system.
Student Condition Rules
You can create Student Condition Rules for many purposes throughout the Workday Student system. Like student eligibility rules, student condition rules also allow you to identify a subset of a student population for a given process or transaction. You can select these condition rules in many of the same tasks and processes where you use student eligibility rules. Some common examples of student condition rule usages include:
- Academic Standing
- Application Pool assignments
- Course Definitions
- Course Enrollment Eligibility
- Course Section Definitions
- Registration Appointments
- Reserve Capacity
Student condition rules are also available to use in configuring combination eligibility rules. The combination of eligibility rules and student condition rules provides you with flexibility in controlling which student populations the rule affect in processes throughout your system.
Student Eligibility Rules
The student eligibility rule framework is a foundational framework used throughout Workday Student. Student eligibility rules use pieces of data about a student or student prospect to determine if they are eligible for something within Workday. Some examples of student data include: Residency, program of study, student tag, and last name. You can create an eligibility rule that identifies a specific population of prospects or students. You can use these rules to perform many functions across the Student system, including:
- Assigning a specific application GPA to an application.
- Assigning specific prospects to an application pool.
- Defining completion requirements for applications.
- Creating academic requirements for completing a program of study.
- Controlling registration appointments for enrolling in classes.
- Identifying an audience for a campus event.
For example, you can create an eligibility rule to identify all applicants that are at least 18 years old. You can then apply this rule to a specific application pool so that it only contains student applicants over the age of 18.
When creating an eligibility rule, select from one of the Workday-defined eligibility rule types (e.g., Age, Address, Student Tag). You then use an eligibility criteria condition to compare that type to a specific value to identify a target population.
Educational Institutions
Workday provides flexibility for your admissions process by enabling you to create student eligibility rules based on educational institutions on student applications. An Educational Institution eligibility rule type is selectable option on the
Create Student Eligibility Rule
task. It allows you to assign and waive action items based on a student's educational institution.To configure this student eligibility rule:
- Access theCreate Student Eligibility Ruletask and select Educational Institution as the Eligibility Rule Type.
- Access theMaintain Student Application Requirementstask and assign the educational institution Student Eligibility Rule to the desired Application Action Item.
- Create a student application and add an Educational Institution. Go to the Application's Requirements tab to verify that the system has assigned the action item.
Student Eligibility Rule Meanings
You can also override autogenerated meanings for student eligibility rules with your own custom text. Doing so gives you more flexibility and enables you to effectively communicate information about eligibility rules wherever they appear in Workday Student. To override autogenerated meanings, select the Use Custom Meaning checkbox on any Student Eligibility Rule.
Exclusion Eligibility Rules
In addition to eligibility rules that select students or prospects that match selected criteria, you can also create eligibility rules to select everyone except those that match the criteria. For example, a rule that excludes prospects with a birth country of the United States would match anyone born in any other country. You can do this by selecting the Excludes checkbox on the
Create Student Eligibility Rule
task.Combination Eligibility Rules
Occasionally, you may need an eligibility rule that uses more than one type of eligibility rule function. For example, you may need to identify all students in the School of Music who are over the age of 18 and also born in the United States. For these situations, use combination type eligibility rules to combine two or more existing rules, allowing you to create more complex criteria.
To create a combination eligibility rule, do the following:
- First, create two individual eligibility rules (e.g. an Age rule to only select School of Music students over the age of 18, and a Birth Country rule to only select students born in the United States).
- Second, create a new combination type eligibility rule and select the two eligibility rules you want to combine.
Student Holds
Student holds block students from completing certain processes within Workday. Universities commonly use student holds to prevent students from performing actions such as registering for classes or receiving financial aid. Student holds are made up of a hold reason, a hold type, and hold context.
Hold Reasons
The hold reason is the reason for the hold, which you must resolve to remove the hold. The institution defines the hold reason using the
Create Student Hold Reason
task. Here, you configure a hold reason for an academic unit and select what hold types the reason uses. If you select a superior academic unit for a hold reason, that hold reason will be available for any subordinate academic units.Workday displays hold reasons to students in their Workday account and explains why the student received the hold and how they can resolve it.
You can reuse a hold reason for multiple hold types, giving you flexibility in your hold configurations. Likewise, you can apply multiple holds on a student for multiple processes using the same hold reason. For example, if a student has a past due balance, the institution can prevent them from registering for classes and receiving financial aid.
Some common examples of student hold reasons include:
- Past due balance
- Undeclared major
- Incomplete registration
- Lack of attendance
- Low or failing grades
- Missing federal verification
- Noncompliance with institutional policy
You can set up segmented security for hold reasons. This will ensure that users have access to create, apply, override, and remove hold reasons.
Tip
: When creating hold reasons make sure that the hold names are descriptive, complete, and contain resolution instructions that are informative and complete.Hold Reason Security
You can define security requirements when managing student hold assignments and determine whether to allow holds to apply to all students.
You also have the ability to secure certain hold reasons using segmented security. You have the ability to decide which of your administrators can apply which types of holds to students. For example, you can use segment security to ensure that only financial administrators can apply a hold for a past due balance on a student's account.
The following domains secure the ability to configure hold reasons in your tenant:
Domain | Description |
|---|---|
Set Up: Hold Reason Segments | Controls which users have access to create and manage the hold reason segments in your system. If a user can create a hold reason, Workday recommends that they also have access to put that hold reason into a segment. |
Set Up: Hold Reasons | Determines which users can create hold reasons. |
Access Hold Reasons | Grants secured users access to hold reasons when using the Apply Student Hold business process. Include any segment-based security here to ensure correct access. |
Manage: Apply Holds | Grants users the ability to apply a hold for a given reason. Also gives users access to the Update Student Hold task to edit a hold. |
Applying Student Holds
You can apply student holds directly to an individual student or mass apply them to a group of students. Now, take a closer look at these two methods.
Individually Applying Student Holds
To apply a hold to an individual student, run the
Apply Student Hold
task and select a student. You can also access this task through a student profile's Related Actions by selecting Holds and then Apply Hold. Once you have accessed the task, select a hold reason and valid hold type for that reason. Indicate if the hold type applies to:- A specific institution
- A specific academic record (if the student has multiple records)
- A specific academic period (e.g. Fall 2026)
- All institutions, academic records, and periods
You can also use the Add button to add additional holds to a student. When you complete the task, Workday applies the hold to the student. The system displays the hold on the Action Items and Holds profile group of the student's profile.
Mass Applying Student Holds
You can use Workday Mass Operation Management framework to automatically apply student holds to groups of students. This can be much more efficient than applying the same hold to many individual students. To use this feature, perform the following steps:
- Configure security settings for the Mass Operation Management Domain. (You can optionally use segment security to further customize these security settings.)
- Create a custom report to identify the students the hold applies to.
- Use theMass Operation Managementtask to apply the student hold.
Custom Reports for Mass Applying Student Holds
To mass apply student holds, identify the target students of the hold. To do this, create a custom report using one of the following data sources:
- Academic Records
- Financial Aid Records
- Student Charges
- Student Course Registration Records
You can use report filters, and even calculated fields, to define the student population you want to apply a mass hold to.
Using the Mass Operation Management Task
After you define your target student population with a custom report, run the
Mass Operation Management
task. Here, select the Apply Student Hold mass operation type and select your custom report. You will also indicate the frequency of the hold application run. Selecting OK prompts you to enter a name for the run. Select the appropriate hold reason and hold types for the run.Lastly, select the Reassign Criteria for this run. This enables you to select whether you want to reapply the hold to the student in future. If you select Never, the hold applies only once when the report meets the same conditions. Workday excludes students who had the same hold type and hold reason applied in the past from this mass action.
After configuring the mass operation, when the report meets the same hold criteria, the system automatically applies the holds to the students who meet the criteria. The system also sends a notification to resolve or remove the hold, if you have configured notifications in your system.
Report
: Use the Mass Operation Management Runs
report to review the conditions of when Workday applies mass student holds.Mass Removing Student Holds
In addition to mass applying student holds, you can use the Mass Operation Management framework to remove holds from multiple students in one transaction. To do so, select Remove Student Hold when running the
Mass Operation Management
task.You can then select a custom report to identify which students with holds should have them removed. These mass operations make managing your institution's holds more streamlined and efficient.
Mass Remove Student Hold Security Configuration
To use the Remove Student Hold option on the
Mass Operation Management
task, you first need to make the following security configurations:- Create a segment-based security group to grant access to the Workday-owned Remove Student Hold mass operation type segment. Refer to the security configurations for Mass Apply Holds to see if the same permissions are appropriate.
- Add the new segment-based security group to the Mass Operation Management domain.
- Activate your pending security policy changes.
- Create a custom report to identify which students should have their holds removed.
After you make these configurations, users with the correct access can use the custom report in the Mass Operation Management task to remove student holds. You can do this immediately or at a future scheduled time.
Additional Hold Application Options
Several business processes in the Workday Student system have steps to automatically enforce students holds. This is in addition to the intentional application of holds, either via individual application or through a mass operation. For example, in the Student Onboarding business process, you can configure the system to automatically apply a hold on a particular step. This is useful to prevent new students from registering for courses before completing orientation or paying any past due balances on their account.
Student Documents
Student Documents allow for centralized tracking and storage of documents. Documents from various areas of Workday, such as onboarding and financial aid verification, display on the student profile under the Personal tab. Use the
Maintain Student Documents
report to manually manage documents.Distribute Documents
Workday also enables you to distribute documents ad hoc to students for their review. You can manage student holds by applying and removing holds related to the student reviewing the distributed documents.
Use the Manage: Student Document Distribution domain (secured to the Action Items and Holds functional area) to distribute documents to students in an ad hoc manner. Enable this domain and configure the appropriate security to access the functionality.
Workday secures this domain to these tasks and report:
- Create Student Document Distribution
- Edit Student Document Distribution
- View Student Document Distribution
Purge Student Documents
Workday delivers purgeable data types that enable you to purge student documents from your Workday tenant. For instance, you can purge questionnaire attachments, action item documents (attachments, external URLs, etc.), and application documents. This helps you comply with federal, state, and institutional policies related to document retention and purging.
Begin by creating a custom report to identify documents to purge. Then, run the
Purge Person Data
task and identify the reports. Select the areas of documents that you want to purge.You can also configure the
Manage Purge Setting Event
business process to enable students or administrators to manage a Do Not Purge flag on the Student. This flag ensures not to purge any of the student's data that you must retain for legal or other reasons.The External Student Site
One of the most versatile features of the Workday Student system is the external student site. The external student site is a customizable portal that your students and student prospects can use to interact with your institution without having to sign into your system. You can use this portal to grant users access to public and authenticated tasks.
A public task does not require sign in credentials or an account. For example, viewing a recruiting event calendar is a public task. The recruiting event calendar is available for anyone to see, so anyone can view the calendar, whether logged in or not. On the other hand, authenticated tasks need sign in credentials or an account. For example, filling out an application for admission and viewing a financial aid application summary are both authenticated tasks.
Public Facing Tasks
:- Event Registration
- Inquiry Form
- Recruiting Event Calendar
Authenticated Tasks
:- Application for Admission
- Application Fee Payment
- Application Requirements and Status
- Accept/Decline Admission
- Complete Financial Aid Requirements
- Complete Pre-Matriculation Requirements
- Pay Admissions Deposit
- Residency Questionnaires
- View Preliminary Transfer Credit
- View Residency Status
Any information entered on the external student site pulls directly into your tenant, eliminating the need for duplicate data entry efforts. The external student site can be viewed on a laptop or mobile device. Now, explore the external student site configuration options.
Configuring the External Student Site
You can use the external student site for a variety of purposes throughout the Workday Student system. However, in order to use the external student site for any purpose, you must first create an external site for a given academic unit and level. You can create an external site for the topmost academic unit in your hierarchical structure and use it for all subordinate academic units. You can also create and customize individual external sites for each school or department at your institution. You have tremendous flexibility in how you choose to deploy the external student site at your institution.
To configure the external student site, first access the
Create External Student Site
task. Here, enter the following required fields:- Academic Unit: Which academic unit will own this external student site? Remember that associating the site with the topmost academic unit in your institutional structure will ensure that all students and prospects for your institution can use the site.
- Academic Level: Which academic level is this external site used for?
- Name: Enter a name for your external site. Keep in mind that you may have multiple external sites, so be sure to create an appropriate naming convention to help you stay organized.
- ID: Enter an ID for the external site.
- Languages: English will be selected by default.
There are several sections of the external student site that you can configure immediately from this task. For example, you can hide sections, such as the Important Dates section, provide payment options on admissions applications, and provide a recommender password reset option. Now, explore a few of the external student site sections.
Branding
Workday requires branding colors for external student sites. The branding section of the external site lets you customize the appearance of the site. Here you can add custom branding for the header, buttons, progress bar, accent bar, and home menu. You can also resize logos, include a customized banner for your institution or academic unit, and include a unique institutional icon. You can configure the header text to display across the banner image, the background color for the banner, and the font color for the text.
Use either the
Create Student External Site Brand
or Edit Student External Site Brand
task and:- Add Hex Color Codes specific to your brand.
- Add a logo and banner images.
- Select button shapes, button colors, and text colors.
- Add a progress bar color.
Then, access the
Create Student External Site Brand
or Edit External Student Site
task and:- In the Branding section, select either Simple Brand Settings or Custom Brand Settings.
- If you select Simple Brand Settings, continue to select logos and banners in this section.
- If you select Custom Brand Settings:
- Select the Brand to use for this external student site.
- Enter a Homepage URL the student selects to navigate back to the home page of your choosing from anywhere on the External Student Site.
- Enter the Home Link Text. This text appears under the student's user id. Select the text to navigate to the homepage URL.
Note
: If you do not configure a brand, the external student site displays with default Workday colors.Landing Page
The Landing Page section determines the text that displays on the external site landing page. You can include text and embedded links to suit your institutional needs.
Follow Us
Include any social media links for your institution or academic units in the Follow Us section. This is a great way to increase interaction and engagement with prospective students.
Terms and Conditions
The Terms and Conditions section of the external site is where you configure the Terms and Privacy text. This text displays when prospects register for events, upload documents, or accept offers of admission. Additionally, the Accept Terms and Conditions text displays along with a checkbox when prospects complete these actions.
Cookie Banner Agreement
Workday enhances cookie banners on external student sites. Users now have the option to explicitly accept or decline cookies for your custom cookie policy, helping to support your compliance and analytics requirements.
In the Cookie Banner on external student sites, there are two button options:
- Accept Cookies. Enables candidates to agree to the use of cookies during the job application apply flow.
- Decline. Enables candidates to indicate they do not agree to the use of cookies during the job application apply flow.
When a user does not accept or decline cookies, Workday does not use cookies for that user.
On branded sites, Workday also adds links to the Cookie Banner to expand or minimize the text that displays:
- Read Full Privacy Policy Message
- Minimize Privacy Message
Engagement Preferences
In the Engagement Preferences section, you can display additional fields for student prospects to opt in or out of additional engagement messages. This is an optional selection, but important if your institution plans to do a lot of marketing engagement messages.
Previewing and Publishing The External Student Site
When creating the external site, you will see a Site URL link displayed on the task. You can use this URL to preview the external site configurations that you have made.
After you have made your customizations and configurations, you can save the external site by selecting OK. However, just saving the configurations will not make the external site available for use. To make the site publicly available and accessible, you must first publish the external student site. To do this, you must select the Publish Site checkbox from the
Create External Student Site
or Edit External Student Site
tasks.After publishing, you can distribute the site URL to any students and prospects you want to access the external site.
Applicant Immigration Information
You can also configure the immigration information your applicants submit on the external student website to automatically populate on immigration tasks and reports in Workday. Workday enables the process to initiate prematriculation and onboarding business processes, creating a more automatic process that simplifies how you manage student records.
To configure applicant immigration information:
- Set up the Configure Student Applicant Immigration Form for the External Student Site.
- Configure the Student Applicant Immigration Event Business Process policy and definition.
- Add the Submit My Immigration Information Action.
- Configure the business process to approve, cancel, deny, review, and revise the submitted immigration information. (You may need to create the default definition first.)
- Add the Submit Student Applicant Immigration Information allowed action step on these business processes:
- Student Application Pre-Matriculation Event
- Student Onboarding Event
- Configure theMaintain Student Immigration Statustask to add Immigration statuses relevant for your Institution.
Invalid External Student Site Accounts
Workday also enables you to identify invalid external student site accounts and prevent them from automatically matriculating into Fast Path-enabled programs or submitting applications. This saves you the effort of investigating and cleaning up invalid or fraudulent applications submitted through the external site.
Configure rules on the
Maintain Rules for Invalid External Accounts
report (secured to the Manage: Rules for Invalid External Accounts
domain) to identify duplicate accounts using Google aliases or configured email domains and block them from submitting applications or flag for further review.Applicant Home Portal
The external student site is particularly well suited for managing admissions applications to your institution. You can use the external student site to set up an Applicant Home portal for your student applicants. Here, students can complete their admissions applications and all application information imports directly into your system. Applicants can return to the applicant home to view their application status, complete any required action items, and pay any relevant fees.
Using the external student site in this way streamlines the application process and prevents a lot of manual data entry for your admissions administrators.
Applicant Home Portal Uses
You can use the Aplicant Home on the external student site in many areas of Workday Student. For instance, you can use the external site to allow students and applicants to:
- View upcoming student recruiting events.
- Apply for admission.
- Pay application fees.
- View application statuses.
- View outstanding application requirements.
- Complete certain application requirements with a document upload.
- View admissions decisions.
- Accept or decline offers of admission.
- Pay admissions deposits.
- View preliminary transfer credit.
- Upload any required pre-matriculation documents.
- View financial aid award packages.
- Complete outstanding financial aid action items.
Student Recruiting & Admissions
Some examples of where you can use the external student site in student recruiting and admissions include:
Use | Description |
|---|---|
Recruiting Event Registration | Enables student prospects to locate and register for upcoming recruiting events. |
Admissions Applications | Applicants can submit their admissions applications in the external site and the information will enter directly into your tenant. |
Recommenders | Enter recommendations for applicants through the external site. Applicants must identify their recommender and provide a valid email address. |
Pre-matriculation Questionnaires | Include custom questionnaires to gather pre-matriculation information such as orientation availability or program-specific information. |
Admissions Deposits | Accepted applicants can submit admissions deposits through the external site and the information will process directly into your tenant. |
Application Fees | Applicants can submit application fees at the time of application through the external site. |
Preliminary Transfer Credit | Applicants can see a preliminary transfer credit report to get an unofficial look at how their completed course work will transfer to your institution. You can also evaluate and assign preliminary transfer credit for education test results. This enables student applicants to see what credit they can receive if they decide to attend your institution |
Student Residency | Students can submit residency information and documentation through the external site as part of the application or onboarding process. |
Financials and Financial Aid
Some examples of using the external student site in student financials and financial aid include:
Term | Definition |
|---|---|
Financial Aid Award Packages | Student applicants can view financial aid award packages and complete financial aid action items through the external site. |
Waitlist and Defer Decision Statuses
You can also configure custom content on the Applicant Home page when applications have a Waitlist or Defer Decision status. Doing so enables you to communicate what applicants need to know about those statuses. This provides additional clarity to applicants as to why you deferred the decision for the application or put the applicant on the waitlist.
You can also control whether to publish the content, giving you the ability to hide statuses that you do not use or content that is still in progress. Additionally, when you copy an applicant grouping, Workday preserves any content configured for the Applicant Home page, saving you the effort of manually recreating the content.
Additional External Student Site Usage Configuration
Configure each of the additional functions that you want to use the external site for, such as the Application Home or Preliminary Transfer Credit, using separate tasks. After you run these tasks and configure functionality, you will see a new section for the function when using the Edit External Student Site task.
External Site Configuration Tasks
Review the following list of tasks you can use to configure the external student site for different areas of Workday Student.
Task | Description |
|---|---|
Configure Events for External Student Site | Allows students and prospects to find and register for student recruiting events. Use along with the Create Student Recruiting Event Registration form to configure what information a student must submit when registering for a recruiting event. |
Create Applicant Home | Enables the external site to host the Applicant Home portal. This allows student prospects to apply to your institution, check applications, and more. You can also include a preliminary transfer credit section using this task. |
Create Admissions Application Configuration | Create a customized application form, hiding, requiring, and renaming fields as needed. Fields populated by the student will correlate directly with the fields in your system. Note that you can include recommenders on this application. |
Configure Residency for External Student Site | Attach a residency questionnaire to the external site and allow student prospects to submit residency information. Note that this requires you to create a questionnaire and configure the relevant business processes to ensure that the questionnaire appears as part of the application process. |
Configure Financial Aid for External Student Site | Enables student applicants to view and complete financial aid action items. |
Delaying External Student Site Creation
You can prevent Workday from creating external student site accounts for applicants until you have rendered admissions decisions, enabling you to limit external student sites to admitted students. Use the
Maintain Delay Student External Account Creation Polic
y task to configure whether an academic unit and level or program of study delays the creation of external student site accounts for applicants.
When a policy is in effect:- Workday does not create external student site accounts for applicants until you run the new Create External Account for Student Applications service.
- Application action items are assigned to the applicant or prospect and made viewable and actionable once they get an external student site account.
Workday also enables you to delay external student site account creation for applicants to Fast Path programs of study. Workday delays creating external student site accounts for applicants to Fast Path programs of study that have been flagged for application review when you use the
Maintain Delay Student External Account Creation Policy
task to configure delays for those programs of study or the academic unit and level that contain those programs of study.Create External Account for Student Applications Service
You can also add the Create External Account for Student Applications service as a step on the Publish Application Grouping Event business process. This service creates an external student site account for admitted students. Configure this step after the Publish Application Grouping Decisions step.
Workday delivers a Student External Account Created report field on the Student Application business object (secured to the Public Reporting Items domain) that you can use in custom reports to identify account creation issues.
Reporting for Student External Account Creation
Workday also delivers a Student External Account Created report field on the Student Application business object (secured to the Public Reporting Items domain) that you can use in custom reports to identify account creation issues.
Chapter 6 Tasks and Reports
Below are the commonly used tasks and reports for the topics covered in this chapter.
Tasks:
- Add Student Note
- Apply Student Hold
- Configure Directory Information for Institution
- Configure Privacy Release Authorization Waiver
- Configure Profile
- Configure Profile Group
- Configure Profile Summary
- Create External Student Site
- Create Student Eligibility Rule
- Create Student Hold Reason
- Edit External Student Site
- Maintain Student Note Categories and Topics
- Manage Permissions for Third Party
- Manage Privacy Settings for Student
- Mass Operation Management
Reports:
- Find Admissions Counselor
- Find Student Recruiting Notes
- Find Students
- Manage Duplicate Records
- Mass Operation Management Runs
- Public Student Directory