
Student Recruiting & Admissions Overview
Overview
Workday Student Recruiting and Admissions provides the framework and tools you need to recruit and admit prospective students. In this chapter, you will take a high-level look at the key objects, processes, and reports that you need to understand to get started with Workday Student Recruiting and Admissions.
If you plan to work with student recruiting or admissions in your institution, Workday encourages you to take the Student Recruiting & Admissions course. You can locate this course on the Workday Learning Center. The course provides a more detailed and comprehensive look at the features and functionality of Workday Student Recruiting and Admissions.
Objectives
By the end of this chapter, you will be able to:
- Identify the features of the Student Recruiting process.
- Update an admissions counselor's assignment criteria.
- Identify the details and structure of a recruiting campaign.
- Identify the features of the admissions process.
- Create and process an application for a student prospect.
Student Recruiting and Admissions Overview
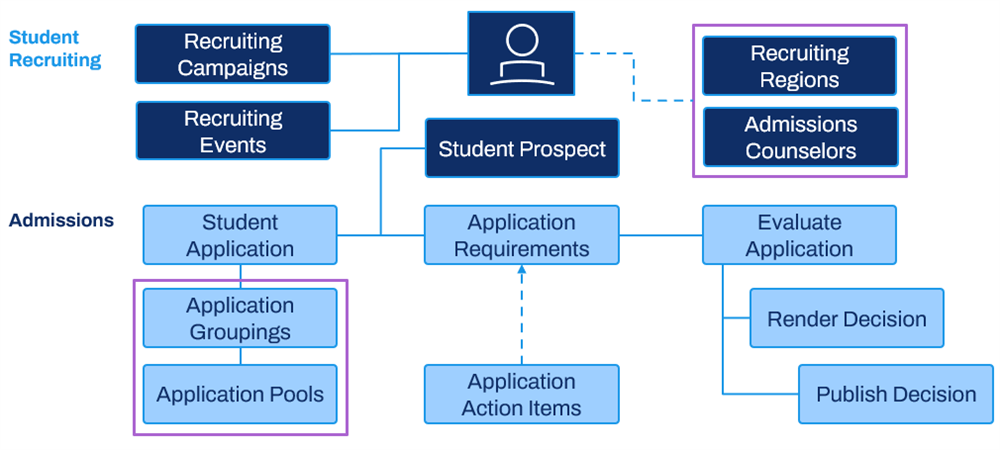
The process from recruiting prospects to admitting applicants in Workday has several steps, as outlined in the following diagram. Let's explore the components involved in each phase of this process.
Student Recruiting Required Components
The following components must exist in your system as part of the student recruiting process.
Student Prospect
Once a prospect has expressed interest in your institution, you must add them as a student prospect in your system. Use the student prospect profile to manage the application and admissions process.
Admissions Counselors
Admissions counselors are the faculty and student workers who perform the bulk of recruiting activities for your institution.
Recruiting Regions
Identify and parse out geographical areas for your admissions counselors to focus their recruiting efforts. This makes your student recruiting processing more manageable.
Recruiting Campaigns and Events
You create recruiting campaigns focused on recruiting specific sets of student prospects, such as athletes or prospects who live in a particular recruiting region. Each campaign can include multiple recruiting events, such as a high school campus visit, designed to interact with student prospects and create interest.
Student Admissions Required Components
The following components must exist in your system as part of the admissions process.
Application Groupings
Application groupings are groupings of applications for the same admitting level of an academic unit with the same anticipated start date. You can separate groupings into one or more application pools.
Application Pools
Each application pool is a subset of applications within an application grouping. You can assign each application pool to a separate Admissions Counselor. Separating the applications into smaller groups enables you to control and adjust the workload for counselors at your institution.
Application Action Items
To consider the status of an admission application as complete, it must meet a set of requirements. Application action items can define those requirements (e.g., Submit Transcripts).
Application Requirements
After creating application action items in the system, you can assign the actions to specific academic units, levels, and programs of study. You must complete these action items before the application is considered complete.
Evaluation Views
When evaluating an application, the evaluator sees the details of the application based on the assigned evaluation view. The evaluation view is configurable for individual academic units and levels to ensure that application evaluators are getting the appropriate information for their academic unit.
Application Evaluation and Rendering Decisions
After a student completes their application, designate someone in your institution to review the application. Once they have completed their review, they decide whether to admit or deny the student's application.
Publishing Decisions
Once you have made and finalized all application decisions, you can publish the application grouping to make the decisions publicly available. Doing so allows the student to view the status of their application and accept your institution's offer, if applicable.
Student Prospects
Student prospects are individuals who have shown an interest in attending your institution or who you are interested in recruiting. In Workday, you can enter prospects manually or they can come in via a web service such as a search service file load. You can also create prospects from test scores you have purchased from external testing services or received from individuals.
When creating a student prospect, you must provide a name and contact information at the very least. You can also capture additional pieces of information about prospects, such as:
- Educational interests
- Social media information
- Recruitment source
- Current and previous educational institutions.
Prospect Stages
Workday assigns a prospect stage to individuals based on how they became prospects to your institution. The system assigns these stages when creating the prospect. As the prospect submits more material, these stages do not automatically update, except for the applicant and pre-matriculant stages. The system automatically moves a prospect to the applicant stage when the prospect submits an application. Then, the system automatically moves them to pre-matriculant when they accept the offer of admission.
Prospect stages are as follows:
Prospect Stage | Assignment Rule |
|---|---|
Lead | Assigned to prospects whose test scores have been purchased from an external source (e.g., search service). |
Inquirer | Assigned to prospects who have initiated contact with the institution. (e.g., attended a college fair, completed an inquiry card). |
Pre-Applicant | Assigned to prospects who have submitted unsolicited supporting materials (e.g., transcripts, test scores). |
Applicant | Assigned to prospects who have submitted an application. |
Pre-Matriculant | Assigned to applicants who have accepted the offer of admission. Assigned to applicants admitted to a program of study with "Admission Response Not Required" selected on the program of study. |
Student | Assigned this value during the:
|
Recruiting Regions
Recruiting regions allow you to group your prospects geographically in a way that makes sense for your institution. You can then assign prospects to admissions counselors and engagement plans, based on those regions.
Recruiting regions are associated with an academic unit and academic level or levels. If your institution recruits graduate students differently than undergraduates, you can create separate recruiting regions for each level.
Recruiting regions are not mandatory, nor required to capture your entire student prospect population. However, they provide additional control over the management of your student prospects. You can use these regions to greatly streamline the recruiting and admissions processes.
You can define recruiting regions by:
- Country
- State or province
- Counties
- Cities
- A range of zip codes
- School districts
- A combination of these
For example, if your institution primarily recruits from the New England region, you may want to break that down into smaller subsections of each state. This process would help you better target New England prospects, while keeping prospects from the western United States grouped by state only.
In general, you should enter the most granular criteria for a region. If you enter a postal code, do not also enter a city and state. The combination of data in a row must be valid. For example, if you enter the state of Maine, but a postal code from New Hampshire, Workday will not automatically assign prospects to that region.
Hints
:- Do not create rows with overlapping criteria. Example: If you create a row for Texas, do not add another row for Austin.
- If you enter a city without selecting a state or province, the region will include prospects in all cities with the same name. Example: Portland will include prospects in Portland, Oregon and Portland, Maine.
Prospect Region Assignment
Workday automatically assigns prospects to a region if they have an address or educational institution that meets the criteria for that region. For regions based on an address (instead of an educational institution), the assignment criteria are as follows:
If a prospect has an address, matching occurs by the student's:
- Primary street address
- Any street address
- Any other primary address
If a prospect does not have an address, matching occurs by the institution's:
- Primary street address
- Any street address
- Any other primary address
The prospect's address always takes priority.
Example
: An AMU prospect, Betty Martin, was originally created without a home address. So, she was matched to a region based on her high school's address in New Hampshire. Betty later fills out an AMU prospect card, providing her home address in Maine. When this address is entered into Workday, the system reevaluates Betty's region, and assigns her to the Maine region instead of the New Hampshire region.Admissions Counselors
Admissions counselors are staff or guests your institution designates to recruit prospective students and review applications. These individuals can be admissions officers, faculty members, volunteer alumni, and others, including nonemployees. An admissions counselor can also be temporary, with a start and stop date. Keep the following in mind regarding Admissions Counselors in the system:
- Admissions counselors exist as their own business object in the Workday system and you maintain them separately from the employee or user business objects.
- Remember to assign admissions counselors to the appropriate security roles on the correct academic unit to ensure access to the correct student and prospect data.
- Admissions counselors are assigned criteria to determine which prospects they are responsible for.
Recruiting Cycles
Recruiting cycles combine an academic date range and one or more levels of an academic unit. This combination enables you to track and measure the success of recruiting campaigns and events.
Academic Date Ranges
Academic date ranges define the start and end dates for a recruiting cycle. For example, if Alma Mater University recruits undergraduate students for the 2027 academic year from January 1, 2026 through January 31, 2027, you would create an academic date range spanning those dates and assign Alma Mater University to that range. Note that you can use the same date range for multiple units and levels.
Recruiting Cycles
Use recruiting cycles to track all recruiting activity for an academic unit and level for a date range. For example, a 2026 - 2027 undergraduate College of Engineering recruiting cycle would contain all the recruiting activities performed to recruit those prospective students. This cycle would allow you to report on their overall efficacy.
Recruiting Campaigns and Events
The bulk of your student recruiting efforts go toward recruiting campaigns and the events included in those campaigns. Next, take a closer look at these components of student recruiting.
Recruiting Campaigns
Workday defines recruiting campaigns within recruiting cycles as specific programs, such as a Summer Campus Visit program. Recruiting campaigns target a specific subset of prospects, such as female STEM applicants. Recruiting campaigns specify targets, overall budget, and ownership, and can have one or more events. A recruiting campaign's start and end dates must fall within the date range defined in the associated recruiting cycle. For example, the Summer Campus Visit program and the Hockey Recruiting Campaign must have start and end dates that fall within the range established in the 2026 - 2027 recruiting cycle.
2026 - 2027 Recruiting Cycle | |
|---|---|
Summer Campus Visit Program | Hockey Recruitment Campaign |
Touchpoint
: Recruiting campaigns and events automatically create associated worktags, allowing you to directly associate costs entered via Workday Expenses.Recruiting Events
Recruiting events are events tied to a recruiting campaign with a specific time, location, owner, and budget. A recruiting campaign may have one or more events associated with it.
Recruiting events use campus engagement to invite prospective students, send out registration confirmations, and send separate follow-up communications. Events can also specify assignment criteria to ensure prospects who meet that criteria get automatically invited to that event.
Recruiting Event Registration
Workday enables you to customize a student-facing external site to use in event registrations. Use the
Create Student Recruiting Event Registration Form
task to see the fields available to include on this external site. When students fill in the information on this site, Workday uses the data to create a new student recruitment record for that prospect. This is a convenient way to register student prospects for recruiting events and create a new prospect record all from one task.Workday has several standard fields available to include on this form. You can relabel the available fields for clarity, mark them as required for form completion, or hide them from the form completely. This provides you with flexibility in choosing exactly what information your institution requires to create a new student prospect from this registration form.
Student Admissions Process
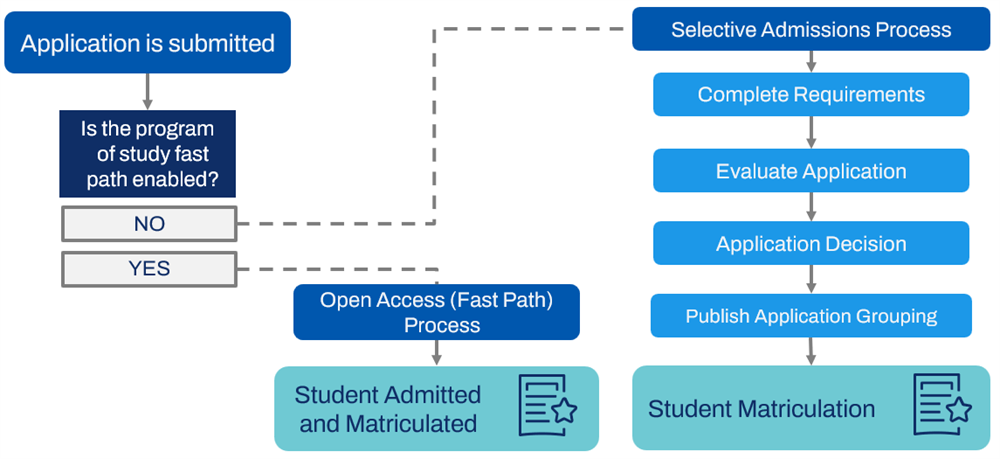
There are two kinds of admissions processes: Selective admissions and open access (also called Fast Path).
Selective Admissions Process
The most common type of admissions process is selective admissions. With selective admissions, applicants must complete a set of requirements before an application is considered ready for review. Once complete, the system routes this application for review and decision according to your institution's business processes.
The selective admissions process includes:
- Application requirements
- Application evaluations
- Application verifications
- Student recommenders
You can record transcripts, test scores, and other information to prepare selective admissions applications for review. With programs of study using the selective admissions process, your institution controls when to:
- Render admissions decisions
- Publish decisions
- Matriculate students
When creating your instution's selective admissions process, there are some prequisitives you, or your institution's administrator, needs to complete:
- Set up Recruiting and Admissions.
- Create programs of study without selecting the Fast Path Enabled option.
- Create application groupings and application pools.
- Configure these business processes and their security policies in the Admissions functional area:
- Admissions Evaluation Event
- Student Application Decision Event
Note
: You can find more information about configuring these business processes on Workday Community.Open Access Admissions Process – Fast Path
The second type of admissions process is open access, also known as Fast Path. Fast Path programs of study do not require the completion of requirements or review. Instead, applicants are directly admitted and matriculated upon completion of the application.
Fast Path programs of study may also have requirements, but they are not required to progress the application. However, like selective admission programs, Fast Path programs must have an application grouping for the relevant academic unit and range of start dates to receive applications. The following diagram outlines the steps in the selective admissions and the open access admissions processes.
Fast Path Admissions and Duplicate Students
Because Fast Path programs automatically admit all applicants, there can be a risk of creating duplicate student records if a prospect applies more than once. This duplication can create a large number of prospect records. To avoid this scenario, configure the following steps on the
Student Application Fast Path Event
business process:- Find Duplicates for this Person (service step). This step should occur before the Reconcile Student Applicant step.
- Reconcile Student Applicant (action step). This step should occur before the matriculation step and the completion step.
Workday does not notify you when the Find Duplicates for this Person step identifies suggested matches. To prevent unreconciled matches from halting business processes, Workday recommends that you run these reports and reconcile matches on a regular basis:
- Manage Duplicate Records for Student Match and Merge
- Merge or Manage Duplicate Records
Fast Path Application Review
Institutions can optionally route specific Fast Path applications for manual review to prevent automatic matriculation for special cases, such as international applicants or those with criminal convictions or academic disciplinary actions. This gives you more control over Fast Path applications by enabling you to prevent applicants with special considerations from automatically matriculating into programs of study.
To enable this, you can add an optional
Flag for Fast Path Application Review
service step to the Student Application Fast Path Event business process. If configured, the new step must be placed after the Reconcile Student Applicant step.
You can configure condition rules to identify which applications to flag; if no rules are configured, all Fast Path applications will route for review. When an application is flagged, Workday cancels the automatic process and allows reviewers to manually render an admissions decision, cancel it, or withdraw it.Workday also delivers a Flagged for Fast Path Application Review report field on the Student Application business object (secured to the Public Reporting Items domain) that you can use in custom reports. When an application is flagged for Fast Path application review, Workday displays the new Flagged for Fast Path Application Review field on these reports on the student application: Application Details and Overview.
Historical Students
Workday automatically suggests matches between historical and prospective students, saving you time and enabling you to easily access historical data for returning students. Workday delivers exact and suggested matches using rules based on:
- National ID.
- Last Name and Student ID.
- Last Name and Date of Birth.
Workday automatically:
- Identifies a historical student and a student applicant as a match if they satisfy the National ID rule.
- Suggests a historical student as a match to a student applicant if they only satisfy either or both of the remaining rules.
Historical Students and Multiple Institutions
To preserve the integrity of historical records, Workday prevents the merging or associating of historical records and active student records from different institutions. You can only associate an active student's record with the same student's historical academic record if they are associated with the same institution. You can only merge historical records if they are within a single institution.
Application Groupings and Pools
Application groupings are mechanisms in Workday that allow you to group your applications by academic unit, level, program of study, and range of start dates. You can then divide that group of applications into application pools for review among your admissions counselors.
Application Groupings
Application Groupings are a group of applications for the same academic unit, level, and range of start dates. For example, all graduate applications to the College of Engineering for the Spring of 2027 would fall into the same grouping.
Note
: A grouping must exist for an incoming class before you begin receiving applications for both selective and Fast Path applications.Application Pools
Application pools are a subset of applicants within a grouping. Your institution defines application pools as a means of dividing your applications among admissions counselors for review. When you create an application grouping, Workday automatically creates a default pool. If you do not wish to create other pools, all applications fall into this default pool. An application gets placed into the first pool it is eligible for. Therefore, order the application pools from most restrictive to least restrictive. Review the following example:
Application Grouping
:AMU Undergraduates Spring 2027
Application Pools
:- Hockey Players
- Applicants from NYC
- Last Name Beginning A-M
- Last Name Beginning N-Z
Ordering pools from most restrictive to least ensures Workday places applications in the most appropriate group. Then, you assign one or more admissions counselors to an application pool. This assignment indicates who is responsible for reviewing the applications in that pool.
Creating Application Pools
When using the View Application Grouping report to view an application grouping, select the Maintain Application Pools button. Here you can add as many application pools as your institution requires. Remember that each application grouping always has a default application pool, regardless of how many application pools it has.
When you add a row to create a new application pool, define the following:
- Application Pool Name
- Eligibility Rule
- Admissions Counselor
Note that you can also copy an existing application grouping, along with all the application pool configurations, to use with another academic period. To do this, use an application grouping's Related Actions to select Application Grouping > Copy. You can then use the Maintain Application Pools function on the new application grouping to make any adjustments. This is a quick way to create new application groupings that use the same or similar application pool configurations from period to period.
Application Pool Eligibility
When defining application pools, one of the key configurations is the use of student eligibility rules or student condition rules. Using student eligibility rules or student condition rules narrows down which applicants belong to a given pool. Unlike many other aspects of the Workday Student system, application pools can use both student eligibility rules and student condition rules. You can use pre-existing rules, or use the Eligibility Rule prompt to create a new student eligibility or condition rule.
Application Process Overview
The application process in Workday takes place over several steps. Each part of this process is configurable to suit your institutional needs. Explore these steps of the application and admissions process:
- Application submission
- Application action items and requirements
- Application evaluation
- Decision recommendation, rendering, finalizing, and publishing
Application Submission
Potential students can submit their application in multiple ways. Often students submit paper applications or apply via an external online portal. In these cases, admissions administrators have two ways to enter an application.
If an applicant exists as a student recruitment in the system, you can use the recruitment's Related Actions to select Admissions > Add Application. This action prepopulates the application with information derived from the student prospect record. If an applicant does not exist in the system, you can use the
Create Student Applicant
task to create an applicant profile and submit the application at the same time. This task makes it easy to enter new applications without needing to first create recruitment records.Additionally, you can configure the External Student Site to allow prospects to access an Applicant Home portal. This external portal allows students to submit applications directly into your system, eliminating the need for a lot of manual data entry.
Application Action Items and Requirements
As part of the admissions configurations, you must define the application requirements for each relevant academic unit and academic level, as well as individual programs of study. Some of these requirements may involve the applicant completing specific action items. For example, applicants must submit a secondary school transcript, upload writing samples or portfolios, or provide standardized test scores. When an application gets submitted, the system automatically assigns application requirements in accordance with the identified primary program of study on the application.
Note that you can also manually add application action items to an applicant. Applicants must complete all of their application requirements and action items before an evaluator can evaluate the application and recommend a decision.
Application Evaluation
When an applicant completes all application requirements and action items, their application routes to an evaluator for review. This review consists of the fields identified in the configured Evaluation View for a given academic unit and level combination. The evaluator only sees the fields included in the Evaluation View, and uses that information to recommend an admissions decision.
Decision Recommendation, Rendering, Finalizing, and Publishing
When an evaluator completes an application evaluation, they submit an admissions decision along with a reason for the recommendation. Workday owns admissions decisions, such as Admit, Deny, Defer, or Waitlist. You cannot create admissions decisions. However, you can create and customize admissions decision reasons to suit your institutional needs.
After an evaluator recommends an admissions decision, the application routes to an admissions administrator to render the final decision. When the admissions administrator renders the official decision, the administrator navigates to the relevant application grouping to finalize the admissions decision. Finalizing admissions decisions makes them available for internal administrators to view, but does not make the decision public.
After the administrator finalizes the admissions decisions for the applications in an application grouping, the administrator can then publish the application grouping. Publishing an application grouping makes all of the finalized decisions publicly available. After this step is complete, the student can see the admission decision. If admitted, the applicant can then choose whether to accept the offer of admission or not.
Application Requirements
Application requirements define the additional information an applicant must supply to complete the application. You can attach these requirements to an academic unit and level and to a program of study. Applications inherit requirements from the superior academic unit. The image below is a sample application requirement configuration for Alma Mater University.
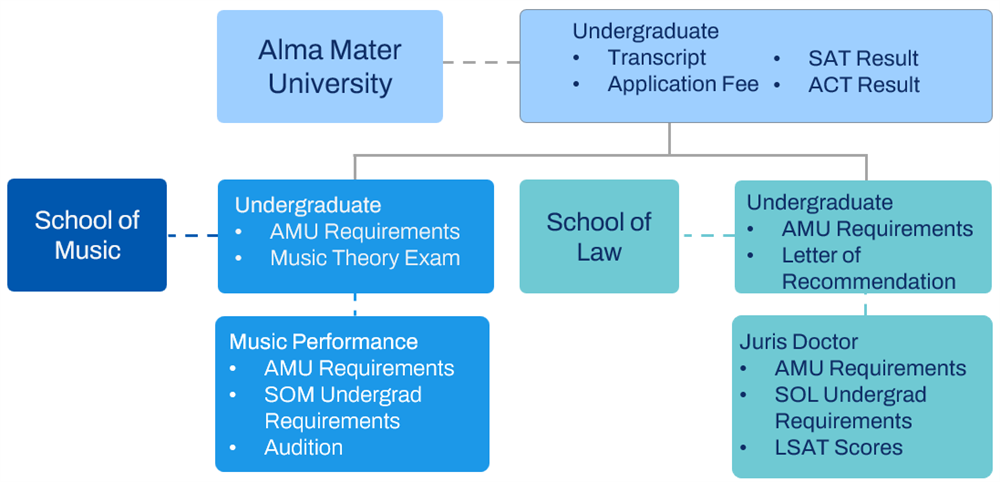
Notice that the Undergraduate requirements inherit down from the Alma Mater University academic unit to each of the subordinate units. Additionally, each subordinate unit has additional application requirements for undergraduate prospects, as well as more specific requirements based on a prospect's program of study.
Submitting Applications
Both students and administrators can manually enter applications. In either case, when entering an application, include as much information as you can. Including this information helps your admissions teams organize applications into application pools within an application grouping. One way to do this is by using configurable applicant types. You can create custom applicant types, such as First Year, Freshman Transfer, International, etc. using the
Maintain Student Applicant Types
task. Doing so aids your institution's admissions staff to better categorize and organize admissions applications.Additionally, like test scores and transcripts, an integration can enter applications. As with all student prospects, the match and merge process runs to prevent duplicates, whenever an application gets entered or information gets updated.
Manual Administrative Entry
You can use the
Create Student Applicant
task to create a student application from scratch when no prospect record for an applicant exists. Here you enter the applicant's personal information, as well as their application details.If an applicant already exists as a prospect in the system, use the recruitment record's Related Actions to select Admissions and then Add Application. Here you enter the details of the application.
Online Application
In addition to manual entry or integration, Workday also offers a student external site, which can house a configurable online application on the Applicant Home portal.
You can use the
Create Admissions Application Configuration
task to create a customized online application for your incoming student prospects to complete. The application has separate sections, which you can relabel. Each section contains several fields mapped directly to fields in Workday. You can relabel these fields, mark them as required, select a default value to appear in the application, or hide a field that your institution does not require.Additionally, after submitting an application, applicants can return to the Applicant Home portal to view the status of their application. They can also see the application requirements and required action items they must complete from the Applicant Home.
Application Evaluation
When a student prospect submits an application, the system evaluates the identified primary program of study and configures the appropriate application requirements on the applicant's profile. When an applicant completes all the application requirements on their profile, the system automatically launches the application evaluation process.
The Evaluation View Policy controls the actual evaluation of the student's application for the appropriate academic unit and academic level combination. You can configure the evaluation view layout. Use the
Create Evaluation View
task to specify which fields from an application should be available to all, some, or no applications evaluators. You can choose to hide entire sections of the application as well.After defining an evaluation view, use the
Maintain Evaluation View Policy
to assign the view to an academic level of an academic unit. Doing so presents admissions reviewers with the configured evaluation view when reviewing the application.Admissions Committees
In addition to an individual evaluator configuration, you also have the option of creating admissions committees to have multiple reviewers evaluate the same application at once. Admissions committees get assigned to an academic unit and are responsible for reviewing applications within an identified application pool.
Student Application Verifications
Student application verifications are independent of application evaluations. This enables you to make application evaluations an optional part of the application review process. This also gives you the flexibility to verify applications at any point before applicants matriculate. Use the
Maintain Application Verification Policy
task to configure application verification policies. You can also use the Verify Application
task to verify that applications are accurate and complete, and set their status to verified.You can automatically assign applications for verification, saving you time and effort. When you configure automatic verifiers for application pools, Workday assigns applications to them for verification as soon as the applications are ready, helping the applications reach evaluations more quickly.
As soon as an application is ready to be verified, it will be assigned to the verifier who has been assigned the fewest number of applications that day. The count for the applications assigned to a verifier will be reset daily at midnight (tenant local date and time). The automatic assignment does not take into account previous application assignments.
If verifiers are tied in the number of assignments for the day, the system will randomly choose one of the tied verifiers and assign the application to them.
Once the Automatic Assignment task setting is configured with verifiers, it will take effect from that moment forward:
- Any applications already assigned to a verifier will continue to be assigned to the current verifier.
- Any application not assigned to a verifier will remain unassigned.
- Any new applications ready for verification will follow automatic assignment configuration.
To configure automatic assignments for student application verifications, use the
Manage Application Verification Assignments
report.Admissions Decisions
After an application gets evaluated, the evaluator recommends a decision. An administrator either accepts or changes that decision recommendation.
Workday Student provides several secured steps to prevent publishing application decisions too soon or in error. Before an applicant can see the decision on their application or receive any decision communications, an administrator must finalize and publish the decisions. You can restrict these actions to select individuals (e.g., the Director of Admissions), to prevent errors.
The Finalize step indicates that your admissions office is satisfied with the overall class makeup and decisions. This makes the decision final, but still only internally visible. The Publish step makes that decision publicly available and allows the system to send decision communications to applicants. Once there are applications with decisions in an application grouping, users with access can select Finalize from the grouping's Related Actions.
Publishing Fast Path Decisions
You can configure Fast Path applications to automatically become publicly available once completed. Additionally, you can render decisions for Fast Path programs of study using a web service.
Chapter 8 Tasks and Reports
Below are the commonly used tasks and reports for the topics covered in this chapter.
Tasks:
- Create Admissions Application Configuration
- Create Admissions Counselor
- Create Application Action Item
- Create Evaluation View
- Create Student Applicant
- Create Student Recruiting Event Registration Form
- Maintain Student Applicant Types
- Purge Person Data
Reports:
- Find Admissions Counselor
- Find Student Prospects
- View Application Grouping
- View Evaluation View