
Student Records & Advising Overview
Overview
The central purpose of any institution is to help students complete a program of study and earn a credential. The Workday Student system provides the functionality necessary to accomplish this goal. You can use the system to make sure you have fully built out curricula for students to follow. You will also manage student registrations and course eligibility. And of course, you will need to monitor each student's academic progress to provide accurate advising, helping them achieve their educational goals.
In this chapter, you will examine the key features in Workday that will help you to manage all of these components. The Curriculum Management features will allow you to configure course loads for your programs of study, create courses and course sections, and assign instructors appropriately. Academic advising will help you track a student's academic progress, providing helpful analytics to see how your university's overall student population is performing. Student records will allow you to configure how and when students are able to register for courses. You will also be able to create student cohorts to manage groups of students by academic unit and program of study.
Objectives
By the end of this chapter, you will be able to:
- Identify the features of curriculum management.
- Identify and manage the details of course creation and configuration.
- Identify the features of academic advising.
- Identify and manage the details of an academic track.
- Identify the features of student records.
- Identify and manage the details of a student's academic progress.
Student Records and Advising Overview
Workday Student Records and Advising is the central control for all aspects of a student's academic performance. As students progress through their academic programs, there are several parts of the system that you need to configure. The process of managing students as they complete their programs falls into these categories:
- Curriculum Management
- Academic Advising
- Student Records
Each of these categories has several components that you must consider and configure. We'll explore each of these areas in this chapter.
Curriculum Management
Curriculum management involves creating the courses and course sections that students complete as part of their coursework.
Courses
The first and most fundamental component of your university's curricula are the courses. A course is a series of lessons in a particular subject, typically leading to qualification. Institutions can offer courses in multiple formats (e.g., lectures, labs). Institutions may require students to enroll in multiple instructional formats to complete the course.
There are two parts to defining your institution's courses in the Workday system. First, you create a course definition, which defines the format and grading behaviors.
Course Definitions
When you use the
Create Course
task to create a new course in your tenant, two things happen.- The system creates a course definition for the course. The course definition includes all of the data about this course, including its controls and relationships with other courses or objects in Workday. The system directs the course definition view toward administrators and staff of your institution and includes detailed information about the course that students do not need to see.
- The system also creates a course listing for the course. This course view is meant for a student audience and only contains data relevant to students, including information about prerequisites and course descriptions.
When creating a course, identify most of the details of your course, including:
- Academic Level
- Academic Unit
- Subject / Course Number
- Instructional Format
- Delivery Modes
- Allowed Grading Basis
- Eligibility Rules and Prerequisites
Prerequisites
Enter any required prerequisite courses or competencies.
Eligibility
Define any eligibility rules, such as major or class standing, that you require for students to enroll in a course.
Delivery Modes
Define the allowable delivery modes for a course, such as in-person or online.
Tip
: You can customize the labels of Workday-delivered course delivery modes. This gives you the flexibility to describe course offerings according to your institution's specific format.Section Defaults
Define the default values for sections of the course. These values can include section capacity, units, and wait list capacity.
Additional Course Configurations
Here are some additional recommended key configurations for your curricula.
Course Tags
You can create custom tags to attach to your course definitions to categorize them and make them easier to track and manage. Setting up tags, such as "Humanities" or "Foreign Languages," and associating them with specific courses allows you to:
- Filter courses in search reports.
- Enable and ease reporting and tracking.
- Identify attributes of a course.
- Create smart lists.
Grouping tags into tag categories also makes courses easier to find in prompts. For example, you can define a General Education course tag category that includes the tags for Humanities, Social Sciences, and Natural Sciences.
These course tags provide a handy way to designate sets of courses you can apply to degree requirements. As an example, Humanities is a general education requirement across degrees at many institutions. Students can typically fulfill this requirement with classes in History, Psychology, Sociology, or other subjects that can range across different academic units. If you tag these classes with a Humanities course tag, advisors can easily identify which classes are available for students to fulfill the Humanities requirement.
Tip
: For those supporting multiple institutions, you can use the same name for course tag categories across multiple institutions. Go to Workday Community for more information on Course Tag Categories for Multiple Institutions.Learning Outcomes and Competencies
Institutions can assess a student's academic success by measuring and testing for competencies and using learning outcomes to help students achieve those competencies. Now, take a closer look at these two concepts.
Competencies
Courses cover a variety of subject matters. Competencies are goals for measurable proficiency in that subject matter. Many institutions use competencies to track their student learning. Institutions can associate competencies with courses and students, as well as learning outcomes. Students earn competencies by completing a course with related learning outcomes. You can also manually assign students competencies that they have demonstrated.
For example, you may have a comptency such as this: Competency: Self-Awareness. A thorough understanding of oneself across multiple dimensions.
When a student successfully completes a course with an assigned competency, they automatically earn the competency. This competency appears on their student profile, and their transcript.
Learning Outcomes
You can use learning outcomes to define the skills that make up a competency. Learning outcomes help your institution track and measure student learning. You can assign learning outcomes to a course and you can also associate them with a specific competency.
For example, you may have a Learning Outcome such as this:
Learning Outcomes: Students with competence in self-awareness can:
- Define and articulate their personal values.
- Evaluate and reflect on their actions and change as necessary.
- Discern and describe their personal leadership style, strengths, and limitations.
- Actively seek, evaluate, and incorporate appropriate feedback.
You would assign these learning outcomes, with the idea that students should be able to demonstrate proficiency in the learning outcomes after completing the course.
Course Sections
After creating the course definition, create course sections. A course section indicate the specific locations, times, days, and date ranges for the course. A course section uses an identified instructional format. There can be multiple course section offerings for one course in a given academic period. Students enrolling in courses locate a valid course section and register for it during enrollment.
To define an actual time schedule and identify an instructor for the course, create at least one course section for a given course. Use the
Create Course Section
task to identify the relevant course, academic period, weekly meeting pattern, and who will teach each course section. For example, after creating a course definition for Biology 101, you can create a course section that meets every Monday, Wednesday, and Friday from 2:00 PM - 3:00 PM. You can identify Dr. Audrey Hodges as the professor.Course Instructors
When defining your courses and course sections, identify which instructors teach or lead each section. Doing so gives instructors access to course section information such as rosters and grades.
For an instructor to be able to teach the class, they must first:
- Have at least one valid academic appointment.
- Have an assigned role on the appropriate academic unit.
Touchpoint
: Academic appointments are part of the Workday HCM product area. To find more information on how to configure academic appointments, see Workday Community.After confirming that an instructor has an academic appointment and role on the academic unit, use the
Designate Instructor Eligibility
task to specify a particular worker's eligibility. You can specify the eligibility at the highest level of academic unit, or use more granular criteria such as specific courses, course subjects, and delivery modes.Once you have assigned an instructor to a course section, you can grant them information only on that course section. This means that instructors can only view and edit the grading information for students in their own sections.
Course Section Location
You need to identify a location.
Course Materials
You need to identify the required and optional materials that students need for a given course section.
Publishing Course Sections
After you have created all of the course sections offered for your course, you also need to publish your course sections. To do this, run the
Find Course Section Definitions
report and select one or more course sections to publish. Then select the Mass Publish Sections button. Publishing course sections makes them publicly available for your student population to see and register for.Viewing Course Sections
Both students and administrators need the ability to search for and view course sections in the system. However, the information that each group needs is quite different. As such, Workday offers two ways to find course sections in the system. Take a closer look at these.
Find Course Sections
Students can use the
Find Course Sections
report. Students can select an academic period, one or more academic levels, and an optional location. The system displays a list of published course sections meeting that criteria. The report displays the name of the course, the listed instructor, and the meeting pattern for the course section. Students can select a course section to view additional details such as a description and course materials. This report only displays the information that students need to review and register for course sections.Find Course Section Definitions
Administrators need more information on course sections than students do. They need to know the name, instructor, and meeting pattern for a course section. Additionally, they also need to know details about section owners, delivery formats, grading bases, section controls, eligibility rules, and more. Faculty and administrators can use the Find Course Section Definitions report to quickly find and access the profile view of a course section. This report provides all of the administrative details they need to take any required action on the course section.
Student Messages from Course Section Roster
You can send messages to all students enrolled or waitlisted in a course section, eliminating the need to manually manage students' email addresses to send them messages outside of Workday. Use the
Send Message to Enrolled Students
task (secured to the new Manage: Group Ad-Hoc Communications - Course Roster domain) to more easily send an email to all students enrolled in the same course section. Access this task by selecting the Send Message button on the View Course Section Roster
report.Academic Advising
Students require guidance from your academic advising staff as they progress through their programs. There are a few components of the academic advising process that you need to consider and configure.
Academic Requirements
Academic requirements represent the validations of educational objectives for students. You can define academic requirements using eligibility rules. Then, you can assign them to academic units, programs of study, or program areas.
Advisors
You need to identify your institution's academic advising staff and use student cohorts to assign staff to specific students. Keep in mind that academic advisors need access to student information; using role-based security configurations can give them the restricted access they require.
Registration
During their designated registration appointments, students locate and register for course sections.
Troubleshooting
When students attempt to register for courses, they may run into unexpected issues with enrollment access or holds. Your students and faculty advisors need to understand the tools they can use to troubleshoot registration issues. Additionally, they also need to know resolutions to common registration problems.
Academic Progress
As students complete courses and earn competencies, they need to track their progress in a measurable way. You can create academic plans for given programs of study so that students can easily see which courses they need to take. Academic plans help students mark off the requirements as they complete them.
Academic Requirements
Build every program of study with specific educational objectives in mind. These objectives measure the educational progress and competencies of students enrolled in the program. Academic requirements act as validations of the education objectives of enrolled students. You can configure these requirements to be as broad or granular as your institution requires. You can configure academic requirements for your institution's academic units (with academic level), programs of study or program focuses, and program areas.
Note
: Requirements for academic units can be inherited by lower-level academic units.Academic Requirement Effective Dating
When configuring academic requirements for an academic unit, program of study, or program area, you must enter an effective date for the requirements. Doing so ensures that the system assigns any students who enroll in the academic unit or program of study after the effective date that set of academic requirements.
If you update the academic requirements later, the system only applies those updated requirements to students who are enrolling in the relevant program after the new effective date. In this way, the effective dates act as a versioning mechanism for the academic requirements.
For example, say that you create a new program of study on 1/01/2026 and configure a set of academic requirements for the program on that same day. The system assigns any new students in the program to the academic requirements you configure.
A year later, you update the academic requirements for the program with a new effective date of 01/01/2027. The system assigns any students who enroll in the program after 01/01/2027 the new set of academic requirements. However, the students who enrolled before 01/01/2027 are only required to complete the original set of academic requirements (which were effective dated 01/01/2026).
Configuring Academic Requirements
Workday provides a wide array of options for you to control the requirements for your units and programs. You can use custom eligibility rules to create academic requirements that are specific to a small subset of your student population. Use the following types of eligibility rules to define academic requirements:
Eligibility Rule Type | Description |
|---|---|
Course Requirement | Verifies completion or enrollment in all or a certain number of specified courses. You can further specify a grade criteria for the completed courses. You can also use course smart lists to easily identify many courses. |
Unit Requirement | Verifies completion of units with multiple characteristics, such as:
Example : A student has completed 12 units in residence from Biology courses 300 - 499 with a grade greater than a D. |
Test Achievement | Verifies scores from tests or test sections. Example : ACT, SAT, or AP Exam |
Grade Requirement | Verifies:
|
Competency-Learning Outcome | Verifies the achievement of any or all of specified competencies and learning outcomes. |
Activity | Verifies completion of activities such as internships or orientations. |
Combination | Verifies any or all of a specified number of a combination of eligibility rules. Example : Student must take at least three courses from any of three different areas. |
Smart Lists
You can use the
Create Smart List
task to create lists of courses that satisfy the same requirement. This process can make it easier to identify applicable courses to a particular program of study requirement, especially when there are a large number of applicable courses available.You can also create and use restricted requirement sharing groups to prevent courses from satisfying multiple requirements at once.
Academic Requirement Groups
Higher Education institutions often require the ability to track the academic progress of students on a granular level. Counselors and students need to see which academic requirements are specific to their program of study, and which are general education requirements. You can use academic requirement groups to help categorize academic requirements into these different segments. Doing so enables you to provide advisors and students with better insight into understanding a student's academic progress.
Some common types of academic requirement groups can include:
- General Education (GE) requirements
- Upper Division GE requirements
- Major requirements
- Minor requirements
When running the Configure Academic Requirements task, you can select an academic requirement and a group to include the requirement in. This selection enables you to provide a comprehensive list of requirements and groups to aid students and advisors in creating academic plans.
Total Academic Requirement
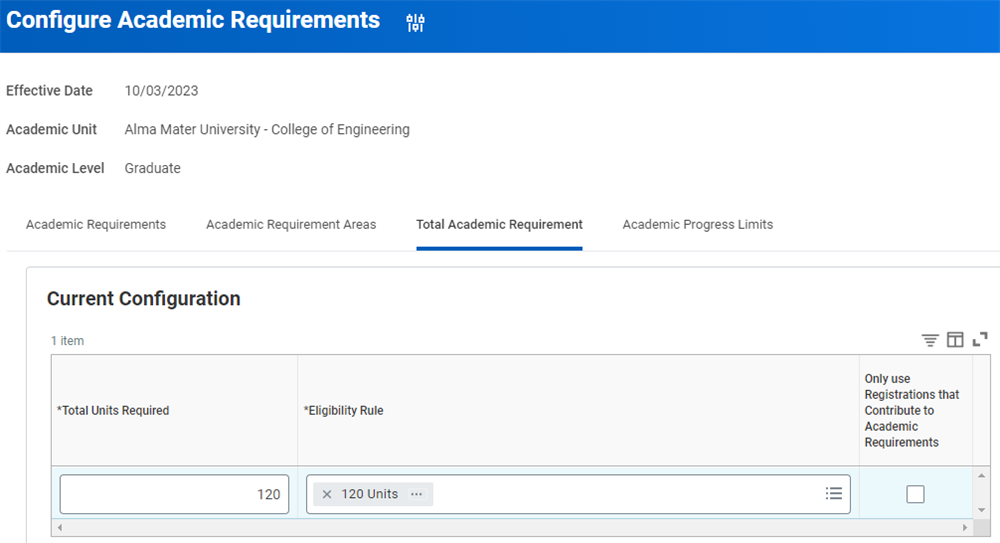
When configuring academic requirements for an academic unit or program of study, you also have the option to configure a Total Academic Requirement. This configuration represents the total number of units a student must complete in order to complete their program of study. This total includes all academic requirements for a program, providing administrators and students with a comprehensive view of degree completion to track progress.
Academic Requirement Areas
You can create academic requirement areas to group academic requirements and determine a total number of units needed across those grouped requirements. When configuring academic requirements for an academic unit and level combination, or program of study, you have the option to configure academic requirement areas. Here you can select from the list of academic requirements identified for the academic unit or program of study. You can select one or more of these requirements. You can also designate a number of units that students must complete across these requirements to satisfy the academic requirement area. Note that, like academic requirements, academic requirement areas inherit downwards through the academic unit hierarchy structure.
For example, you could create a requirement area for all of AMU undergraduate students called Institutional Core Requirement. This area requires students to complete 20 units from the Literacy Requirement, Oral Communication, Quantitative Reasoning, and Written Communication requirements. This academic requirement area inherits down to all undergraduate academic units and programs of study at AMU.
Once configured, academic requirement areas appear on the Academics profile group of a student's academic record.
Conditional Assignment of Academic Requirements
You can configure conditions for academic requirements using student eligibility rules. With conditions configured, Workdays automatically assigns the most relevant requirements to students. Use the
Configure Academic Requirements
task to configure and define conditions on academic requirements.To configure conditions for academic requirements, use the
Create Student Eligibility Rule
task, and create any of these eligibility rules types to assign as conditions to academic requirements:- Athletic Team
- Program of Study
- Student Cohort
- Test Achievement
Then, use the
Configure Academic Requirements
task to configure and define conditions on academic requirements.Student Cohorts and Faculty Advisors
In order to meet the advising needs of your student population, it may become necessary to divide the advising load among a number of faculty advisors. Student cohorts provide an easy way to group students for advising purposes, using criteria that you select such as grade, program of study, or class standing. Student cohorts are role-enabled, meaning you can assign different advisor roles to different sets of students. You can limit the information advisors see with appropriate security configuration.
When you create a student cohort, give it a name that indicates the type of students you plan to include in the cohort. Some examples could include, Music Performance majors or Mathematics Department students.
Student Cohort Collections
You can also group student cohorts into collections based on cohort types, enabling you to grant administrators access to only the cohorts they manage. This gives you the option to configure the administration and security of cohorts independently from the academic unit, helping you maintain and organize support for your student populations. To group student cohorts into collections, you need to:
- Configure the security group on the Set Up: Student Cohort Collections domain.
- Create collections of cohorts based on cohort types.
- Assign roles to cohort collections so that those users can create, maintain membership of, and have visibility into only the cohorts that are in their collections.
You can grant access to any domain with Roles - Student Cohort as an allowed security group type to role assignees on cohort collections. This gives the collection role assignee access to the items in the domain for all the cohorts in their collection.
Manually Populated Cohorts
Once you have created the cohort, use the Find Academic Records report to manually identify the student population that you want to include in the student cohort. You can later edit the cohort population at any time.
Tip
: Use the facet filters in the Find Academic Records
report to narrow your results and select all the students that meet the criteria.Criteria-Based Cohorts
In addition to the manually populated cohorts described above, you can create cohorts with criteria-based memberships. These cohorts use saved searches or custom reports to determine who is in the cohort. You can choose to populate the cohort once upon creation or to update automatically. For automatically updating cohorts, you have the option to specify an academic period to stop updating automatically.
Additionally, after you create and populate a criteria-based cohort, you can use the
Add Student to Cohort
, Remove Student from Cohort
, and Edit Student Cohort Membership
tasks to manually update the cohort population. This process gives you a lot of flexibility to update criteria-based cohorts as needed.Mass Adding and Removing Students
For both manually populated and criteria-based cohorts, you have the option to mass-edit the student population at any time. You can use the
Add Academic Records to Student Cohort
task to add multiple student records to a cohort. You can use this task now or at a specific date or academic period in the future. Similarly, you can use the Remove Academic Records from Student Cohort
task to remove multiple student records from a student cohort. Note that you access these two tasks through the Find Academic Records
report.Special Populations
It is good practice to create cohorts specifically for special student populations such as international students or military students. Doing so helps advisors and administrators track the unique requirements for these students.
Assigning Faculty Advisors
Once you have created and populated the student cohort, you can use the cohort's Related Actions to select Roles, and then Assign Roles. You can define one or more advisor roles to assign to different workers in your institution. Each role can then have a separate security configuration to limit the amount of data access for specific advisors.
After assigning the roles to the student cohort, be sure to also assign them to the relevant academic unit. Doing so gives the advisor access to the data on that academic unit. However, you may restrict their access based on their security configuration. For example, say you create a student cohort for students in the History Major undergraduate program at AMU. You could assign three advisor roles: Faculty, professional, and peer. However, your security configurations may allow the faculty and professional advisors to see a student's courses and grades, but only allow the peer advisor to see courses.
Advising Appointments
Students can use Workday to schedule academic advising appointments with their assigned faculty advisors. Students can use the
Request Student Appointment
task to schedule a faculty advising appointment, as well as other appointment types in the system. Advisors can use the View Student Appointments
report to view past and present appointments. This report also helps advisors note which students failed to show up to their appointment. Additionally, staff supervisors can use the View Student Appointment Availability
task to view the appointments of their staff.Academic Planning
Course catalogs and program requirements can often be cumbersome and difficult to decipher. As a result, students may have a difficult time identifying which courses they need to take, and planning their course schedule for a given academic period. To alleviate this problem, Workday offers the ability to create an academic plan for a student.
These academic plans help students satisfy academic requirements and complete their coursework. Workday provides students with the information they need to register for courses that help them complete their educational objective. There are a couple of different configurable components that go into academic plans.
Typical Attendance Pattern Policies
You can create typical attendance patterns for students in different programs of study. These patterns are essentially a projection of student attendance before actual enrollment. You can use this configuration in the creation of academic plans, as well as in financial aid attendance plans.
Academic Plan Templates
You can also create academic plan templates. These templates provide an easier and more efficient way to create academic plans for students. You can create academic plan templates for specific programs of study. Students who enroll in those programs of study automatically have an academic plan created in accordance with the template configuration, effective for their anticipated start date.
Like academic requirements, academic plan templates are effective dated. When a student enrolls in a new program of study, the system assigns an academic plan based on the template with the latest effective date. This plan remains their academic plan unless the student or their advisor manually updates the plan. This is the case even if there is a new academic plan template configured in the tenant later.
Managing Academic Plans
Students can work with an academic advisor to create an academic plan or have the system automatically assign an academic plan.
Tip
: Configure the Student Onboarding Event
business process to automatically create an academic plan for students from a template.After academic plan assignment, students can update their academic plan at any time. They can design multiple schedules from their plan and use the saved schedules to register for courses during their registration window. They can also register directly from the plan during their registration window.
Alternate Academic Plans
In addition to the academic plan assigned automatically based on the relevant academic plan template, students also have the option to create alternative academic plans. An alternate plan gives students the freedom to explore different options for how they want to complete their programs. Students can designate their alternate academic plan to become their primary plan at any point in their academic tenure at your institution. This provides students with the flexibility to find the best pathway to complete their program of study.
Student Appointments
Students, faculty, and staff can create, schedule, and manage appointments in Workday. Student appointments allow students to collaborate with administrators and faculty as students progress through their educational experience. Additionally, student appointment tracking happens through institutionally created appointment categories and reasons. You can manage all scheduling for this feature, including employee availability, within Workday.
Both students and staff can manage conflicts in schedules by canceling existing appointments. Workday enables staff and students to provide a cancellation reason at the time canceling an appointment. Workday updates staff availability, once a student, or staff member cancels an appointment.
Student Statuses
Each student in your institution has a status. These statuses inform you of the student's progress toward program completion. These statuses also help you to identify, process, and report on specific populations of students. For example, you can use student statuses to create a report on all active students who are not on a leave of absence. The following is the list of statuses with a brief description of each:
Term | Definition |
|---|---|
Matriculated | Set when the matriculation process completes and Workday creates the student record. |
In Progress | Begins when the program of study starts. Corresponds to the Declare Date on the program of study. |
Discontinued | Set when the Discontinue Academic Records Event business process completes. |
Dismissed | Set on the Dismissal Start Date specified on the Initiate Dismissal for Student task after the Student Dismissal Event business process completes. |
Institutional Withdrawal | Set on the Withdrawal Date specified on either of these tasks after the Student Institutional Withdrawal Event business process completes:
|
Leave of Absence | Begins on the Leave Start Date specified on either of these tasks after the Student Leave of Absence Event business process completes:
Changes to In Progress on the Return Date specified on either of these business processes:
|
Suspended | Begins on the Suspension Start Date specified on the Initiate Suspension for Student task after the Student Suspension Event business process completes. Changes to In Progress on the Return Date specified on the task. |
Pending Completion | Begins when the student applies for program completion. |
Completed | Set when the program of study completes. |
Discontinue in Matriculated Status
Workday enables you to discontinue students while they are still in Matriculated status in their program of study. Use the
Mass Update Student Status
report to discontinue students who have a current status of Matriculated and a future status of In Progress on their program of study record.This report provides an efficient and accurate way to handle students who accept their admission but do not attend the institution. Using this report also helps you maintain accurate records of student statuses and dates and ensure timely downstream actions, such as deactivating accounts or rescinding access.
Deceased Students
If a student passes away while pursuing their program completion, use the
Designate Student as Deceased
task to initiate the system processing their record accordingly. Configure the Deceased Student Event
business process to do the following things:- Apply a student hold to their account.
- Set the student profile to Private.
- Discontinue the academic records for the student and mark their program of study as Discontinued.
- Withdraw any active student recruitment records with applications.
- Write off any outstanding student charges for that student.
- Disable the student's Workday account.
As part of this business process, you can upload any relevant documentation as attachments for your institution's records.
Student Records
Student Records encompasses the student experience at your institution. These configurations are designed to allow students to enroll in the classes they are eligible for during the correct periods. Students also need to be able to track their academic progress as they complete their assigned coursework.
Student Registration
After defining your program requirements and organizing your student population, you can move on to the student records part of Workday Student. Here, students register for courses and move through their programs of study, hopefully resulting in a completed educational credential. First, however, there are a few necessary configurations you must make to ensure that the correct students are enrolling in the correct classes at the appropriate times.
Registration Date Controls
You can use the
Maintain Academic Period Date Controls
task to control date-specific processes or events. These include registration-related dates such as Registration Soft Drop Window Start, Registration Soft Drop Window End, Open Enrollment Start, Open Enrollment End, and Drop with W Grade End.Participation Verification
You can configure when instructors can no longer update a student's course participation status. You can configure the date controls for when these outcomes occur. Use the date control framework to set an end date for instructors updating course participation. This helps you accurately and consistently verify participation for downstream processing such as financial aid, while appropriately limiting when instructors can make changes.
Enrollment Access Policies
Enrollment access policies are enrollment access rules that get assigned to either an academic unit and level combination, or a specific program of study. The enrollment access policies you define determine which students can enroll in which courses. These configurations also determine which grading scheme is available to select during registration. You can assign enrollment access policies to academic units or programs of study. You also have the option of selecting a specific course or smart list of courses to apply the policies to.
Registration Appointments
Once you have configured the open enrollment start and end dates and created the enrollment access policies needed for your various student subpopulations, you can use the
Maintain Academic Period Registration Appointments
task to define the registration appointments for your students. For the academic period intended for registration, you can create registration appointments and assign students to them. The eligibility rule you select determines which students can register during the appointment period. When students meet more than one eligibility criteria, Workday assigns the earliest appointment to them.Students can only register for course sections during specific date windows that you need to configure in the system. Students have different registration appointments depending on their academic level, class standing, or other qualifiers.
Registration Methods
There are several ways that students can register for classes. Students can register for courses on the desktop or mobile application from:
- Their academic plan.
- Their saved schedule.
- TheFind Course Sectionsreport.
- TheFind Coursesreport.
You may need to configure each of these methods in your system in order to give students access. For example, your institution may only wish to allow students to register from their saved schedule or academic plan. In such a case, your security administrator needs to disable the security permissions for the Register From Find Courses or Register From Find Course Section Report security domains.
Registration Drops, Swaps, and Waitlists
In addition to registration, there are a few other options that students have when managing their course schedules, both during and after the registration period. Students can drop or withdraw from a course at any time during the academic period. During registration, they can swap classes as well, making it easy to amend their proposed schedule without adding and dropping several classes manually. Additionally, when course sections reach capacity, many students may have to register for a course section's waitlist. This waitlist lets the system automatically register the student if previously registered students drop out.
Drop or Withdraw
When a student wants to drop or withdraw from a course, there are three potential outcomes:
- The student drops the course and it is removed from their student record.
- The student drops the course and is assigned a withdraw or "W" grade on their student record for that course.
- The student drops the course and is assigned a grade based on their completed coursework.
You can configure the date controls for when these outcomes occur. Use the date control framework to determine when the last day of an academic period to drop a course without a record should be.
You can also define the last day to withdraw from a course and earn a "W" grade. Instructors grade any students who withdraw from a course after this date in accordance with their completed coursework. You also have the option to configure the withdraw grade to a custom grade depending on your institution's setup using the
Create Student Grading Scheme
task.Course Swap
Students can use the Swap button during registration to drop and add course sections concurrently without dropping from any course. For example, if a student registered for a Biology 101 course, but needed to take a Music 202 course at the same time, they can select the Swap button during registration to swap out these course sections. This process is much easier and more streamlined than manually dropping the Biology class and then searching for and adding the Music class.
Waitlist
You configure each course section with a specific course capacity limit. This capacity determines how many students can register for a class before the system considers it full. The system may add any students who wish to register for a full class to a waitlist, which is a queue of students who wish to register. When a registered student drops, the system registers one of the waitlisted students in their place.
You can define waitlist capacity for course sections as well. Doing so determines how many students you allow on the waitlist before the course section registration closes. Additionally, you can configure the waitlist to behave in one of two ways:
- Automatic: By default, Workday manages waitlists automatically based on how you configure theRegistration Waitlist Availability Eventbusiness process. When the section capacity becomes available, the system promotes waitlisted students to enrollment sequentially, in order of waitlist registration. It also notifies students of their eligibility to enroll.
- Manual: You can select the Manually Manage Waitlist Promotion checkbox on the course section configuration. This selection allows you to use these tasks to manage waitlists manually:Waitlist Student in Course,Register Student from Waitlist,Remove Student from Waitlist.
Registration Troubleshooting
Students may attempt to register for a course and encounter issues. Or, they may anticipate problems with registering for a course. In these cases, there are a few of methods of analyzing the registration issue. First, when students view a course section, they can select the Troubleshoot button to preemptively see any issues they may have with registration.
Additionally, if a student tries to register for a course section and fails, the system displays a reason for the failure. This display helps inform the student's conversation with their faculty advisor.
Faculty advisors or other administrators can use the
Registration Troubleshooting Console
report to select a student and course section. This report displays the exact reasons for the registration failure for this student. You can use the other tabs on this report to get more information about the specific details of the failure. For example, this information could include which prerequisite courses a student has to complete in order to successfully register.Chapter 9 Tasks and Reports
Below are the commonly used tasks and reports for the topics covered in this chapter.
Tasks:
- Add Student to Cohort
- Configure Academic Requirements
- Create Course
- Create Course Section
- Create Smart List
- Create Student Cohort
- Create Student Eligibility Rule
- Create Student Grading Scheme
- Designate Instructor Eligibility
- Edit Student Cohort Membership
- Maintain Academic Period Date Controls
- Maintain Academic Period Registration Appointments
- Maintain Grading Basis Values
- Register Student from Waitlist
- Remove Student from Cohort
- Remove Student from Waitlist
- Waitlist Student in Course
Reports:
- Find Academic Records
- Find Course Definitions
- Find Course Section Definitions
- Find Course Sections
- Find Courses
- Mass Update Student Status
- Registration Troubleshooting Console
- View Academic Requirements
- View Student Appointments