
Recruiting Subprocesses
Overview
Workday provides several subprocesses you can configure to determine how a candidate moves through your recruiting process. Configure these subprocesses within the dynamic
Job Application
business process. Different candidates may go through different subprocesses or a different order of those subprocesses. In this chapter, you will learn how to configure the subprocesses that comprise the Job Application
business process.Objectives
After completing this chapter, you should be able to:
- Configure the Workday Recruiting subprocesses:
- Review
- Screen
- Assessment
- Interview
- Reference Check
- Offer
- Employment Agreement
- Background Check
- Ready for Hire
- Schedule and manage interviews.
- Configure the offer letter template.
The Dynamic Job Application Business Process
The
Job Application
business process is unique; you can configure it to be dynamic or linear. There is no specified order of steps; you configure the Job Application
business process step order. If you decline a candidate, you can also select a reason for the dispositioning.Note
: Candidates can have more than one job application in progress at a time.The
Job Application
business process includes the steps below: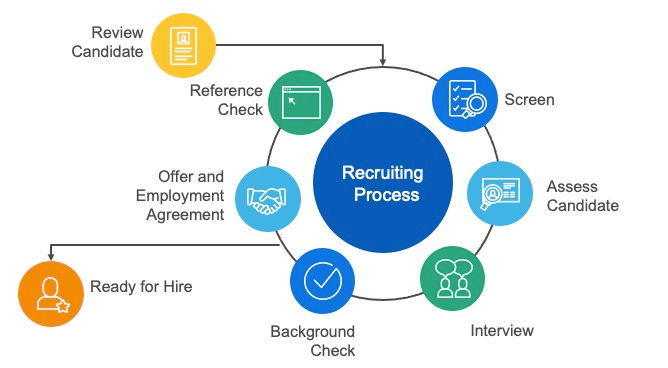
Workday Recruiting Business Process
Review is the Initiation step, and Ready for Hire is the Completion step. All the steps are subprocesses with their own security policies. When you choose the Ready for Hire step, one of the following staffing business processes triggers:
- Hire
- Contract Contingent Worker
- Change Job
- Convert Contingent Worker
- Add Additional Job
When candidates apply for a job, Workday automatically assigns the Review step. When a recruiting user reviews the resume, the assigned reviewer takes the Move Forward or Decline action on the candidate. If they decide to decline a candidate, Workday prompts for a disposition. If they have an interest in a candidate and select Move Forward, they can select the next action (e.g., Phone Screen, Interview).
What Makes the Business Process Dynamic?
Although the
Job Application
business process is dynamic, you can configure it in a linear order. If your business has one recruiting path for all candidates, you can configure only one Move Forward option for each subprocess step. This configuration forces all candidates through the same path.Recruiting Subprocesses
Workday Recruiting subprocesses are linear.
- Review Candidate
- Screen
- Assess Candidate
- Interview
- Reference Check
- Offer
- Employment Agreement
- Background Check
- Ready for Hire
Note
: Each subprocess has various available actions. You can explore each one in your tenant. Search bp:[subprocess name].Subprocess Effective Dating
When a candidate applies to a requisition, Workday initiates the
Job Application
business process and all subprocesses as of the date of the application. You can use the Maintain Business Process Definition Selection
report to enable the subprocess effective dating feature. This feature allows you to change subprocess effective dates to the date the parent Job Application
business process initiates the subprocess.Candidate Tasks
During any stage of the recruiting process, you can configure additional tasks to gather information from candidates. Workday sends tasks to external candidates' Candidate Home accounts. Internal candidates receive tasks in their Workday My Tasks. For external candidates, tasks display as awaiting actions. After completion, the information flows back to the Candidate Profile for recruiting users to review. If there is no Candidate Home, recruiting users can receive tasks on the candidate's behalf.
Candidate Home
A candidate must have a Candidate Home account to complete tasks. Use the
Edit Tenant Setup - Recruiting
task to enable the Require Candidate Home Account option. Once enabled, Workday recommends you require the Candidate Home account before a candidate completes their application.Note
: If you choose not to require this functionality, candidates must create an account to complete the first task.Task Placement
You can include tasks in any
Job Application
subprocess. Workday recommends including all candidate tasks before the decision step on the subprocess.Help Text
You can include help text on candidate tasks within each subprocess. Help text displays on all tasks for internal candidates.
Help text displays on Candidate Home for external candidates on the following tasks:
- Change Government Identifiers
- Change Personal Information
- Update Candidate U.S. Veteran Status
- Candidate Self-Schedule Event
Notifications
You can use notifications to inform candidates of a task using a business process. Configure the notifications on the subprocess that has the task.
If a candidate does not have a Candidate Home account, you can configure a notification requesting the candidate to create one. Include the Create Candidate Home Account URL field in the body of the email. When the candidate creates their account from the link, it ensures their account includes the correct job application.
If a candidate has a Candidate Home account, you can include the External Site Task Link field in the body of the email. Candidate Home does not have an inbox where candidates can retrieve tasks. When the candidate accesses this link, it takes them to the task in their Candidate Home account.
Questionnaires
You can include questionnaires in Workday Recruiting subprocesses. These questionnaires allow you to gather information from recruiting users or candidates during the recruiting process.
External candidates view the questionnaire as a task on their Candidate Home account. Internal candidates and other internal recruiting users can access questionnaires from their My Tasks in Workday.
Note
: You can include the Complete Questionnaire steps in any Workday Recruiting subprocess.Personal Information Collection
Use the
Change Personal Information
task to request additional personal information from candidates. You can send this request at any stage in the recruiting process. The primary location of the job requisition determines the questions.The
Personal Information Collection
task can include the following information:- Birth Place
- Citizenship Status
- Date of Birth
- Disabilities
- Ethnicity
- Gender
Note
: Access the Maintain Localization Settings
task for a complete list. Select the Personal Information area.You can view completed information from the Personal Information tab of a candidate's record.
Update Candidate U.S. Disability Status and Update Candidate U.S. Veteran Status
You can present external candidates with the U.S. Self-Identification of Disability form and the Update Candidate U.S. Veteran Status form at any stage of the
Job Application
business process. You can add these steps to any recruiting subprocess. Workday recommends that you send candidates a notification alerting them of pending tasks.Note
: These tasks only trigger for external candidates.Government and National ID Collection
You can request that external candidates enter their government or national ID information at any stage of the
Job Application
business process. You can hide, show, or require this information. Use the Maintain Localization Settings
task and select Personal Information. The country of the Primary Location on the job requisition determines the information collected.Candidate Self-Scheduling
Candidates can self-schedule recruiting events through their Candidate Home accounts. Event type examples include:
- Phone interview
- Group interview
- Onsite assessment
- Orientations
You can create calendar types using the
Maintain Recruiting Self-Schedule Calendar Types
task. Set up time slots for candidate selection in the Create Recruiting Self-Schedule Calendar
task.Assign calendars to a requisition using the task
Assign Recruiting Self-Schedule Calendars
. You can assign multiple calendars to a requisition.You can add the
Candidate Self-Schedule Event
business process to any recruiting subprocess. If the candidate is external and the requisition has a valid calendar, Workday sends the task to the candidate's Candidate Home account.Candidates can schedule, reschedule, cancel, and view upcoming scheduled events. Recruiting users can view pending or scheduled events and schedule, reschedule, or cancel on behalf of candidates.
Review Candidate Subprocess
The
Review Candidate
subprocess allows you to review a candidate's resume and decide if you want to move them to the next stage of the recruiting process. The Review step triggers when either a candidate applies for a job through a career site or you add them to a requisition using the Create Job Application
task.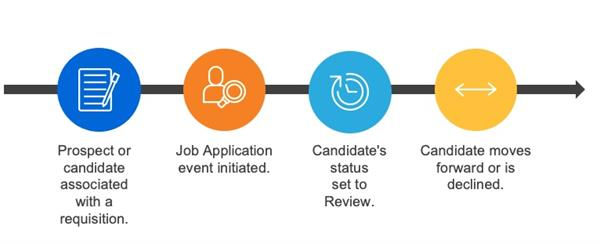
Review Subprocess
When a candidate applies for a job, the recruiter or the authorized security group member performs the following steps:
- Navigates to the requisition
- Reviews the resume and cover letter
- Elects to Move Forward or Decline the candidate
Note
: The Review Candidate
subprocess does not generate a My Tasks item. Recruiting users can perform reviews from the Recruiting Hub or the candidate list of a job requisition.Screen Subprocess
The
Screen
subprocess occurs early in the recruiting process to filter out candidates that do not meet basic job criteria.This step provides you with an opportunity to determine:
- If the candidate still has interest in the job.
- If the candidate's qualifications match the job qualifications.
- When to schedule an interview.
When a recruiter moves the candidate to the
Screen
subprocess, Workday sends a My Tasks item to the person assigned to the defined role on that subprocess. The screener can Move Forward or Decline the candidate.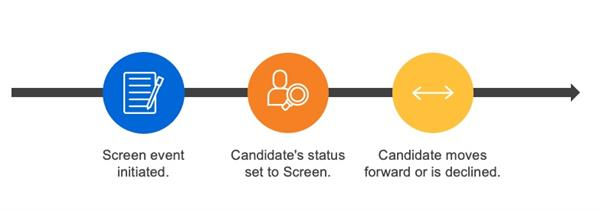
Screen Subprocess
Assess Candidate Subprocess
The
Assess Candidate
subprocess allows you to:- Assign a status to aptitude metrics (e.g., skill tests).
- Evaluate specific aptitude tests.
- Evaluate an overall assessment.
- Assign assessment tests and a status date.
When a recruiter moves the candidate to the assessment step, Workday sends a My Tasks item to the person assigned to the defined role on that subprocess and sets the candidate's status to Assessment.
The final step of the business process prompts the assigned user to Move Forward or Decline the candidate.
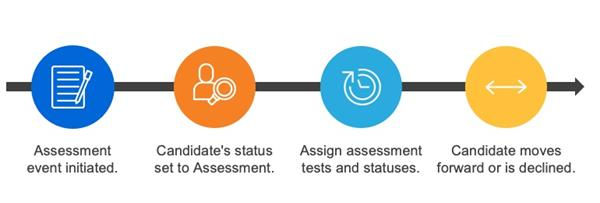
Assess Subprocess
Workday can support your organization's high-volume recruiting needs by allowing you to consolidate assessment events into a workbook. This feature saves time and effort, so you do not have to complete these tasks individually. To use this feature, edit the business process security policy. In the Business Process Type field, select Assess Candidate, and then select the Consolidate Task checkbox.
Use the
Maintain Recruiting Assessment Tests
task to define assessment tests. Additonally, you can configure integrations with assessment vendors (e.g., HireVue) using the Workday public web service.Maintain Assessment Tests and Statuses
When you assign multiple assessments to a candidate, you can identify individual and overall assessment statuses. Use the
Maintain Assessment Statuses
task to define the available statuses.Interview Subprocess
The
Interview
subprocess allows you to conduct a meeting with the candidate to determine if you want to advance the candidate to the next stage. A team of interviewers can rate and comment on the candidate. After completion, interviewers can decide to conduct additional interviews, move the candidate forward, or decline the candidate.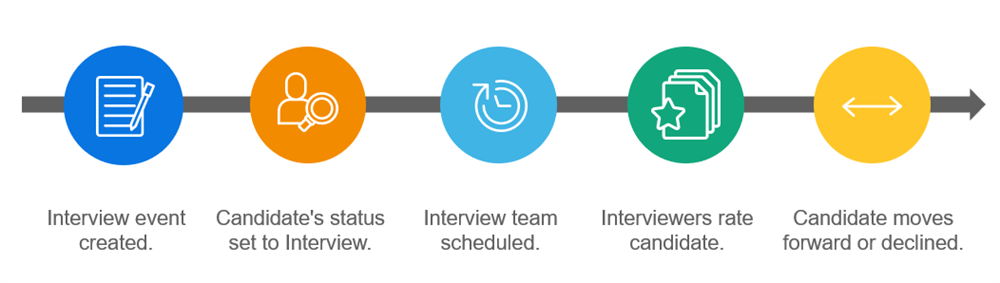
Interview Subprocess
Scheduling Interviews
Workday allows two methods for scheduling interviews.
Business Process Step | Description |
|---|---|
Schedule Interview Team | Allows you to schedule an interview for one or more people in a simple one-page view. Communication about interview details takes place outside of Workday. |
Schedule Interview | Allows you to schedule an interview for one or more people per session for a specific duration, location, interview type, and time in a multi-page layout. You can use the Outlook 365 or Google Calendar integration to send email notifications and include a link to the Candidate Profile.
If configured, you can include a unique web conference link in your meeting invitations and interview notifications. You do not need a calendar integration to use this feature.
Use the Manage Interview Scheduling Settings task to create interview teams and assign them to a job requisition. You can also use this task to select interview types, competencies, and questionnaires.
Use the Maintain Interview Types task to create interview types.
If enabled, candidates can access their interview schedule in their Candidate Home account. |
Scheduling Differences Between Interview Functionality
Depending on which interview functionality your deployment team configures, scheduling interviews will differ as follows:
Original Interview Scheduling | Enhanced Interview Scheduling |
|---|---|
Schedule Interview Team task | Schedule Interview task |
One page to schedule interviews | Multi-page experience: Pre-Calendar, Calendar, Final Submission |
Interview date, time, and location communicated outside of Workday | Interview date, time, type, and location communicated inside of Workday with possible email notification, Outlook 365 integration with Outlook invitation, or Google Calendar |
Interviewer must respond to interview request outside of Workday | Availability and responses available inside Workday (with Outlook 365 integration) |
Must communicate interview details to candidate outside of Workday | Candidate Home Interview Schedule |
No ability to reschedule | Ability to reschedule |
If configured, you can schedule email or push notification reminders that Workday automatically sends to candidates with an upcoming interview.
Recommended Interview Scheduling
The Recommended Interview Scheduling feature automatically generates schedule recommendations for interview schedulers. Workday displays proposed interview schedules based on multiple interviewers and locations. Use the
Manage Interview Scheduling Settings
task to define the interview settings.The Recommended Interview Settings tab allows you to:
- Define the earliest interview start time and latest end time for a specific job requisition.
- Select a range of dates and day of the week.
- Enable the order of the interviewers.
- Select a location or room.Note: These fields displays with or without an Outlook 365 or Google Calendar integration. However, this feature only functions with an integration.
Rating Differences Between Interview Functionality
Depending on which interview functionality your deployment team configures, rating interviews will differ as follows:
Simple Interview Rating | Enhanced Interview Rating |
|---|---|
Interviewer provides feedback by rating and entering comments. | Interviewer provides feedback by rating and entering comments. |
Use the Rate Interview task. You cannot modify interview comments | Use the Manage Interview Feedback task. You can modify interview feedback. |
Interview Feedback
You can configure rating options and fields on the Rate Interview page. Use the
Maintain Interview Feedback Ratings
task. If you require a rating, complete the Interview Scale. Once you create the interview scale, you can edit the Feedback Descriptions on the scale; you cannot edit the scale.Interview Feedback Results
Candidate Profiles store the interview feedback results. Recruiting users with proper security can view the results.
The Interview profile group includes:
- Interview schedule details
- Date interview feedback submitted
- Overall average rating
- Ratings submitted
- An interview feedback grid
If an interviewer has not submitted feedback, you can remove them from the interview feedback grid. The grid will display their name without any ratings.
Competencies and Questionnaires
The
Schedule Interview
and Manage Interview Feedback
tasks allow you to use your existing talent data and include targeted competencies for each interviewer.For example, one interviewer may be responsible for rating the candidate's change management competency while another interviewer may be responsible for rating the candidate's domain expertise. You can also include questionnaires for each interviewer to guide them on specific questions to ask during the interview.
You can require, allow, or hide competencies and questionnaires. Use the
Configure Optional Fields
task, and select the Interview functional area.Interview Business Process Setup
You can set up the interview tasks on the
Interview
business process using these methods:Option 1 | Option 2 | Option 3 |
|---|---|---|
Schedule Interview | Schedule Interview | Schedule Interview Team |
Manage Interview Feedback | Rate Interview | Rate Interview |
Make Interview Decision | Make Interview Decision | Make Interview Decision |
Reference Check Subprocess
The
Reference Check
subprocess allows you to confirm the candidate's character, background, and experience by contacting personal and professional references. For external candidates, you can perform this process in Workday.When a recruiter moves the candidate to the
Reference Check
subprocess, Workday sends a My Tasks item to the designated recruiting user, and the candidate's status is set to Reference Check. Candidates can indicate references. References can respond to a questionnaire or decline. Recruiters can add and manage references. The final action for this step is to Move Forward or Decline.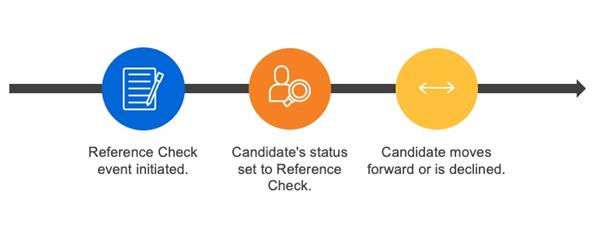
Reference Check Subprocess
Offer Subprocess
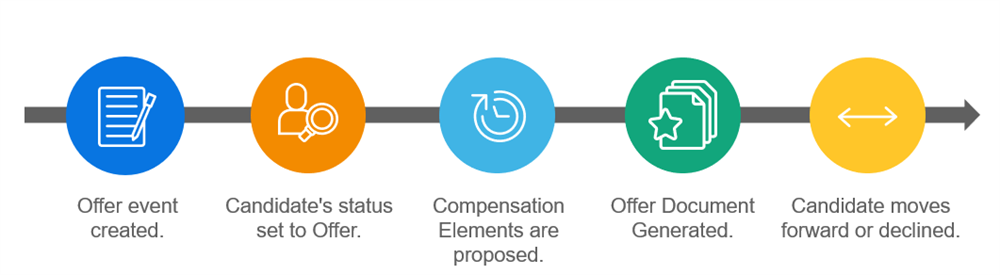
The
Offer
subprocess can include steps to ensure:- Designated individuals review the candidate's proposed compensation.
- The offer letter is generated properly, if assigned as a step.
- The attachment of additional documents, if assigned as a step.
- Designated individuals review the offer letter.
When recruiting users move a candidate to the Offer step, Workday sends a My Tasks item to the designated individual. Workday sets the candidate's status to Offer. Initiation of the Offer step converts the candidate to the Pre-Hire status.
Offer Subprocess
Offer Compensation
You can configure the
Offer
business process template with the P
, ropo
se Compensation OfferRequest One-Time Payment
, and Request Stock Grant Offer
compensation subprocesses. Include these subprocesses to ensure the designated individuals review the proposed compensation elements during the Offer stage.Once the candidate approves the offer, you can generate and distribute an offer letter for review. Include the
Generate Document
and Review Documents
steps in your Offer
business process.You can track the candidate's offer status. Select Set Offer Status from the candidate or job requisition's Related Actions. Workday records the change in offer status in the Activity Stream and the Offer Status field displays on the candidate's profile. Use the
Maintain Offer and Employment Agreement Statuses
task to configure your offer statuses.Consolidated Tasks for Offers
Workday can support your organization's high-volume recruiting needs. The
Consolidate Tasks
report allows you to consolidate offers and compensation events into a workbook (e.g., offer, compensation, one-time payment, and stock options). You can consolidate a maximum of 200 Offer
tasks into one workbook. This feature reduces the need to process tasks individually, which can improve recruiter efficiency.Offer Letter Generation
You can use dynamic document generation to create customized templates to generate documents (e.g., offer letters). Use text blocks to generate the offer content. The
Offer
business process delivers the letter to reviewers and candidates.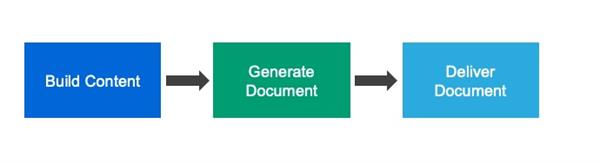
Offer Letter Generation
To build the content of your offer letter, use the
Create Document
task to generate a template. You can create templates for offers and employment agreements.The offer template has text blocks, which you can reuse in multiple templates. You can configure these text blocks with static text and external fields. External fields enable you to pull in specific data (e.g., approved salary, business title, and recruiter) to ensure each candidate receives a customized offer letter.
Additionally, you can use condition rules with these text blocks to further automate the offer process. For example, you may have a text block that refers to U.S.-specific benefits that you include in U.S. offer letters. By including a condition rule, you can ensure that offer letters generated in other locations using this template will not include the U.S. benefits text block.
Workday Docs for Offer Letters
Workday Docs enables you to create Document Generation templates. You can enable Workday Docs for Offer Letters and Employment Agreements, permitting you to easily create and edit templates, insert data fields, and apply condition rules. You can also include tables, images, additional formatting, built-in headers and footers, and preview as you build.
Creating Workday Docs Templates
This table summarizes the primary actions you can do when working with Workday Docs offer letter and employment agreement templates.
Action | Notes |
|---|---|
Add Text | If you copy and paste from a text block to a Docs template, Workday does not preserve condition rules and data fields in the Docs template.
Character rendering in non-Latin languages (e.g., Korean, Thai) may be unreliable. We recommend testing the full document workflow to the final PDF to review results.
The Docs template editor and the PDF previewer use the Roboto font; the font selection is not editable.
The size limit for body content, including images, in the Docs template and the generated document is 30MB. If you try to insert content that causes the limit to be exceeded, an error message displays and Workday does not save the change. |
Manage Headers and Footers | Select Layout > Headers & Footers to open the header and footer text editor.
If you add more than one header or footer, you must add a condition rule to each header and footer.
When you preview a document, only one header or footer displays at a time. Docs always displays the first header/footer listed until you hide its corresponding condition rule, then it displays the next header/footer listed until you hide its corresponding condition rule, and so on.
When generated, the first header and footer with a true condition rule displays. The user who has access to the document generation task can edit and delete headers and footers if there are multiple headers/footers with a true condition rule.
Header and footer settings apply to all headers and footers; you cannot control individual header and footer values. |
Manage Data Fields | To insert a data field, select Insert > Data Field. Highlight text, or place your cursor in the document, and select the Plus (+) icon next to the data field.
To view all data fields added to the document, open the Manage Data Fields panel.
To delete an individual data field, right-click the field in the editor and select Delete.
To delete all instances of a data field, select the actions menu next to the data field in the panel and then select Delete.
To create a new calculated field, you can navigate directly from the Insert Data Field dialog to the Create Data Field task by selecting Create New at the bottom of the dialog. |
Manage Condition Rules | Highlight text on which you want to assign condition rules and right-click the highlighted content.
To insert a condition rule, select Insert > Condition Rule; start typing a rule name to find it.
To create a new condition rule, you can navigate directly from the Insert Condition Rule dialog to the Create Condition Rule task by selecting Create New at the bottom of the dialog. |
Manage Tables | To add a table, select Add table. A dashed line shows the table placement. In a table you can:
|
Insert an Image | Select Insert image and navigate to the image.
|
Insert Page Numbers | From the header or footer menu, select the Page Number icon to insert the page number. If you want to create a running page number and total, you can include text along with the page number values. Example: Page Page [Current] of Page [Total] . |
Insert Page Break | Select Insert Page Break. |
Lock Content | Highlight text in the document and select Lock Content.
After you lock content, users with access to the document generation step cannot edit it; however, users can still delete text even if it is locked. |
Change Fonts | The Docs template editor and the PDF previewer use the Roboto font. Workday Docs does not support changing the font; however, you can change the text style (paragraph style and headlines). |
Undo or Redo Your Changes | To undo a change, press Ctrl+Z (Windows) or Command+Z (Mac).
To redo a change, press Ctrl+Y (Windows) or Command+Y (Mac). |
Preview a Document | Select Preview.
Use the Manage Condition Rule panel to show or hide content assigned a condition rule before previewing the document. Only one header or footer displays at a time. |
Resource
: Search for "concept: Workday docs" in the Workday Community Administrator Guide for more information.Offer Letter Step Configuration
You can include and configure the
Generate Document
subprocess in your Offer
business process to generate an offer letter. You can add and configure one or more Review Document steps to ensure the appropriate individuals review and sign the offer letter.Regenerate Offer Letter
You can regenerate an accepted offer document after initiating or completing a hire for a candidate. If configured, this feature makes it easier for your recruiting users to amend offer letter details and resend offer letters to candidates. Use the
Regenerate Offer Documents
business process to configure components of this feature and the Regenerate Offer Documents
task to regenerate the offer document.Offer Letter Review
You can add one or more Document Review steps that distribute the offer letter for review. To allow for signatures or approvals, you can configure this step with the Workday e-signature option or a Workday e-signature partner. Once Workday submits the final review of the offer, you can send a task to the candidate's Candidate Home account. E-signatures are available through integrations. If configured, you can send documents back if the reviewer does not agree with the offer. You can view offer letters from the Offer tab of a candidate's profile.
When sending offers for approval internally, you can use the offer attachment feature to:
- Attach documents to the offer.
- Control who can view and edit the attachments.
- Access the documents from the candidate or worker profile.
To configure the offer attachment feature, edit the Offer business process security policy to enable attachments and configure view and edit permissions.
Employment Agreement Subprocess
You can generate or attach employment agreements for candidates as a subprocess of the
Job Application
business process. You can also generate or attach employment agreements for contingent workers who apply for a requisition with a worker type of employee.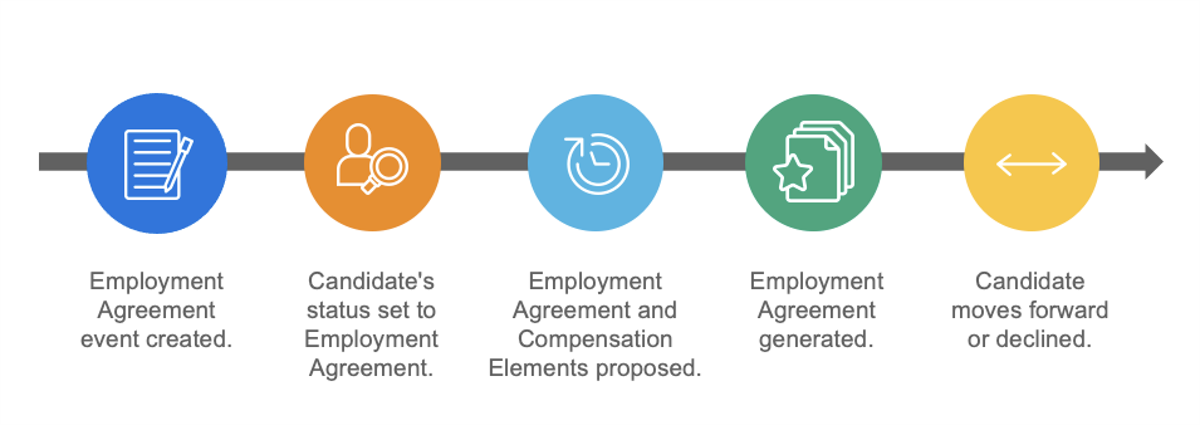
Employment Agreement Subprocess
The
Offer
business process includes only compensation, one-time payments, and stock grants. The Employment Agreement
business process includes additional employment agreement details.The Employment Agreement Business Process
Within the
Employment Agreement
business process, you can generate the employment agreement using the Document Generation and Review Document steps. You can have Workday deliver the employment agreement to recruiting users and the candidate. You can use Workday e-signature or Adobe Acrobat Sign for review and signatures.Your
Job Application
business process definition can include options for offer and employment agreement. However, you can only have one per job requisition and candidate combination. If you generate an offer and an employment agreement, the offer has preference.To view a candidate's employment agreement details, use the
Configure Profile Group
task to include an Employment Agreement profile group on the Candidate Profile. This profile group includes details about the approved agreement and a link to the document.Offer and Employment Agreement Alignment
Within the
Job Application
business process, you can align the Offer
and Employment Agreement
subprocesses to improve efficiency and data compliance. These subprocesses, if configured, may flow sequentially, allowing data from the Offer
subprocess to populate the Employment Agreement
. Additionally, you can include Notice Period and Probation Period details to the Offer
document.Important
: You cannot use condition rules to add or remove Notice Period and Probation Period from the Offer
consolidated template.Use the
Maintain Staffing Field Defaults
task to default Hire Date and Contract End Date on Offer
. However, if you remove the exclusivity between Offer
and Employment Agreement
, you cannot use this task to populate Hire Date and Contract End Date on the Employment Agreement
.Background Check Subprocess
The background check stage allows you to confirm the candidate's:
- Credit history
- Driving records
- Criminal records
- Security clearances
- And other personal information
Third-party vendors can perform background checks (e.g., HireRight). Workday provides integrations for several of these vendors. You can select different background check packages. The Screening profile group of the Candidate Profile displays the background check results.
When a recruiting user moves a candidate to the Background Check step, Workday sends a My Tasks item to the designated person. The candidate's status is Background Check. The recruiting user can assign a background check package to the candidate and select a status (e.g., Pass, Fail, Pending). Background check packages can also default based on defined condition rules. Once the recruiting user reviews the background check results, they can decide to either Move Forward or Decline the candidate.
Initiation of the Background Check step converts the candidate to the Pre-Hire status.
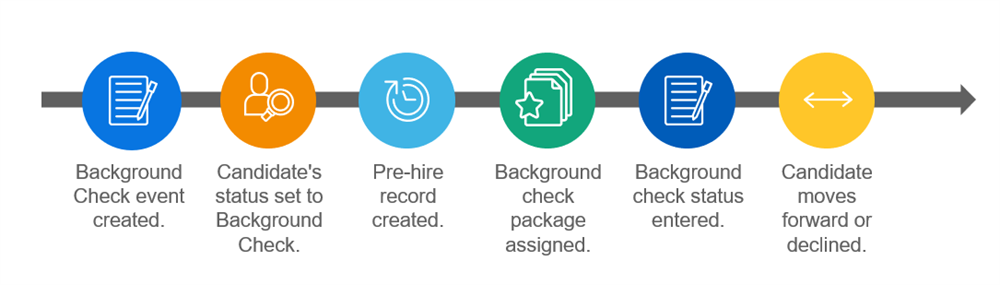
Background Check Subprocess
Background Check Packages
In Workday, you can set up your background check packages for integration with a third-party vendor. You can also use these packages without an integration to track background checks performed outside of Workday. Use the
Maintain Background Check Packages
task to enter and group the tests into packages. As the vendor returns the results, you can monitor individual test statuses. When ready, you can enter an overall background check status and progress the business process.Assigning Background Checks
When a recruiting user receives a background check task, they can manually select a background check package. Alternately, you can configure condition rules to automatically identify and apply a background check package for the candidate.
To enable defaulting, use the
Maintain Background Check Package Condition Rules
task to apply a rule using attributes on a candidate's job application. For example, workers in a certain location or job profile may require a different background check package. Once the candidate moves into the background check stage, Workday evaluates the job application to determine if one or multiple packages apply.Ready for Hire Subprocess
The Ready for Hire stage is the last step before you initiate a staffing business process. It provides the opportunity to take final actions before you initiate a hire or transfer.
These actions include:
- Automatically unposting a job
- Collecting final questionnaire data
- Automatically rejecting all other applications
When a recruiting user moves a candidate to the
Ready for Hire
step, Workday sends a My Tasks item to the person assigned to tasks within this subprocess. If there is only an Initiation step configured, recruiting users do not need to take action. Once Ready for Hire
reaches the completion step, candidates move to the applicable staffing business process. There is no Move Forward or Decline option from Ready for Hire
.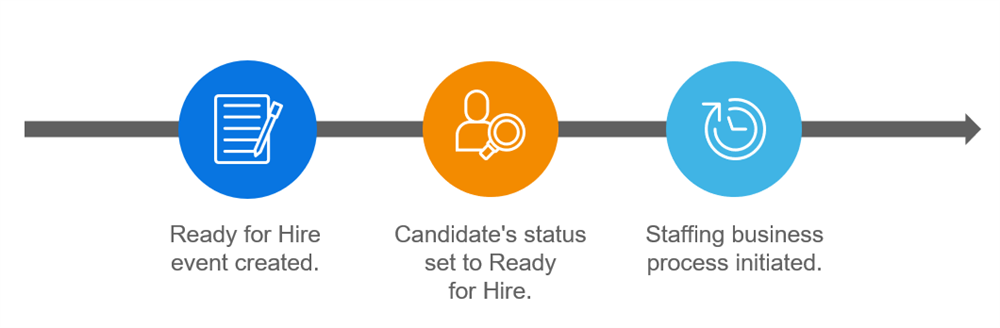
Ready to Hire Subprocess
Decline Remaining Jobs and Decline Remaining Candidates
When you insert the Decline Remaining Jobs and Decline Remaining Candidates batch processes into Ready for Hire, Workday can automatically decline all other applications associated with the hired candidate (Decline Remaining Jobs). Workday can also decline all other applications associated with a requisition (Decline Remaining Candidates).
You can use the Decline Remaining Jobs batch process with the following subprocesses:
- Offer
- Background Check
- Employment Agreement
- Ready for Hire
To assign the disposition reason, configure the
Maintain Recruiting Dispositions
task. Select the Disposition Remaining Jobs and Decline Remaining Candidate checkboxes.Automatically Decline Candidates on Close of Job Requisition
When you close a job or evergreen requisition, Workday can automatically decline all candidates who were not hired on the requisition. Ensure you map a disposition reason to the
Close Job Requisition
business process and make available at all applicable stages of the Job Application
business process. To assign the disposition reason, use the Maintain Recruiting Dispositions
. Select the Disposition Candidates on Close Job Requisition checkbox.Use the
Configure Optional Fields
task to ensure the Decline Remaining Candidates checkbox is available upon closing a requisition.This checkbox, if available, is an option for these business processes:
- Close Job Requisition
- Close Evergreen Requisition
- Mass Close Job Requisitions
On these business processes, add the appropriate Batch/Job step as needed, and for Run As User, use an Integration System User security group.
Auto-Complete Staffing Processes
You can automatically complete staffing business processes and subprocesses. This feature helps reduce the need to manually process staffing tasks, compensation subprocesses, and other steps. This feature provides a more streamlined process and management of internal candidates and workers. You can enable auto-complete on the following business processes:
- Add Additional Job
- Contract Contingent Worker
- Propose Compensation Hire
- Propose Compensation Change
- Request One-Time Payment(as a subprocess)
- Request Stock Grant
Note
: You can also enable auto-complete on the Assign Pay Group
business process. This business process:- Only auto-completes when it is a subprocess of theHirebusiness process.
- Auto-completes regardless of whether the hire event initiated from Workday Recruiting.
Auto-Complete Hire from Recruiting
If configured, the
Hire
business process automatically bypasses approvals, reviews, to-dos, and notifications associated with those steps. All other subprocesses are still required.
When editing the Hire
business process, select the Enable Autocomplete checkbox to use this feature.Offer/Employment Agreement Compensation
Automatic Compensation on Propose Compensation Hire
If configured, the
Propose Compensation Hire
business process can auto-complete with the Hire
business process. This feature is for external candidates only. The information defaults from the Propose Compensation Offer/Employment Agreement
business process. Similar to the auto-complete functionality used in the Hire
business process, you can automatically bypass approvals, review, to-dos, and notifications.Note
: This functionality does not auto-complete steps such as one-time payment and stock grant.