
Other Transformations
Overview
Some Prism transformations can reduce the number of rows in a dataset according to filter conditions or aggregations. In this chapter, we explore Filter, Group By, Explode, and Unpivot stages. Filter stages involve using one or more filter conditions to reduce the number of rows. Filter conditions can be basic or advanced, using Prism expression language. Filter conditions do not impact the number of columns, just the number of rows. You can also use Group By transformation stages to aggregate data for defined groupings to capture summarizations such as counts or sums. Group by stages typically impact the number of rows and columns, reducing the number of instances and fields. Unpivot transformations convert data by converting columns to rows. Explode transformation stages convert multi-instance fields into single-instance fields.
Objectives
By the end of this chapter, you should be able to:
- Add a Filter stage to reduce the number of rows.
- Add a Group By stage to reduce the number of rows and fields to only the defined groupings and summarizations.
- Demonstrate substituting Group By stages using Windows Functions.
- Add an explode stage to convert a multi-instance Workday field into a single-instance field type.
- Explore the unpivot transformation to reshape existing data.
Filter
Add a Filter stage to remove rows based on the conditions you specify. There are two options for defining a filter. By default, the basic filter option displays. This mode is helpful for less technical users who do not want to learn the details of the Prism expression language to write a filter expression manually. Alternatively, you can use the advanced filter to write a more complex filter expression that you cannot build in the Basic mode.
Basic Filter
You can define one or multiple filter conditions by which to filter the dataset. Select If All to require that data meets all filter conditions, or If Any to require only one. The If All option functions like an AND operator in the condition while the If Any option functions like an OR operator.
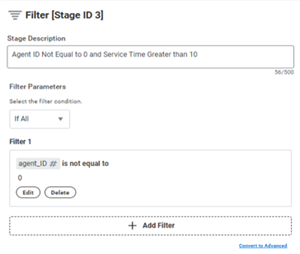
Basic filter
Select Add Filter and specify a field. The operators available depend on the type of field you select. After you specify a field and operator, enter a value. Text field types do not require quotation marks or escape characters. Select the checkmark to save the filter condition. After you save the filter, you can edit or delete the filter condition using the available buttons.
Advanced Filter
You can select Convert to Advanced to toggle the advanced filter option. Use the Prism expression language to write a filter expression that evaluates to true or false. The typical format of a filter expression is: field_name comparison_operator comparison_value
The comparison value must be the same field type as the field in the expression. You can also use logical operators (such as AND and OR) or arithmetic operators (such as + or /) to define more complex expressions.
When the field name includes a space or a special character, enclose the field name in square brackets: [ticker symbol]. When the comparison value is for a Text field type, enclose the value in double quotes (" ").
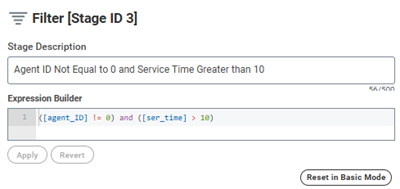
Advanced filter
Filter Expressions on Date Type Fields
Filter expressions on Date type fields must be in the format yyyy-MM-ddTHH:mm:ss:SSSZ (or any shortened version of this format). Do not enclose comparison values for Date fields in quotation marks or use or any other punctuation. If the date value is in Text format rather than Date format, you must enclose the value in quotes like all text values.
When specifying a range of dates, always write the earlier date first. If the filter expression is a shortened version of the full format, then it assigns any values not included a value of zero (0).
Example
: The expression BETWEEN 2017-06-01 AND 2017-07-31 is equivalent to this expression:BETWEEN 2017-06-01T00:00:00.000Z AND 2017-07-31T00:00:00.000Z
The expression above does not include any values from July 31, 2017. To include values from July 31, 2017, use BETWEEN 2017-06-01 AND 2017-08-01.
Group By
The Group By stage aggregates multiple values in a dataset by the groups you specify using a summarization field. The summarization groups the values of multiple rows together and returns a single value for that group. Group By transformations take in detailed data and output aggregated data. The resulting dataset only contains the group by fields and the configured summarizations.
Tip:
To retain a field in the output dataset, you must Group By that field. For example, if you need to group data by location, you can include the Location instance and the Location text fields in the group by configuration. Even though you only need one for the actual summarization. If you need both in the resulting dataset, you can include both in the groupings.Depending on the summarization fields you specify, group by transformations output fewer rows than they ingest. One purpose of this stage may be to transform data to the appropriate level required to join one dataset with another dataset of different granularity.
Configuration
First, select the grouping fields you want to apply to the summarizations. Next, select a summarization type and field to summarize.
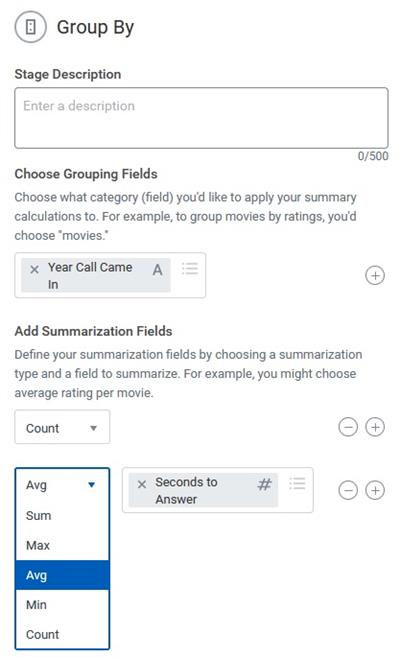
Group By configuration
The following summarization types are available:
- Average
- Count
- Max
- Min
- Sum
When to Use Group By
Using Group By to aggregate data is not always desirable because the report includes no detail data and only includes one row of data for each summarization. For this reason, you may want to let a matrix report do the aggregations to include the detail data behind the summarizations.
Use Group By fields:
- To get data at a higher level.
For example, you can use this when several sources of data import at a monthly level of detail, but one imports at a daily level. If you do not want to display daily level details when joining them, you can group to only identify the monthly level needed.
- To blend aggregated metrics and detail data together.
Unpivot
The Unpivot stage enables you to arrange the data in derived datasets in a way that is more meaningful to you. You can convert fields (columns) to rows. The unpivot process consolidates data from two or more similar fields into a pair of new fields:
- A field created from the original field names (referred to as Input Fields)
- A field created from the original field values (referred to as Output Values)
When you unpivot:
- Workday populates the new fields with the values you specified for the unpivot.
- Workday repeats row values in the input fields you did not include in the unpivot.
You can:
- Apply the unpivot to all field types.
- Rename your output values.
- Specify names for your pairs of new fields.
- Unpivot up to 150 input fields within each Unpivot stage.
- Create multiple pairs of new fields within each Unpivot stage.
- Add or delete an Unpivot stage anywhere in the pipeline of a derived dataset.
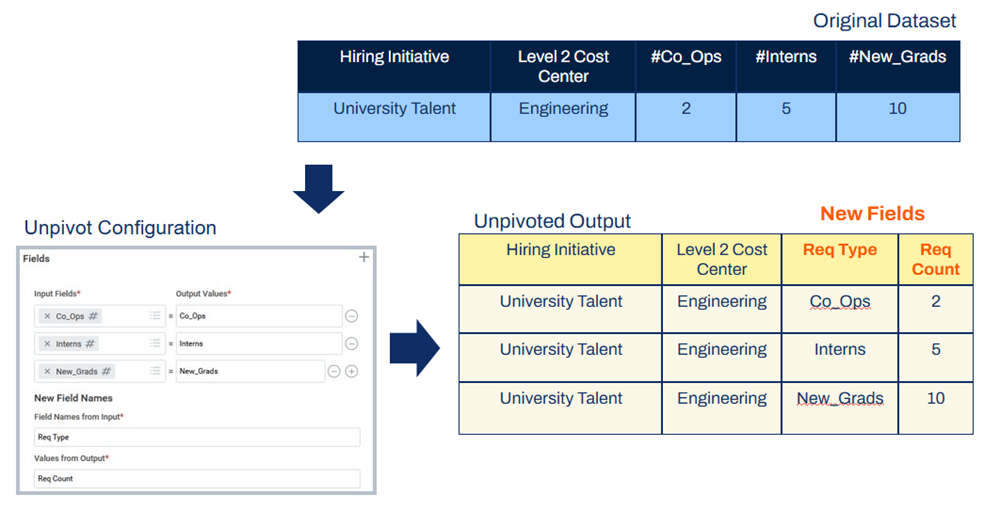
What about Pivot (Transposing rows to columns)?
The Pivot transformation stage is currently on the Prism product roadmap but does not yet have a specified availability date. To pivot data in Prism, you can use a Join stage and calculated fields as a workaround.
Explode Stage
When editing dataset transformations, you can use the Explode stage to convert a multi-instance field into a single-instance field. Workday creates a new row for each instance value in the multi-instance. All other fields remain unchanged.
In the Explode stage, Workday removes:
- The multi-instance field from future stages.
- The report field associated with the multi-instance field.
You can assign a report field to the new instance field in a subsequent Manage Fields stage. Assigning a report field to the instance field narrows the available values when prompting on the published instance field to those relevant to the field.
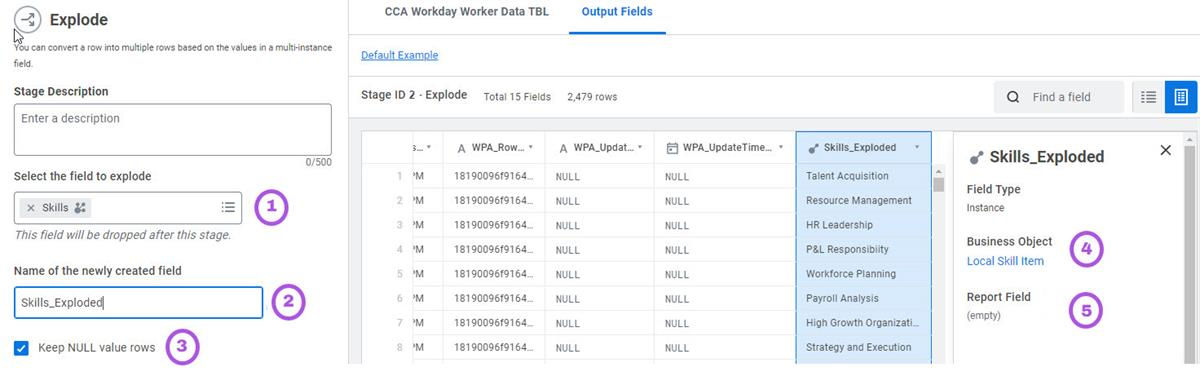
Explode stage screen
The following steps outline how to convert a multi-instance field to an instance field in the Explode stage.
- Choose the field to explode. You can only explode multi-instance fields.
- Name the single-instance field you are creating.
- Use the checkbox to indicate whether to keep NULL instances through the result of the explode stage. The checkbox defaults to selected.
- Specify the Business Object the single instance field should map to. This populates by default, but you can edit it for mapping purposes.
- To assign a report field to the single instance field, create a Manage Fields stage following the explode stage. (The report field assigned to the newly created single instance field is empty by default.) Mapping the instance field to a report field enables you to restrict instance prompt values to those relevant to your dataset.
Chapter Summary
- The Filter stage allows you to apply conditions to filter the resulting instances in the dataset, typically reducing the number of rows.
- Filter conditions can use Prism expression language.
- Using the Group By stage in a derived dataset allows you to transform data at an aggregate level.
- When using a Group By stage, the resulting dataset only includes the group by fields and the resulting aggregations. It does not include the detailed instances and other fields.
- When you include a filter stage, the transformation flows to downstream datasets automatically.
- When you include field changes, e.g., adding fields or changing field names, you must edit downstream Join, Union, or Manage fields stages to include the changed fields in the result.
- You can use an unpivot stage to transform columns into rows.
- You can use an Explode Stage to convert multi-instance fields into single-instance fields.