
Controlling Assembly Flow
Overview
In addition to MVEL flow control statements, Workday Studio includes components that can control looping and branching at the assembly level. We will review the route component and its various strategies that conditionally trigger sub-routes or iterate through assembly paths or event documents. We will also look at the splitter, which can break large files into records (or archives into individual files) for iterative processing. The aggregator performs the opposite function, efficiently collating messages into batches.
Like subroutines in other programming environments, sub-assemblies and collections allow for modular units of code in Workday Studio. Using these tools, we will build integration components to reuse in other integrations, improving maintainability and development effort.
Objectives
By the end of this chapter, you will be able to:
- Explore strategies that loop and branch through assembly paths.
- Extract individual records for processing using the splitter.
- Merge data for import or output with the aggregator.
- Define reusable subassemblies that can be called between projects.
Create Modular Sub-Assemblies
Workday Studio provides a way to develop modular sub-assemblies that integrations can share and reuse, enhancing developer productivity and centralizing maintenance of common code. Sub-assemblies can exist in their own project or on the same assembly as the integration that calls it.
A sub-assembly behaves very much like a subroutine or procedure in a traditional programming language. It doesn't return a value as a function does, but it has access to the global mediation context and can use any assembly components. It can update the message, trigger web services, and set useful output properties for the calling assembly to leverage.
Define Sub-Assembly: Local-In
The local-in defines an entry point to a sub-assembly processing chain, which can be called from the same assembly or other assemblies using the local-out transport.
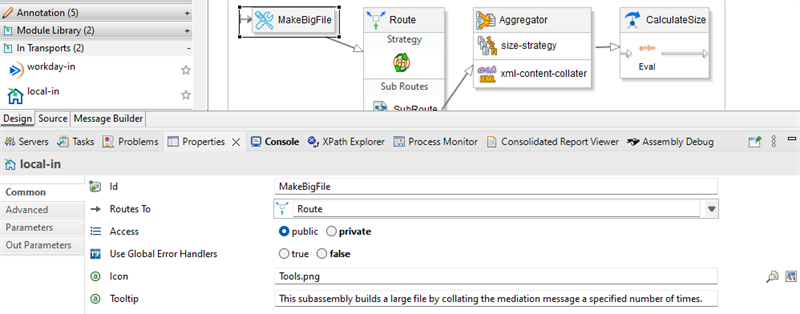
While some of the common local-in properties are cosmetic, they all affect the ease with with developers can use the sub-assembly:
- Id: The name of the sub-assembly as it appears in Workspace Components and as the default Id of any local-out that calls it.
- Access: Whether the sub-assembly can be called from another project in the collection. Set to public when adding it to a shareable library of sub-assemblies.
- Use Global Error Handlers: Whether global error handlers in this project will catch sub-assembly errors. In general, you want the calling assembly to handle unexpected errors.
- Icon: A friendly graphic to represent the sub-assembly. This appears in the Workspace Components and on any local-out that calls this sub-assembly.
- Tooltip: Documentation of this sub-assembly for the palette and the Select Parameters dialog.
The Parameters tab defines the inputs that your sub-assembly needs for processing. These are properties (accessed through the MVEL props object) whose values are, by default, local to each execution of the sub-assembly. This means that, unlike most other mediation context objects, changes to parameters within the sub-assemblies do not affect properties throughout the event.
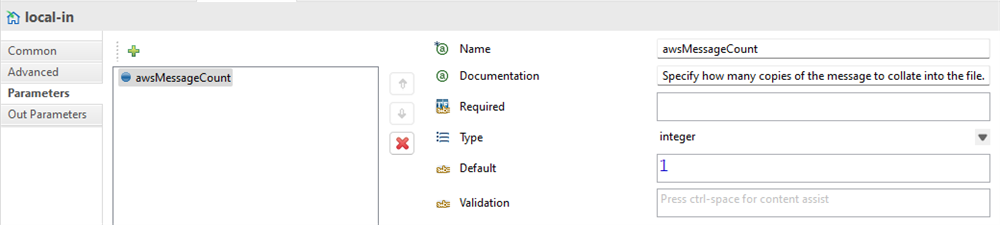
Parameters are required by default. Set the Required, Type, Default, and Validation properties as needed to define requirements for a parameter, if any.
Note
: The Required, Default, and Validation properties of parameters support MVEL, which means you can dynamically determine all of these based on the context when you call the sub-assembly.Out Parameters are an optional way of defining the output or return values of a sub-assembly. They formally document properties that the sub-assembly will populate as part of its execution and that might be useful back in the calling assembly. However, unlike Common Component out parameters, the out parameters that you define are not discoverable to an integration developer calling your sub-assembly. They are technically no different than any props object you use in the sub-assembly; they are just better documented.

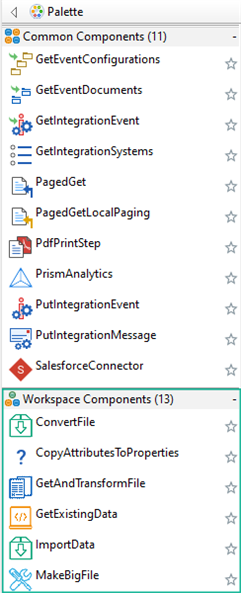
When you create a local-in and save your integration, a new entry is placed in the Workspace Components drawer of the palette.
Note
: Notice the similarity of Workspace Components to Common Components. Common Components are simply sub-assemblies that Workday developers have created and made available to you.Call Sub-Assembly: Local-Out
The local-out is the component that invokes a local-in. This is like calling a subroutine or procedure in a programming language.
The easiest way to create a local-out is to drag it from the Workspace Components in the palette, which lists all local-ins defined in all projects in your workspace.
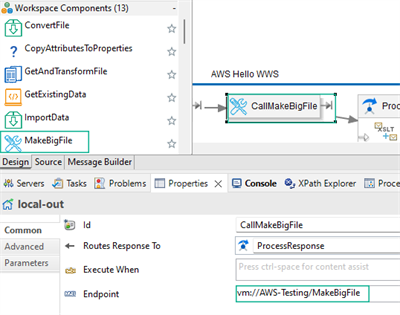
You can also search for a sub-assembly by using the select icon beside the local-out's Endpoint field. The endpoint URL is made up of "vm://" (which represents the virtual machine that is the cloud runtime), the project the sub-assembly is in, and the local-in Id.
In the Select Parameters dialog, select any parameters that you need to fill in as part of the sub-assembly call. Required local-in parameters are selected by default. The dialog displays sub-assembly and parameter documentation as defined in the local-in. (Out parameters are not displayed.)
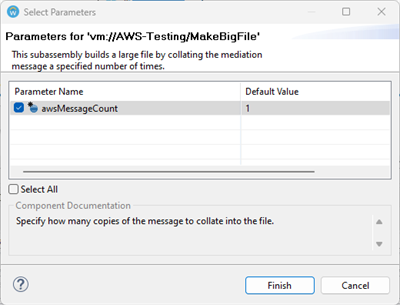
Local-out components have some useful advanced properties that control sub-assembly interaction with the mediation context. In particular:
- Clone Request(default: false): Determines whether the sub-assembly can change the mediation message. Setting this to true protects the original message from any sub-assembly changes but is more memory-intensive as the local-out creates a copy of the message to pass into to the local-in.
- Unset Properties(default: true): Determines whether parameters set by the local-out are changed back to their original values after the sub-assembly is done. Keeping this value as true is what makes input parameters local to each sub-assembly call.
Manage Collections
A collection is a container for all the assets that a Workday Studio integration needs. It is the organizational unit that a cloud repository CLAR file is based on and that is loaded into the cloud runtime at the beginning of an integration event. Structurally, a collection is made up of projects that contain the assembly XML files and any other supporting files (e.g., XSLT) needed for an integration.
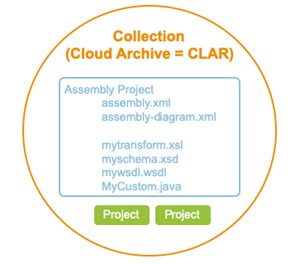
A Workday Studio integration event only has access to assembly logic and supporting files within the collection loaded into the cloud runtime. In order for an integration to use sub-assemblies from separate projects, you must include those projects in the collection. This is similar to registering modules or "including" scripts in other environments.
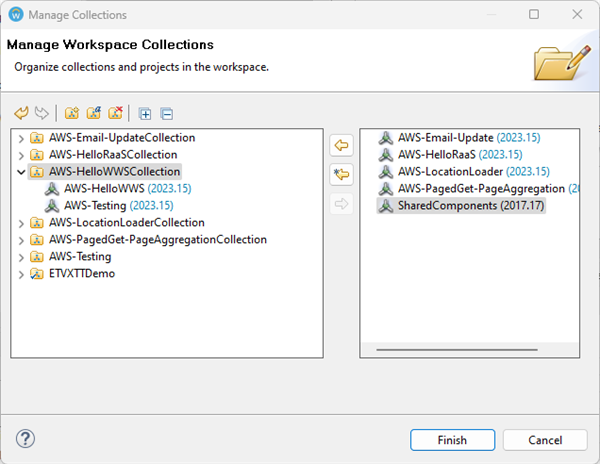
In Workday Studio, select Workday > Manage Collections to review the collections defined for all the projects in your workspace. From here, you can create, rename, and remove unneeded collections, and add projects with useful, public sub-assemblies to collections.
Control Flow in Workday Studio
Workday Studio can handle a large number of use cases by flexibly executing expressions, components, and entire processing chains based on your requirements. We have already seen how MVEL expressions can control the execution of steps and components, taking them out of the assembly flow while allowing the following components to execute. Conditional expressions can also determine the scope of error handlers.
Workday Studio includes several structural components that allow for conditions and iteration. These components provide a graphical alternative to heavy coding, providing obvious branches and loops in your diagram while still being controlled by your arbitrary rules.
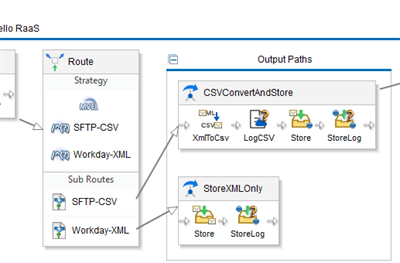
The route, splitter, and aggregator components have similar, two-part structures. They each have a strategy, which determines at a high-level how the component will process or interpret the data. The route and splitter have sub-routes, which are the paths the selected data will follow. The aggregator includes a collater instead, which determines how it should batch messages.
Loop and Branch With Route
The route component includes several possible strategies, some of which replicate the conditional ("if") and looping ("for") structures of traditional programming languages.
All route components have at least one sub-route, the path to follow when a condition is true or a loop continues.
Conditional strategies include choose-route elements that select a sub-route when its expression evaluates to true:
- regex-strategy: Selects a sub-route based on string pattern matches using regular expressions.
- mvel-strategy: Selects a sub-route based on MVEL expressions.
- xpath-strategy: Selects a sub-route based on XPath expressions.
Important
: The first choose-route expression that evaluates to true determines the sub-route. Order the choose-route expressions so that the most common conditions are at the top and the least common (or default) conditions are last.You have a few options for how to handle situations where none of the choose-route expressions in a conditional strategy return a true value:
- Add a choose-route with a hard-coded expression of "true": This acts as a default path to follow if nothing more specific applies. Make sure this choose-route is last or it will override any choose-route that follows in the component.
- Raise an exception: Set the conditional strategy's Filter property to "false" to raise an exception if none of the choose-route expressions return true. This is the default. You should set a local error handler to catch this possibility.
- Skip the component: Set the conditional strategy Filter property to "true". This acts like the rewind option of a mediation in that it starts the pop/request phase of the assembly, possibly going back to a previous component to fetch another record or file. This setting does not raise an exception and needs no error handling.

Looping strategies execute a sub-route iteratively:
- doc-iterator: Executes a sub-route for each event document retrieved into memory.
- loop-strategy: Executes a sub-route until a specified condition evaluates to false.
Note
: Looping strategies typically only have a single sub-route. Loops only execute one sub-route per iteration, so if there is more than one, each iteration picks a new sub-route in a round-robin fashion (see below).The other strategies have their own rules and don't allow for your own conditions. Although rarely used, these are the only strategies that might execute more than one sub-route (typically upon error) and have options to clear faults and clone the message between sub-routes:
- round-robin-strategy: Executes a single sub-route, switching to the next sub-route each time the route is called (i.e., load balancing).
- failover-strategy: Executes the first sub-route every time the route is called, only executing following sub-routes if a fault occurs (i.e., high-availability).
- all-strategy: Execute each sub-route in sequence, unconditionally. This is effectively no different than calling multiple sub-assemblies in a chain.
Limit Values With Enumerations
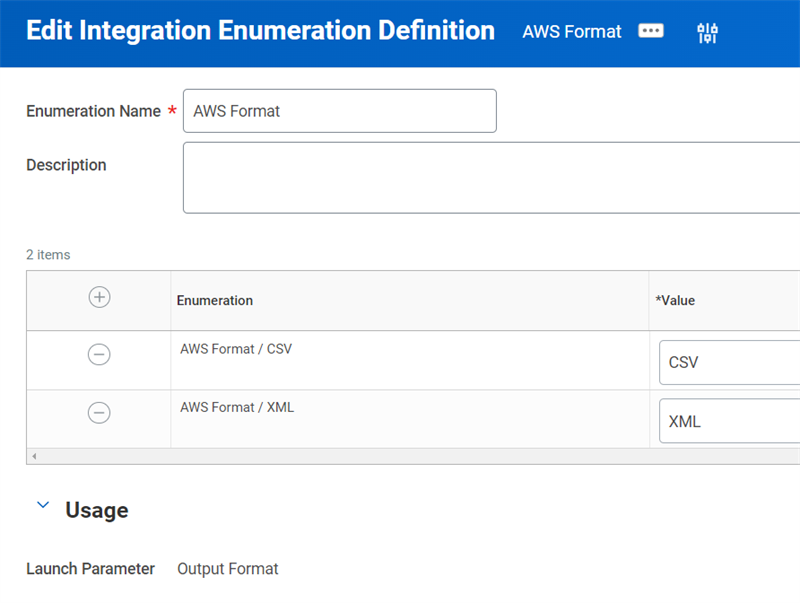
Enumerations are lists of values that restrict users to a small set of valid options. Developers can quickly create these definitions in Workday Studio and apply them to launch parameters and attributes. They are a simpler, string-only alternative to calculated fields and custom objects when Workday does not deliver an appropriate report field for your needs.
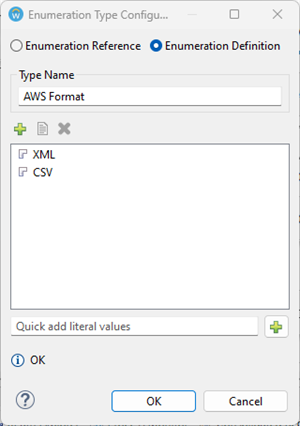
The Enumeration Reference option lets you reuse a previously created definition in this or other integrations.
Administrators can also create enumerations in the tenant and maintain those deployed with Workday Studio collections.
Split Data Into Records
The splitter is a component that can process bulk messages containing more than one data record. It is similar to the route, but all of the splitter strategies are data-driven loops. As such, they typically only have a single sub-route.
Splitters provide great flexibility in how you choose to process the data in the sub-route. However, all of its strategies are iterative and therefore slow. Splitters are best used when memory limitations (rare) or technical requirements (common) force you to process one record at a time instead of handling an entire file with a streaming component like xslt-plus. Good examples would be inbound WWS requests that only accept one business object at a time and external HTTP endpoints that might be restricted to individual queries or updates.
Splitter strategies support data in different formats, even archives:
- standard-splitter:Splits fixed or delimited files by end-of-line or other tokens. You can add structure details like header-ends-with, content-fixed-lines, footer-begins with to further define the data to be split.
- xpath-splitter:Splits XML files by an XPath expression. Although it supports complicated expressions (such as predicates), this strategy is memory-intensive and should be avoided in favour of the xml-stream-splitter.
- xml-stream-splitter:Splits XML files by an XPath expression through streaming. This strategy reads in only enough input data to parse a single record at a time. It is therefore more memory-efficient than the xpath-splitter.
- json-splitter:Splits a JSON document by a JSON path. Workday Extend APIs and most cloud services use JSON for data interchange.
- unzip-splitter:Splits a tar or zip archive into individual files. You could nest splitters to further split those files into records.
- mtable-splitter:Rarely used option that splits in-memory tabular data into rows.
Retrieve Integration Documents
Workday supports document retrieval as part of the Integration Process Event business process. Although Workday Studio includes direct file transfer via assembly components such as sftp-out and http-out, configuring a retrieval service on the integration process event is the preferred method for collecting inbound files for several reasons:
- You configure retrieval services in the tenant. This allows an administrator to adjust endpoint attributes like file directories and credentials that can change in production.
- Retrieval services can leverage the robust digital signing and encryption capabilities of Workday more easily than Workday Studio code.
- Retrieval services provide separation between the execution of the integration itself from the act of retrieving files.
Create an integration system-specific business process by selecting Business Process > Create, Copy, or Link Definition from its related actions.
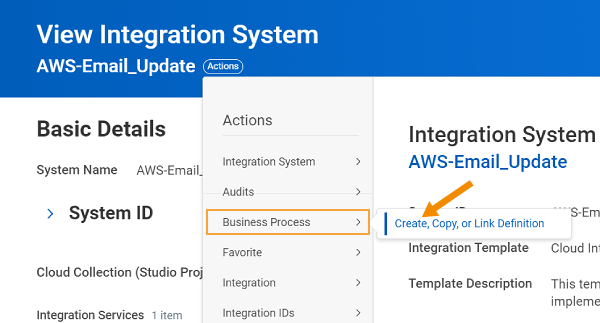
From here, define the transport details and labels you need.
The retention policy should be kept as short as possible while still being long enough to support any necessary troubleshooting.
Access Event Files in Workday Studio
Accessing retrieved file data for splitting into records is a three-step process in Workday Studio:
- Access the event documents in the Workday repository
- Iterate through the event documents
- Copy each document to the mediation message
Get Event Documents
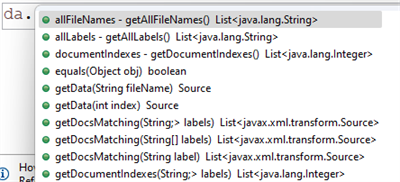
The retrieval service fires to upload any documents to the integration event before the Workday Studio integration itself executes. MVEL includes a document accessor (da) helper object that lets you access these files. However, you need to initialize this object.
The GetEventDocuments component calls a WWS operation to get the blobitory information relevant to the integration event. It then initializes the da object so that you can pull the file data into the cloud runtime for processing.
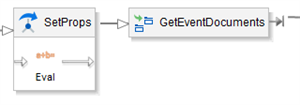
GetEventDocuments includes a single parameter, ie.event.wid, which determines the event whose documents you need to process. The default expression for that parameter sets the WID to the currently running integration event. You have the flexibility of passing in a WID for an entirely different event to process previously retrieved files. This can be useful for testing as well as for complex, multi-step file processing patterns.

Iterate Through Event Documents
You need to load the event files into the mediation context in order to process them. After GetEventDocuments is complete, you have two methods to retrieve the files from the blobitory:
Direct access using the document accessor (da) variable
Access the da object directly from MVEL when you want general information about event files, or to search for and retrieve files by name or order. For example:
- da.size()returns the number of files collected.
- da.getFileName(index)returns the name of the file based on the supplied index. Note: The indexing starts at 0.
- da.toVar(index, variable)retrieves the file in the specified position (index) into a target mediation context variable.
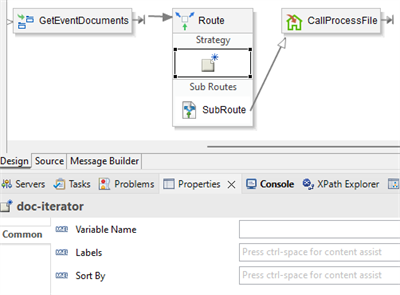
Automatic retrieval using the route doc-iterator strategy
This is the preferred, no-code method to loop through the files collected by the retrieval service. The doc-iterator strategy uses the da object to select each file in the event that matches the labels (if any) that you provide in the strategy. You also have the option of sorting the retrieval in ascending or descending order by file name.
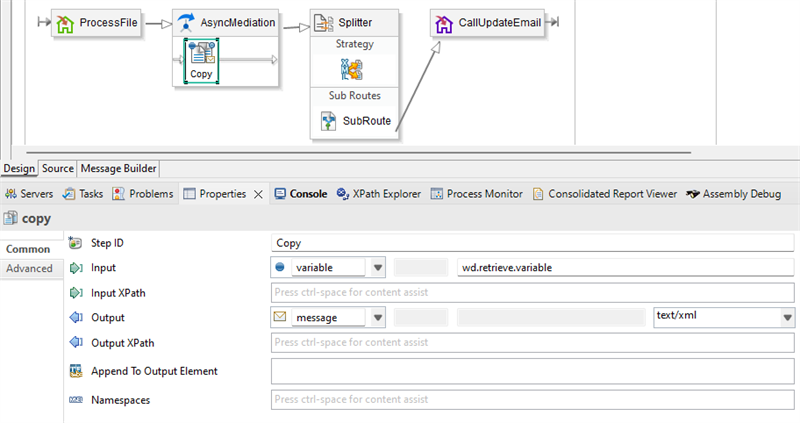
The doc-iterator strategy copies each retrieved file into a variable. The default variable name is wd.retrieve.variable.
Copy Document from Variable to Message
Whether you use the da object's toVar() method or the doc-iterator route strategy, a variable is always the first object to receive the blobitory file data. Variables only retrieve the first 100 MB or so of a file into actual cloud runtime memory, with the rest hosted in the ESB disc space. This allows you to efficiently run transformations and other full-file processes, with Workday Studio components sequentially pulling into memory only what they need for stream-based processing.
However, some components do not have the option of using variables. The splitter, in particular, needs the mediation message to hold the data that it will split. The copy step is the easiest way to move large data structures (or parts of them, using XPath) from one mediation object to another.
Validate Inbound Data
Workday applies its own application logic to inbound requests, just as it does when users enter data in the tenant. This is one of the reasons inbound integrations tend to be the slowest performers. Another is that many inbound operations can only update one Workday object at a time.
If we already need to split an incoming file into individual records, then we can at least take advantage of various record-level assembly components to check the data before submission to Workday. Custom validations that avoid unnecessary web service requests can greatly improve performance.
On the other hand, sometimes you need to do lookups against data in the tenant. For example, you might want to look up an employee's existing skill proficiency before updating it or avoid adding a duplicate organization. There are several ways to accomplish this, but in general fall into two categories:
- Use a Get operation for each inbound file record to perform a lookup or check for duplication. This can be fast at low volumes, but the multiple web service calls per record don't scale well.
- Use a PagedGet to load relevant lookup data from the tenant into a mediation context variable. You can then use the contents of the variable to lookup values, apply maps, and perform duplicate checks. The initial retrieval and aggregation can take time, but the rest of the integration can avoid repetitive requests, so it scales better.
Apply Custom Validation
The custom validation steps in Workday Studio let us implement our own business conditions within an assembly. We can replicate Workday validation to more quickly apply application logic without having to submit expensive WWS requests, or we can invent entirely new rules to satisfy the requirements of a specific Workday audience or external system.
The assembly palette includes three validation steps:
- validate: Used to validate an entire XML file using an XML schema definition (XSD). XSDs are limited in what rules they can apply and are generally reserved for confirming the existence of required elements and their data types.
- validate-exp: Used to validate messages using MVEL expressions. This is a common option, but be wary of decimal comparisons as MVEL stores these as floating point numbers with rounding errors.
- validate-xpath: Used to validate XML using an XPath expression. Can only perform a single XPath test but doesn't have the decimal precision problem of MVEL.
A failure (false result) in these steps raises (or "throws") an exception that needs to be handled by an error handler. The validate-exp step lets you define custom failure messages and error codes that you can access from the context helper object for error reporting.

You should include a local error handler on the same mediation that contains these steps to give you flexibility in assembly behavior. The mediation Continue After Error property determines the assembly flow after the error handler clears the exception but only works for exceptions thrown within that mediation:
- rewind(default): Triggers the response/pop processing phase. Flow goes backward, possibly to pick the next record from a splitter or file from a doc-iterator. This is consistent with how an error in a record should be treated.
- recover: Continues the request/push phase. Subsequent steps in this mediation execute before continuing forward to other components. This is consistent with a less severe, warning situation where we can recover from the issue and still process the data.
Important
: Rewind is the safer option, as the current message won't continue through the assembly. If the recover option is selected, ensure that the message data is in the form you expect for further processing. PIMs, for example, use the message to update the integration event, which overwrites the original message.Check for Existing Data (Example)
Assume the following sample location data was loaded into a variable in the tenant.
<locations>
<location>
<name>Atlanta</name>
<hierarchy_ref_id>99999</hierarchy_ref_id>
</location>
<location>
<name>Pittsburgh</name>
<hierarchy_ref_id>99999</hierarchy_ref_id>
</location>
</locations>
To detect a duplicate location record within the above XML, we could use the following MVEL expression.
!vars['tenant.data'].xpathB('/Locations[wd:Location_Name="' + props['location.name'] + '"]')
The xpathB function is returning a Boolean value of true when the data is present and false when the data is not. Searching in the tenant data for Atlanta, an existing tenant location, will return a true. However, the preceding "!" operator will reverse the Boolean value to false. A Boolean value of false is an exception in error handling.
Tenant Location | MVEL Expression | Result |
|---|---|---|
Atlanta | vars['tenant.data'].xpathB('/Locations[wd:Location_Name=" Atlanta "]')
| true |
Atlanta | !vars['tenant.data'].xpathB('/Locations[wd:Location_Name=" Atlanta "]')
| false |
./. | vars['tenant.data'].xpathB('/Locations[wd:Location_Name=" Pittsburgh "]')
| false |
./. | ! vars['tenant.data'].xpathB('/Locations[wd:Location_Name=" Pittsburgh "]')
| true |
Aggregate Messages
The aggregator component concatenates mediation messages into batches and routes them for further processing (e.g., storage or import). Without resorting to custom java, it is the most efficient Workday Studio component to produce large files from many smaller messages for any purpose.
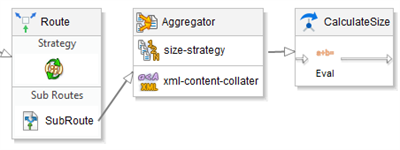
The aggregator has two non-Java strategies that control how big each message batch will get before being passed to the next component (or passed back via the response/pop phase of processing):
- size-batch-strategy:The number of messages to collate before producing a batch. Set the Batch Size to -1 to turn off batching entirely and produce a single output.
- time-batch-strategy:The time to wait (default: 10 seconds) before batching however many messages have been collated so far. As long as the receiving system can handle files with varying numbers of records, this is useful to satisfy the rate limits of external APIs.
Aggregator collaters determine the output format of the message batches. Take care to match the collater to the format of the messages you are aggregating:
- message-content-collater:The most generic collater, use this when concatenating fixed and delimited file data.
- xml-content-collater:Wraps XML messages into a combined document with a new root element (header and footer are required). You also have the option of using XPath to extract just the data you need from each XML input message.
- json-collater:Creates a JSON list from individual JSON object messages.
- zip-file collater:Creates a tar or zip archive of file messages.
- mtable-collater:Rarely-used option to create an in-memory table where the input messages are treated as rows.
The aggregator itself has some important common properties that control its behavior:
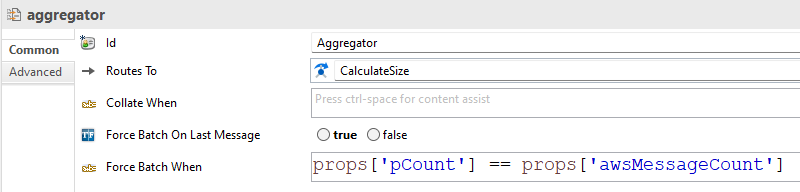
- Collate When:Determines whether a message should be included in the batch. This can be useful for skipping records with exceptions or just for triggering a batch without adding another record.
- Force Batch On Last Message:Controls batching when the aggregator is within a splitter or PagedGet. These components set a mediation context property that trigger the aggregator to produce a final batch when they have completed splitting data or retrieving pages.
- Force Batch When:Gives you full control of when the aggregator creates its last batch using MVEL. Use this for criteria that have nothing to do with splitting or paging, or when nesting those components. Note: Any expression in this field overrides the Force Batch on Last Message property.
Import High Volume Data
The Import web service pattern uses a single import call to import large amounts of data to Workday. This pattern automatically splits up a large document into several parallel threads to improve processing performance. A synonymous term for an Import Web Service is Web Service Background Process.
Unlike a standard WWS request that returns a success (or fault) message from Workday when the update completes (or fails), an import operation only returns a reference to a Workday background process. You can use the
Process Monitor
or additional operations to monitor the progress of the event.Resource
: For more information about the import web service pattern, refer to the Administration Guide under Integrations > Workday Web Services and Integration IDs > Workday Web Services Attributes, Filters, and PatternsIn general, Import WS should be reserved for high volumes (thousands of objects) as you could run out of resources to spool up background processes if you submit too many small operations of this type. For up to 200 records (sometimes more, depending on the operation) it is still best to use the individual "submit" type operations.
Sometimes you receive many small files of input data that could be merged to produce an appropriately large file for an import operation. The aggregator is the most efficient native Workday Studio component to collate files for any purpose, including imports.