
Orchestration Data Access
Overview
This chapter focuses on accessing and working with data in Workday Orchestrate. Topics include selecting appropriate data sources, using Reports‑as‑a‑Service (RaaS) and Workday Query Language (WQL), looping through results, mapping and aggregating data, and storing outputs for downstream integrations.
Objectives
By the end of this chapter, you will be able to:
- Retrieve orchestration data using Reports-as-a-Service (RaaS) and Workday Query Language (WQL).
- Use JSONPath to configure data set boundaries for loop steps.
- Handle errors in loops.
- Configure integration system maps making them available for orchestrations to use to look up data.
- Aggregate loop results into JSON payloads for downstream use.
Managing and Merging Data Inputs
Some integrations use values from launch parameters together with integration attributes or integration maps. Instead of reading these sources in many places, consolidate them into a single set of inputs.
Combining Sources in Create Values
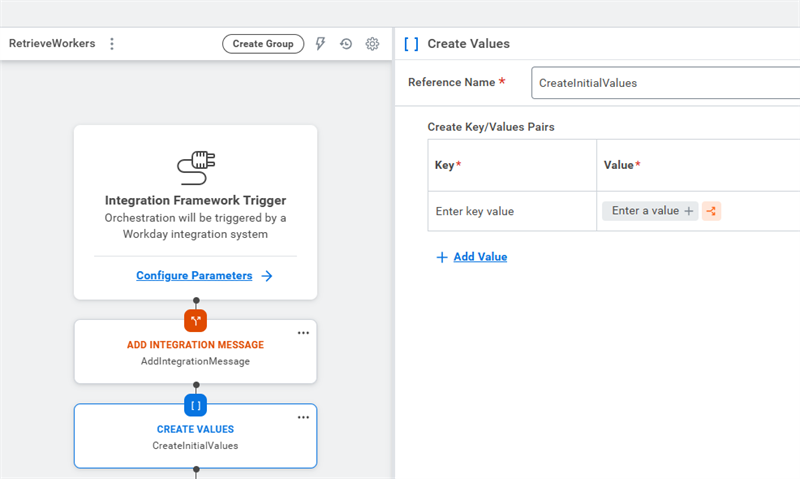
Use a Create Values step near the start of the orchestration to build the values that downstream steps use.
- Read runtime values with the lp functions described earlier, such as lp.dateParam or lp.booleanParam.
- Read configuration values with integration‑system attribute and map functions, such as stringAttributeValueOrDefault or mapLookupWithDefault.
- Store the result under a clear key, such as startDate or departmentCode.
Downstream steps then use data.InitialInputs.startDate (for example) instead of calling lp or intsys directly.
Priorities and Fallbacks
When more than one source can provide the same value, define a simple order of precedence and implement it inside Create Values:
- First, use the launch parameter if it exists and has a value. Use lp.existsAndHasValue to check.
- If that's not the case, then, use an integration map or attribute default.
- If that's not the case, then, use a hard-coded default only when it is safe and documented.
Use Expression Builder conditions so that each key in Create Values always resolves to a single, well-defined value.
Using Report-as-a-Service (RaaS) in Orchestrations
Report-as-a-Service (RaaS) allows you to access Workday reports through web services. By enabling a report as a web service, you can integrate data from your Workday tenant into your orchestrations, external systems, or reporting tools. RaaS is particularly useful for retrieving structured data, such as employee records or payroll details, in various formats like JSON, CSV, or XML.
Adding a Raas Step to an Orchestration
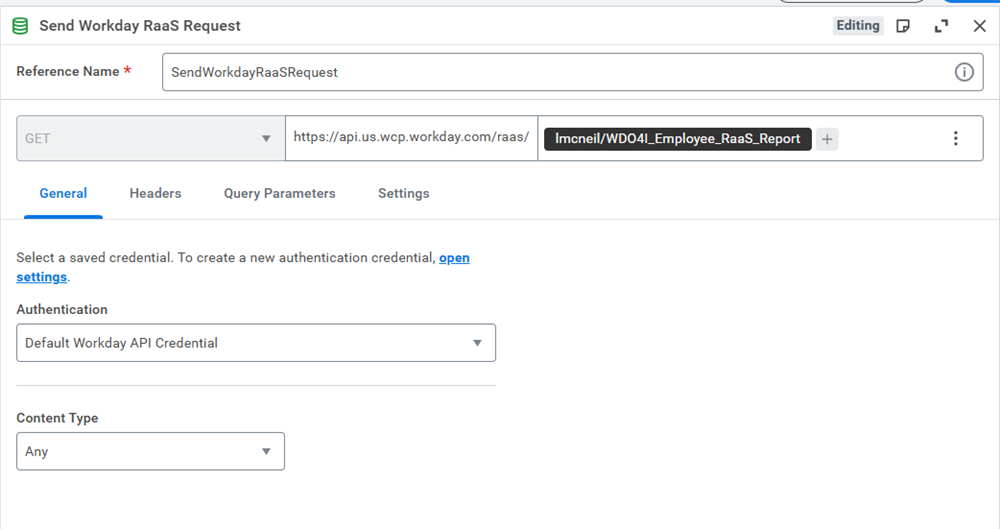
To incorporate RaaS into your workflow, use the Send Workday RaaS Request component. This step makes a request to a Workday RaaS endpoint and retrieves data to use in the orchestration.
Step-by-Step Configuration
- Add the Component by dragging the Send Workday RaaS Request step onto the orchestration canvas.
- Set a Reference Name to identify the step in the workflow.
- Configure the General Tab:
- Complete the URL for the GET. The first part of the URL is automatically defaulted in and should not change. The Pill part of the GET represents the Workday user who is the owner of the report followed by the custom report name.
- Choose an Authentication Type from the drop-down menu (e.g., OAuth or Workday credentials).
- Specify the desired output Content Type (e.g., JSON, CSV).
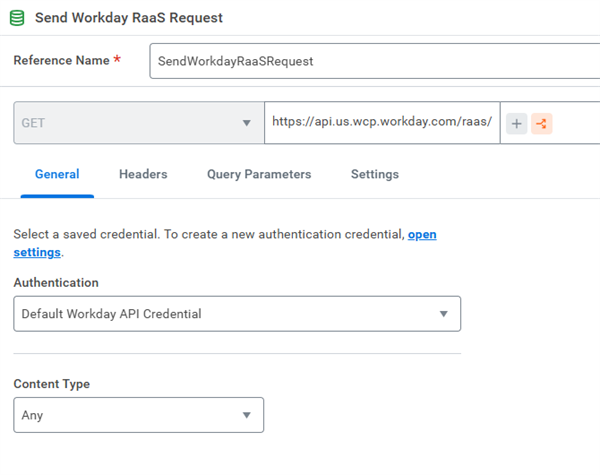
- Set Headers and Query Parameters:
- Use the Headers tab to add any required HTTP headers. For example, specify an API key or authorization token.
- In the Query Parameters tab, define key-value pairs to filter report results. For instance, department=Engineering limits the data to a specific department.
- Adjust Request Settings:
- On the Settings tab, configure timeout and retry settings. For long-running reports, set an extended Connect Timeout.
- Apply a retry policy to handle temporary network disruptions.
Output Types for RaaS Responses
RaaS provides several output formats, each suited to specific use cases:
- CSV: Ideal for importing data into spreadsheets for analysis.
- JSON: Commonly used for system-to-system workflows requiring lightweight data structures.
- Simple XML: Suitable for basic integrations with tools like Microsoft Excel.
- Workday XML: Useful for REST- or SOAP-based integrations that require detailed data structures.
For onboarding integrations, a RaaS report may output worker data in JSON format for use in external HR tools or analytics platforms. Alternatively, exporting as CSV allows for manual data reviews or ad hoc processing.
Store Document Component
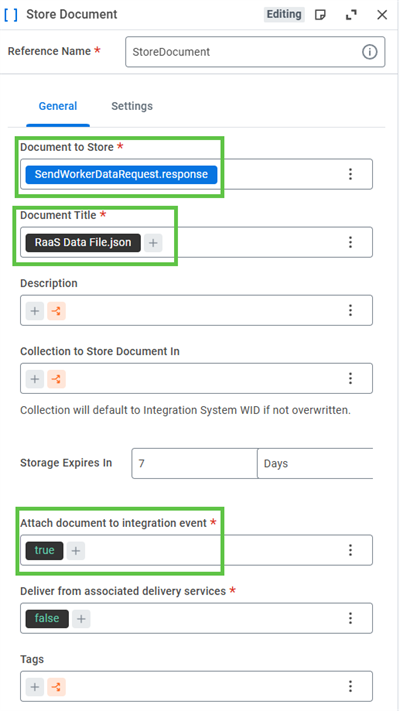
The Store Document component creates a persistent copy of a document that is available to users and, optionally, can be viewed as an attachment to the integration event in the tenant.
If you review the overall flow of this orchestration, you will notice that a Store Document component or step displays after the RaaS step. This step will:
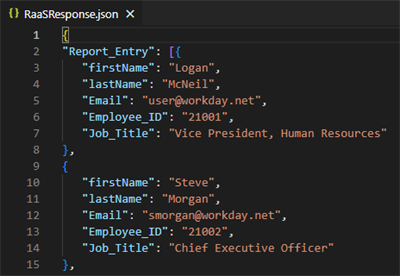
- Take the JSON response from the FetchEmployeeData RaaS API call.
- Write it to a file that will be named RaaSResponse.json.
- Attach that file to the integration system event.
- Specifies that the document will remain in storage for seven days (default).
Important
: By default, Store Document does not attach the file to the integration event.The columns of the custom report will directly correlate to the output of this orchestration. That report used the following columns:
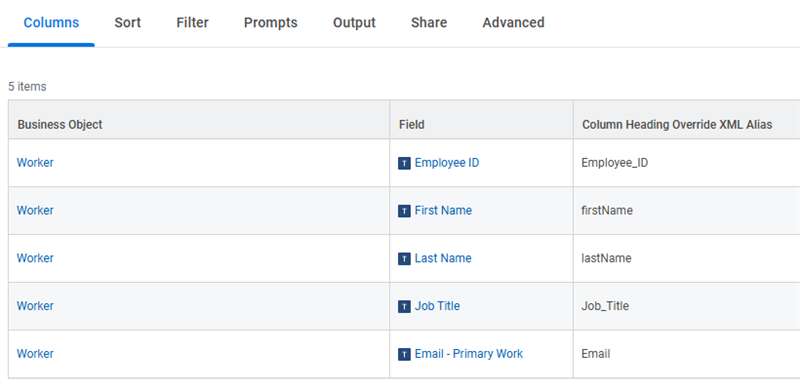
Because we chose JSON as the output format, a file with all workers and the above columns is the result of the Store Document step of this orchestration.
Overview of Workday Query Language (WQL)
Workday Query Language (WQL) is an SQL SELECT-like syntax that was created for accessing data using Workday data sources and fields. WQL was initially built for Extend customers has now has an expanded focus. You can use WQL in:
- Workday Orchestrate
- Workday Studio
- Tasks in a Tenant
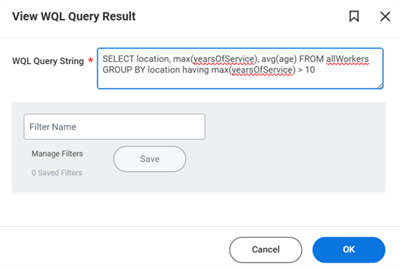
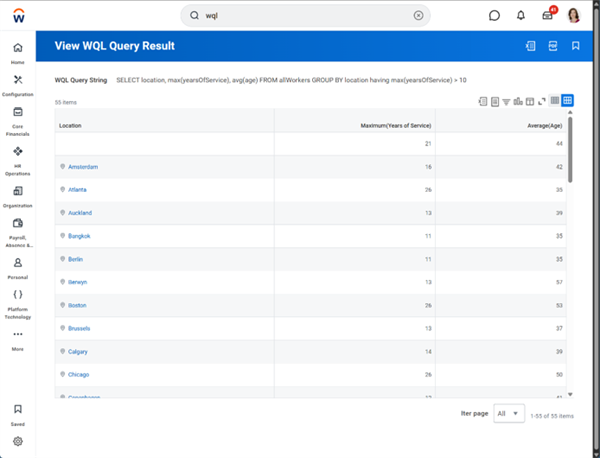
- View WQL Query Result
- Convert Report to WQL
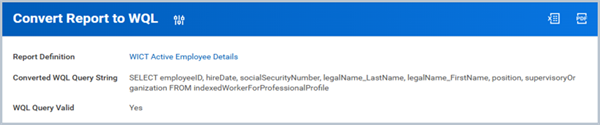
Users that want quick answers about their Workday data without having to build a custom report should use WQL.
WQL:
- Supports a subset of SQL.
- Is read-only.
- Is part of the Workday REST API.
WQL uses the same data source, row-level, and field-level security as Workday reporting.
WQL Syntax
A WQL query operates on a data source (for example, allWorkers) and a set of field aliases exposed on that data source. The core clauses are SELECT, FROM, WHERE / WHERE ON, ORDER BY, GROUP BY, HAVING, and LIMIT. The following table briefly explains each clause:
Clause | Description | Example |
SELECT | Specifies which fields (and optional aggregations or related business object fields) to return from a data source. Required in every WQL query. | SELECT fullName FROM allWorkers |
FROM | Identifies the data source to query, and can also supply built-in prompts like data source filters, effective dates, and entry dates. | FROM studentApplications (dataSourceFilter = studentApplicationsByAcademicUnitAndAcademicLevel, academicUnit = {Workday ID}, academicLevel = {Workday ID}) |
WHERE | Filters the result set by one or more conditional expressions, using comparison operators (=, !=, >, etc.) and logical operators (AND, OR). | WHERE workerStatus = "ACTIVE" AND country = "USA" |
ORDER BY | Sorts the result set based on one or more fields or expressions, optionally specifying ascending (ASC) or descending (DESC) order. (Used together with other clauses, not by itself.) | ORDER BY worker ASC |
GROUP BY | Groups rows that share the same values so you can apply aggregation functions like MAX, SUM, or COUNT over each group. Aggregations are defined in the SELECT clause. | GROUP BY location |
HAVING | Specifies a condition for the GROUP BY. | HAVING max(yearsOfService) > 10 |
LIMIT | Restricts how many rows the query returns in total, helping control large result sets (up to a maximum of 1 million rows per query). | LIMIT 500 |
For example, to return the worker, full name, and location for a subset of workers:
SELECT worker, fullName, location FROM allWorkers WHERE location in (043e71ed793b1054de6213435945000c)ORDER BY fullName ASC LIMIT 100
Access WQL Aliases from the Tenant
SQL uses columns and tables. WQL uses fields and data sources. WQL also references data source filters and prompts. Before you can write any WQL you must know the WQL aliases.
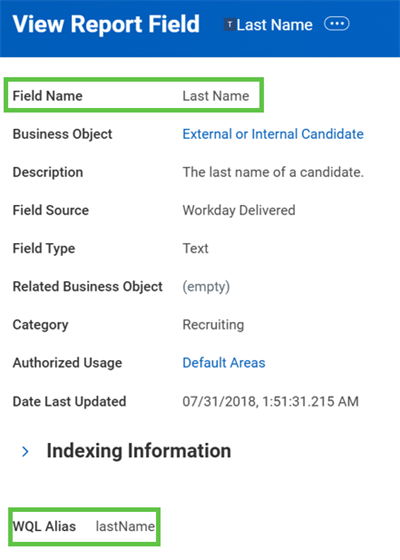
All Workday delivered objects have a WQL alias. WQL queries reference data sources, fields, data source filters and prompts by their WQL alias.
You can access WQL aliases in the tenant by running the Data Sources report.
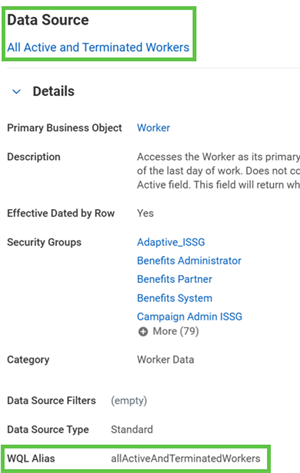
You can also drill down from the Business Object Details report and use the View Report Field task in the tenant.
Access WQL Aliases using the REST API Explorer
The WQL API has a dataSources collection. There are GET methods to get WQL aliases for dataSources, dataSourceFilters, and fields.
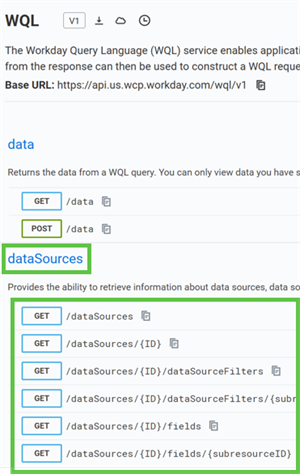
These GETs allow for query-string parameters like searchString to allow you to easily find the alias for the elements you need. You can try the many dataSources API operations here in the REST API Explorer.
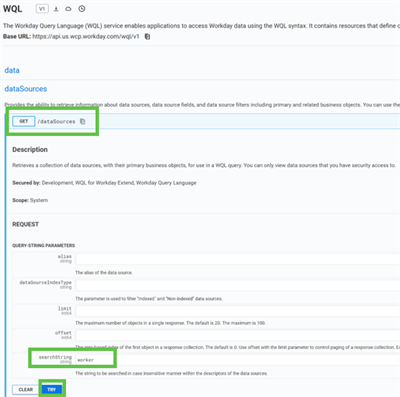
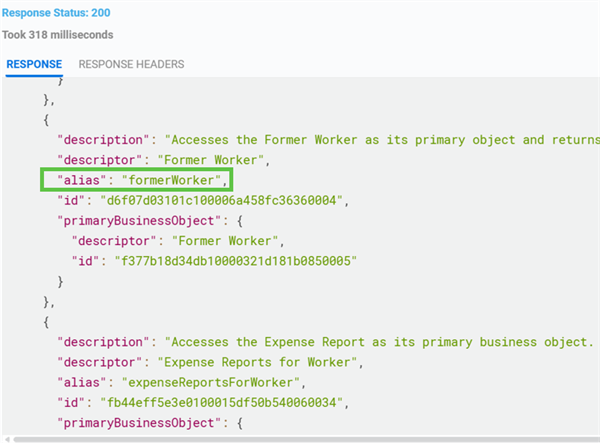
For the above GET operation, you will see that the JSON response contains the alias for all dataSources that contain "worker" in their name.
WQL Where Clause Examples
Here are some sample WHERE clauses. Most are standard SQL. Note that when using the IN clause, you can pass either a Workday ID (WID) or a reference ID.
- WHERE hireDate >= '2016-01-01' AND hireDate <= '2016-12-31'
- WHERE (totalBasePayAnnualizedAmount > 50000 AND totalBasePayAnnualizedAmount <= 100000) OR isManager = TRUE
- WHERE workAddress_City = ″San Francisco″
- WHERE workAddress_City IS EMPTY
- WHERE age >= 50
- WHERE supervisoryOrganization IN (e50d309a6d8540e3b533219cfa2c330b)
- WHERE supervisoryOrganization IN (Organization_Reference_ID='SUPERVISORY_Operations','SUPERVISORY_Information_Technology’)
- WHERE isManager = FALSE
WQL Group By Clause
The Group By clause:
- Specifies how the data should be grouped and how to filter group data (HAVING).
- Is used with aggregate functions like sum, count, avg, max, and min.
- Cannot group by multi-instance and currency fields.
- Must contain any non-aggregated fields from the SELECT statement.
Sample GROUP BY:
SELECT location, max(yearsOfService), avg(age) FROM allWorkers GROUP BY location having max(yearsOfService) > 10
Indexed Data Sources
Indexed data sources can be used in WQL. Here are the rules and some samples. Indexed data sources:
- Are optimized for performance.
- Can contain predefined filters.
- Need security access to filters.
- Examples:
Examples:
SELECT legalName FROM indexedAllWorkers(dataSourceFilter=indexedAllWorkersFilter, location=(Location_ID='San_Francisco'))
SELECT worker, workerAdditionalData FROM indexedAllWorkers(dataSourceFilter=indexedAllWorkersFilter, isActive=true, reportWriterProvidedTopLevelEffectiveMoment='2018-11-28') WHERE worker IN (3aa5550b7fe348b98d7b5741afc65534)
Testing WQL Queries with the REST API Explorer
The REST API Explorer has two collections in the WQL API:
- Data Sources, which you have seen and can use to access WQL aliases.
- Data, which you can use to test your WQL.
The WQL SELECT statement goes into the query parameter of the data collection's GET operation. Ensure that quotes in string filters are straight single quotes; avoid “smart quotes” when copying from documents.
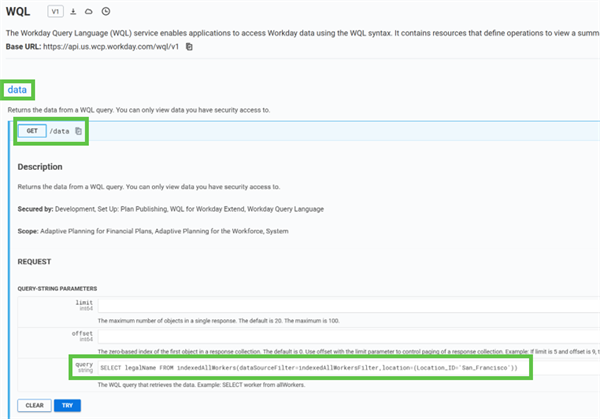
You submit queries with:
- GET /data?query=... for shorter queries.
- POST /data with a JSON body for longer queries.
The response includes a total count and a data array that you can compare with your expectations. When testing in the REST API Explorer:
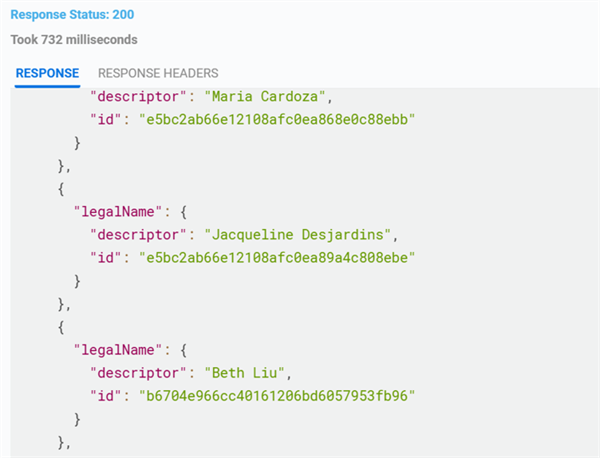
Using WQL in an Orchestration
Workday Query Language (WQL) returns data that you can use directly in orchestrations or through the WQL REST API.
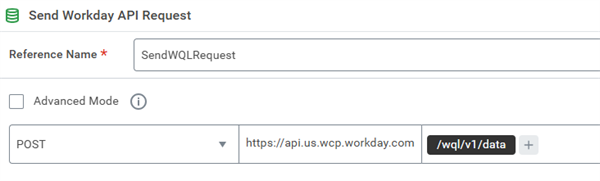
Typical benefits for integrations include:
- Selecting only the fields you need instead of full report outputs.
- Filtering with WHERE and WHERE ON to keep results small and focused.
- Using related business object fields (for example, dependents of a worker) in a single query.
- Paginating large result sets with LIMIT in the query and limit/offset parameters in the REST call.
Common orchestration patterns include:
- Retrieving workers or positions that match a set of conditions.
- Returning a small set of fields for downstream REST calls.
- Building JSON or CSV payloads for connector‑style integrations.
Dynamic Data Retrieval with WQL
In orchestrations, you often parameterize WQL queries so that the same orchestration can target different populations or time windows. Typical pattern:
- Use launch parameters or other inputs to capture filter values (for example, region, organization, or date range).
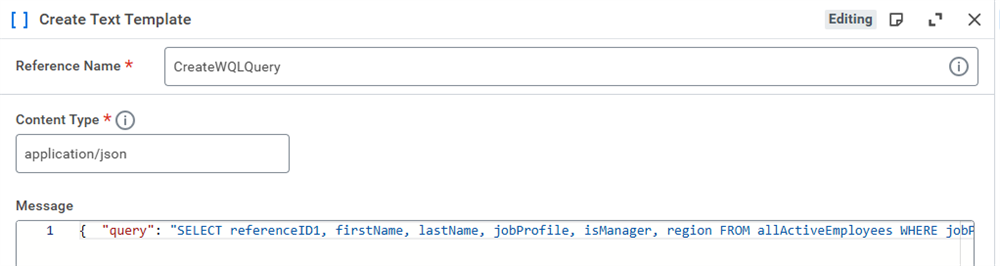
- Build the WQL statement in a Create Text Template or Create Values step, inserting the input values into the WHERE clause.
- Use the completed query text as part of a WQL REST API call (for example, via Send Workday API Request) or as the URL path when you call the WQL service.
At runtime, the orchestration replaces {{Input.Region}} with the actual region value. You can then iterate through the results in a Loop and pass them to downstream connectors or aggregations.
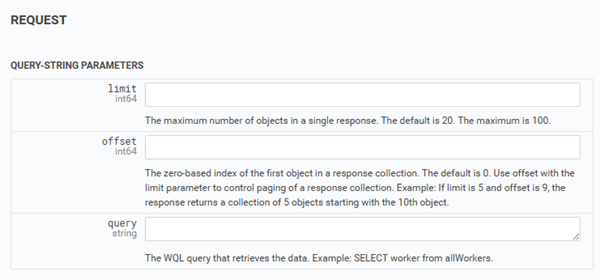
WQL supports both:
- A LIMIT clause inside the query, which caps the total number of rows returned.
- REST-level limit and offset parameters, which page through the result set up to 10,000 rows per page.
For example:
- First page: {baseURL}/data?limit=1000&offset=0&query=SELECT worker, location FROM allWorkers
- Next page: {baseURL}/data?limit=1000&offset=1000&query=SELECT worker, location FROM allWorkers
RaaS vs WQL
Now that you've worked with both Reports as a Service (RaaS) and Workday Query Language (WQL), here's a final comparison to reinforce when to use each:
Feature | Report as a Service (RaaS) | Workday Query Language (WQL) |
Primary Use | Prebuilt reports as APIs | SQL-like queries for Workday data |
Performance | Slower, processes full reports | Faster, retrieves only required data |
Security | Report-based access control | API client and domain security required |
Input | Custom report with predefined labels | Query with SELECT, WHERE, GROUP BY clauses |
Output | XML, JSON, CSV, Excel | JSON |
Use Case | Large, structured data extracts | Quick, on-demand data retrieval |
Note
:
A large data extract for an integration is typically characterized by the volume of documents or records being processed. In the context provided, it is noted that some customers have requirements to extract documents where the volume exceeds 750,000 documents. Additionally, there are instances where customers have requested to extract 500,000+ FIN documents. Generally, extracts involving over 500,000 to 750,000 documents are considered large.JavaScript Object Notation (JSON)
JSON (JavaScript Object Notation) is a lightweight data‑interchange format commonly used to represent structured data. JSON is used in several Workday integration patterns, including:
- Report‑as‑a‑Service (RaaS) responses.
- Workday Query Language (WQL) responses.
- Workday REST API requests and responses.
JSON is built from a small set of concepts:
- Objects: unordered collections of key–value pairs.
- Arrays: ordered lists of values.
- Keys (properties): names that identify values within an object.
- Values: strings, numbers, booleans, null, objects, or arrays.
The following WQL statement selects basic worker information:
SELECT employeeID, firstName, lastName, jobProfile, isManager, region FROM allActiveEmployees
A JSON response from this query might look like the following: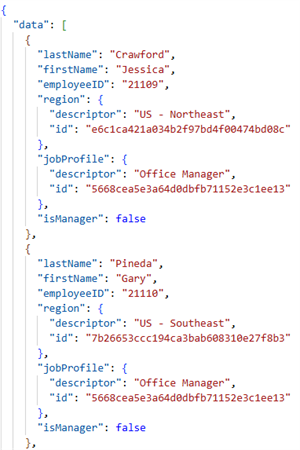
Using JSONPath
It will be common for you to need to write JSONPath in your Orchestrate expressions. Here are a couple of good tools to help you learn JSONPath.
First is JSONPath Online Evaluator and can be found at: https://jsonpath.com. The JSONPath online evaluator is a tool that allows users to extract values from JSON data using JSONPath syntax in a real-time environment. It helps visualize and test JSONPath queries by displaying results as you type your path expressions. In this example, the JSONPath expression $.data[*] returns all the data in the sample document.
![Displaying JSONPath Online Evaluator with the $,data[*] expression, displaying all of the source document data.](/content/dam/ilx/workday-education/en-us/course-manuals/creating-integrations-using-workday-orchestrate/media/9ba24035-01f4-4b98-9c24-0170a0817200.png/_jcr_content/renditions/original)
In this next example, the JSONPath expression $.data[2] returns Oliver Reynolds. Steve Morgan is clearly item 2 in the data file. JSON is a zero-based language. Logan is item 0 and Steve is item 1, making Oliver item 2.
![Displaying JSONPath Online Evaluator with the $,data[2] expression, displaying worker 3 only. JSON is zero-based.](/content/dam/ilx/workday-education/en-us/course-manuals/creating-integrations-using-workday-orchestrate/media/1e12a016-0329-474c-828f-7318b1969549.png)
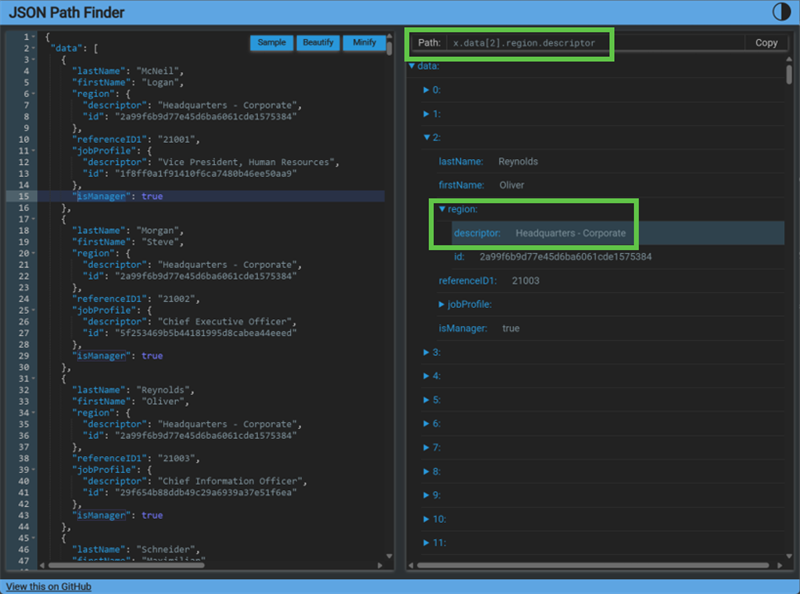
Another good tool is JSONPath Finder. JSONPath Finder is located at https://jsonpathfinder.com. JSONPath Finder is a tool that helps users query and navigate JSON data using JSONPath expressions. It allows users to easily extract specific information from JSON documents by entering the JSON data and selecting the desired paths. In this example, we selected the specific region from item number 3. If you look at the Path, this is the JSONPath expression you would need to read the descriptor "Headquarters - Corporate."
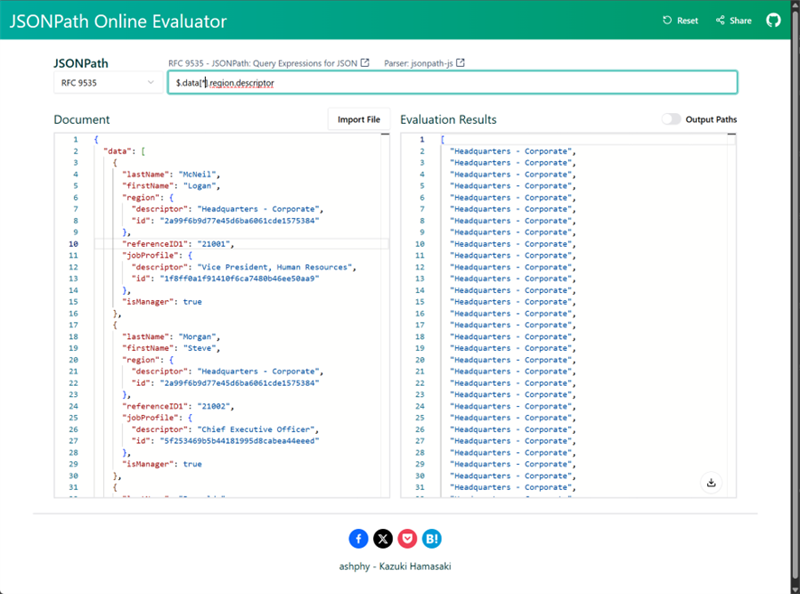
You can then take that knowledge, and even manipulate the expression to perform a task like get a list of all of the region descriptors via the JSONPath Online Evaluator. Notice in the JSONPath, we changed the $.data[2].region.descriptor to $.data[*].region.descriptor.
Important
:
Use these tools to help teach yourself JSONPath. Or to help you write JSONPath for your own Orchestrations. Never upload data to either site that contains personally identifiable information (PII). You don't know who or where that data really goes.Loop Component
Use the Loop component when an orchestration must perform the same set of steps for every item in a dataset, such as each row returned by a WQL query. The Loop step evaluates an iterator expression and runs the steps inside the loop block once per item
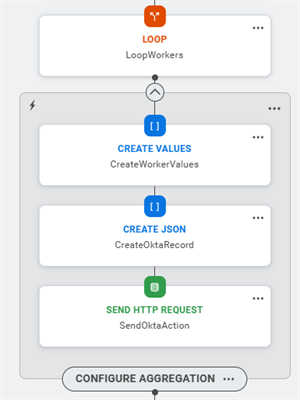
When you configure a Loop step, pay attention to these properties.
- Data Type:The type of items in the dataset (e.g., JsonIteratorType or XmlTypeIterator). You can select AutoType so Orchestrate determines the iterator type and adjusts if the dataset type changes.
- Data Set:The iterator expression that provides the items to process, defined with Expression Builder. For a WQL response, this is typically a JSON iterator over the data array. Notice the use of JSONPath in this expression.
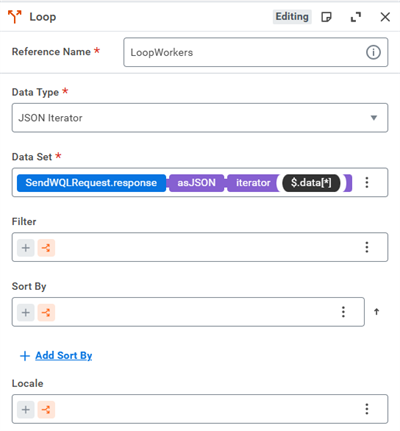
The Loop component can reduce and order the items before they enter the loop body:
- Use the Filter expression to exclude items that do not meet specific criteria. Only items where the filter evaluates to true enter the loop.
- Use the Sort By expression to sort items by a string or number value before the loop runs. You can add multiple sort rules; Orchestrate applies them in order.
- Text values are sorted lexicographically; numeric values are sorted numerically.
- Sorting by string can produce different results in different languages. To control this, use the Locale expression property for the Loop. This temporarily overrides the default locale for the duration of the loop and can help produce consistent sort order across tenants.
Global Error Handlers
Global error handlers act as the fallback for the entire orchestration. They capture unhandled errors that are raised anywhere within the orchestration, ensuring workflows exit gracefully instead of failing unexpectedly. Additionally, if a step-level error handler propagates an error and there is no parent error handler, the Global error handler captures the error. Global handlers are modified by selecting the following toolbar icon:
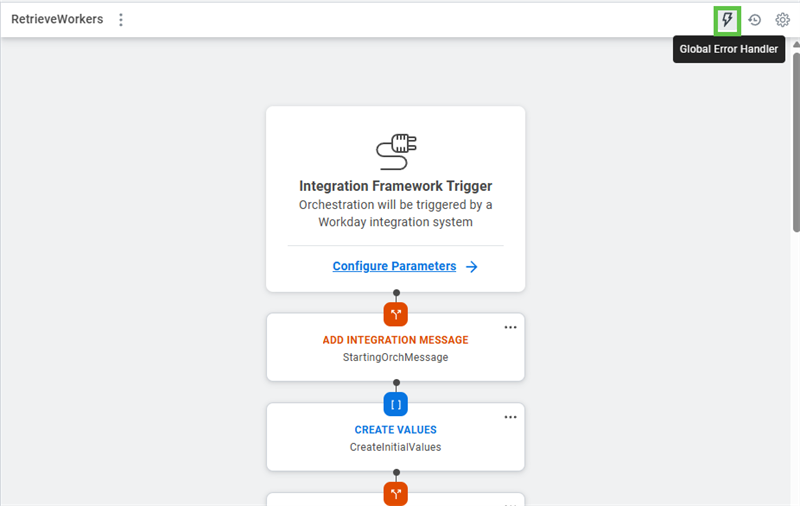
When you initially create the Global error handler, a hidden panel appears with a new flow. There is a Back button that allows you to return to the main flow of the orchestration. You can bring as many steps as needed into this error handler. In this case, we have added one step using the Add Integration Message component.
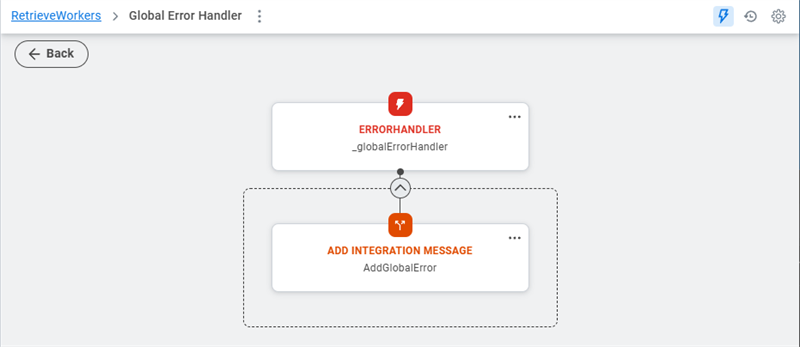
Common actions include:
- Logging detailed error messages.
- Sending notifications to alert stakeholders.
- Ensuring the orchestration terminates cleanly, preventing partial or inconsistent data updates.
Here we see that the Add Integration Message step is outputting information using the ProcessingError member functions, including:
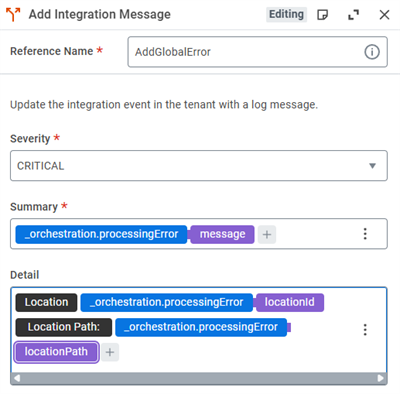
- message, which is a string returning the underlying error message, prefixed with the error type and suffixed with the qualified ID of the step that caused the error.Note: The message is available for logging purposes only when included in a local error handler or global error handler. A Log to File component can access this log and generate a file with error messages.
- locationId, which is a string returning the ID of the step that caused the error.
- locationPath, which is a string returning the qualified ID of the step that caused the error.
Unlike step-level handlers, global handlers cannot continue workflow execution after an error. Their role is to close out workflows securely and provide visibility into the failure.
Handling Errors in Loops
Loops enable an orchestration to iterate through a dataset, process items, and aggregate results. When an iteration fails, error handling is critical so that the orchestration behaves in a predictable way.
Step-Level Error Handlers
Step-level error handlers are applied to individual steps or groups of steps. For example, when an API call fails due to a timeout, a step-level handler can retry the call or log an error for review.
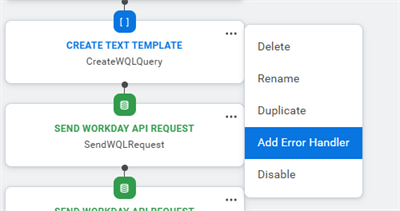
Adding the step-level error handler acts similar to the global error handler. A new panel displays a hidden flow allowing you to add steps or components.
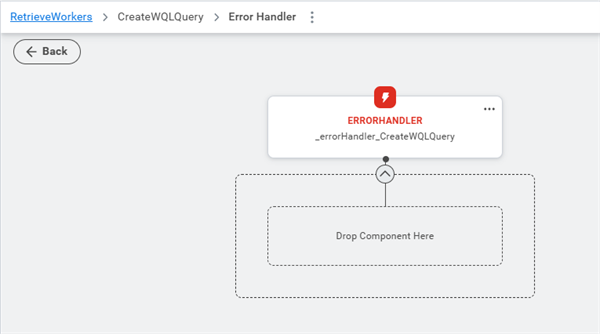
Step-level error handlers are defined within their own workspace, allowing you to isolate error-specific actions from the main workflow. For instance, you might log an error, send a notification, or retry the operation multiple times before escalating the issue.
Conditional Outputs from Step-Level Error Handlers
When you open the step-level error handler in the canvas and select the base ERRORHANDLER item, its properties let you choose how the handler behaves: Conditional Outputs or Propagate Error.
Conditional Outputs
: Runs any steps that you add to the error handler and returns a boolean output named isSuccess. If the step or group of steps that uses the error handler completes successfully, isSuccess is true. Both isSuccess and the normal outputs of that step or step group are available to downstream steps. If the error handler steps do not complete successfully, isSuccess is false. In that case, only isSuccess is available to downstream steps.Propagate Error
: Runs any steps that you add to the error handler and then rethrows the error to a parent error handler. The parent is the component that contains this step, not the previous step. The error is propagated out to the containing scope. If no parent error handler exists, the error goes to the global error handler.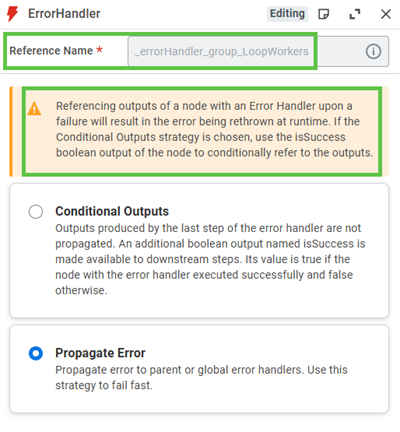
Note
: The default option is Propagate Error.Conditional Outputs can work with a Loop to send step-level error messages to a downstream Log to File step instead of the global error handler when the error is propagated.
Configuring a Loop with Error Handlers
- Select the Loop step in the orchestration.
- From the Loop step's Related Actions icon, add a Loop Error Handler.
- Define the handler actions, such as logging the error, and decide whether to propagate the error or continue processing from the next step.
- Review downstream steps so that they account for incomplete processing if the Loop stops before all iterations finish.
Loop Error Handlers
A Loop Error Handler applies to the entire Loop step and stops the Loop if any iteration raises an error. Use this handler when all iterations must succeed to maintain data integrity. For example, when processing payroll data, each employee record must be valid before the orchestration continues.
Error Handler per Iteration
An Iteration Error Handler manages errors that occur during a single iteration of a Loop step. When an iteration fails, the handler can log or address the error without stopping the entire Loop. This allows the orchestration to process valid items in the dataset while it manages problematic records. To prevent the Loop from stopping, configure the Iteration Error Handler to use Conditional Outputs.
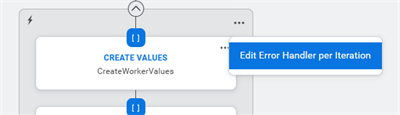
How It Works:
- The handler attaches to the Loop at the iteration level.
- If an iteration raises an error, the handler runs its configured actions, such as logging error details or skipping to the next item.
- Later iterations run and complete independently of the failed iteration.
Configuring an iteration Error Handler
- Add a Loop step to the orchestration and configure it with the data set, such as a list of employee IDs or records.
- From the Loop step's Related Actions icon, select Add Error Handler per Iteration.
- In the Iteration Error Handler, define actions such as:
- Logging the error by adding an Add Integration Message step.
- Creating a log entry by adding a Log to File step.
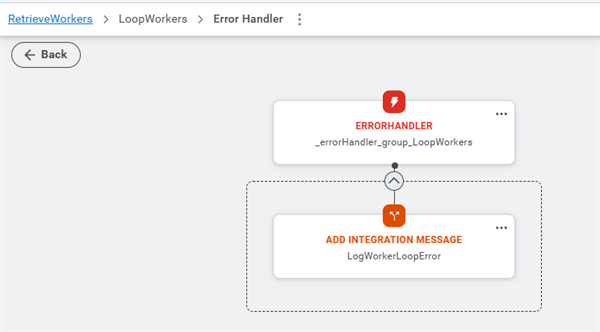
Use an Iteration Error Handler when partial completion is acceptable. Log errors and branch them based on the error details. Ensure downstream steps account for skipped or incomplete items.
Integration Maps and Orchestrate
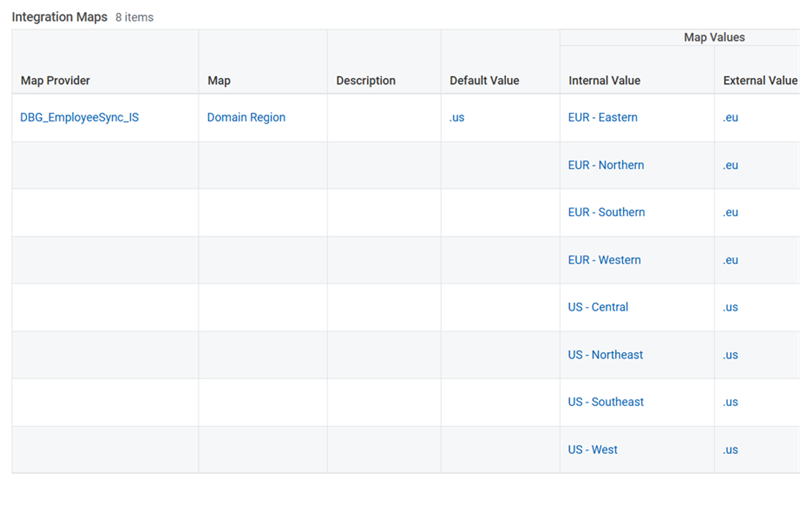
Integration Maps are configurations on an integration system that translate a field’s internal Workday value to an external value, or the reverse, during integration processing. Integration maps reside on the integration system, not in the orchestration definition in the DevSite.
Aggregating Loop Data
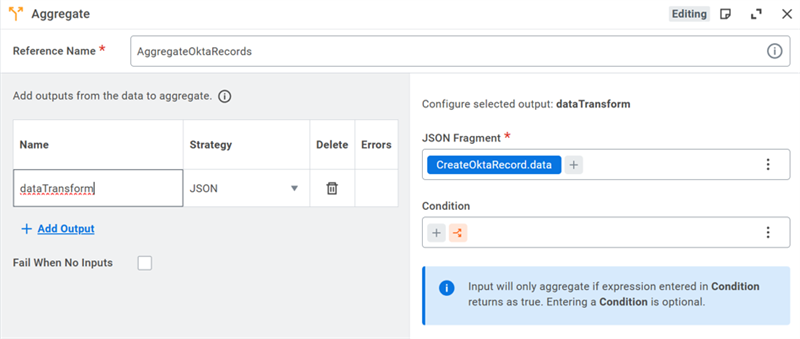
Aggregation is the process of condensing data items from multiple iterations into a single output by applying a specific function called an aggregation strategy. Workday Orchestrate supports aggregation strategies within Loop, Batch Loop, and Join Loop components. Aggregations can handle various data types, such as text, numbers, dates, or complex structures like JSON and XML.
Aggregation strategies define how data is combined during loop iterations. The steps to configure an aggregation are as follows:
- On the Loop step, select Add Aggregation from the step menu.
- Provide a reference name for the aggregation.
- Select Add Output and choose a strategy, such as Text or JSON.
- Configure the strategy details, such as the fragment, to include from each iteration and any conditions for inclusion.
- Use Expression Builder to define the data to be aggregated.
Workday Orchestrate provides various strategies for different use cases:
- Text: Combines text fragments into a single document. You can specify a line separator, header, and footer.
- JSON: Combines JSON fragments into a single JSON array. Use this for type-safe JSON construction.
- CSV: Aggregates rows into a CSV document.
- Count: Returns the number of iterations that met the aggregation condition.
- Sum: Adds numerical values from each iteration.
Note
: The aggregation strategies covered in this section focus on key use cases commonly encountered in orchestrations. Workday Orchestrate supports additional strategies, such as XML, Boolean List, and Custom, among others.Text Aggregation
Use the Text strategy to combine text outputs from multiple iterations into a unified string or document, such as a log file or a delimited list.
To configure Text aggregation:
- Add an aggregation to your Loop step and select theTextstrategy.
- In theSelect Textfield, use Expression Builder to define the string to collect from each iteration. For example: Loop.item.stringAtXPath("/ID").
- Specify aLine Separator(such as a newline or comma) to delimit the items.
- Optionally, add aHeaderorFooterto wrap the aggregated text.
- You can also set aConditionso that only specific items (for example, those with a status of "Error") are included in the text output.
CSV Aggregation
The CSV strategy aggregates rows from loop iterations into a single CSV document. Use this strategy when you need to generate a structured report or a delimited file for an external system.
To configure CSV aggregation:
- Define the CSV format, create a format definition. Specify the header row, separator character (such as a comma or pipe), and column names.
- Add the aggregation and select the CSV strategy.
- Map data to columns:
- Select the Format you created.
- In the String Map table, map values from the current loop iteration (for example, Loop.item.stringAtXPath("/ID")) to the corresponding CSV columns.
- Set conditions to include only specific rows, such as employees in a specific department. Enable Fail When No Inputs if the orchestration should stop when no rows are generated.
Count Aggregation
The Count strategy tallies the number of iterations in a loop. Use it to track processed items, generate summary statistics, or verify that data was found.
To configure Count aggregation:
- Add an aggregation to your Loop step and select theCountstrategy.
- Provide a name for the output variable (for example, TotalRecords).
- Optionally, add aConditionso that the strategy counts only items that meet specific criteria (for example, department == "Sales").
- After the loop, the count variable is available to downstream steps for logging or reporting.
Sum Aggregation
The Sum strategy calculates the total of numerical values across loop iterations. Use it to sum financial figures, hours, or quantities.
To configure Sum aggregation:
- Add an aggregation to your Loop step and select theSumstrategy.
- In the Select Number field, use Expression Builder to reference a numeric value from the current iteration. Ensure the source value is a Number type. If extracting from XML or JSON, use numberAtXPath or numberAtJsonPath.
- Optionally, add a Condition to include only specific values in the total.
- After the loop, use the total in downstream steps, such as a Create Text Template step for a summary report.
Working with Join Loops
Join Loop steps let you match records from one dataset with records from one or more additional datasets based on a common key. Use them when an orchestration must align related data, such as worker records with position data or transactions with reference tables.
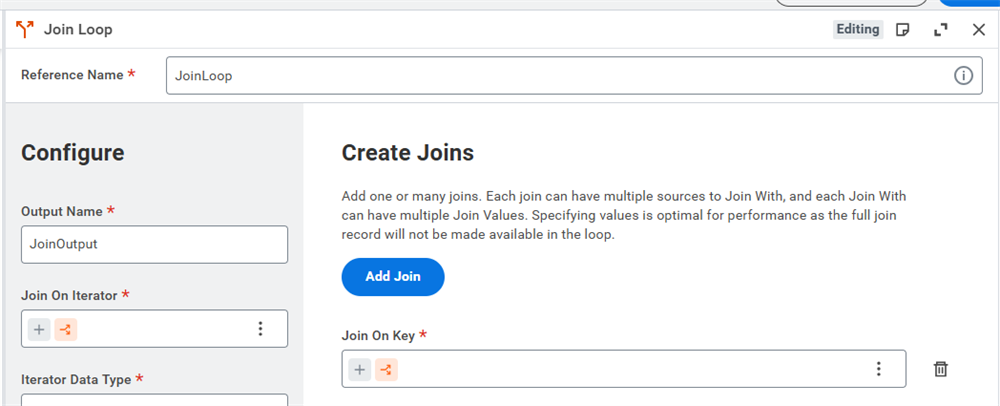
A Join Loop works with:
- A Join On dataset, which drives the iteration.
- One or more Join With datasets, which supply matching records or values.
Orchestrate makes the Join On record and any matched Join With records available inside the loop block for processing.
To Configure a Join Loop:
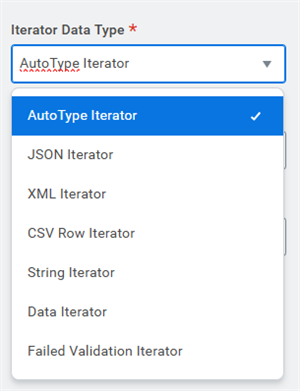
- Add a Join Loop step and provide a clear reference name.
- In the Configure section, define the Join On dataset:
- Set an output name for the Join On record that will be available inside the loop.
- Use Expression Builder to define the Join On iterator (e.g., an iterator over workers or XML elements).
- Specify the iterator data type or use AutoType so Orchestrate determines the iterator type.
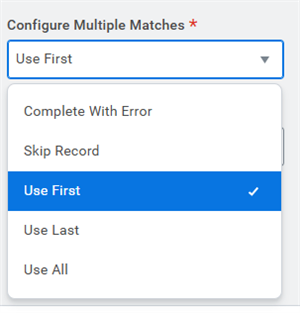
- Configure how the Join Loop handles multiple matches for a Join On record: Complete with Error, Skip Record, Use First, Use Last, or Use All.
- Configure how the Join Loop handles missing matches: Alternate Processing, Complete with Error, Skip Record, or Add Log.
- In the Create Joins section, define each Join With dataset:
- Join On key: The field in the Join On record used as the match key.
- Iterator: The Join With dataset.
- Key: The field in the Join With record used as the match key.
- When you only need specific values from the Join With dataset, configure the join to expose those values instead of the full record.
Inside the Join Loop body, you can:
- Read fields from the Join On record (e.g., worker identifiers or names).
- Read fields or selected values from each Join With dataset.
- Use isDataDefined to detect when a Join With output is missing and branch to alternate logic instead of failing.
Typical patterns include:
- Joining workers from a primary dataset with position or compensation records from Join With datasets based on a shared worker identifier.
- Joining integration output rows with a lookup table to enrich records with external codes or descriptions before aggregation or delivery.
By keeping all matching rules in the Join Loop step and using isDataDefined and the Multiple Matches / Missing Matches settings, you can control how the orchestration behaves when data is missing or duplicated without scattering join logic across many steps.