
Orchestration Builder Core Concepts
Overview
This chapter introduces the core concepts of creating orchestrations in Workday Orchestrate. You will learn how to structure workflows, configure steps, and link an integration system in the Workday tenant to an orchestration app on the Developer Site.
Objectives
By the end of this chapter, you will be able to:
- Build an app to act as a container for your orchestrations.
- Navigate the Orchestration Builder interface.
- Create a new orchestration.
- Configure and manage orchestration steps.
- Describe the application lifecycle including how to promote and install apps.
- Create the integration system that will launch the orchestration.
- Access integration system attributes and launch parameters from an orchestration.
Building an Integration Using Orchestrate
To build an integration using Orchestrate, you need the following components:
Component | Definition |
|---|---|
App | The application, or app, is:
|
Orchestration | The orchestration defines the flow that will process inbound or outbound data. |
Integration System | The integration system is the same system that customers have been building in Workday from the beginning. The only difference is this integration system will use the Orchestrate Integration Template. This template is simple. It contains attributes that allow the integration system to launch the orchestration. |
Comparing Apps and Orchestrations
Workday Orchestrate uses apps and orchestrations to organize and execute workflows. Understanding how they interact is essential for designing effective integrations.
Apps are containers that organize orchestrations and their configurations. They group related workflows, simplifying management and testing.
Key features of apps:
- Centralized Management:Apps house multiple orchestrations, keeping related workflows together.
- Modularity:Group orchestrations by function or purpose, such as onboarding or payroll.
- Simplified Testing:Test orchestrations within their app framework for consistency.
For example, an app for Employee Onboarding might include orchestrations for provisioning accounts, assigning equipment, and setting up payroll.
Orchestrations are the workflows within an app. Each orchestration consists of a sequence of steps that perform specific actions, such as retrieving data, applying logic, or interacting with APIs.
Key Features of Orchestrations:
- Workflow Execution:Steps process data and execute tasks in a defined order.
- Reusable Components:Steps and sub-orchestrations can be reused across workflows.
- Independence:Orchestrations can run on their own or interact with other workflows as needed.
Defining Apps
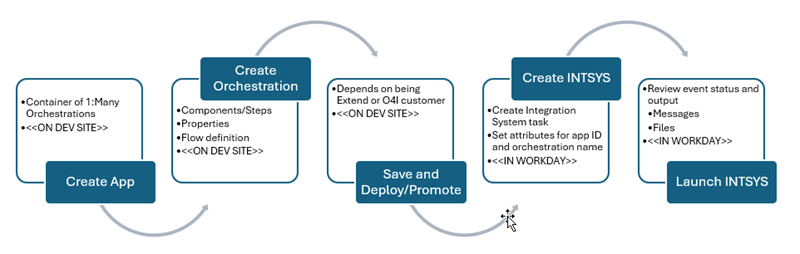
Before creating the orchestration, you must create the app. Apps are created on the Workday Developer Site. There are two options for creating the app:
- At the top of your Developer Site home page, you will notice a Create an Integration App link.
- On your Apps console, there is a Create button that allows you to select an Integration App.
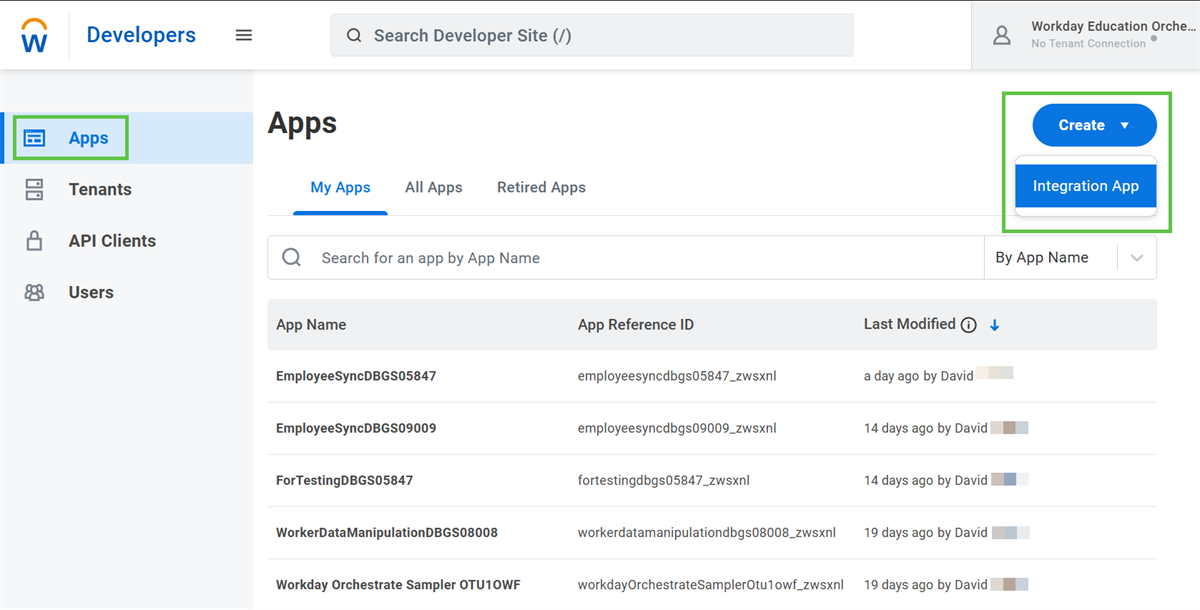
You are allowed three options when creating an app. You can:
- Copy an app from the App Catalog. This brings up a dialog that allows you to browse and search through the contents of the App Catalog.
- Upload a zip file that has been downloaded or provided to you by another developer.
- Start from scratch where you define the name and an app description, and are then given the option to view the app overview page or begin building the orchestration.
Orchestration Builder Overview
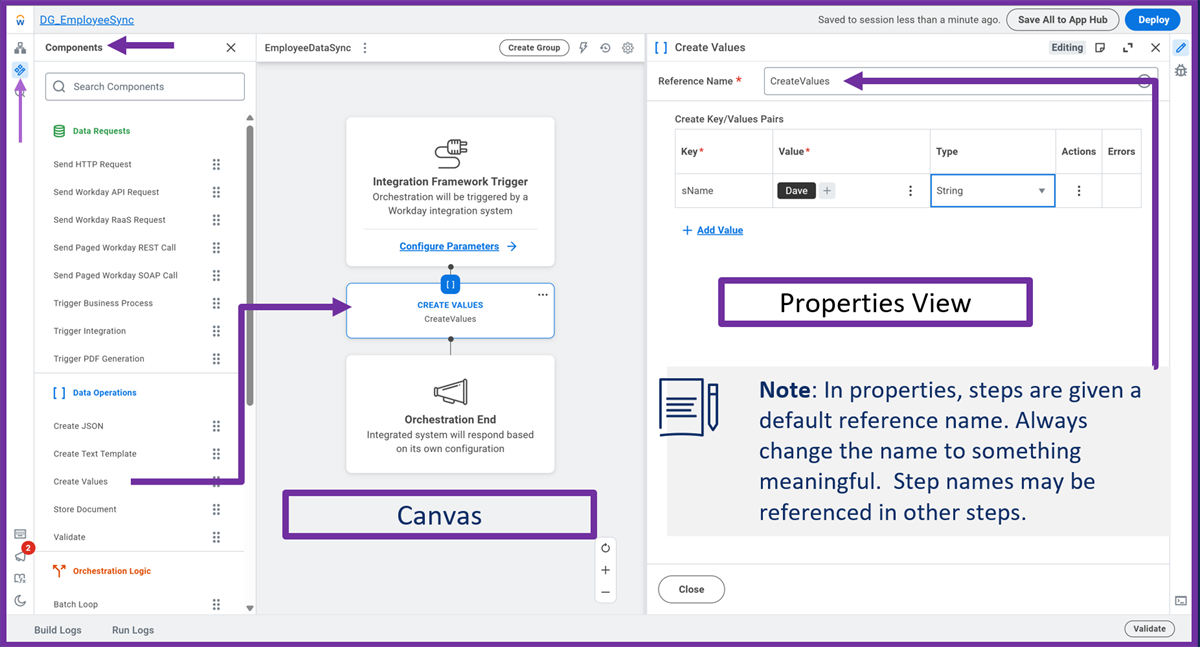
Orchestration Builder is the browser-based visual design tool on the Workday Developer Site. Orchestration Builder is used to design and edit orchestrations.
The main views of the Orchestration Builder are:
- Canvas
- Components
- Properties
The Canvas provides a drag-and-drop area where you arrange your process flow steps between the provided start and end steps.
The Components view is a list of all components you can drag onto the canvas. It is broken down into components that perform:
- Data Requests, like accessing APIs.
- Data Operations, like storing files, writing messages to the integration event, reading and writing data for further use in the orchestration steps.
- Orchestration Logic, like looping and branching.
- Suborchestrations for reusability.
Note
:
Once a component is dragged onto the canvas, it is known as a step, not a component.The Properties view appears when you select a step on the canvas. The number of properties depends on the nature of the step. Properties serve as the means to configure a step.
A Sample Orchestration
The following is a sample orchestration that accesses Workday worker data. This orchestration will be making a call to a SOAP Workday Web Service (WWS).
This orchestration uses the following categories of component types:
- Data Operations Components
- Create Values
- Create Text Template
- Store Document
- Data Requests Components
- Send Workday API Request
- Orchestration Logic Components
- Branch on Conditions
- Add Integration Message
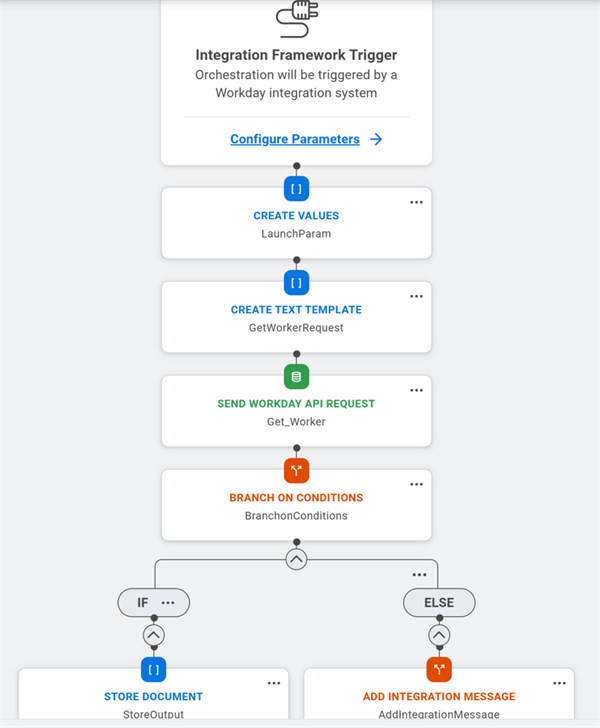
The above orchestration is performing the following steps:
- The Create Values step reads the data from the launch parameters included in the associated integration system. In this case a worker ID number.
- The Create Text Template step defines the WWS request which filters the amount of data being returned by the web service. It uses the worker ID from the Create Values step in doing so.
- The Send Workday API Request makes the call to the Get Workers SOAP operation. It uses the request from the Create Text Template step.
- The Branch on Conditions step evaluates if the web service call was successful or not.
- If successful, writes the web service response to a file that is attached to the integration event.
- If not successful, writes a message to the integration event.
Creating the First Orchestration
Before you can build the orchestration, you must have built an app. This process was covered at the end of chapter 1. The following outlines what it takes to create your first orchestration.
Choosing the Orchestration Type
This process first asks you what type of orchestration you are building. The options are:
- Workday Integration System:A Workday integration system will trigger this orchestration.
- Workday Business Process:An existing Workday business process will trigger this orchestration.
Note
:
The business process option is more of an Extend feature. It was a prosthetic integration
, when integration system option was not there yet. For most scenarios the business process is a poor cousin to the integration. What the business process can do, that the integration cannot, is get triggered on rescind, cancel, or correction. Still, business processes are harder to maintain because there is no integration event, making troubleshooting more difficult.Naming the Orchestration
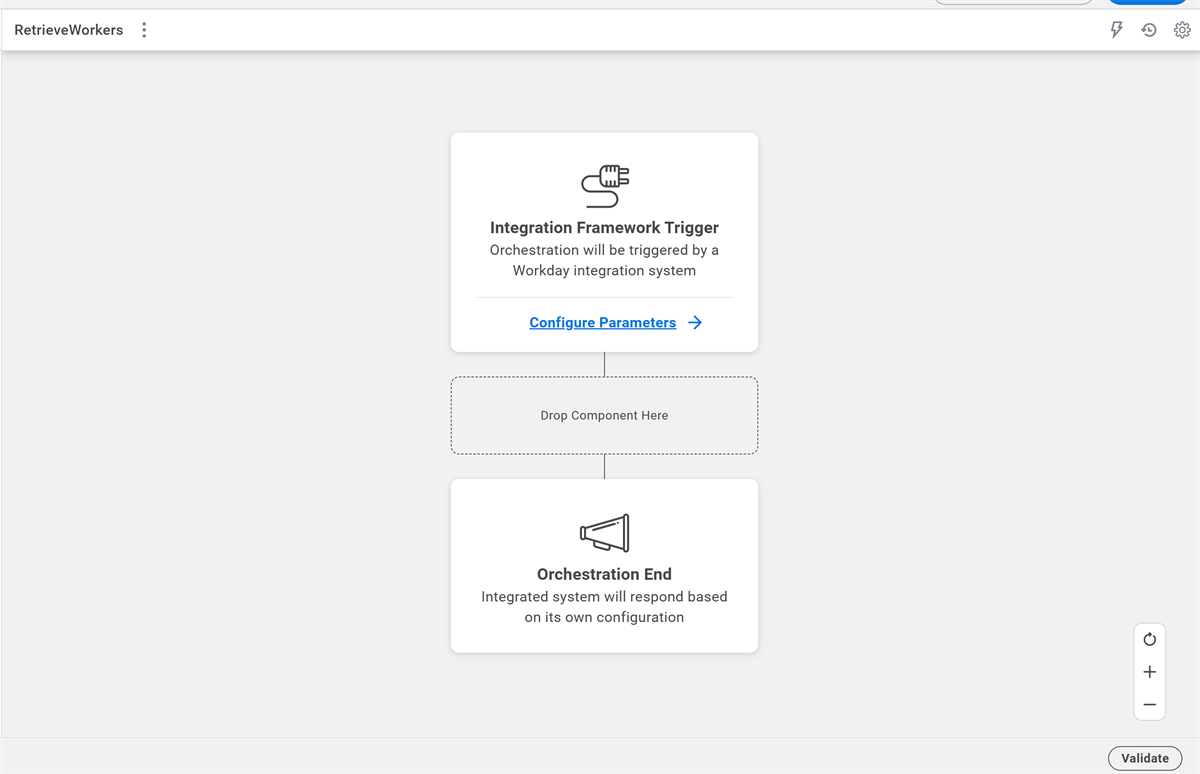
After naming the new orchestration, you will enter the Orchestration Builder to develop the steps, or workflow. The Orchestration Builder opens with predefined Start and End steps on the canvas. These steps serve as boundaries for your workflow, and intermediate steps define the workflow functionality.
Process for Building an Orchestration
To build the orchestration you:
- Drag a component from the Component view on to the Canvas.
- After adding steps, re-order them as necessary. The order of steps is important as a step can only read data from earlier steps in the workflow.
- Configure/set the properties of the step you just added, usually by writing expressions for the property values. Some properties are required and will need your attention. You should also:
- Rename steps for better clarity. Every component you drag onto the canvas is given a default name. You can view or change that name in the properties panel. A best practice is to use meaningful names for steps to make your orchestration easier to understand and maintain.
- Add comments about what the step is doing.
- Add error handling logic. Step level and global error handling.
- Promote and install the app on a Workday tenant.Note:Orchestrations are contained in apps. The app could contain multiple orchestrations. Every time you make a change to an orchestration you need save it to the App Hub and then promote its app to a Workday tenant in order to test. The install process must occur only the first time you promote an app, or if you are promoting a new app.
- Test. Edit. Repeat.
Adding Orchestration Steps
Each step performs a specific task, such as retrieving data, applying logic, or interacting with APIs. Configuring steps correctly ensures that orchestrations execute as expected and align with business requirements.
For instance, a workflow that retrieves data from the Workday API, applies business rules, and sends results to an external system would include multiple steps, each with defined properties to ensure smooth execution.
Dragging Steps to the Orchestration Canvas
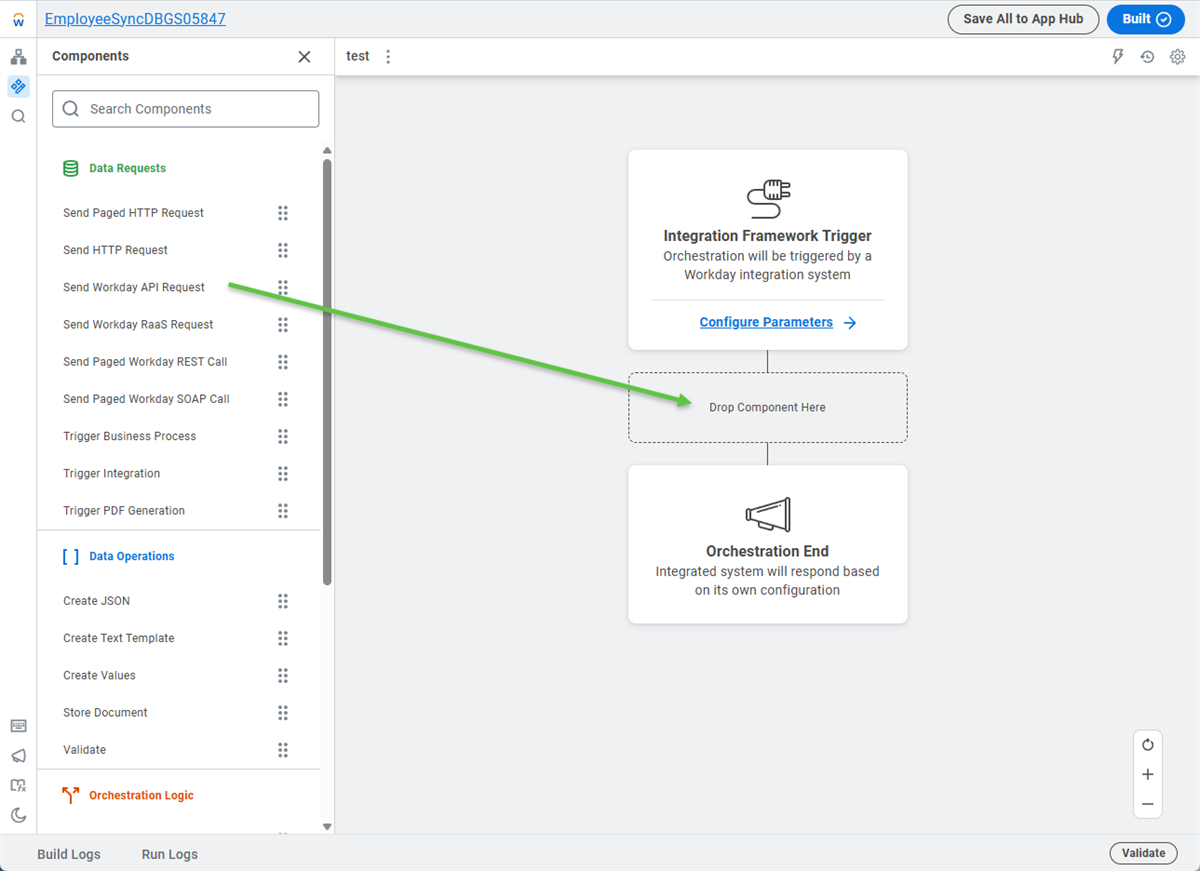
To build a workflow, components must be added to the Orchestration Canvas. Drag components from the Components panel on the left side and place them between the Start and End steps. Each step represents a specific action or function, such as retrieving data, applying transformations, or controlling the workflow's logic.
Configuring Steps
Once you add a component to an orchestration, it becomes a step in the orchestration flow, and the Properties panel controls its behavior. The properties you configure define how the step interacts with others in the workflow. Proper configuration ensures that data flows correctly and tasks execute as intended.
Key properties for steps:
- General
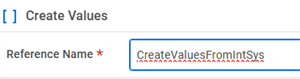
- Naming:Assign a clear, specific Reference Name that reflects the step's purpose. Example: Use CreateValuesFromIntSys instead of a vague label like CreateValues.
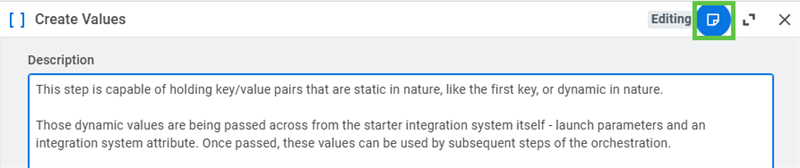
- Notes:Use the Description field to document the step's role, especially in workflows with multiple steps. This helps with troubleshooting and ensures maintainability.
- Inputs
- Define Required Data:The Properties panel has an asterisk ( * ) to define required properties. Example: A Create Values step requires both Keys and Values. It is important to note that the Create Values is capable of storing static or dynamic data. In this case, name is static where jobProfile and ResultLogName are reading their values from launch parameters and integration system attributes on the starter integration system.
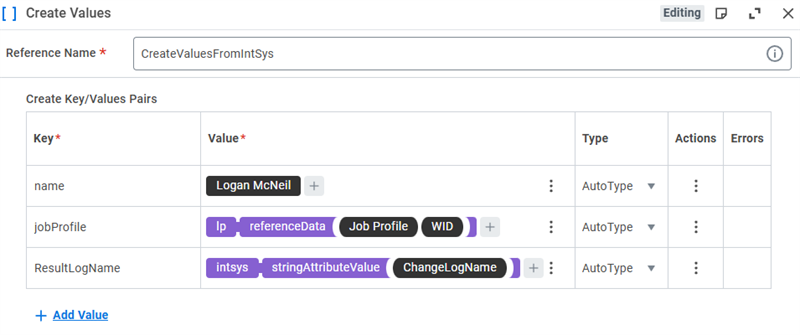 Note:Regarding AutoType: Autotype will always use the type returned by the last expression, i.e. the expression StringAt*Path returns a String. Math.plus(3,4) returns a number. Most of the time it is safe to leave the expression as AutoType. If you intend to build an expression that has complexity, or if you just want to be sure you end up with the type you want, those are cases where you would not use AutoType.
 - In addition, steps may need additional required data to perform their job. Example: An API request might require a worker ID or date range.
- Outputs
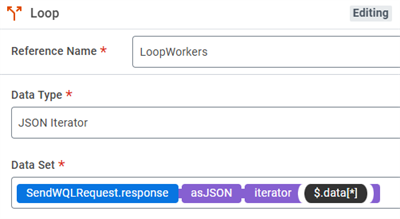
- Define Produced Data:Specify the outputs that the step generates for use in subsequent steps. Example: An API request might return a list of workers, which can then be passed to a loop. In the following example, SendWQLRequest is the name of an earlier step calling the REST API for Workday Query Language (WQL). An API call generates a response which is being passed into the loop step.
- Plan for Downstream Use:Clearly identify which outputs will feed into future steps to maintain workflow consistency.Important: Flows contain multiple steps. If a step references data, you must configure that data in preceding steps. Steps cannot reference data from later steps in the orchestration.
Adding the Integration Message Component
The Add Integration Message component is needed to log a message to the integration event in the tenant.
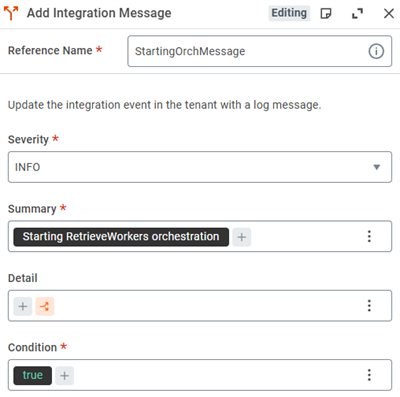
When defining the Add Integration Message, you will begin by selecting the severity level you want associated with the message. The default value is INFO. You can also select:
- CRITICAL
- DEBUG
- ERROR
- WARNING
Enter the message you want to display in the Summary property. If you need more information associated with the message, enter it in the Detail property. The message is attached to the integration event only if the Condition property evaluates to a Boolean value of true. You can make all of these properties dynamic using the Expression Builder.
Important:
If you use expressions to build your Summary and Detail properties, and the test result is not formatted correctly, you can try the Log component as an alternative. The Log step output appears only on the Developer Site logs. You can use a Store step to save a larger output to the Integration Event.Application Lifecycle
Workday orchestrations move through structured environments to ensure thorough testing and validation before reaching production. Each environment serves a specific purpose, providing controlled spaces to design, test, and deploy orchestrations effectively.
Understanding the Environments
Workday uses four primary environments to manage orchestrations. Each environment serves a specific purpose in the orchestration lifecycle, as the following table describes:
Environment | Purpose |
|---|---|
Development (DEV)
| Workspaces for designing and testing orchestrations in isolation. They are only available for Extend customers. |
Implementation (IMPL)
| A controlled environment for structured testing and fine-tuning using partial production data. |
Sandbox (SBX)
| A production-like environment for comprehensive testing, including User Acceptance Testing (UAT). Sandbox tenants are refreshed every week with production data. |
Production (PROD) | The live environment where validated orchestrations run business-critical operations. |
These environments ensure that orchestrations progress systematically to reduce risks and improve reliability at every stage.
Note
: Customers who purchase the Workday Orchestrate for Integrations SKU do not have access to Development (DEV) tenants unless they also purchase the Workday Extend SKU.Promoting Orchestrations Across Environments
Promoting orchestrations involves transferring an app through environments in a structured workflow. This process ensures orchestrations meet the necessary standards at each stage before deployment.
Steps to Promote an Orchestration:
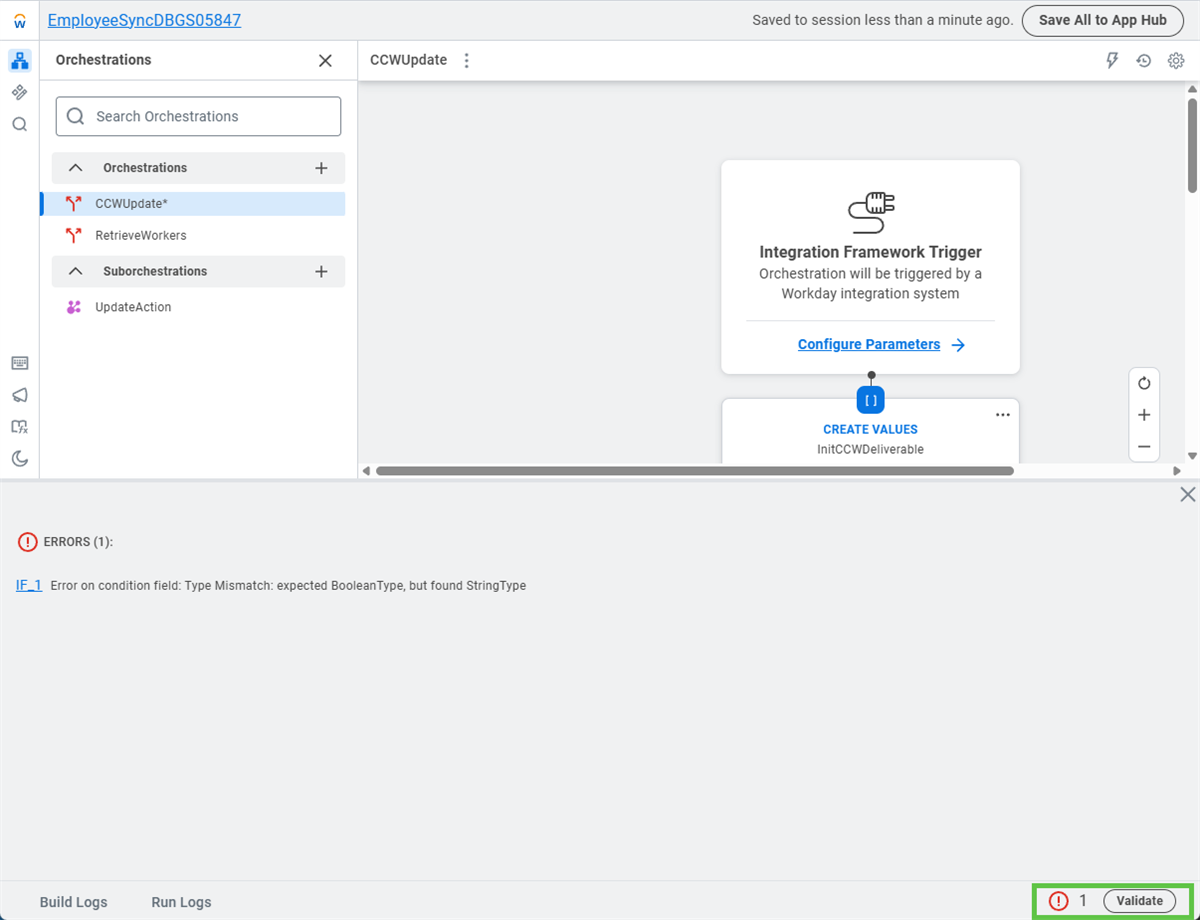
- Validate the Orchestration: Use the validate tool in the Orchestration Builder to identify errors and confirm configurations. Ensure the app passes validation checks before promotion. The validate displays warnings and errors. Errors must be corrected. Warnings should be corrected, but they will not stop the execution of the orchestration.
- Save All to App Hub: Commit changes to the App Hub, preparing the orchestration for promotion. If you have a promoted app, every time you Save All to App Hub you will be prompted to create a new version of the app. This tool does not offer version control. Orchestrate, does, however, keep track of the versions you have promoted. While there is no automated feature to roll back to a certain version, you can access any version, create a ZIP file for that version, and use that ZIP file to restore to the older version.
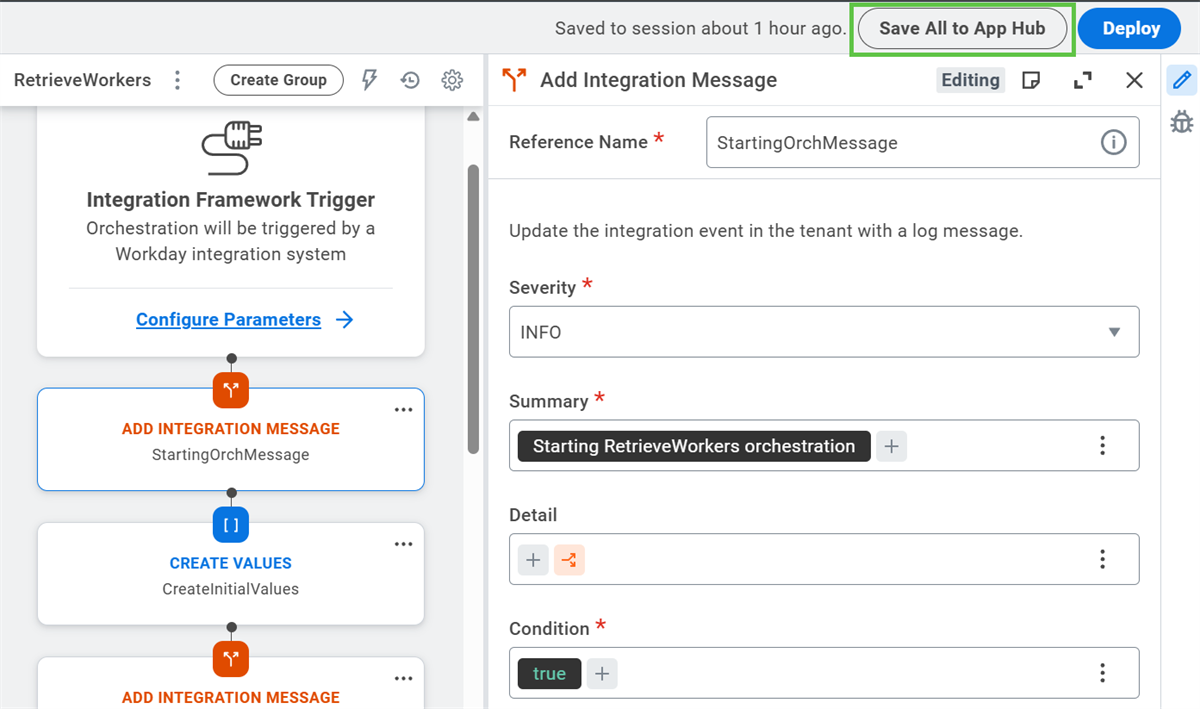 Note:For non-Extend customers, the Deploy button is irrelevant. It actually changes to Building... during the save operation. If you are an Extend customer, it is common to Save All to App Hub and then select Deploy. Selecting Deploy displays a list of your company's Development tenants. You choose the right Development tenant and when the process completes, you are ready to test.Important:You are saving the app to the app hub. The app can have multiple orchestrations included in it. When saving it is possible that you have errors on an orchestration other than the one you are displaying on the screen. It is advisable to always look at the Build Logs when a Save All to App Hub fails and nothing is reported by the validation.
 - Promote the App: Navigate to the Promotions tab on the app, and select the Promote button. Promotion is a static process, from your implementation tenant (IMPL) to your sandbox tenant (SBX) to your production tenant (PRD).Important: You cannot reverse the promotion action. Once you select Promote, you must perform your testing in the next tenant environment in the chain.
- Selecting Promote displays a dialog allowing you to input release notes and again to confirm your intention to promote the app.
- After a successful promotion, the Promotions tab displays new information such as another Promote button on the Implementation card. Continue selecting the Promote button until you are at the desired level.
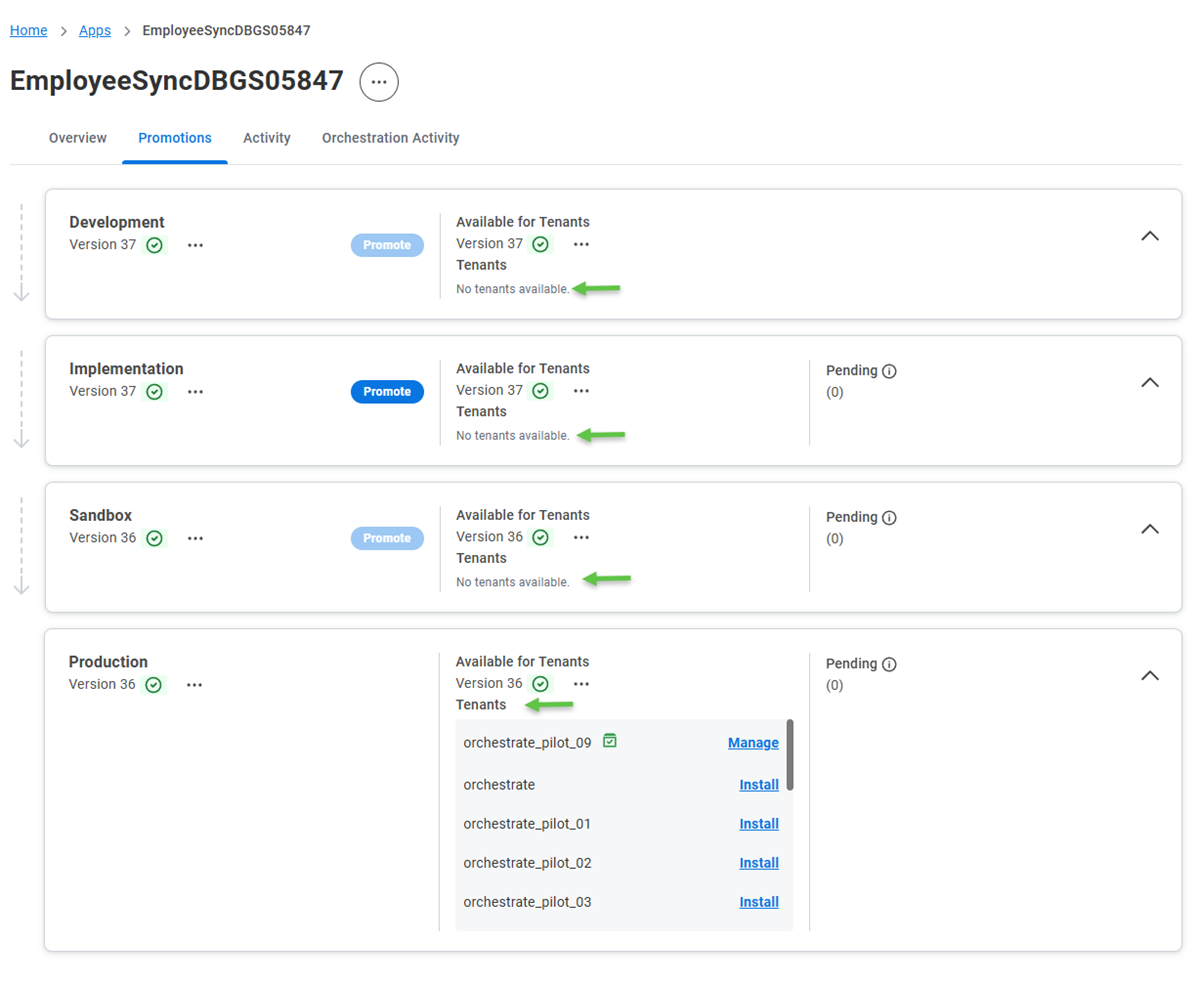 Note: The above picture is that of our classroom environment. We have expanded all of the environment cards. You can see there are no tenants available under the Development (DEV), Implementation (IMPL) or Sandbox (SBX) environments. To test you have to promote all the way down to the production level. In your environment you will promote to your company's desired level for testing, usually an IMPL or SBX environment.
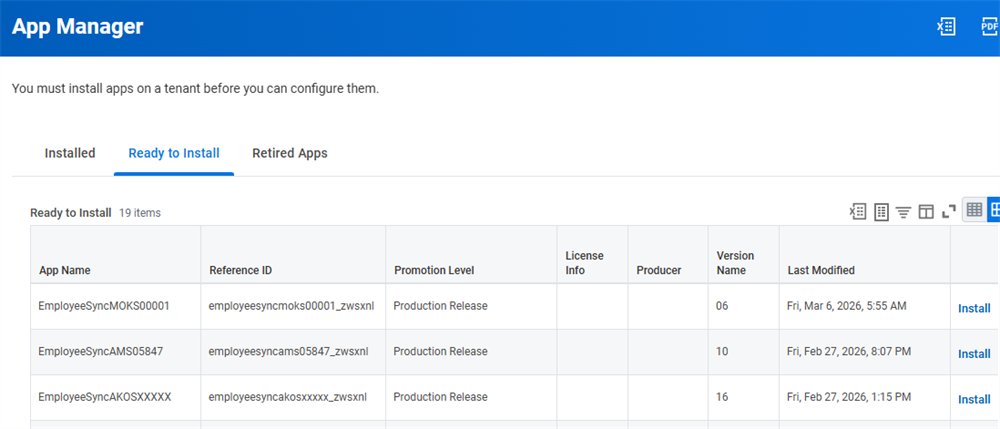
 - Install the app into the appropriate tenant type. In this case, we would install into our classroom production tenant.Important: Once you install an app on an Implementation, Sandbox, or Production tenant, you can't remove the app from that tenant. However, when you promote an app, you replace the existing version of the app with the target promotion level.Selecting the Install link on the Promotions tab takes you to the App Manager report, which displays your tenant. Go to the Ready to Install tab, find your app, and select Install. You must confirm your intent to install. If the install is successful, a confirmation message will display and your app will move from the Ready to Install tab to the Installed tab.
Important
: Promotion addresses only the app and the orchestration. Other components associated with the orchestration, such as the integration system or any custom report needed for a RaaS operation, must be promoted to another tenant using separate tools like Workday OX 2.0At this point, you are ready for testing. If you make changes during testing, when you save to the App Hub a new version warning message displays. Either confirm that you want to save as a new version or cancel the save.
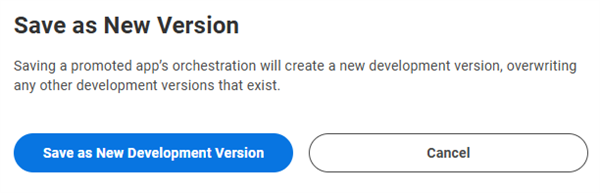
If you save as a new version, you will be able to promote again.
Best Practices for Promotion
Observe the following best practices when promoting orchestrations:
- Name orchestrations clearly and consistently to simplify tracking and management across environments.
- Perform comprehensive testing in the Sandbox environment, which closely mirrors Production. This minimizes the risk of errors when deploying orchestrations to Production.
- After promoting an orchestration, monitor logs and performance metrics to identify any issues quickly.
Note
:
You can promote integration apps using Orchestrate at any time; the promotion deadlines and schedules for Extend apps do not apply.Following these best practices maintains consistency, reduces downtime, and ensures your orchestrations are error-free when deployed to production.
Workday Integration Systems and Orchestrations
To successfully connect your integration system in the Workday tenant to the orchestration app created on the Developer Site, follow these steps:
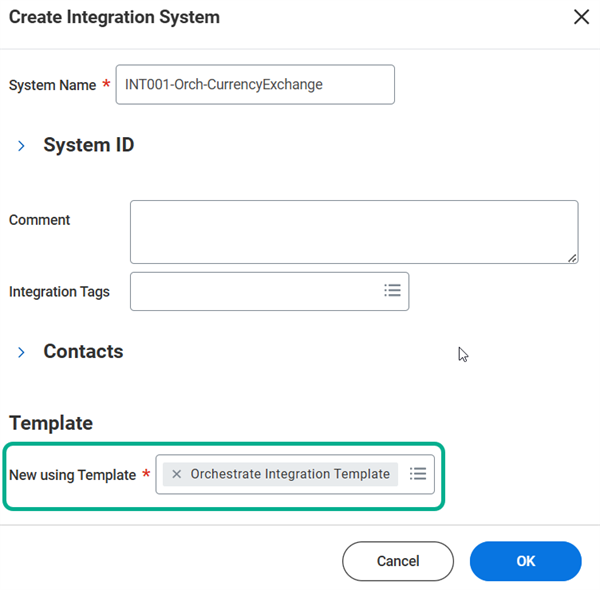
- Create an integration system in the Workday tenant.
- Use theCreate Integration Systemtask and select theOrchestrate Integration Template.
- Enter a meaningful system name.
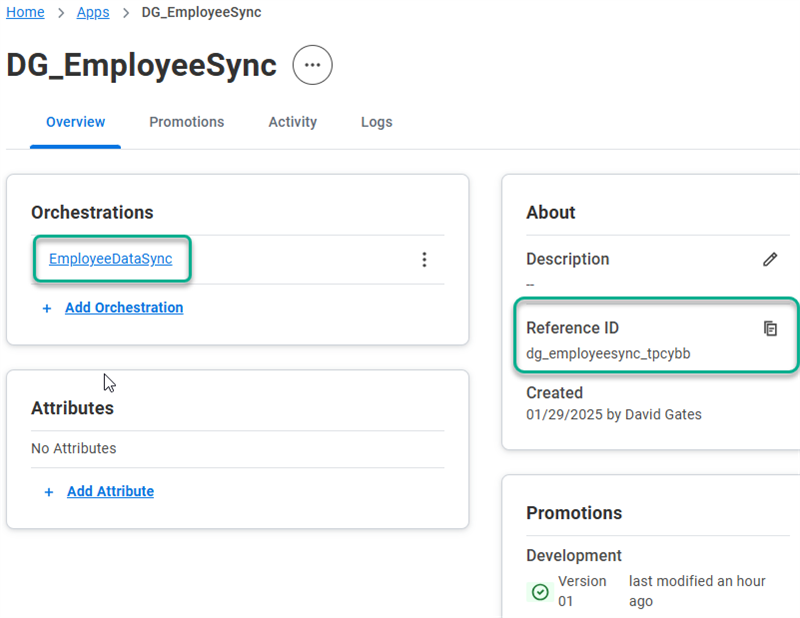
- In the Developer Site, locate your orchestration's Application Reference ID and Orchestration Name.
- Navigate to the App Overview page.
- Copy the Application Reference ID and Orchestration Name from the Overview tab.
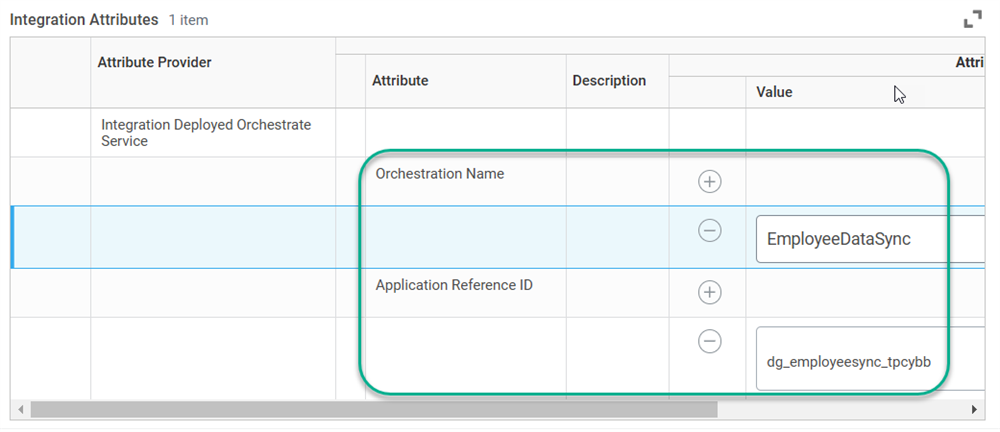
- Configure Integration Attributes
- In the Workday tenant, open the integration system’s Related Actions menu.
- Navigate to Integration System > Configure Integration Attributes.
- Select the Plus + button to add values for:
- Orchestration Name:Paste the value from the Orchestration Builder.
- Application Reference ID:Paste the app's reference ID from the Developer Site.
- Confirm Attribute Values and Save
- Ensure there are no typos in the Application Reference ID or Orchestration Name to avoid failure during execution.
- Save the changes.
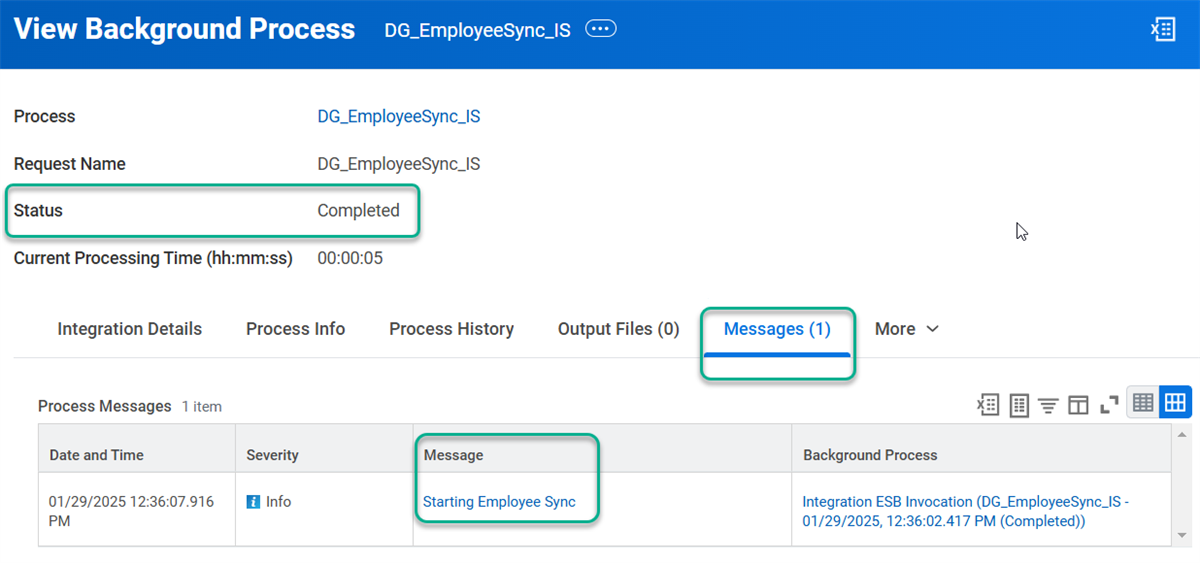
- Deploy and Test
- Deploy your orchestration to the appropriate tenant (e.g., Development or Implementation).
- Schedule or launch the integration to test the setup.
- Monitor the Messages tab for any errors, which could indicate issues like mismatched attributes or an undeployed app.
Building Expressions
The Expression Builder
Select the Plus button within the Expression Builder. Then, enter a string or use the pull-down menu to access data from your orchestration upstream steps, your attribute store values, or global functions.
Viewing the Detail property below, you will notice two icons: a Plus + icon, and a Condition icon (the orange icon with lines displaying multiple paths).
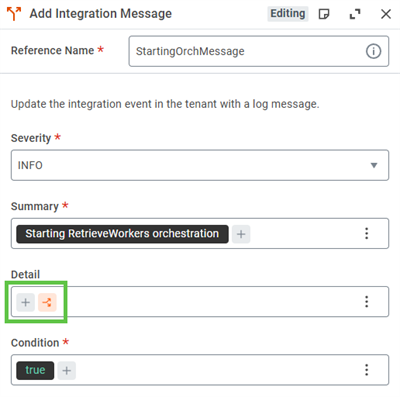
The Plus + icon (Add New Expression) is used when you want to:
- Directly enter a value, like text or a number.
- Access data from an output of apriorstep.
- Call a global function.
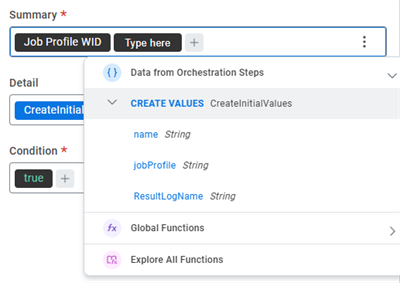
Note:
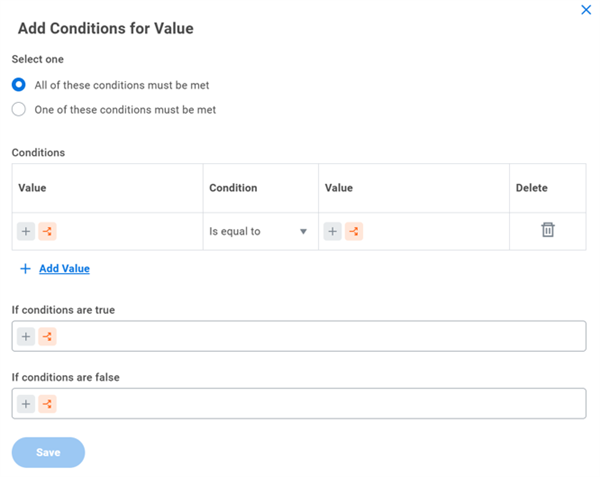
After you have selected the Plus + icon, the Condition icon no longer displays.Selecting the Condition icon (Add Condition for Value) displays a dialog that allows you to make different expressions based on conditional values.
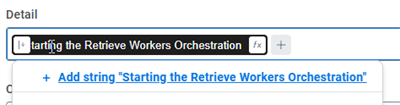
The following are common use cases when working with expressions and the default pill mode.
- To add text into a pill, select Plus +, enter your text, then select the link to add what you typed as a string.
- To add a second pill, select the Plus + icon again.
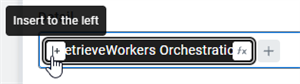
- To create a new pill before the current pill, select the current pill that displays an icon on the left of the pill that reads, "Insert to the left".
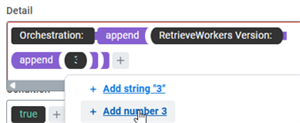
- To add a value as a number instead of a string, enter the number into the pill and, when prompted, select the link to add as a number. Numbers will appear in a green font color.
- To add a value as a Boolean instead of a string, enter either “true” or “false” into the pill and, when prompted, select the link to add as a Boolean. Booleans also appear in a green font color.
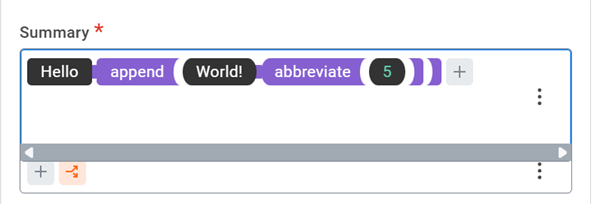
- When you hover over a pill, there are two icons. The Insert to the left icon, as shown above, and the function icon, which appears on the right of the pill. This example depicts another way to concatenate Hello and World versus what displays above. This time, when selecting the function icon, we will search for the append function, which takes a string argument, and use that to join the two elements.
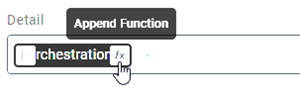
- Note which icon you use when adding a function. Notice your placement. In this example, we added another pill or function. This new pill is attached to the append function itself. This may or may not be the way you intended to build this expression.
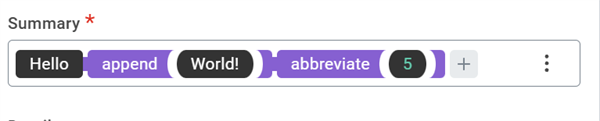
- Notice the abbreviate function attached to the World! argument instead of the append function. This was done by selecting the function icon that appeared over the World! argument or pill. Always make note of the connectors. In the first example, the abbreviate connector is tied to the append function itself. In the second example, the abbreviate connector is clearly tied to the World! argument.
Switching Between Modes
Workday Orchestrate allows you to toggle between Pill Mode and Advanced Mode within the Properties panel of most components. While Pill Mode simplifies implementing functions, Advanced Mode offers granular control for technical users.
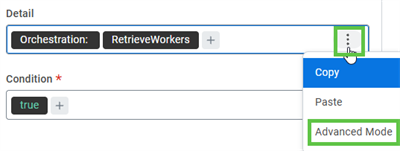

Consider these best practices when deciding how to use Pill and Advanced modes:
- Start with Pill Mode: Use Pill Mode as a default to keep workflows simple and visual.
- Switch to Advanced Mode for Complexity: Transition to Advanced Mode only when you need to edit an expression somewhere in the middle or if your workflow requires advanced configurations.
- Validate Expressions:Regardless of mode, validate your expressions to ensure that data dependencies are correctly handled.
Viewing Complex Pills
Property expressions can get complex. There will be times you cannot see the entire expression.
There is a Fullscreen icon you can select. The properties view goes to full screen. But you temporarily lose the orchestration canvas.
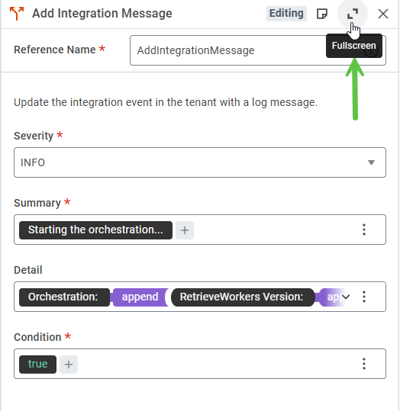
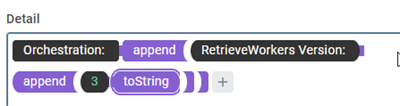
Instead of expanding to full screen, you can also expand a specific property expression by clicking the View More icon associated with the property. Here is a an unexpanded look at a property:

And the after effect when you View More:
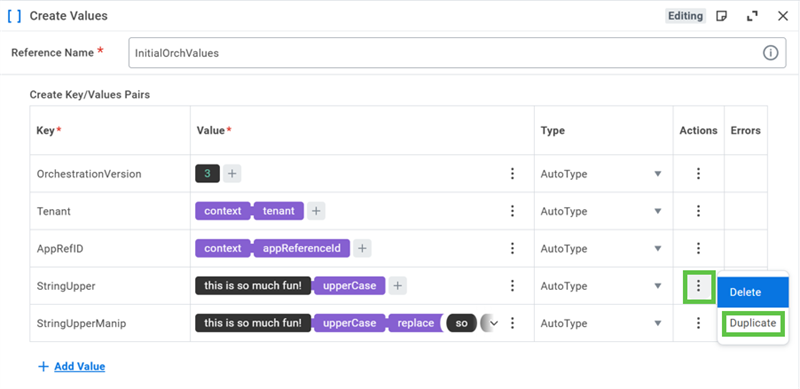
Duplicating Expressions/Pills
You may find that in a step you must write several similar expressions. This can be done using the Related Actions on an expression and selecting the Duplicate option.
Function Explorer
The Orchestration Builder includes a Function Explorer tool providing access to descriptions of Orchestrate Expression Language functions without requiring you to leave your orchestration and consult separate documentation. When you open an expression field, four possible menu options appear:
- Data from Orchestration Steps
- Global Functions
- Explore All Functions
- Attribute Store Values
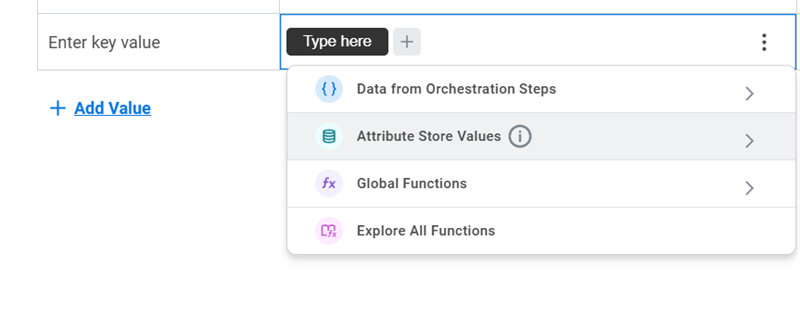
The Data from Orchestration Steps option appears only if a preceding step in the orchestration has outputs. Steps can only reference outputs of the steps above them in the orchestration; they cannot reference data from steps below. The Attribute Store Values option only appears if the application has set attributes.
Global functions are not specific to any data type. They can be used to construct objects or transform data. This menu lists commonly used global functions followed by categories of other global functions.
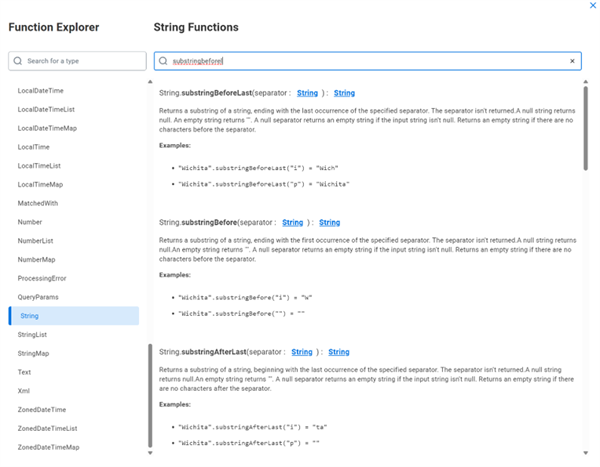
The Explore All Functions menu opens a searchable library of global functions in a pop-up window. For each function, you can view:
- Its inputs and types seen in parentheses.
- Its output type (following the function title).
- A description of its purpose.
- An option to add the function to your currently selected property but only if you came into the Function Explorer using the Explore All Functions option from the Add Expression dropdown.
The Function Explorer is also accessible from the Function Library icon in the lower-left corner of the Orchestration Builder.
Launch Parameters
Launch parameters are runtime inputs defined on the integration system that let you adjust orchestration behavior without changing the orchestration design. Typical uses include enabling validation-only runs or supplying filter values such as dates or IDs for a specific execution.
Defining Launch Parameters
You define launch parameters on the integration system, not in Orchestration Builder. Each parameter has:
- Name: A descriptive label, such as Last Run Date or Validation Mode.
- Datatype: The type of value accepted, such as Text, Boolean, or Numeric.
- Optionaldefaultvalue: A value used when no value is supplied at launch.
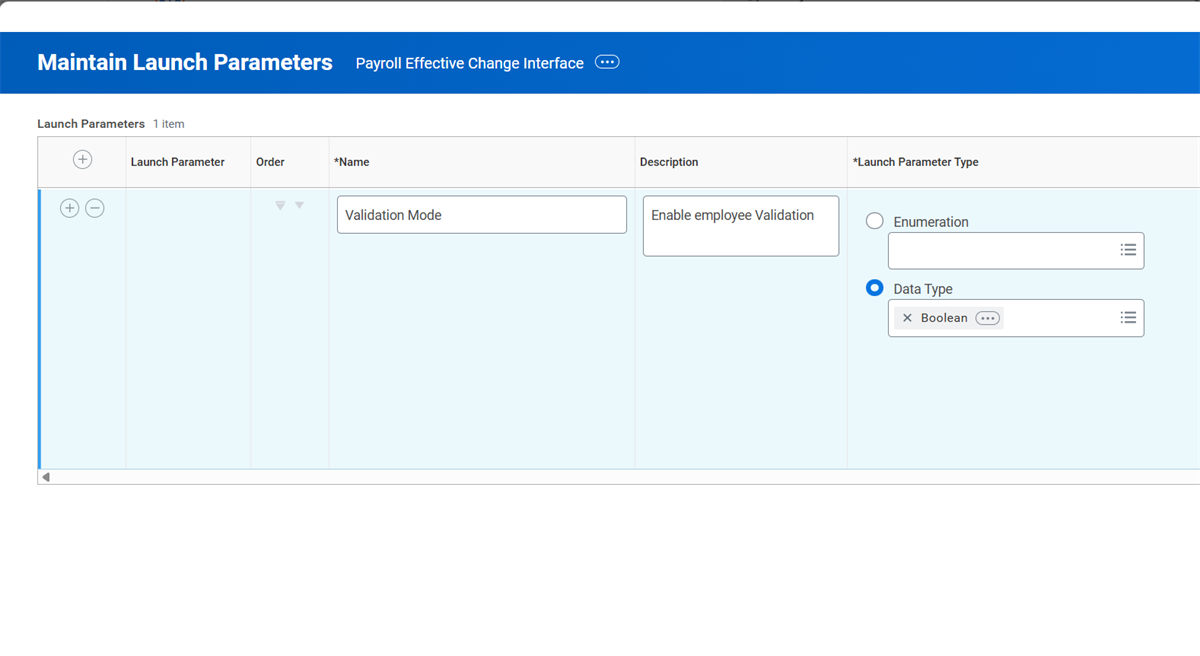
At a high level, to add launch parameters:
- Open the integration system’s related actions.
- Select the option to maintain launch parameters.
- Add parameters with clear labels and correct data types.
- Save so they are available when the integration runs.
Note
:
Later, when you reference the launch parameter in your orchestrations, make sure the parameter labels appear exactly as they are on the integration system.Using Launch Parameters in Orchestrations
In Orchestration Builder, use the lp global functions to read launch parameter values at runtime. Choose a function that matches the parameter type.
- Textparameters:
- lp.stringParam("Country Code") returns a Text-type parameter as a string.
- lp.simpleData("Message") returns the raw runtime parameter as a string when type‑specific validation is not required.
- Booleanflags: lp.booleanParam("Validation Mode") returns a Boolean value and throws an exception if the parameter type is not Boolean.
- Numericparameters: lp.numberParam("Batch Size") returns a numeric parameter as a Number.
- Date and datetime parameters:
- lp.dateParam("Last Run Date") returns a Date‑typed parameter and is preferred over reading the same value as plain text.
- lp.dateTimeParam("As Of") returns a ZonedDateTime value when you need datetime and time zone.
For instance, to drive a date filter in a REST or report-style request, you can use lp.dateParam("From Date") and lp.dateParam("To Date") as the bounds in your query expression.
When you need instance set reference IDs from a parameter, use: lp.referenceData("Organization Reference", "Organization_Reference_ID") to retrieve a specific ID type from an instance set reference parameter.
Practical Considerations
Launch parameters behave like report parameters for integrations: they supply values that shape what data the orchestration processes for a given run. Typical uses include:
- Date or ID filters that narrow the data set for this run.
- Mode flags (for example, validation‑only) that change which steps execute.
- Reference parameters (for example, organization or company) that select a scope.
When you design around launch parameters:
- Validate presence before use:
- Use lp.existsAndHasValue("Last Run Date") to confirm that a parameter is present and has a value.
- Combine this check with a Continue on Conditions step so the orchestration stops with a clear message when a required parameter is missing, instead of proceeding with incorrect defaults or a duplicate output.
- Use defaults carefully:
- Define default values on the launch parameter only when there is a safe, predictable behavior (for example, defaulting a date range to “today” or to a known reporting window).
- For parameters that must be supplied explicitly for each run, omit defaults and enforce presence with lp.existsAndHasValue and Continue on Conditions.
- Avoid unnecessary logging of parameter-driven data: Use logging to capture key messages or error details, not to write out entire data sets for each run, to avoid noise and large log volumes.
- Keep IDs tenant-aware: When working with reference ID types, align launch parameter values with the ID types defined in the tenant. Use delivered reports that list Integration IDs and reference types to verify that the label and type you pass to lp.referenceData match the tenant configuration.