
Configuring Connectors
Overview
This chapter explores how to configure and customize outbound connectors.
Objectives
By the end of this chapter, you will be able to:
- Define sequence generators and notifications for connectors.
- Configure delivery options for outbound connectors.
- Schedule an outbound connector.
Configuration Common to All Integrations
Scheduling Integrations
You can configure an integration to run automatically, on a schedule, using the
Launch / Schedule Integration
task. Integration schedules have flexible scheduling criteria and launch parameters that allow you to accommodate many situations. For example:- Run every other Friday for a specific cost center.
- Run monthly on the first and 15th day for any new hires.
- Run the last day of each quarter for expense reports over a certain amount.
The Launch / Schedule Integration task contains a Run Frequency option. The values you can choose from include:
Option | Details |
|---|---|
Run Now (default) | Runs the integration immediately. |
Run Once in the Future | Requires you to specify the start date and time, including time zone. |
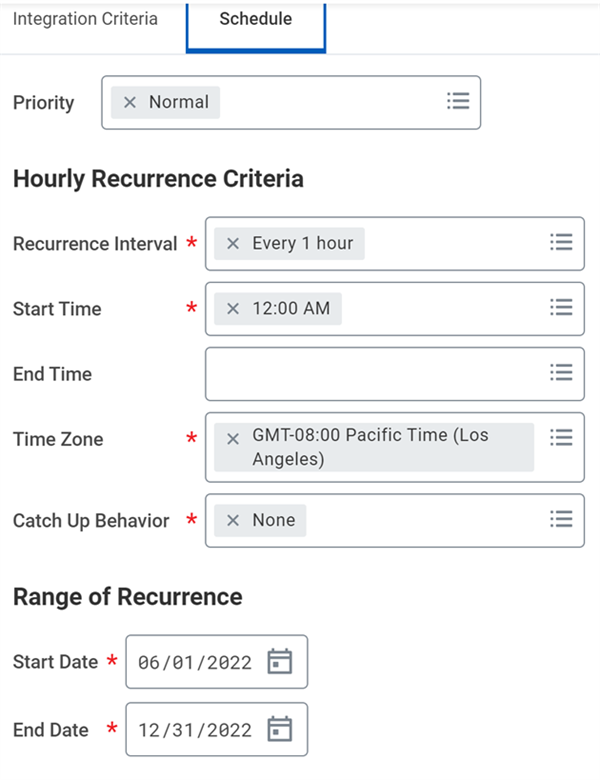
Minute Recurrence | Must choose a recurrence interval of 5, 15, 30, or 45 minutes. Can enter both start and end time, including time zone. There is also a Range of Recurrence requiring you to specify the start and end dates for this type of schedule. The start date and time must be in the future. |
Hourly Recurrence | Must choose a recurrence interval ranging from 1 to 12 hours. Must also enter both start and end time (optional), including time zone. There is also a Range of Recurrence requiring you to specify the start and end dates for this type of schedule. The start date and time must be in the future. |
Daily Recurrence | Must configure to recur every weekday, or to recur every n number of days. Must enter the start time and time zone, as well as the starting and ending date for the recurrence. |
Weekly Recurrence | Must configure: a recurrence of every n weeks, which days of the week, start time and time zone, and start and end dates for the recurrence. |
Monthly Recurrence | Must select a recurrence criteria, either every month, or you can select which months. Must also specify a recurrence type. This type is either a numeric day of the month, or chooses 'Last Day of the Month.' Or you can set the type to a day of the week, like First Monday, or Last Tuesday. Workday also requires start time and time zone as well as start and end dates. |
Dependent | Must choose one of many dependencies, like a Requested Worker Approved alert, or choose a specific integration, and so on. Must also specify to trigger this integration based on a status like Completed, or Completed with Warnings. You could use the dependent scheduling option to set up a domino effect, where one integration triggers another. |
Custom Recurrence | This option allows you to specify one to many start dates and times. |
Important
: Most schedules have a Priority option, allowing you to choose Critical, High, Normal, or Low. This option allows Workday to ensure that lower priority integrations do not impact critical integrations.You can set the Catch Up Behavior option to None or Run Once. A case where this option matters would be if Workday skips the integration because the scheduled time occurs during a Workday maintenance window.
Note
: Regarding the Range of Recurrence End Date, a scheduled integration will, at most, run for five scheduled instances after the end of the following calendar year.Integration Notifications
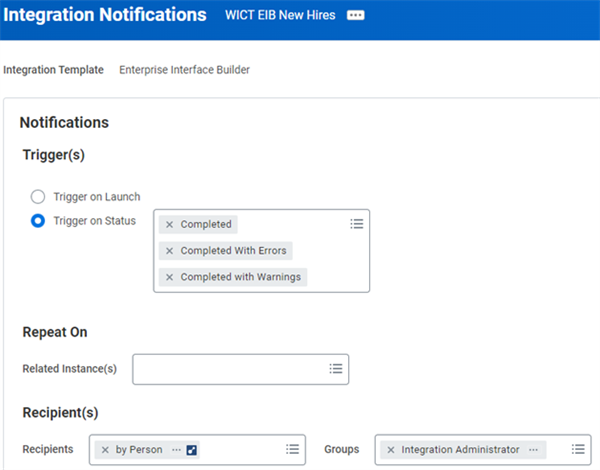
To help monitor integration events, you can send notifications to recipients and groups, based on integration event status. You can send these notifications to a Workday Inbox, an email address, or both.
Configure notifications from an integration system's Related Actions, selecting Integration System > Configure Integration Notifications. Workday can trigger the notification when the integration launches, or when the integration system incurs one of the selected integration statuses.
When defining the notification recipients:
- SelectbyPersonto send a notification message to the Workday Inbox of the worker who launches the integration.
- Select the active user-based security group that receives the notification in Workday.
- To send email notifications outside of Workday, enter one or more target email addresses.
Note
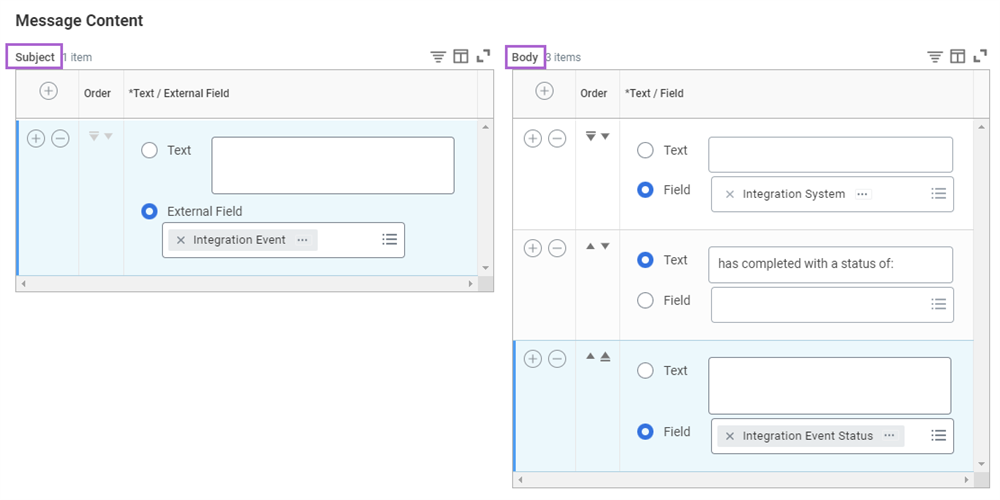
: When configuring the notification, there is a section to enter one or more email addresses. The email address section will appear after the Recipients field seen above.The notification consists of a subject and a body. You can configure the contents of the subject or body to come from one or more static text entries and dynamic fields. Dynamic fields update for each integration event.
Security Note
: The default email template for integration notifications includes a link to the integration event and its files. To view the event or files, users must sign in to Workday. Workday does not recommend including integration files as email attachments for security reasons.If you connect an integration to a business process, you can configure business process notifications instead.
Connector Delivery
Sequence Generators for Connectors
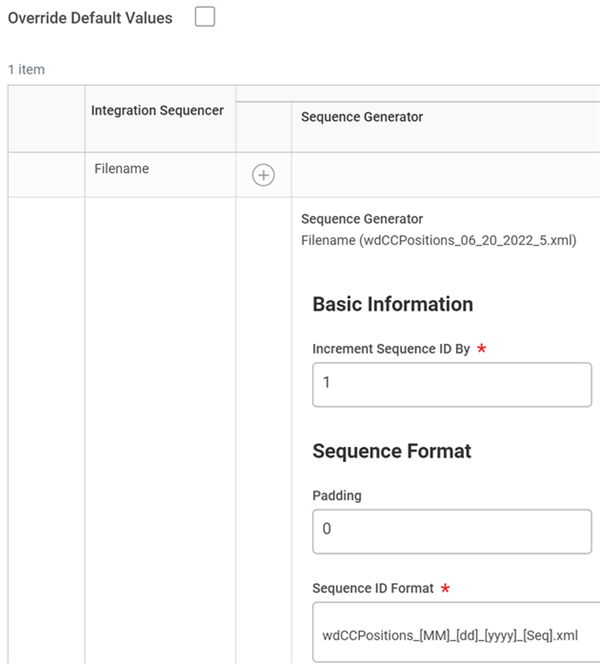
Sequence generators prevent overwriting external files by automatically creating unique, sequenced file names each time they run. You can configure sequence generators to include dynamic dates, time stamps, and sequence numbers, as well as fixed text.
For a connector, it is a two-step process to create a sequence generator:
- Enable the Integration Sequence Generator service.
- Configure the sequence generator.
Note
: Document Transformation integrations automatically enable this service.To configure the service, navigate to the integration system's Related Actions, then select Integration System > Configure Integration Sequence Generators. The syntax options display if you hover over the Sequence ID Format field.
Note
: If you configure an integration sequence generator, Workday ignores the static Output Filename integration attribute.Business Processes
Business processes can control various Workday transactions. The business process can define what needs to happen, who does it, and when they need to accomplish the task.
- What: Tasks, actions, and subprocesses
- Who: Workday security groups
- When: Defined time frame and order
Some common business processes include:
- Hiring workers.
- Generating expense reports.
- Reviewing data entered in Workday.
Integration Business Processes
Launching an integration triggers the
Integration Process Event
business process type. If an integration system does not have a configured business process, it uses the default definition for the Integration Process Event
. The default definition contains two steps: Initiation and Service - Fire Integration.You can configure a unique business process for each integration system. This business process type enables you to:
- Add additional steps between the integration launch and delivery or retrieval.
- Add multiple retrieval or delivery actions.
- Launch several integration systems in sequence.
- Use integration files produced by integration events earlier in the process.
Create the Integration Process Event Definition
Create an integration system-specific business process by navigating to its Related Actions, then selecting Business Process > Create, Copy, or Link Definition.
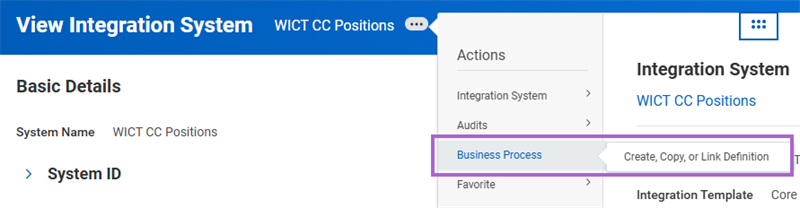
You can tie the custom integration business process to a specific business object, allowing the process to access data from that object. You can also copy or link the business process definition to an existing definition.
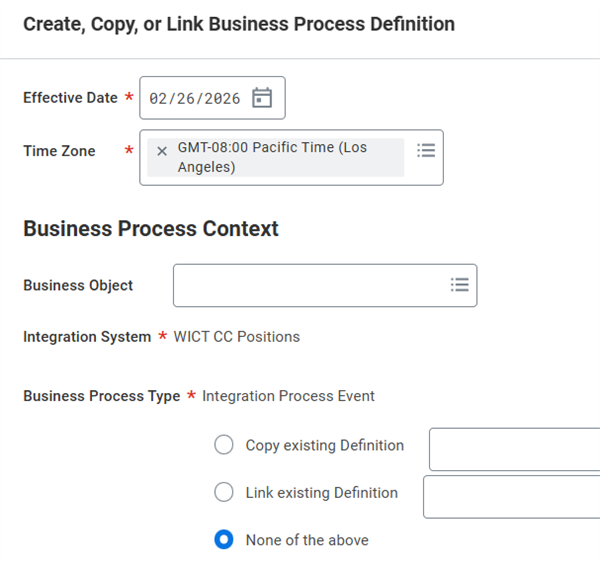
In the configuration shown in the image above, the new definition is based on the default, and contains only the initiation and service steps, where the service step triggers the integration.
If you search by the name of the integration, the results will now contain entries for the integration system and for the integration process event.
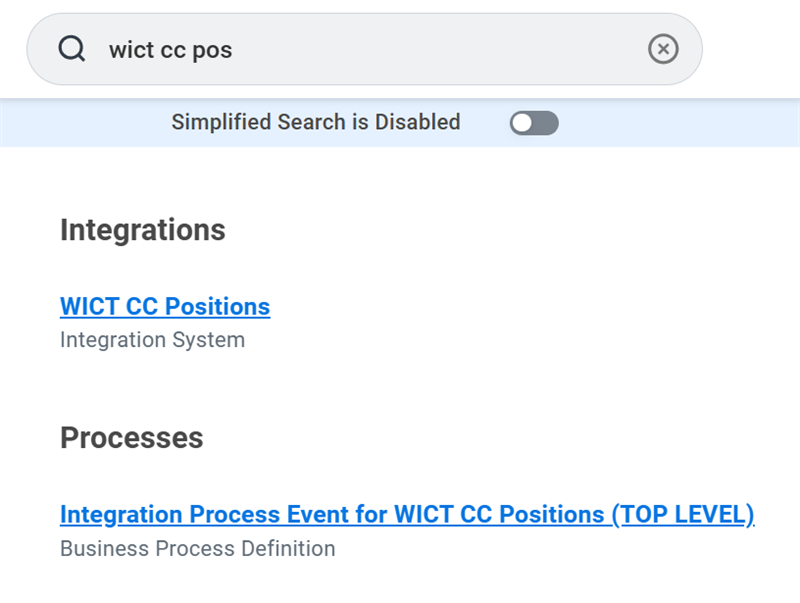
Important
: Once you configure an integration system-specific Integration Process Event
, only use the Business Process > Create, Copy, or Link Definition workflow to create new, organization-specific versions of the process. Locate existing business process definitions by searching for bp: (integration name).Integration Process Event Steps
The
Integration Process Event
business process allows the following common step types:Step Type | Description |
|---|---|
Initiation | Defines who can start the business process. It is always the first step in a business process and you cannot remove it. |
Approval or Consolidated Approval | Gives the assigned user the opportunity to approve, send back, or deny the entire business process. Approval step recipients cannot edit any information. Consolidated approvals allow users to approve multiple items in one step. |
Approval Chain or Consolidated Approval Chain | Seeks approval up a management hierarchy, starting with users in the assigned security group. The chain continues until it reaches the top or meets an exit condition. |
To Do | Sends an Inbox task to assigned workers with instructions for a task inside or outside Workday. |
Integration | Launches a separate integration system with its own Integration Process Event business process. For example, you could add an Integration step to a connector's business process that triggers a document transformation. |
Service - Document Delivery | Delivers files from outbound integrations to external endpoints. |
Service - Document Retrieval | Retrieves files for inbound integrations from external endpoints. |
Service - Fire Integration | Runs the integration system tied to the business process to either generate an output file or load data into Workday. |
Note
: The Integration Process Event
business process also allows the less common Batch/Job, Checklist, Report, Report Group, and Review Documents steps. For more information, visit Workday Documentation.
Search Reference: Concept: Business Processes
Integration Steps on Business Processes
When you create the initial business process definition for the connector, it contains two steps:
- Initiation step.
- Service step that triggers the associated integration.
You can add a third step to the business process definition, another service step. However, this step is for document delivery.
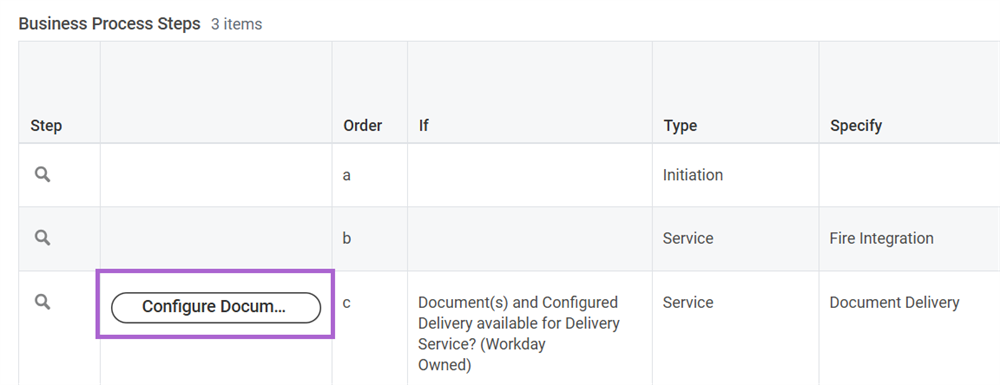
After adding the integration step, you must configure that step to trigger a specific integration system's
Integration Process Event
business process. If that integration system's business process has multiple steps, all steps run as part of the Integration step on another process. When an Integration step fails, the entire business process automatically terminates.Configure the Business Process for Delivery
When you click the Configure button on the document delivery step, there are three key pieces of information you need to supply:
- The source for the document the process will deliver.
- The transport details.
- Authentication details for the transport.
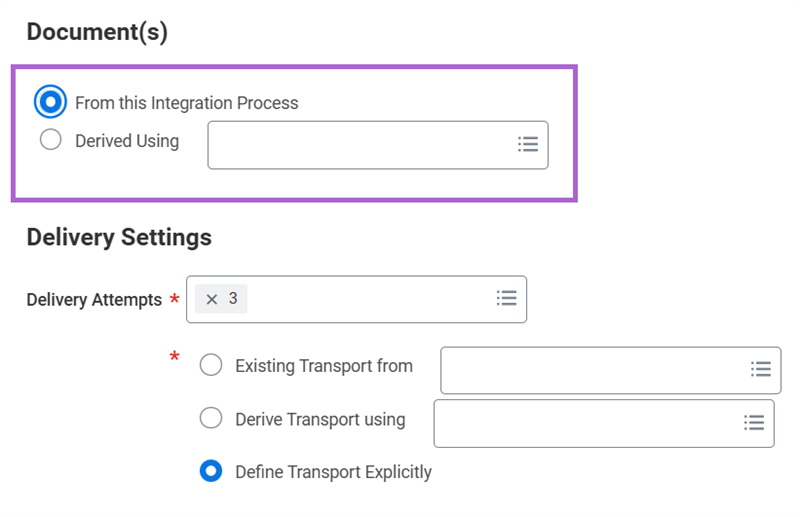
First, we specify that:
- The document delivered is the output of the associated integration process.
- There will be three delivery attempts.
- You will be explicitly defining the transport details.
Next, you will define the specifics for the transport. You specify:
- Transport type.
- Transport URL.
- Directory on the transport to place the file.
Note
: The details needed depend on the selected transport type.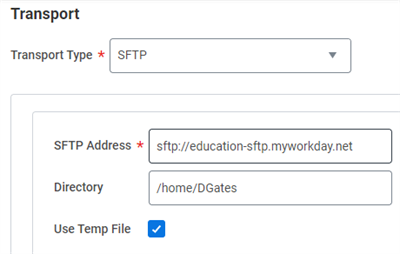
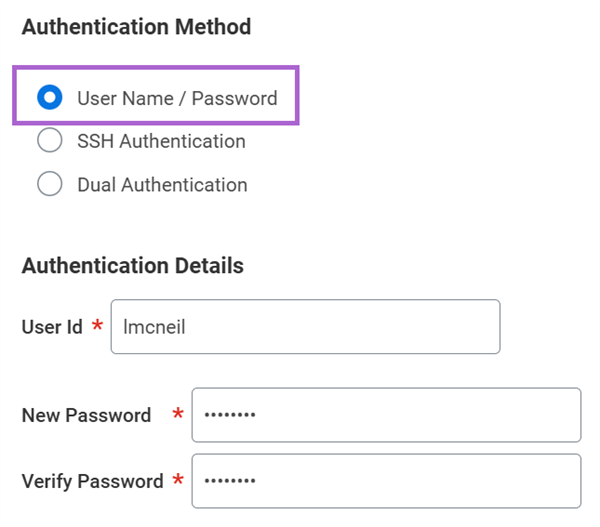
Last, you provide transport authentication details. You specify:
- Authentication Method
- Authentication Details
Testing the Transport
After configuring the document delivery step, you will need to test the transport. Navigate to the connector's Related Actions, then select Integration > Test Transport.
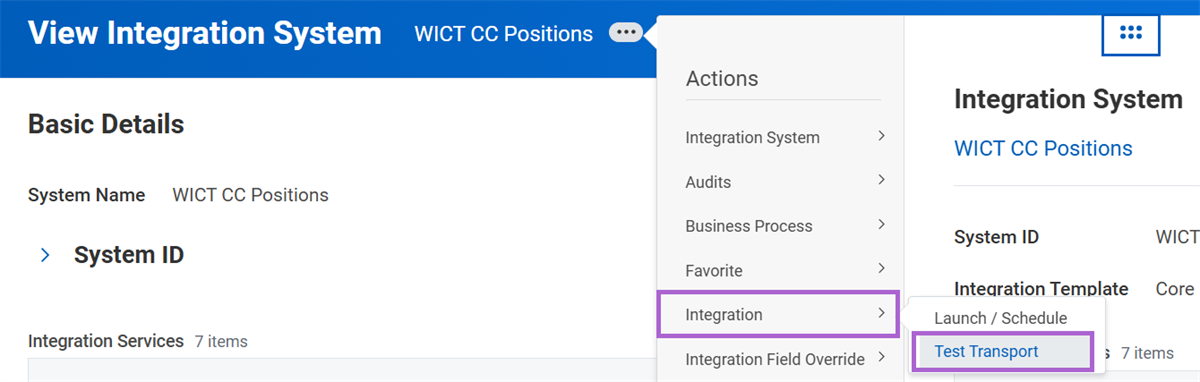
You have several options when testing. You can:
- Only connect to the transport.
- List files in the directory specified on the transport.
- Send a test file to the transport.
Regardless of the test chosen, you must receive a success message before launching the integration system.