
Workday Connectors
Overview
This chapter explores the building blocks of connector integrations, including integration templates, services, attributes, field attributes, maps, and field overrides.
Objectives
By the end of this chapter, you will be able to:
- Explain the benefits of connector integrations.
- Define the building blocks of connector integrations.
- Create, configure, and launch an outbound connector integration.
- Configure integration system field attributes, field overrides, and maps.
Workday Connectors
In Workday, you might encounter the term Cloud Connect integration systems. We refer to these by the simple name, connectors. There are two types of connectors:
- End-to-End Connectors
- Generic Connectors
Connectors are Workday-delivered, pre-built templates that move data between Workday and external systems. You can think of connectors like bridges that allow data to move from Workday to an external system (outbound) or from an external system into Workday (inbound). End-to-end connectors are fully built templates, while generic connectors provide a foundation.
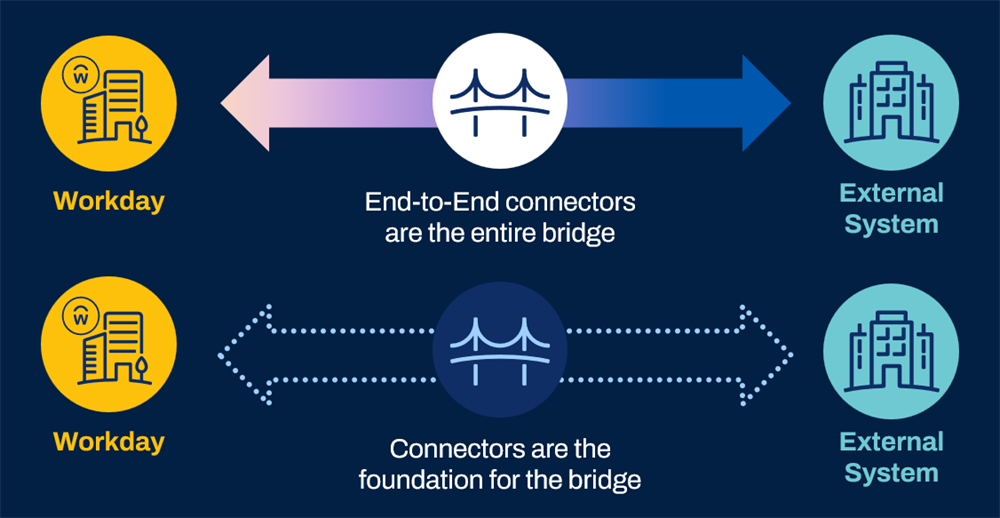
End-to-End Connectors
End-to-end connectors support a specific third-party application or service, like:
- Creating bank integrations for electronic payments made from or deposited to a particular bank account.
- Sending IRS Form 1094-C and 1095-C data (Affordable Care Act) to the Internal Revenue Service (IRS).
- Integrating Workday with the E-Verify service provided by the United States Citizenship and Immigration Services (USCIS).
- Enabling you to outsource Full Service Direct Deposits (FSDD) and printing of payroll checks, payroll advice slips, and mail label files to external payroll vendors.
End-to-end connectors enable you to align each system's specific business functions with no coding or document transformation.
In addition, Workday maintains and tests end-to-end connector templates each release. If an external endpoint's requirements change, Workday updates any impacted end-to-end connector templates.
One of the more popular end-to-end connectors is Cloud Connect for Benefits (CCB). CCB supports over 250 providers of approximately 20 different products.
Resource
:
To access a list of supported benefits providers, review the Cloud Connect for Benefits Catalog on Workday Community.Generic Connectors
Generic connectors, often called Core Connectors, include most of the configuration required to integrate with external endpoints, but are not specific to any endpoint. You still need to configure some components of these connectors to meet your needs. Here are some examples of core connectors that are related to Workday HCM functionality:
- Core Connector: Candidate Outbound
- Core Connector: Job Profile and Job Family
- Core Connector: Organization
- Core Connector: Positions
- Core Connector: Worker
Resource
:
Review Workday Documentation for a full list of available connector templates. Search reference: Setup Considerations: Integrations
Note
: All connectors require some level of tenant configuration and testing. Each customer can have specific mapping requirements and different endpoint configurations. Workday integration templates and mapping capabilities can accommodate different customer requirements.Document Transformation
The Document Transformation connector template is unlike any other connector. This template transforms data from or for another connector integration, including:
- Formatting
- Validation
- Warning messages
- Headers and footers
- Calculations
Document transformations contain an eXtensible Stylesheet Language Transformations (XSLT) attachment with Workday-specific processing instructions. The XSLT uses Element Transformation and Validation (ETV) or XML to Text (XTT) to validate and control the data.
Important
: ETV produces an XML output file while XTT produces a text output file.Inbound Connectors
Inbound connector integration templates pull data into Workday using the same building blocks as outbound templates. These two common inbound connector integration templates import data into Workday in XML or CSV formats.
Connector Template | Use Case |
|---|---|
Core Connector: Organization Inbound | Imports organization data from an external system into Workday, creating, editing, moving, and inactivating organizations. Does not allow changes-only files. |
Core Connector: Accounting Journal Inbound | Imports accounting journal data from an external system into Workday, translating data between an external chart of account structures or Workday worktag and account structures. |
Reasons to Use Connectors
There are many reasons to use Workday connectors, including that they:
- Are supported by Workday.
- Give you roughly 80% of what you need.
- Are configurable.
- Are extensible using Workday tools.
- Have standardized output.
- Allow for change detection.
Important
: While Workday provides the codeline and supported features of connectors, there are aspects of these integrations that you must support. For example, Workday supports Core Connector Worker. Workday will fix any bugs in that code. However, support for the configuration of a Core Connector Worker integration rests on the customer.Common Design Patterns
There are three common design patterns associated with the Workday integrations ecosystem:
- Delivered
- Uses a connector
- Delivered + Custom
- Uses a connector plus a document transformation
- Uses a connector plus Workday Studio
- Fully Custom
- Uses Orchestrate
- Uses Workday Studio
Best Practices
Workday has defined a decision tree for determining which route to take when building an integration. The use of connectors is toward the top of that tree. The order for choosing the correct integration type is to use:
- Manual entry:Due to the cost of integration automation, if you expect low volumes, or the data has a high level of complexity, use a manual entry approach.
- Cloud Connect / Connectors:
- Partner or Workday packaged connectors.
- Generic Workday connectors.
- Custom Integrations:
- Orchestrate
- Workday Studio
Connector Building Blocks
Connectors use several configurable components to simplify connecting Workday to external systems:
- Templates
- Services
- Attributes
- Field Attributes
- Field Overrides
- Maps
- Delivery
- Transaction Log
- Security
- Business Processes
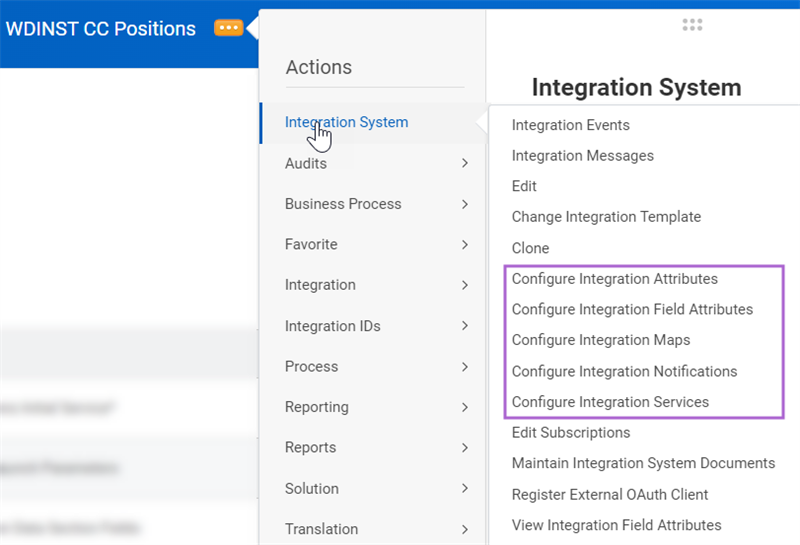
You configure most of the building blocks using the Related Actions of the integration system.
Integration Template
When you create a connector, you begin by selecting a template.
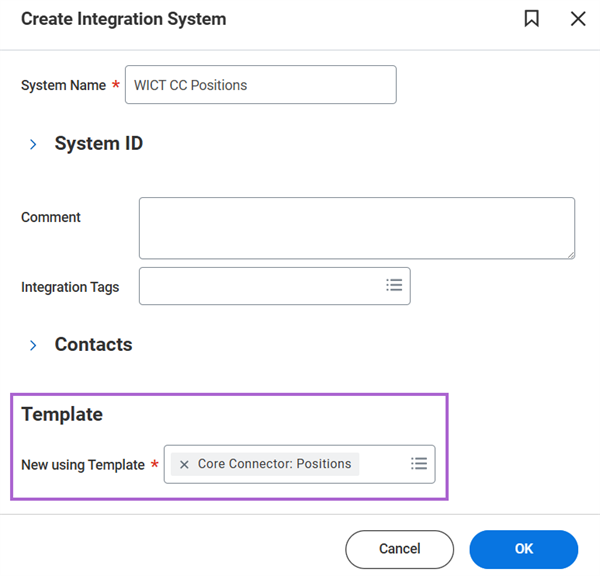
Though templates have default settings, you can configure them to meet business needs.
Every template contains a list of services used to communicate with an external endpoint. The template automatically enables required services. You can enable any optional services.
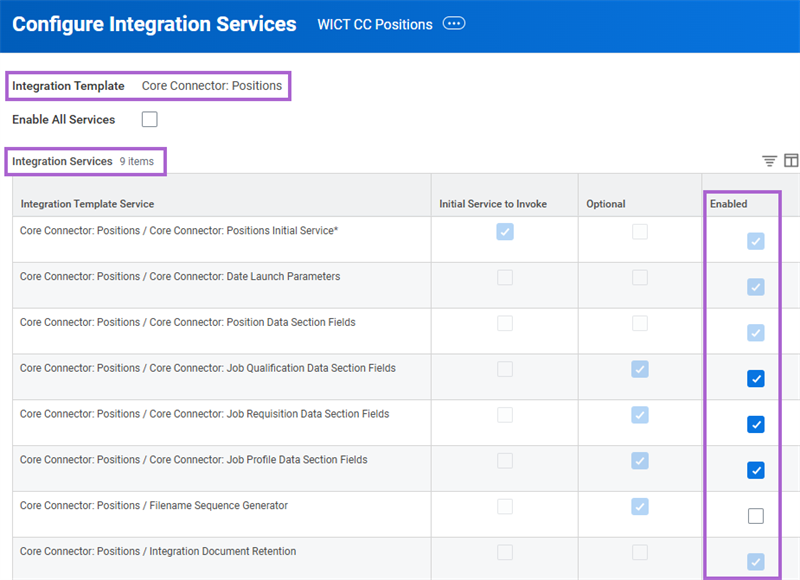
After the service selection, you will notice that the template also defines additional components like integration attributes and maps.
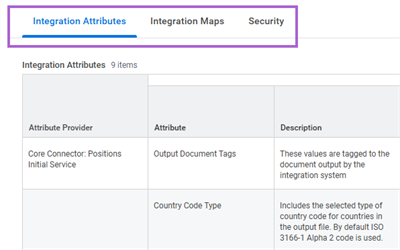
There are templates such as:
- Vanguard: Retirement Savings
- Core Connector: Worker
- CIGNA: Life, Disability
Integration Template Catalog Report
To determine which Connector template best meets your needs, use the
Integration Template Catalog
report. The report includes templates for:- End-to-End Connectors
- Core Connectors
- Document Transformations
You can access this report from the Workday Search bar. The report displays a complete list of connector templates delivered by Workday. You can filter the report by template category.
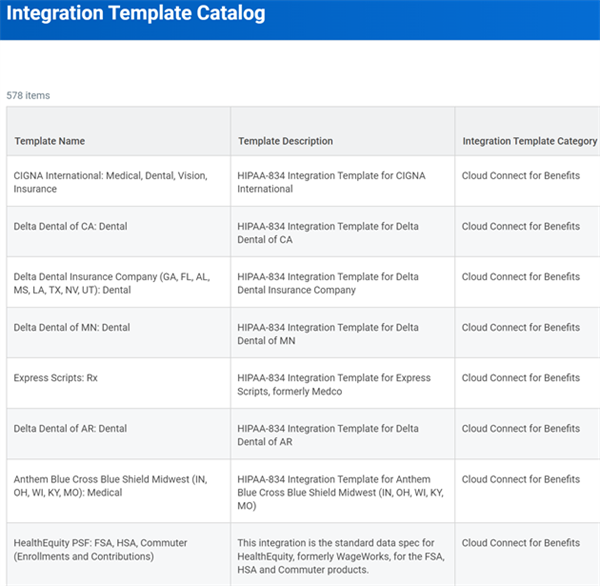
Each row on the above report has a View Details button. Selecting View Details allows you to explore more information about the services, attributes, and maps associated with the template.
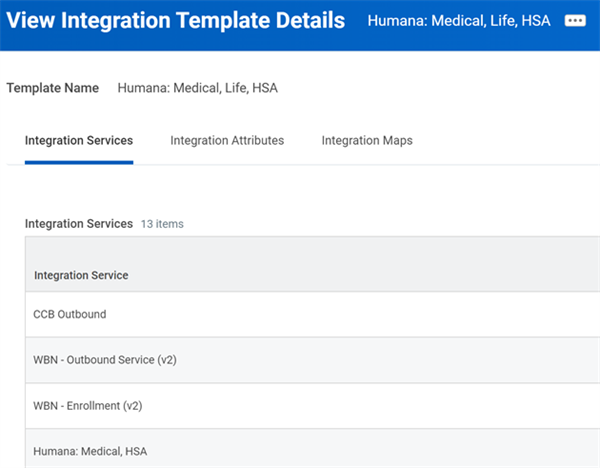
Connector Template Catalog on Workday Community
Workday Community also contains details about connectors. To explore core connector integration templates in Workday Documentation, visit the
Reference: HCM Connectors Catalog
page.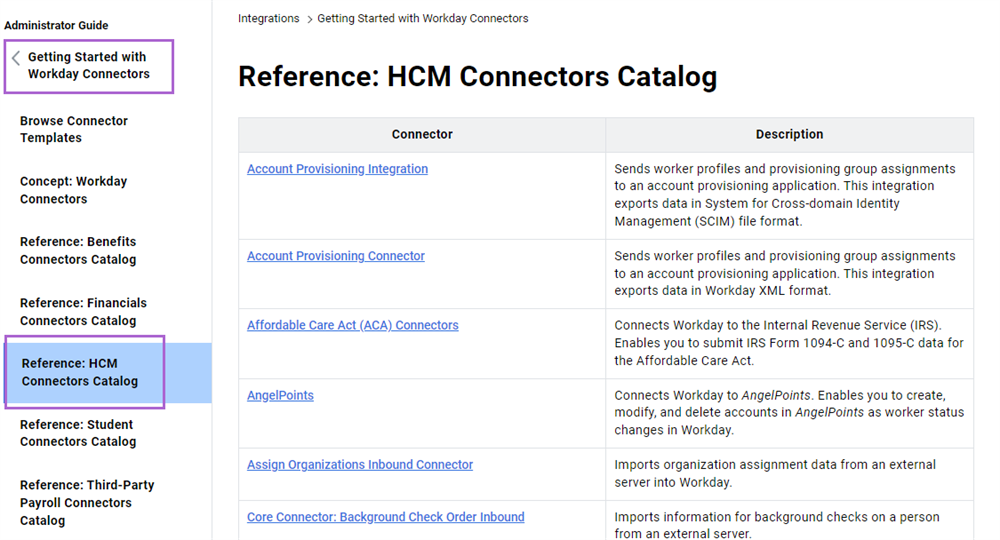
You can drill down using the links shown above to get more details about a specific template. The link takes you to a concept topic in the documentation. From there, you can access specifics about each template, like:
- Information about change detection.
- What you need to do to enable the integration for a full extract.
- What the integration allows as far as filtering data.
- Details about launching and scheduling this integration, including what launch parameters are available.
You need to spend some time reviewing the details in the documentation. Do not just explore the concept topic.
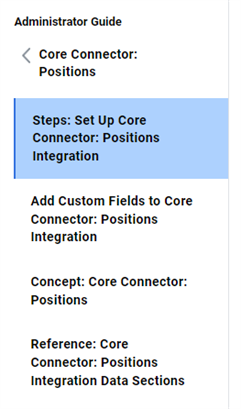
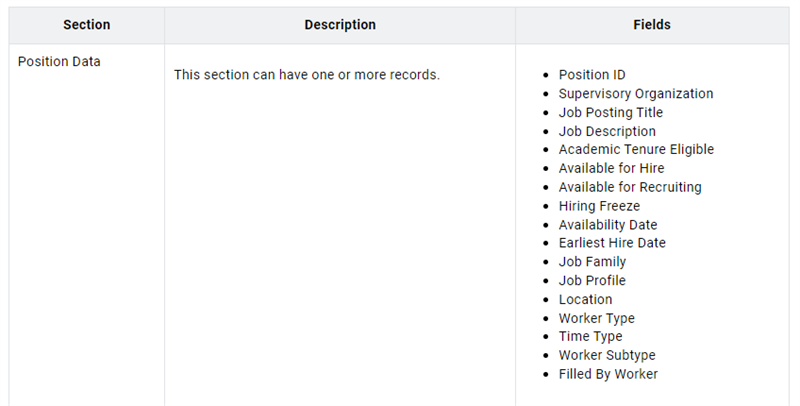
The documentation tells you how to set up and configure the integration. The reference section tells you exactly which fields will be available based on which services you enable.
Integration Services
An integration service is a group of related integration:
- Attributes
- Maps
- Transformations
Services enable you to provide and transform Workday data for an external endpoint. Some services control the data made available by the underlying web service operation. You can:
- Enable and disable these types of services as needed, though the template may require some services.
- Create custom integration services to get additional data.
Some services perform tasks for the integration system. For example, some templates have services that you can enable to:
- Configure a sequence generator.
- Enable/disable the transaction log service.
Important
: The services available differ by integration template.You can enable or disable services by navigating to the integration system's Related Actions, then selecting Integration System > Configure Integration Services.
Tip
: Integration systems run more slowly with more services, so avoid enabling services you do not need.Web Service Operations and Integration Services
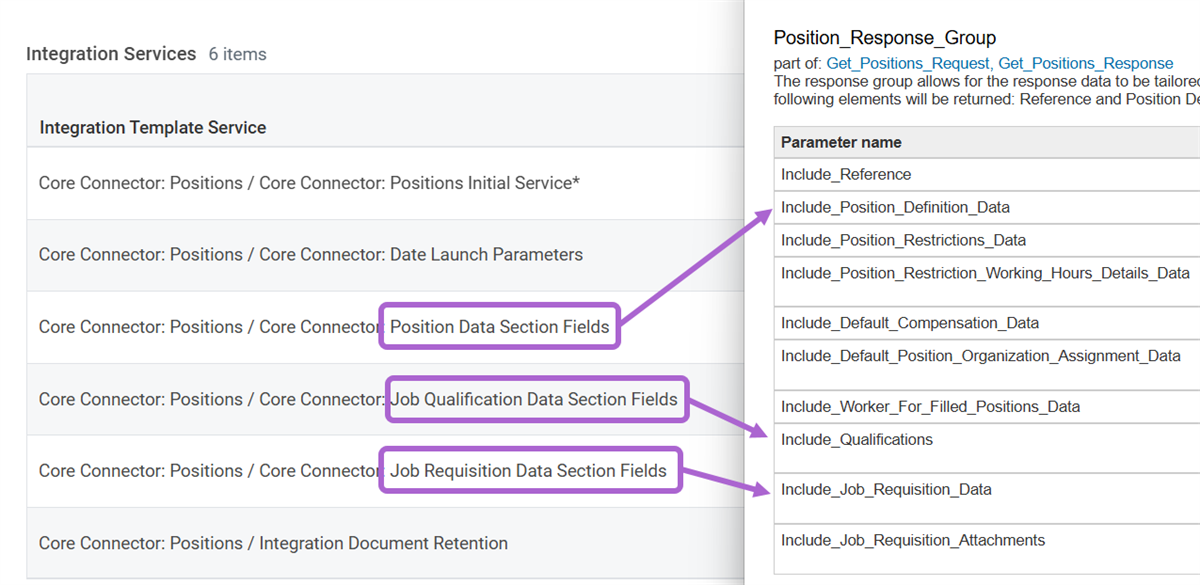
There is a Workday Web Service operation behind some of the integration services. The Core Connector: Positions template is based on the Get Positions operation. Depending on which services you enable, you will be allowed access to the different fields available when the integration calls the web service.
Note
: Core Connector: Positions will call both Get Positions and Get Job Profiles if you enable the Job Profile Data service. Job Profile Data is not enabled by default.Custom Integration Services
You may need to integrate data the web service operation does not include. You cannot change the web service operation, but you can create a custom integration service with additional data, including delivered report fields, calculated fields, and custom fields.
To create a custom integration service, first run the
Configure Integration Services
task. Then, in the Custom Integration Service section, add a row and select the type of custom service you want to create.Integration Attributes
An integration attribute specifies the tenanted value of a data element in Workday. Essentially, integration attributes define:
- The type of data, like an address type.
- The behavior of the data, like whether it includes prior values.
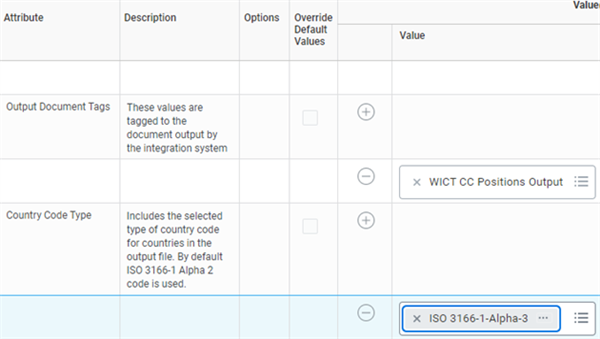
For some integration attributes, Workday provides a default value or requires that you select a value in order to launch the integration. Below are the default attributes for Core Connector: Positions.
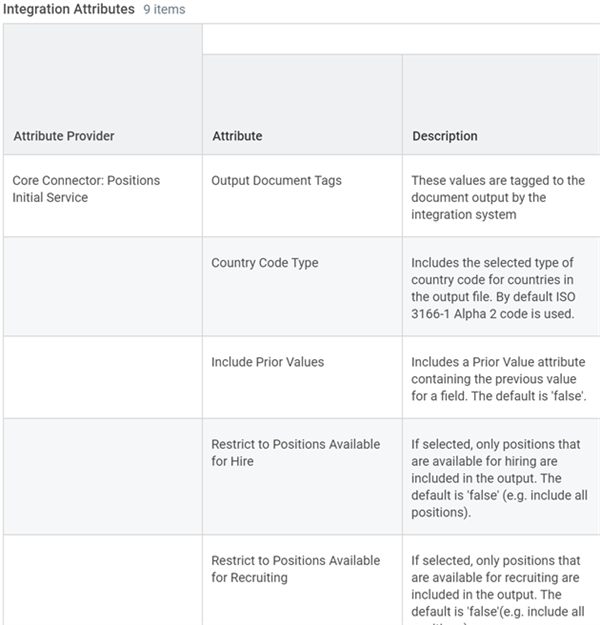
Modify and define an integration system's attributes using its Related Actions > Integration System > Configure Integration Attributes. The following depicts editing the Country Code Type attribute to use the Alpha-3 ISO code instead of the default, which is Alpha-2.
Integration Field Attributes
Field attributes are an important concept. They are where you include or exclude fields to be output by the integration.
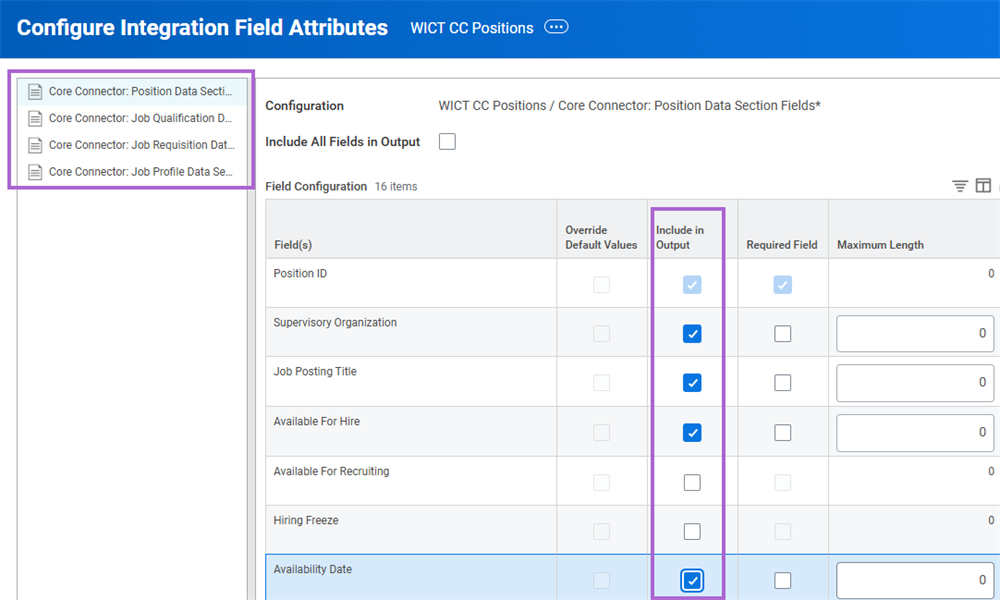
You can modify field attributes by navigating to the integration system's Related Actions and selecting Integration System > Configure Integration Field Attributes. When configuring field attributes, the first thing that displays is a list of all the data-related integration services you enabled. This list appears in the top-left of the configure page. The fields, shown on the right of the page, will differ depending on which of the integration services you select. The list of fields includes information like:
- A checkbox where you can enable all fields for output.
- A checkbox where you can enable individual fields for output.
- An indicator displaying if the field is required.
- A place where you can set the maximum length for the field.
XML Overview
Many systems use XML (eXtensible Markup Language) to store and transport data. XML is a self-describing language. XML uses tags to describe the data elements. Every XML document can define its own tags.
XML Structure
There are two concepts related to XML documents:
- Well formed
- Valid
All XML documents must be well formed. Well formed means the document adheres to these basic requirements:
- There is a single root element that contains all other elements.
- Each opening tag must have a corresponding closing tag. You can define a tag as self-ending, like <pay/>.
- Elements must be properly nested. For example, close a child tag before the parent tag.
- Elements can also contain attributes, which appear as name="value" pairs associated with a tag.
- Declare any entities other than amp(&), apos(single quote), gt(>), lt(<), quot(double quote).
An XML document is valid if it adheres to rules defined for an application. Usually, an XML schema definition (XSD) provides these rules. A valid XML document must be well formed and satisfy the rules defined in the schema.
XML in RaaS
With regard to RaaS, Workday provides two XML formats:
- Workday XML
- Simple XML
By default, RaaS report data is output using Workday XML. The Workday XML format contains additional data like Workday IDs (WIDs) and reference IDs. A sample of Workday XML follows:
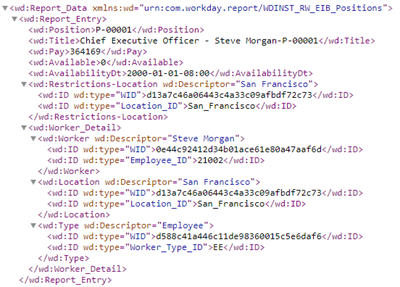
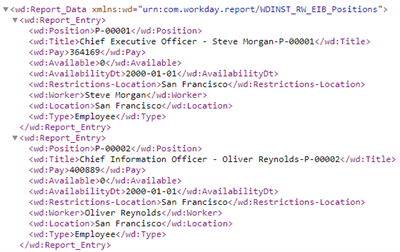
The Simple XML format does not include the same Workday identifiers. A sample of Simple XML follows:
Note
: In addition to Workday XML or Simple XML, you can output RaaS reports in the following formats:- CSV
- RSS
- GData
- JSON
Integration IDs
Integration IDs are unique object identifiers used in integrations.
ID Type | Description | Example |
|---|---|---|
Workday ID | An unchanging, 32-character, globally unique identifier that Workday automatically generates for all object data. | d13a7c46a06443c4a33c09afbdf72c73 |
Reference ID | An optional, unique identifier, consisting of a type and a value, that you can set in Workday or externally. The type defines the unique identifier, but the value is the identifier itself. | Employee_ID 15117 |
External ID | A two-part, unique identifier controlled by an external endpoint that consists of a system ID and a value. The system ID identifies an integration system and the value identifies a business object. | HCSF L-01 |
Finding Integration IDs
There are three methods for finding integration IDs.
Method | Explanation |
|---|---|
Workday UI | View a specific instance of a business object's integration IDs from its Related Actions, Integration IDs > View IDs. |
Integration IDs report | Run this report to pull integration IDs for specific business objects. |
View Reference IDs report | Run this report to pull all reference IDs for a single business object. |
Note
: Not everyone will have security access to view integration IDs. Implementers have access, while typical Workday users will not. There are security policies, like Set Up: System, or Integration Build, that you can configure to let specific Workday users access IDs.XML in Connectors
Workday Connectors output integration data in XML. Below is an example of XML output from Core Connector: Positions. Each XML file contains a header with basic information about the integration run and the number of entries included in the output. After the header, each entry is listed with its relevant data fields.
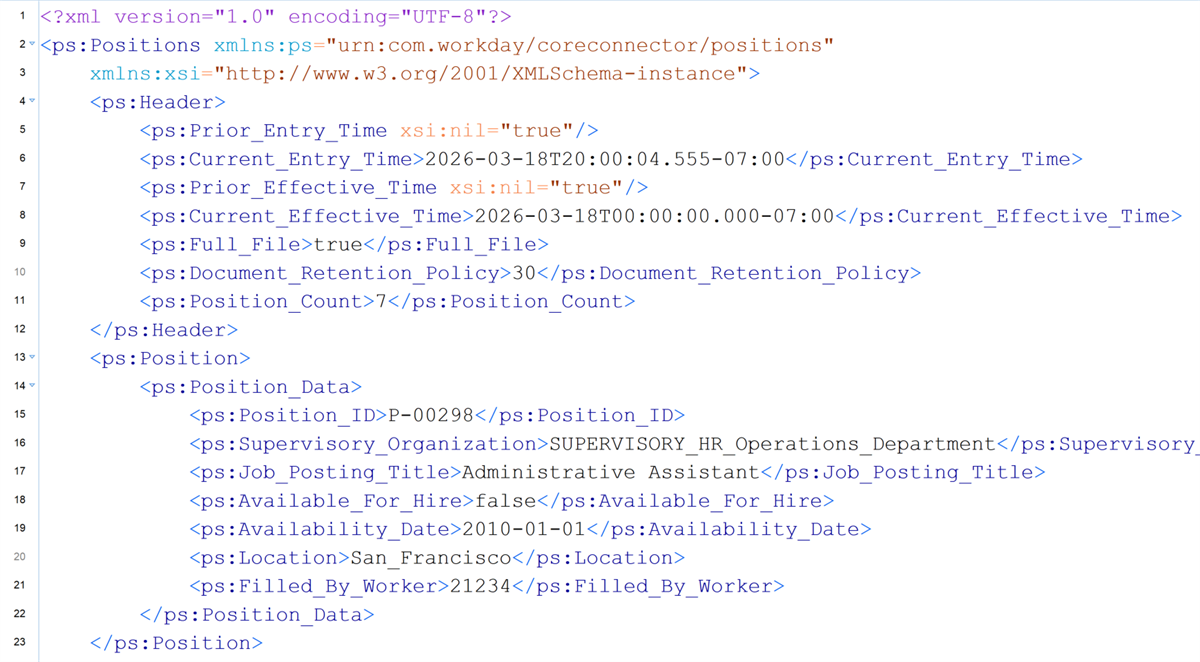
Example XML output from a Core Connector: Positions integration.
Launching an Integration System
After creating a new integration, Workday displays the
View Integration System
report. Use the integration system's Related Actions to launch an integration.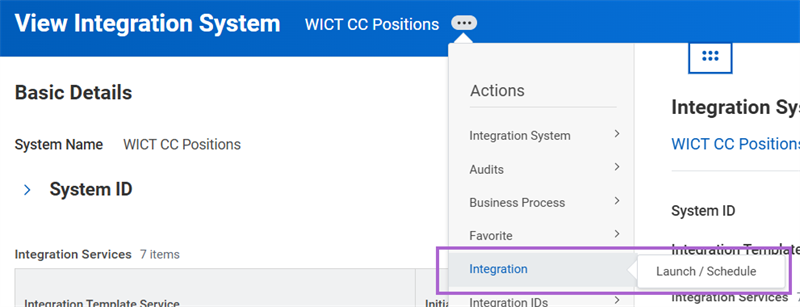
Launch / Schedule an integration from its Related Actions.
From Launch / Schedule Integration, use the Run Frequency field to specify when you want to run the integration. You can run the integration immediately or configure a schedule.
The optional Organization and Integration System Context prompts enable you to limit your integration to a specific organization or academic unit.
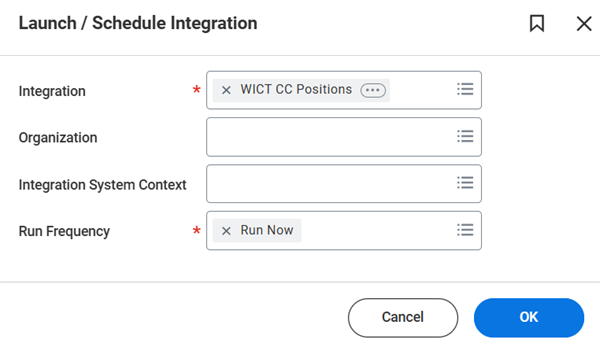
The Launch / Schedule integration menu.
To find an integration system after its initial creation, use the intsys: prefix in the search box:
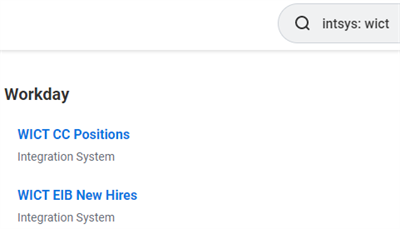
Example of search results using the intsys: prefix.
Launch Parameters
During launch, some integrations require input values. We call these values launch parameters. For example, you can run an integration for only one supervisory organization, or just to get data for the last month.
The integration design dictates the available launch parameters. In this case, the integration is using a custom report, which has two report prompts.
During the launch, Workday displays the
Schedule an Integration
screen, which is where you input the launch parameters.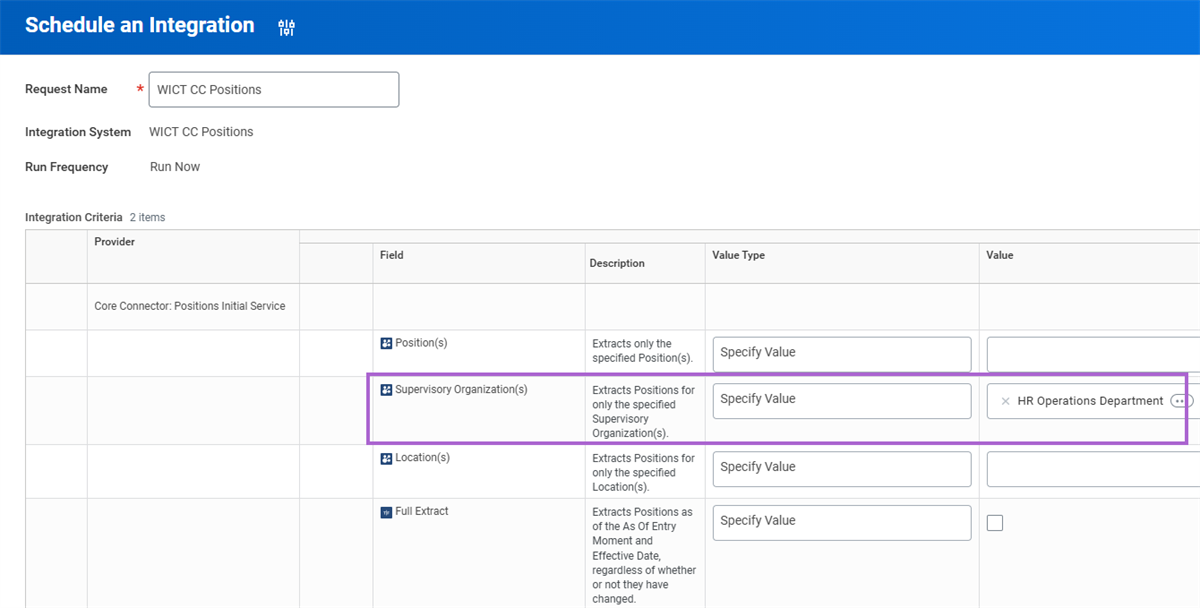
In the image above, the launch parameter values shown are static. When the value type is Specify Value, you enter static values.
There are three choices for Value Type:
- Determine Value at Runtime
- Specify Value
- Use System Default
When the value type is Determine Value at Runtime, your values will be dynamic. For example, you could set the Starting Hire Date launch parameter to Current Date Minus One Month. Current Date Minus One Month is a Workday-delivered report field on the Global object. It returns the current date based on the user's location.
Date Launch Parameters
When you launch a connector, you can enable the Full Extract option. If you are working on the Positions connector, a full extract would extract all positions. You could also use change detection. Change detection is a feature unique to Workday connectors.
Before talking about change detection, there are four launch parameters that you must understand:
Launch Parameter | Description |
|---|---|
As Of Entry Moment | The moment (date and time) that the integration considers current. The integration will not include changes that occur after this moment. Defaults to the current date and time. |
Effective Date | The end date of the date range the integration considers. Workday will not include transactions that are effective after this date in the integration output. Defaults to the current date. |
Last Successful As Of Entry Moment | The last moment (date and time) the integration successfully ran. |
Last Successful Effective Date | The beginning date of the date range the integration considers. Workday will include transactions after this date, up to the Effective Date, in the integration output. |
Important
: While these launch parameters have default values, you can change them when launching the integration. Also, you can enter static dates, or dynamic fields, which will calculate new values every time the integration runs based on current information. For example, you could set Last Successful Effective Date to be the Current date minus 48 hours.In the following example, As Of Entry Moment displayed the current date and time that we launched this integration. Effective Date displayed the current date we launched this integration. Last Successful As Of Entry Moment displayed the date and time this integration was last successfully run. Likewise, the Last Successful Effective Date displayed the date this integration was last successfully run. Notice all of these parameters are editable.
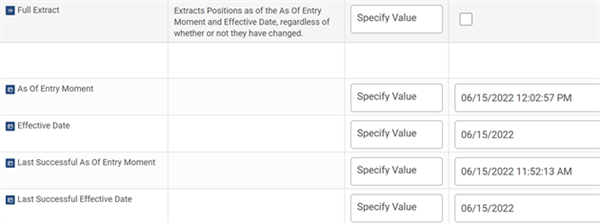
When you launch a Positions connector with the Full Extract option enabled, Workday retrieves all positions per the As Of Entry Moment and Effective Date. This applies to all positions, regardless of whether or not they have changed.
Instead of retrieving a full extract, you can tell the integration to retrieve only new or changed data. With change detection, all the above launch parameters get considered. They form a starting and ending point for retrieving only the new/changed data.
Note
: Change detection is different than extracting data between two dates.For example, consider an integration that will include a termination date. You could have start and end date launch parameters that would output all workers with a termination date that is between the start and end date parameters. This is an example of using launch parameters to filter data. This scenario does not describe change detection.
Now, consider an integration that uses change detection. The output should contain only rows that have had their data changed and that fall within the start and end range. That said, there are many tests used to determine if the integration extracts a row. The examples we provided used Core Connector Positions. Other connectors have different rules and configuration requirements, such as:
- Is the transaction log on and configured?
- Is the row newly effective and either current or past entered?
- Is the row newly entered and either current or past effective?
- Did at least one field selected for output experience a change?
Integration Events
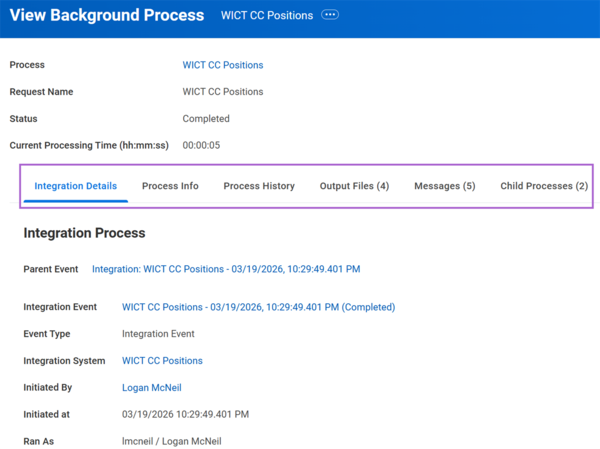
After launching an integration, Workday displays the View Background Process page. While the integration is running, the screen displays a Refresh button. You can select Refresh until the integration completes. The View Background Process page will display the status of the integration. Statuses include:
- Aborted
- Completed
- Completed With Errors
- Completed With Warnings
- Failed
- Not Run due to Exceptions on Future Process
- Processing
Workday displays other details about the integration, including:
- Processing Time.
- Link to the Integration Event.
- Link to the Integration System.
- Who initiated the integration, and when.
The View Background Process page displays multiple tabs, offering more details about the integration:
- Process Info:Shows actual versus scheduled start date and time.
- Process History:Shows information like date, time, status, processing time for the last five runs of the integration.
- Output Files:Contains a link to the file generated from the integration run.
- Messages:Has more details that were output during the event. For example, we mentioned a 2GB limit on RaaS report data for integrations. On Messages, you will notice the size of the data for the integration.
Additional Ways to Locate Integration Events
To locate a previously run integration event, you can:
- Run theIntegration Eventsreport.
- Run theProcess Monitorreport.
Integration Events Report
The
Integration Events
report has prompts for filtering data. This report will show data for all integrations, or you can select a specific integration system. To further filter the report, you can enter additional criteria in the available fields, such as Sent After or Integration Event Status.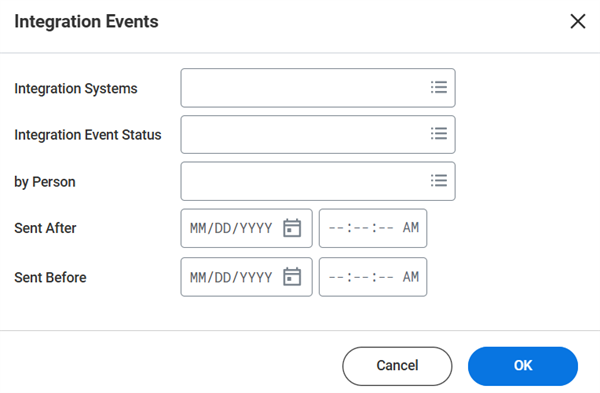
When you are viewing an integration system, use the Related Actions and select Integration System > Integration Events. This action will display the same prompt as above. However Workday will automatically fill the Integration Systems prompt.
The
Integration Events
report displays the same information available from the View Background Process page. The report displays fields like:- Link to the Integration Event
- Link to the Integration System
- The person who launched the integration
- The event launch date and time
- The event status code
Process Monitor
The
Process Monitor
report also displays information about integration events. To use Process Monitor to locate integration events, choose Integration as the process type. You can also filter by selecting a specific integration in the Process prompt.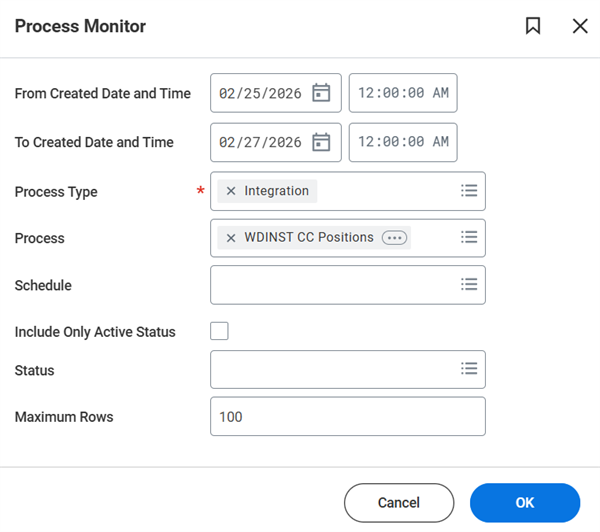
With Process Monitor, you can choose to display only active integrations. You can also filter based on the status of a completed integration event.
The
Process Monitor
report is similar to the Integration Events
report.Integration Field Overrides
Each Workday integration template allows you to enable services. Each service has configurable field attributes. Field attributes are where you define the data needed in the output file. However, Workday does not allow you to edit the templates. The templates control what field attributes you can choose per service.
Field overrides give you the ability to customize beyond what the templates provide. With field overrides, you can control what data you send in a file. Field overrides allow you to add custom values from:
- Report fields
- Calculated fields
- Custom fields
For example, the recipient of your file may need data concatenated, where in Workday there are separate fields. You can create calculated fields to concatenate multiple fields.
Important
: Using calculated fields with field overrides can cause significant performance issues. If you need more than 30 field overrides, you should consider a different type of integration.For most connector templates, configuring a field override is a two-step process:
- Create a custom integration field override service.
- Configure the field override.
You can use the
Configure Integration Services
task to create a custom integration field override service, where you define the name and a description for the field override.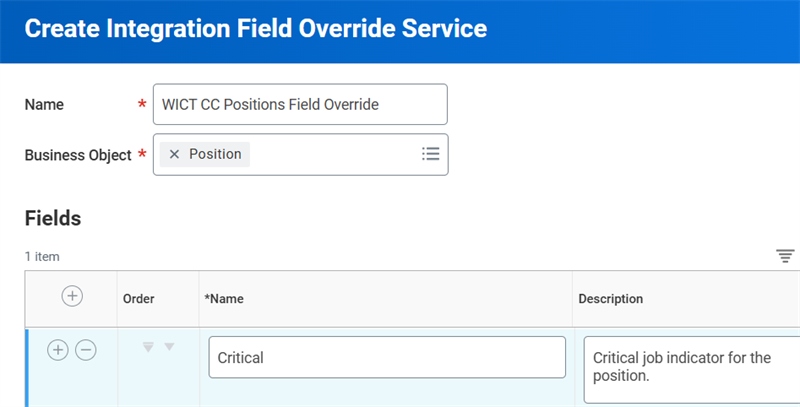
Note
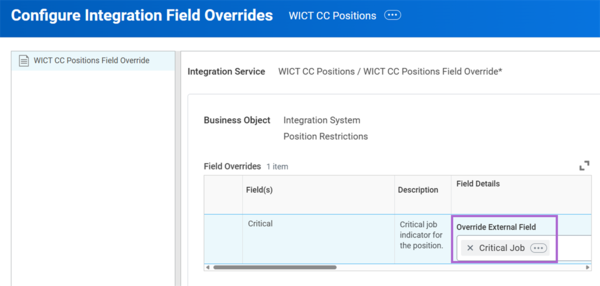
: Some connector templates include a field override service by default.Then, from the integration system's Related Actions, select Integration System > Configure Integration Field Overrides, where you choose the actual field you want to map to the override.
Integration Maps
Integration maps specify how values in Workday relate to values in an external system. To create an integration map, navigate to the integration system's Related Actions, then select Integration System > Configure Integration Maps.
The template, and your service configuration, define which maps display. You provide a default value for the map and then map the Workday internal values to the values needed by the external resource.
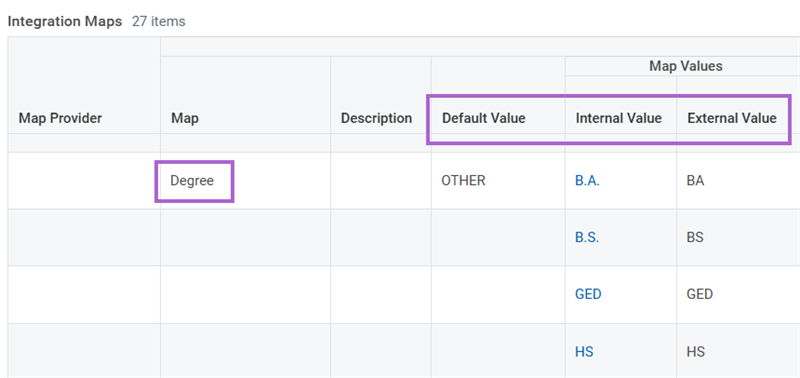
Example
: Configure an integration map to connect the Workday degree value B.S. to an external system's value of BS. The two values represent the same degree, but are not identical, so you must map them.Tip
: Enter a default value for integration maps to ensure that you can return and identify unmapped values.Note
: Some connectors will allow unmapped data to pass through and will show no errors for the integration event. Other connectors will result in a status of Completed with Errors and identify the instances in the Diagnostic Log.