
Event Setup
Overview
After configuring benefit plans, you must identify active plans for a defined period. Then, create events and processing rules to manage and maintain employee benefit elections. Setting up events and event processing rules is complex and requires a clear understanding of the benefit plan structure and details.
Key questions to address include:
- What are your current benefit offerings and will you plan for new offerings?
- What types of job changes and life events will change an employee's benefit eligibility?
- What election changes will you allow?
- Can the employee add or remove dependents?
- For each enrollment event, when does coverage for a benefit plan start? When does it end?
- What if the employee does not make elections? Do they automatically get coverage?
Objectives
By the end of this chapter, you will be able to:
- Define a benefit plan year.
- Configure enrollment events.
- Maintain the enrollment event rule.
Defining Active Plans
Eligibility and Active Plans
When an employee or administrator progresses through the enrollment pages, certain benefit plans may open, while other plans will not open. For an employee to make election changes, the plan must be opened. There are three reasons a benefit plan or entire coverage type might not open. Reasons include:
- The benefit plan is not included in the current benefit plan year definition.
- The coverage type is not included in the processing benefit event type.
- The employee is not eligible for the benefit plan.
Plan Year Definition
The benefit plan year definition is a collection of active benefit plans for a given period of time, as designated by the plan year definition. To offer a worker a plan, that plan must be in a plan year definition that is active as of the worker's benefit event date.
When changes to plan offerings occur, such as adding new plans, discontinuing plans, you have to edit existing, or create new plan year definitions. For example, in the United States it is common to have a benefit plan year based on the calendar year (January 1 - December 31). The plan year contains all the plans that are you will offer for that year, which typically does not change during the year.
However, the plans may change rates for the following year, or you may have new plans added for the following year. You create a new plan year definition for the following year and include plans you are continuing to offer as well as any new plans. You do not include any plans you are discontinuing. Open Enrollment is the process that moves workers' elections from one plan year to the next.
The image below provides an example of the
View Benefit Plan Year Definition
report displaying the U.S. 2026 Benefit Program.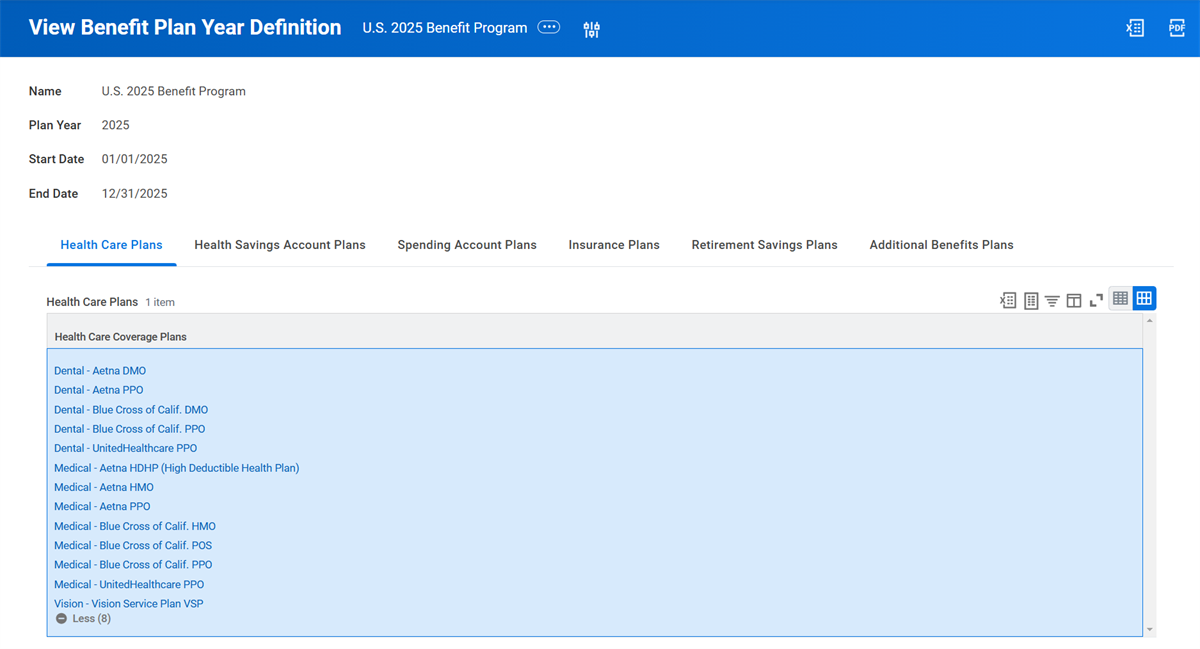
For mid-year plan changes, you can add the benefit plan to the existing plan year definition with the plan's effective date starting on or before the benefit plan year definition's starting date. However, you need to add an eligibility rule on the plan to ensure no one is eligible until the date the plan needs to become available for enrollment.
When a benefit plan is discontinued, do not only remove it from a plan year. If there are any retro events in which a worker should still be enrolled in the plan, the worker would be removed from that plan because Workday would not consider it an active plan. It is best to end the plan year with the discontinued plan and create a new plan year with all the active plans, excluding the discontinued plan.
Note
: It is possible to have more than one plan year definition during the same period, but they cannot share benefit plans. For example, all active plans for the plan year would be in one plan year definition, while retirement savings plans can be in another with an extended end date, such as 12/31/2050. Event Type
An enrollment event refers to any event that results in a change of eligibility or entitles an employee to change existing elections.
Enrollment events include open enrollment, benefit events, and passive events. Enrollment events can occur at any time during the year, based on the employee's situation. For example, if a dependent child is over a certain age, they may lose eligibility for benefits.
To determine what enrollment events to create, consider the following:
- What events occur in an employee's personal life that enables them to make benefit changes?
- What job-related changes will end benefit plan coverage?
- What job-related changes will start benefit plan coverage?
Use the
Create Benefit
or the Event Types
Maintain Enrollment Event Types
tasks to create new event types. When you create the event types, there are additional configuration options in the Enrollment Event Rules to complete.The following table defines the fields in the
Maintain Enrollment Event Types
task:Field | Description |
|---|---|
Enrollment Offering Type | Enter all the benefit coverage types that are in the enrollment event. Examples: Medical, Dental, and Group Term Life. |
Worker Selectable | Enable workers to initiate the benefit event using the Change Benefits task (Self-Service). If not selected, the Benefits Partner, Administrator, or other approved role must initiate the event on behalf of the employee. |
Event Date Field Label | Enter configurable text to display once the Change Benefits task initiates. If no text exists, Workday will display the Benefit Event Date by default. For example, for the Birth/Adoption of Child event you can configure the Benefit Event Date to display as the Child's Birth Date or Adoption Date. |
Route to Benefits Partner | This option functions as a flag that you can use to control routing in business process condition rule. Select if the employee should not enter their own election changes for an enrollment event and should route the elections to the Benefits Partner instead. For example, in a termination event, the benefits partner waives the employee's elections. Or, a passive event removes an overage dependent. |
Inactive | Select if you will no longer use this event type. |
Restricted to Countries | Define enrollment events for specific countries. The country field on the benefit group maps to this field. If the country is blank on the benefit group and there is a country restriction on the enrollment event type, that event will not be available to the employees of that benefit group. |
Reinstatement Event | Select if this event will reinstate terminated benefits. For example, select when an employee is returning from a leave of absence or is a rehire. |
Reinstatement Period Time Units | Use this field to define the period in which you can give the ability for workers to edit benefits during reinstatement. |
Unit of Time | Option to select days, months, or years. |
Days to Enroll
The three fields below define the number of days an employee has to enroll in benefits following an enrollment event. The system adds the number in this field to the event date to determine the last day of enrollment. If the Benefits Partner or Administrator has not manually finalized an event, the employee can continue entering benefit elections after the system-defined last day of enrollment.
Field | Description |
|---|---|
Days to Enroll Calculation | Specify the number of days to enroll. The days could be based on the initiation event date or based on the actual event date. |
Days to Enroll | Specify the number of days to enroll as of the event date or initiation date, depending on your configuration. This becomes the employee's "Submit Elections By" deadline. |
Employee Cannot Report After Days to Enroll | Select to control whether an employee can report an event when the days to enroll deadline has passed. |
Coordination of Events
Workday designed enrollment events to reprocess if events are entered out of order. This provides continuous coverage by ensuring elections entered in an earlier enrollment will roll over into the next enrollment event. There are instances when you want to control whether reprocessing will occur for certain events. There are three settings to provide control:
- Do Not Reprocess Future Events
- Do No Reprocess
- Days to Enroll
Do Not Reprocess Future Events
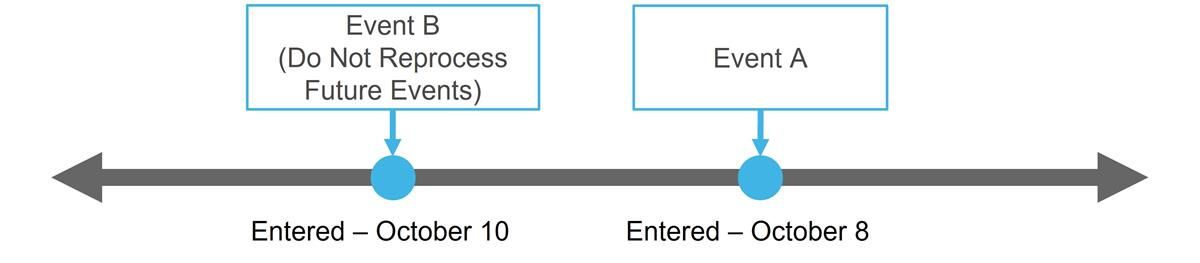
Select this Do Not Reprocess Future Events checkbox if you do not want future events reprocessed after this event type.
The diagram below illustrates the following example: Initiate Event A first. Then, when Event B initiates, both events will remain open. Event A will not reprocess since you selected the Do Not Reprocess checkbox. If Event B is created due to a change in the employee's benefit eligibility, Event A will be placed On Hold and will reprocess, ignoring the Do Not Reprocess settings.
Do Not Reprocess
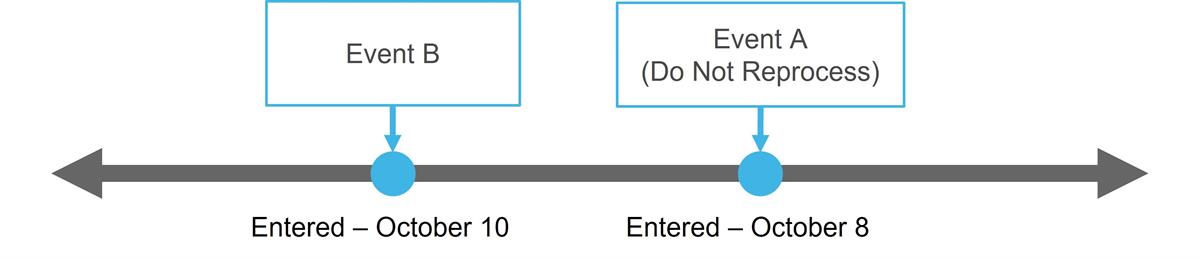
Select this Do Not Reprocess checkbox if you do not want to reprocess this event type.
The diagram below illustrates the following example: Initiate Event A first. Then, when Event B initiates, both events remain open since Event A will not reprocess.
Days to Enroll
Enter the number of days the worker has to complete their benefit enrollment, based on the date Workday triggered the reprocessed event.
Events and Reasons
Events and reasons offer essential capabilities that go beyond standard benefits business processes. While benefits business processes provide a structured framework for initiating and managing benefits, the events and reasons introduce an additional layer of flexibility and granularity.
Events and reasons allow for different benefit events to trigger from the same business process. This is particularly important in situations where a single business process can have multiple outcomes depending on the specific reason for the change.
Example: Return / Leave of Absence
Consider an employee going out on a leave of absence. The
Change Benefits for Life Event
business process can be setup to trigger as a subprocess of the Request Leave of Absense
business process. When initiating the transaction, there can be various reasons associated with it, each potentially leading to different benefit outcomes.- Parental Leave Reason: A parental leave might not require any benefit terminations or reinstatments.
- Extended Travel Reason: An extended leave of absence for personal travel might require the termination and subsequent reinstatment of all benefits.
The
Change Benefits for Life Event
business process is a subprocess to many other benefits and HR processes. If you modify any business process to include the Change Benefits for Life Event
business process, consider the following configuration options:- Use the Event field to map the enrollment event to the event category. This means that when processing the staffing event, Workday will also run the benefits eligibility check and trigger appropriately. This connection informs Workday which event to trigger for the change benefit elections step when it is part of a parent business process like Hire and Change Job. Workday will also run depending on the enrollment event rules and business process configurations.
- Use the Restricted by Reason field if you want the benefits eligibility check to run only when the completed business process includes the valid reason. If you leave the field blank, the benefits eligibility check will run every time the business process occurs.
- Configure a reinstatement event to include the appropriate event or event and reason combination. Hire Employee and Leave Return are common events linked to a reinstatement event.
In the context of HR processes, Human Resources will determine the reasons associated with staffing business processes, such as hire, job changes, or terminations. The reasons selected ensure that the appropriate benefit event and subsequent actions trigger for the worker impacted by the overall business process. Keep in mind that:
- Changes will mean updating your event types.
- Benefits will determine which reasons should have automatic benefit events created.
- Human Resources must use the reasons when entering hires and terminations, or enrollment events are not created.
Note
: The Reason field is not required by default when entering a new hire.When a business process has multiple potential reasons and can trigger different benefit event types, it is essential to map these elements correctly. This mapping ensures that the system accurately reflects the relationship between the business process, the reason for the change, and the resulting benefit event.
By understanding the relationship between events and reasons and Benefits business processes, you can leverage the full potential of these features to manage your organization's benefits effectively.
Enrollment Event Rule
When your organization hires an employee, when does their medical coverage begin? The first time an employee enrolls in life insurance, what level of coverage can they elect? Is there a waiting period before coverage begins for a new employee? Address these questions and others when setting up the enrollment event rules.
The enrollment event rule is divided into six separate tabs. Setup requires a thorough knowledge of the rules and regulations to control enrollment into your benefit plan offerings. There are many fields to populate for all enrollment event types.
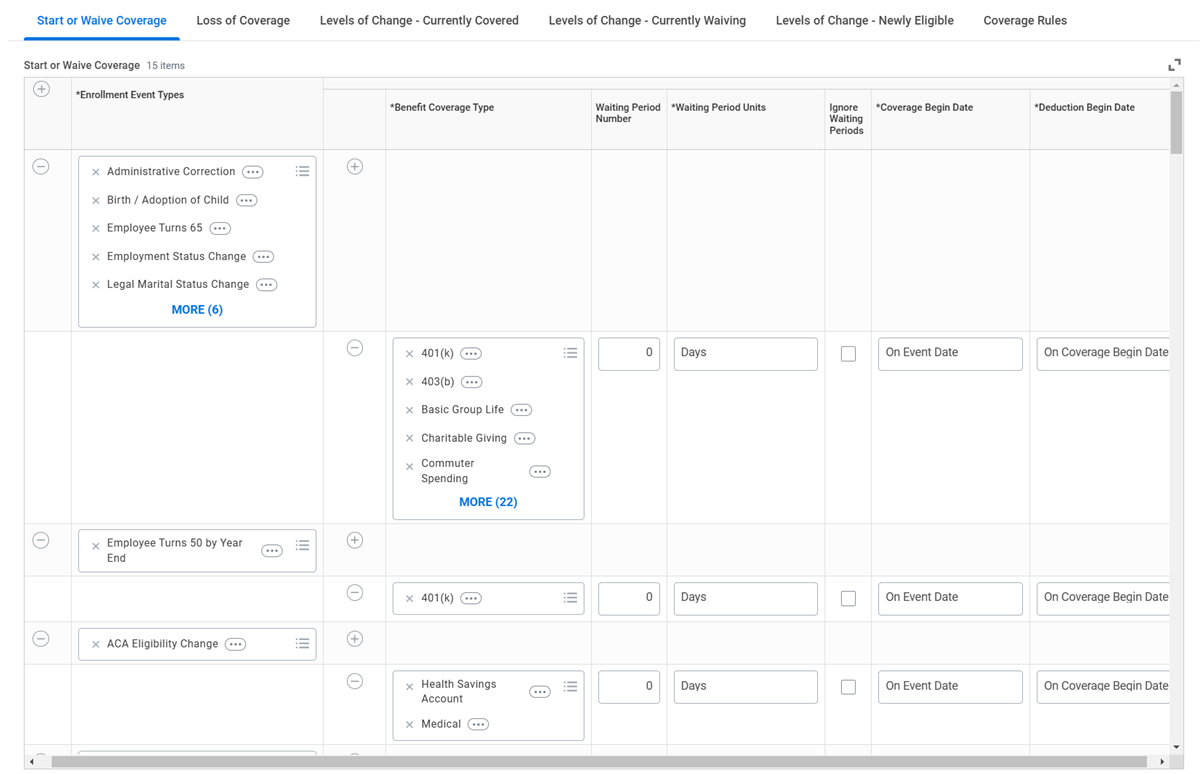
Start or Waive Coverage
When coverage, waive status, or deduction begins, use the Start or Waive tab to control the process:
Field | Description |
|---|---|
Waiting Period Number | Enter the appropriate number. A wait period delays the start or effective date of coverage. |
Waiting Period Units | Waiting periods can be in days, weeks, months, or years. This works in coordination with the Waiting Period Number field. |
Ignore Waiting Periods | If there is a waiting period applied to an employee, you can override it for a specific event type. Otherwise, Workday will always honor the wait period. |
Coverage Begin Date | Workday provides five common options:
|
Coverage Waive Date | Workday provides the following options:
|
Deduction Begin Date | Workday provides the following options:
There is no proration at this time. The deduction is either taken or not taken. Workday Benefits does not provide a prorated amount if taken. Payroll would need to manage any proration. |
You can use waiting periods and coverage begin dates together. The benefit group has a Waiting Period Calculation Order configuration option. The two options are to apply the waiting period and then the coverage begin, or apply the coverage begin and then the waiting period.
The table below provides an example of when coverage and deductions begin depending on various date configuraiton options. Consider the following information for this example:
- Today's Date / Event Date = 03/9/2026
- Current Pay Period = 03/1/2026 to 03/15/2026 (semi-monthly)
- Next Pay Period = 03/16/2026 to 03/31/2026
Start or Waive Coverage Example | ||||||
|---|---|---|---|---|---|---|
Coverage Begin Date | ||||||
First of Month Following Event Date | First of Month On or After Event Date | On Event Date | On Pay Period Begin
After Event Date | Pay Period Begin On or After Event Date | ||
Deduction Begin Date | First of the Month On or After Event Date | Coverage 04/01/2026 Deduction 04/01/2026 | Coverage 04/01/2026 Deduction 04/01/2026 | Coverage 03/09/2026 Deduction 04/01/2026 | Coverage 03/16/2026 Deduction 04/01/2026 | Coverage 03/16/2026 Deduction 04/01/2026 |
On Coverage Begin Date | Coverage and Deduction 04/01/2026 | Coverage and Deduction 04/01/2026 | Coverage and Deduction 03/09/2026 | Coverage and Deduction 03/16/2026 | Coverage and Deduction 03/16/2026 | |
On Event Date | Coverage 04/01/2026 Deduction 03/09/2026 | Coverage 04/01/2026 Deduction 03/16/2026 | Coverage 03/09/2026 Deduction 03/09/2026 | Coverage 03/16/2026 Deduction 03/09/2026 | Coverage 03/16/2026 Deduction 03/09/2026 | |
Pay Period Before Coverage Begin | Coverage 04/01/2026 Deduction 03/16/2026 | Coverage 04/01/2026 Deduction 03/16/2026 | Coverage 03/09/2026 Deduction 03/16/2026 | Coverage 03/16/2026 Deduction 03/01/2026 | Coverage 03/16/2026 Deduction 03/01/2026 | |
Pay Period Before Event | Coverage 04/01/2026 Deduction 03/01/2026 | Coverage 04/01/2026 Deduction 03/01/2026 | Coverage 03/09/2026 Deduction 03/01/2026 | Coverage 03/16/2026 Deduction 03/01/2026 | Coverage 03/16/2026 Deduction 03/01/2026 | |
Pay Period Containing Coverage Begin | Coverage 04/01/2026 Deduction 04/01/2026 | Coverage 04/01/2026 Deduction 04/01/2026 | Coverage 03/09/2026 Deduction 03/01/2026 | Coverage 03/16/2026 Deduction 03/16/2026 | Coverage 03/16/2026 Deduction 03/16/2026 | |
Pay Period Containing Event | Coverage 04/01/2026 Deduction 03/01/2026 | Coverage 04/01/2026 Deduction 03/01/2026 | Coverage 03/09/2026 Deduction 03/01/2026 | Coverage 03/16/2026 Deduction 03/01/2026 | Coverage 03/16/2026 Deduction 02/16/2026 | |
Pay Period Following Coverage Begin | Coverage 04/01/2026 Deduction 04/16/2026 | Coverage 04/01/2026 Deduction 04/16/2026 | Coverage 03/09/2026 Deduction 03/16/2026 | Coverage 03/16/2026 Deduction 03/16/2026 | Coverage 03/16/2026 Deduction 04/01/2026 | |
Pay Period Following Event | Coverage 04/01/2026 Deduction 03/16/2026 | Coverage 04/01/2026 Deduction 03/16/2026 | Coverage 03/09/2026 Deduction 03/16/2026 | Coverage 03/16/2026 Deduction 03/16/2026 | Coverage 03/16/2026 Deduction 03/16/2026 | |
Two Pay Periods Before Coverage Begin Date | Coverage 04/01/2026 Deduction 02/16/2026 | Coverage 04/01/2026 Deduction 02/16/2026 | Coverage 03/09/2026 Deduction 02/16/2026 | Coverage 03/16/2026 Deduction 02/16/2026 | Coverage 03/16/2026 Deduction 02/16/2026 | |
Loss of Coverage
This tab controls when coverage or a waive status ends and when deductions end due to losing eligibility to all plans in the benefit coverage type. This occurs due to termination or a change in employee status that impacts eligibility.
Field | Description |
|---|---|
Do Not Use Auto Enroll | This checkbox allows a worker to be waived from an auto-enroll plan even if the worker is still eligible. Do not use this checkbox. If you need to remove a worker from an auto-enroll plan, refine the plan eligibility rule so the worker is no longer eligible. The system will automatically remove ineligible workers from the plan during a benefit event. |
Coverage End Date | Workday provides five common coverage end options:
|
Deduction End Date | Workday provides the following options:
There is no proration at this time. The deduction is either taken or not taken. |
Grace Period Number | Enter the appropriate number to extend benefit coverage beyond the coverage end date. |
Grace Period Units | Grace periods can be in days, weeks, months, or years. Use for coordination with the Waiting Period Number field. |
You can use grace periods and coverage end dates together. Apply the coverage end date first, and then add the grace period to determine the last day of coverage.
The table below provides an example of when coverage and deductions end depending on various date configuraiton options. Consider the following information for this example:
- Today's Date / Event Date = 09/01/2026
- Current Pay Period = 08/16/2026 to 08/31/2026 (semi-monthly)
- Next Pay Period = 09/01/2026 to 09/15/2026
Loss of Coverage Example | ||||||
|---|---|---|---|---|---|---|
Coverage End Date | ||||||
Last Day of the Month | On Pay Period Begin
After Event Date | On the Event Date | On the Half Month | Pay Period End On or After Event Date | ||
Deduction End Date | End of the Month Containing Event Date | Coverage 09/30/2026 Deduction 09/30/2026 | Coverage 09/01/2026 Deduction 09/30/2026 | Coverage 09/01/2026 Deduction 09/30/2026 | Coverage 09/15/2026 Deduction 09/30/2026 | Coverage 08/31/2026 Deduction 09/31/2026 |
On Coverage End Date | Coverage 09/30/2026 Deduction 09/30/2026 | Coverage 09/01/2026 Deduction 09/01/2026 | Coverage 09/01/2026 Deduction 09/01/2026 | Coverage 09/15/2026 Deduction 09/15/2026 | Coverage 08/31/2026 Deduction 08/31/2026 | |
On Event Date | Coverage 09/30/2026 Deduction 09/01/2026 | Coverage 09/01/2026 Deduction 09/01/2026 | Coverage 09/01/2026 Deduction 09/01/2026 | Coverage 09/15/2026 Deduction 09/01/2026 | Coverage 08/31/2026 Deduction 09/01/2026 | |
Pay Period Before Coverage End | Coverage 09/30/2026 Deduction 08/31/2026 | Coverage 09/01/2026 Deduction 08/31/2026 | Coverage 09/01/2026 Deduction 08/31/2026 | Coverage 09/15/2026 Deduction 08/31/2026 | Coverage 08/31/2026 Deduction 08/15/2026 | |
Pay Period Before Event Date | Coverage 09/30/2026 Deduction 08/31/2026 | Coverage 09/01/2026 Deduction 08/31/2026 | Coverage 09/01/2026 Deduction 08/31/2026 | Coverage 09/15/2026 Deduction 08/31/2026 | Coverage 08/31/2026 Deduction 08/31/2026 | |
Pay Period Containing Coverage End | Coverage 09/30/2026 Deduction 09/15/2026 | Coverage 09/01/2026 Deduction 09/15/2026 | Coverage 09/01/2026 Deduction 08/31/2026 | Coverage 09/15/2026 Deduction 09/15/2026 | Coverage 08/31/2026 Deduction 08/31/2026 | |
Pay Period Containing Event | Coverage 09/30/2026 Deduction 09/15/2026 | Coverage 09/01/2026 Deduction 09/15/2026 | Coverage 09/01/2026 Deduction 09/15/2026 | Coverage 09/15/2026 Deduction 09/15/2026 | Coverage 08/31/2026 Deduction 09/15/2026 | |
Pay Period Following Coverage End | Coverage 09/30/2026 Deduction 09/30/2026 | Coverage 09/01/2026 Deduction 09/30/2026 | Coverage 09/01/2026 Deduction 09/30/2026 | Coverage 09/15/2026 Deduction 08/31/2026 | Coverage 08/31/2026 Deduction 09/15/2026 | |
Pay Period Following Event | Coverage 09/30/2026 Deduction 09/30/2026 | Coverage 09/01/2026 Deduction 09/15/2026 | Coverage 09/01/2026 Deduction 09/15/2026 | Coverage 09/15/2026 Deduction 09/15/2026 | Coverage 08/31/2026 Deduction 09/15/2026 | |
In addition to the grace period, there is a task that enables you to extend benefits for individual employees beyond the last day of coverage. To access the
Extend Benefits Coverage
task, use the Related Actions from the worker's benefit event in which they lost coverage.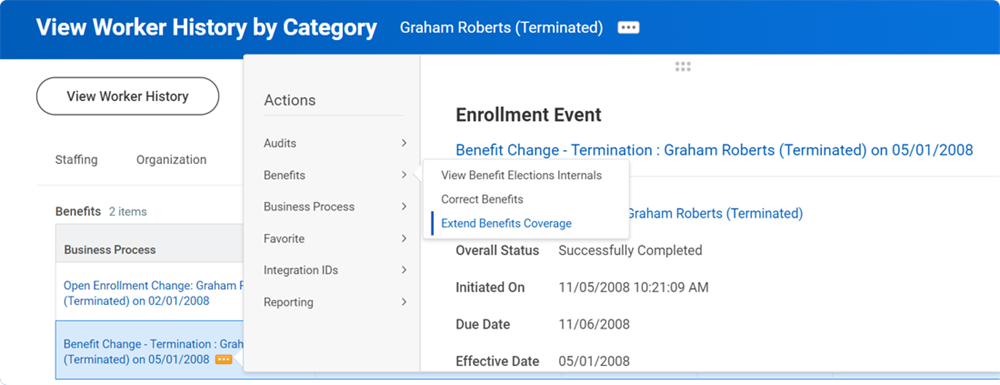
Levels of Change – Currently Covered, Currently Waiving, and Newly Eligible
Workday allows you to limit insurance coverage enrollments and coverage level increases during an enrollment event. Set limitations by specifying maximum amounts and levels of change for an enrollment event, as well as using guaranteed issue amounts.
There are three tabs to support levels of change. Keep in mind the rules can differ depending on if an employee is:
- Newly eligible to elect coverage.
- Previously eligible but currently waived.
- Currently covered and wants to change their coverage level.
A level is defined based on your insurance plan setup, with the smallest increment equal to level one.
The table below includes a list of the available fields for employees currently enrolled in coverage. None of these configuration options are required.
Field | Description |
|---|---|
Maximum Levels of Change Allowed Maximum Level Allowed | Specify the maximum number of levels that workers can increase their insurance coverage. If they elect over the guaranteed issue amount, they will need to provide evidence of insurability (EOI). |
Maximum Amount of Change Allowed Maximum Amount Allowed | Instead of a level of change, you can specify a maximum amount of change. If they elect over the guaranteed issue amount, they will need to provide EOI. |
Include All Benefit Plans in Coverage Type for EOI | This check box enables Workday to recognize coverage levels when workers move across plans within a coverage type. It does not combine coverage amounts from multiple plans to determine guaranteed issue amounts or assess the need for EOI. |
Maximum Levels of Change Allowed without EOI Guaranteed Levels Without EOI | Specify the maximum number of levels that employees can increase their coverage without requiring EOI. This is referred to as the guaranteed issue amount. |
Maximum Amount of Change Allowed without EOI | Instead of a level of change, you can specify a maximum amount of change. This is referred to as the guaranteed issue amount. |
Guaranteed Issue Amount | Set an amount that does not change. Unlike the Maximum Levels or Amount of Change fields, this field does not consider your current level coverage. |
Guaranteed Issue Multiplier | Use a multiplier to establish a guaranteed issue amount for an employee's enrollment. This calculation does not consider your current coverage level. The Salary Source field on the Insurance Coverage defines the salary. |
Set Guaranteed Issue Rule | This defines how the guaranteed issue amount or multiplier applies when the value does not match the defined coverage levels. You can select:
|
Default Coverage if Pending EOI | There are three options for what coverage the employee will receive while an EOI request is pending:
|
Note
: You can indicate a coverage level, coverage amount, or salary multiplier without requiring EOI. With this configuration, the system applies the most restrictive of the limits.Coverage Rules
The Coverage Rules tab controls what election changes are available to the employee. You can restrict the benefit plan and coverage target changes made during an enrollment event, and set defaulting rules. Review the fields on this tab:
Field | Description |
|---|---|
Allowed Benefit Plan Changes | What types of changes can occur for a specified event type?
|
Allowed Dependent Changes | This controls the employee's ability to change covered dependents. It is not a required field. The options apply to insurance and healthcare plans.
|
Dependent Types | If the value of Allowed Dependent Changes is Additional Dependents Allowed or May Remove Dependents, this becomes a required field. Specify the type of dependent to add or remove. |
Defaulting Rules | Automatically apply these rules when the Benefits Partner or Administrator finalizes a benefit event due to the employee not submitting their elections:
|
Benefit Defaults
The Benefit Default component works as an extension of the Enrollment Event Rule. Once you determine if an event type will use defaulting, you need to specify what that default should be. Each health care, insurance plan, additional benefits, and retirement savings plan can have defaults with a default priority.
The default priority allows you to identify a plan and a coverage target as the default. Additionally, choose an additional plan, or plans, for employees who are not eligible for the first priority default. Use
Maintain Benefit Defaults
report for Health Care, Insurance, Additional Benefits, and Retirement Savings.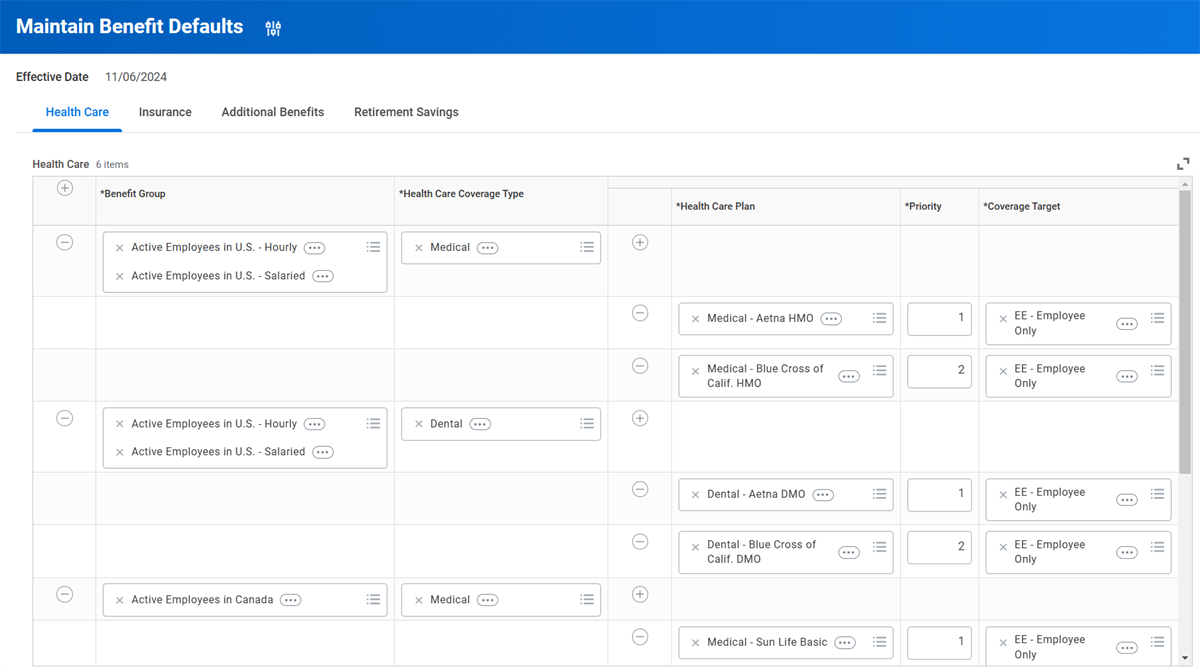
On the Retirement Savings tab, there is a unique option available for defaulting. By entering a percent or amount as an employee contribution, the system defaults to the value into the election page. If the employee chooses an amount over or under the employee contribution default, the system will use that amount.