
Benefit Plans
Overview
Once you set up the foundation components, you are ready to create and edit benefit plans that might be required from year to year. We will review six basic types of benefit plans in this chapter: Health Care Coverage Plans, such as medical and dental; Health Saving Account Plans; Insurance Plans; Spending Accounts Plans; Retirement Savings Plans; and Additional Benefit Plans.
Whether you need to create a supplemental insurance plan or track enrollment in a commuter checks plan, you can build the plans you need in Workday.
Objectives
By the end of this chapter, you will be able to:
- Describe health care plans, such as medical and dental.
- Configure contribution plans, such as HSA, FSA, and Retirement Savings.
- Create insurance plans, coverage, and rates.
- Configure unique benefit plans that do not fall into standard benefit types.
Benefit Plans
All plans share the following fields and attributes:
Label | Values | Description |
|---|---|---|
Benefit Provider | Aetna, Liberty Mutual, self-insured | Select the provider for the benefit plan. |
Benefit Plan Type | Health Care, Insurance, Retirement Savings | The first step when creating a benefit plan is to select one of the six delivered benefit plan types. |
Coverage Type | Medical, Dental, Supplemental Life, 401(k) | Select the coverage type as the category that benefit plans can fit into. For example, a Healthcare Benefit Plan Type includes Medical, Dental, or Vision coverage types. Whereas the Retirement Benefit Plan Type includes 401(k) or 403(b) coverage types. This selection controls the classifications, display order, displaying costs, if you must elect coverage, etc. |
Benefit Plan Name
(Optional) | Mid-Atlantic Coverage | Workday will auto-create the Benefit Plan Name using the provider, coverage type, and classification for healthcare and target for insurance plans. This field is for additional information to identify the plan for employees. |
Description
(Optional) | Text | Internal description for administrators. |
External Plan Description | URL | This provides an enrollment page link to an external plan description. |
Group Policy Number | Alpha-numeric | Group policy number from benefit provider. |
Participating Benefit Group (Required) | Active U.S. Salaried Employees | Identifies which benefit group or groups are eligible for the plan. |
Worker Plan Eligibility (Optional) | Full-time | If not all workers in the participating benefit groups are eligible for this plan, then select an eligibility rule to limit coverage to a subset. Example : You want to limit coverage within the Hourly Employees benefit group to workers in the state of California. To do so, select an eligibility rule that includes only California workers. |
Earnings and Deductions | Medical - Aetna EE (Pre-Tax) | Select the deductions used to calculate employee pre- and post-tax costs. Also, select deductions to calculate employer costs that are not taxable to the employee. Additionally, select earnings to calculate the employer costs that are taxable to the employee (imputed income). |
Health Care Setup
There are three steps for creating a benefit plan:
- Select existing benefits components, such as providers and coverage types.
- Complete all common configuration options for the plan.
- Configure and select all components unique to the benefit plan type.
When creating a benefit plan, you will select an Effective as of Date, Provider, Benefit Plan Type, and Rate Type. Additionally, you will select a Coverage Type, enter a Benefit Plan Name, and select Benefit Groups, Worker Plan and Dependent Eligibility, and Targets. Finally, you will select Classifications, choose if you require a Provider ID, and enter Derived Coverage Targets, Individual Rates, and Employee and Employer Costs.
Healthcare benefit plans have unique configurable options to choose for an integrated flat rate structure and a calculated rate. This plan type includes the ability to specify a healthcare classification, require a primary care physician identification number, and include dependent eligibility rules.
Label | Values | Description |
|---|---|---|
Flat or Calculated Rate | Pull-down menu | If you enter Flat Rate, you will need to enter rate information directly into the benefit plan page. Create the calculated rate separately using the Create Health Care Rate task. Once you select a flat or calculated rate type, this attribute on the plan is no longer editable, regardless of if the plan is in use or not.Additionally, for the Calculated Rate option to display as a choice, there has to be at least one calculated health care rate configured in the system. |
Dependent Plan Eligibility (Optional) | Eligibility Rule | This applies eligibility rules to dependents, both child and adult dependents. Example: Limit coverage to dependents under the age of 26. |
Overage Dependent Eligibility (Optional) | Eligibility Rule | Use with the Fair Market Value per Dependent field. This option allows you to set up the imputed income amount for dependents who are over coverage age in certain states but still qualify for coverage at a federal level. |
Requires Provider ID | Checkbox | Select if you require an employee to enter a primary care physician's provider ID as part of the enrollment process. |
Auto Enroll | Checkbox | Select to have eligible employees automatically enrolled in the benefit plan. On the enrollment pages, this election will default to Elect and will be View only. You cannot change the enrollment. |
High-Deductible Health Plan | Checkbox | Select if the plan is a high deductible health plan with the option of enrolling in a Health Savings Plan. |
Derive Coverage Targets | Checkbox | Select if you wish to use derived coverage targets. Combining plans with and without derived targets in the same enrollment is possible, but it is not a recommended approach. |
Use Individual Rate | Checkbox | Select if employee or employer costs are fixed using the Manage Individual Rates task. This option is not available with the calculated rate health care plan and allows you to manually override rates on a worker level. |
Reset Individual Rates on Plan Year Begin | Checkbox | Select if you enter new individual rates each year. |
Configuration Options for the U.S. Affordable Care Act
Workday uses the following values when populating the U.S. Affordable Care Act (ACA) 1094-C and 1095-C forms.
Label | Values | Description |
|---|---|---|
ACA Plan Funding Method | Pull-down | This pull-down determines whether the plan is Self-Insured or Fully Funded. |
ACA Minimum Value Coverage (MVC) | Checkbox | This checkbox indicates whether minimum value coverage is offered as part of this plan. Currently, the IRS defines MVC as the employer covering at least 60% of the allowed costs. You will want to review the IRS website to determine your configuration. |
ACA Minimum Essential Coverage | Checkbox | Indicates if the plan meets the requirements and provides ACA Minimum Essential Coverage for the Employee, Spouse, and/or Dependents. |
Resource
: Explore the Workday Community Administrator Guide for additional information on the U.S. Affordable Care Act (ACA). Use the following for search reference:- ACA Checklist
- Measurement Period and Reporting Configuration
- IRS and Mailing Connector Configuration
Dependent Plan Eligibility
Dependent plan eligibility rules can apply for both dependent children and a spouse. The dependent relationship determines the fields available. These include values such as age, full-time student, relationship, and Workday ID.
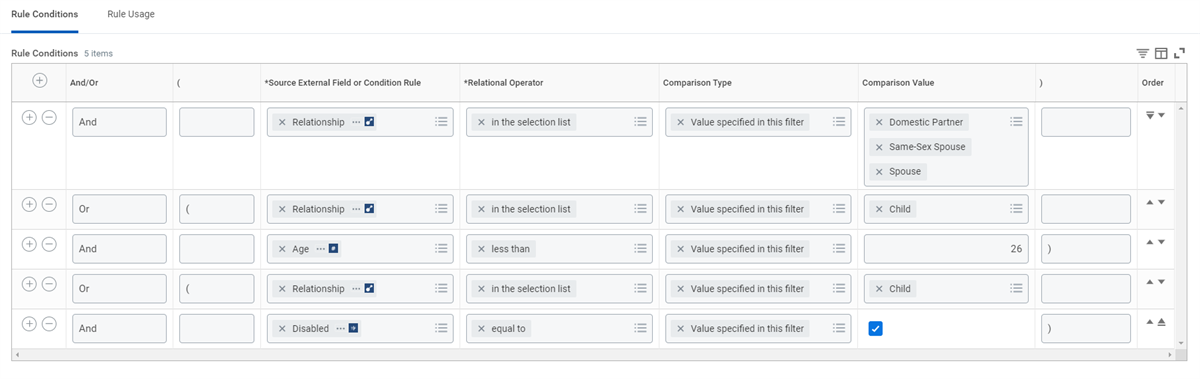
Based on healthcare and insurance offerings, you may need to create one or more eligibility rules. Configuration could be one rule that states that all dependent children less than a specific age are eligible. Alternatively, you may require a rule for each individual plan type. In these examples, the system would be using AND logic to create eligibility for a dependent who was a child AND under 26 years of age.
Dependent plan eligibility rules allow for complex AND as well as OR logic. A perfect example of this logic would be a medical plan that offers coverage to dependents that are a:
- Spouse OR domestic partner, OR child less than 26 years old, OR a child who has a disability.
- Relationship of spouse OR domestic partner.
- Relationship of child AND has a disability.
- Relationship of child AND age less than 26.
The following image is an example of how this eligibility rule would appear in the system.
Spousal Surcharge
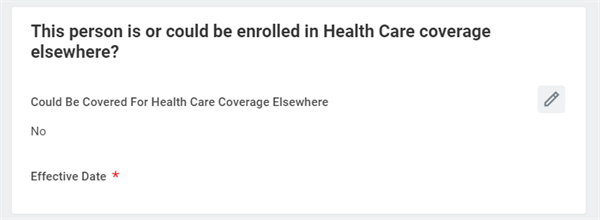
A spousal surcharge allows employees to cover their spouse for healthcare and gives their spouse the option to enroll in their own coverage. Due to this double coverage option, if the spouse enrolls, there would be an additional charge, or surcharge, on top of any coverage target that includes the spouse. Currently, the spousal surcharge is only available as a flat rate value.
Part of the dependent's personal information is a checkbox that indicates whether the dependent has healthcare coverage through another source. Add a surcharge by enabling and entering a date. Then, Workday adds the surcharge to the employee's healthcare cost.
Health Care Rates
When you create health care plans, you can define flat or calculated rates. Flat rates are in the structure of the benefit plan setup, while you create calculated rates separately and link them to the benefit plan. When creating health care rates, identify which health care coverage targets to include.
You can define the following types of rates:
- Rates based on Flat Amountinclude the ability to add demographic factors, such as employee's age, tobacco use, length of service, and salary to vary the rate.
- Rates based on Percent of Salaryare used with demographic factors and include the option of defining a minimum and maximum cost and rounding rules.
- Rates based on a Percent of Salary with Flat Amounthave all the same options of Percent of Salary with the addition of an added flat amount.
Example
: For some Hawaii health care coverages, the rate is based on a percentage of salary for employee only coverage. All other targets use a flat amount or percent of salary with a flat amount.Within each of these rates, there are several rate bands for demographic factors, such as age, salary, or length of service, as well as tobacco use.
Configuration options for the demographics include:
- Use employee or dependent age: If you use age to calculate the rate for Spouse Life, is the rate based on the age of the employee or the age of the spouse?
- Use Age as of: Defines the age as of a certain point in time.
- Beginning of Plan Year
- Coverage Begin
- Coverage Begin or Plan Year Begin - Used for new hire or newly enrolled.
- Coverage Begin or Specific Date - Used for new hire or newly enrolled.
- Event Date
- Specific Date
- Salary: (Definition of Salary)
- Salary Source: Sets the compensation components that define a salary.
- Total Base Salary
- Benefits Annualized Rate or Total Base Salary
- Benefits Annualized Rate or Compensation Elements
- Compensation Elements
- Calculate as of: Defines the salary as of a certain point in time.
- Beginning of Plan Year
- Coverage Begin
- Coverage Begin or Plan Year Begin - Used for new hire or newly enrolled.
- Coverage Begin or Specific Date - Used for new hire or newly enrolled.
- Event Date
- Specific Date
- Length of Service in Months: (Definition of Service)
Note
: Workday recommends creating a healthcare calculated rate over flat rates. This allows customers the flexibility to use a calculated rate in the future without requiring a new plan. Additionally, you can use an EIB to load healthcare calculated rates.Heath Care Rate Enrollment Codes
You can tie enrollment codes to a unique combination of health care benefit plans, premiums, and coverage targets. This feature helps facilitate mapping vendor codes to health care elections.
Use the
Create Heath Care Rate
or Edit Health Care Rate
tasks to map enrollment codes on the Rate Bands tab for each coverage target. Enrollment Codes are only available on the Health Care Rate object. You cannot assign them to plan rates that you configure directly on a health care plan.Individual Rates
Some organizations and countries track rates specific to each individual employee. Rates for healthcare or insurance coverage are not always a configurable calculation. When using individual rates, you can enter and override a default rate after enrollment. Additionally, you can leave the rate and manually enter it later using the
Manage Individual Rates
task. The Manage Individual Rates
task also allows you to select workers to send email notifications.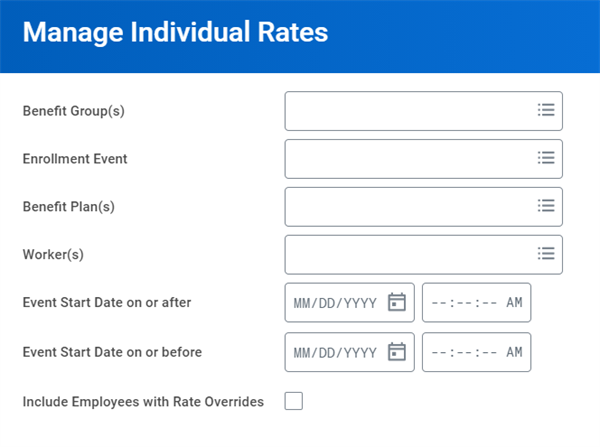
There are several available filters to pull a segment of the workers enrolled in benefit plans with individual rates turned on. If no benefit plans exist, or no workers have elected individual rate plans, then no results will appear.
Use the
Create Benefit Plan
task to set up a benefit plan. There are two checkboxes on this task:Label | Description |
|---|---|
Use Individual Rate | Select to use individual rates. Once in use, you cannot disable individual rates on the benefit plan. |
Reset Individual Rates on Plan Year Begin | Select if a worker needs to have the individual rate determined each year. When they re-enroll, the system will set the rate back to zero. The Manage Individual Rate task can repopulate the rate amount. |
Health Savings Account Setup
A health savings account (HSA) is a specific benefit plan that allows you to save for medical expenses and reduce taxable income.
An HSA allows employees with a high-deductible health plan (HDHP) to set aside money for qualified medical expenses. A few examples include annual physical examinations, medical supplies, chiropractor treatments, medicine, breast reconstruction surgery, and dental treatments. Typically, the employee receives a debit card to their account to pay for qualifying expenses.
Health savings accounts are only available to employees who have a high-deductible health plan (HDHP). An employee is not eligible for an HSA if they are eligible for Medicare or claimed as a dependent on another person's tax return.
Every year, the government determines the maximum amount an individual can contribute to an HSA. For example, the 2026 annual HSA contribution limit is $4,400 for individuals with single HDHP coverage, and $8,750 for individuals with family HDHP coverage.
One benefit of an HSA is that the contributed funds roll over year after year and earn interest. There are no time limits to use the money in the account. The account belongs to the individual rather than an employer, so the individual gets to decide what happens to the unused funds. In case an employee leaves their job, any funds in the HSA are theirs to keep and can roll over into another HSA with the new employer.
Setting up a health savings account has only a few steps:
- First, you will select an Effective as of Date, Provider, and a Benefit Plan Type.
- Then, you will select a Coverage Type, enter a Benefit Plan Name, and select Benefit Groups, and Worker Plan Eligibility.
- Finally, you will enter HSA Coverage Targets, Maximum and Minimum Contributions, and Employer Contribution Costs.
The following table contains the fields in a health savings account benefit plan type:
Label | Description |
|---|---|
Do Not Calculate Remaining Pay Periods | Select this checkbox if you want the employee or administrator to enter the number of remaining pay periods during enrollment. Leave this checkbox clear if you want to use the payroll period schedule to calculate the remaining pay periods during enrollment. |
Maximum Contribution | Specify the maximum contribution amount. This applies to the sum of the employee and any employer contributions. |
Minimum Contribution | Specify a minimum employee contribution amount. |
Employer Contribution | Specify an employer contribution amount. |
Frequency | Set the frequency in which you are inputting the employee contribution maximum and minimum and employer contribution. For example, if the maximum yearly pledge for an employee is $3000, set the frequency to annual and the contribution maximum to $3000. |
Touchpoint
: You must have Payroll Period Schedules configured before testing HSA and FSA enrollment elections.Additional HSA Coverage Target
Federal regulation specifies a contribution maximum for two targets:
- Employee coverage
- Family coverage
If an employer chooses to include an employer contribution, they may need more than these two levels of contribution. For example, they may include an "Other" option in the HSA Coverage Targets list.
Reminder
: In the Edit Tenant Setup - HCM task, under the Benefits section, you can select the Include an additional HSA Coverage Target Option checkbox. This will enable you to access an additional HSA Coverage Target of "Other," which identifies a third level of employer contribution.Spending Account Setup
A healthcare flexible spending account (FSA) is a way to save for medical expenses and reduce taxable income in the U.S.. Money in an FSA comes from the employee's paycheck before taxes.
FSA accounts are prefunded. The full contribution amount selected during open enrollment is available to spend at the beginning of the year before it is fully paid.
Medical expenses employees can use a health care FSA for are the same as an HSA. However, unlike an HSA, an employee can enroll in an FSA without a health care plan. Additionally, an employee cannot carry over FSA funds from year to year. The rule for the FSA is use it or lose it. Employees lose any amount they have not spent at the end of the year, unless the employer has a carry over or a grace period option.
Upon leaving the company, the employee loses the FSA contributions, unless they qualify for continuation through COBRA.
Note
: In most cases, you cannot have an FSA and an HSA plan since both accounts cover the same health expenses. The only way to have both is to have an HSA and a limited-purpose FSA, which you can only use for vision and dental expenses.When creating a spending account in Workday, you will select an Effective as of Date, a Provider, and a Benefit Plan Type. Additionally, you will select a Coverage Type, enter a Benefit Plan Name, and select Benefit Groups and Worker Plan Eligibility. Finally, you can select the Do Not Calculate Remaining Pay Periods checkbox, enter Maximum and Minimum Contributions, and Employer Contribution Costs. After this step is complete, the remaining configuration is relatively straightforward.
Complete additional fields that are unique to setting up a spending account plan. Below is a description of the available fields:
Label | Description |
|---|---|
Do Not Calculate Remaining Pay Periods | Select this checkbox if you want to manually enter the number of remaining pay periods during enrollment. If the event processed is an open enrollment, the system will refer to the Benefit Group frequency to populate the number of pay periods. For all other events, the Number of Pay Periods Remaining field will be blank. Leave this checkbox clear if you want to use the payroll period schedule to calculate the remaining pay periods during enrollment. The employees Pay Group frequency determines the period schedule. |
Maximum Contribution | This field limits the employee contribution amount to a maximum amount. |
Minimum Contribution | This field limits the contribution to a minimum amount. This amount only applies to the employee contribution and does not include any employer contribution amount. An employee can elect coverage with a zero contribution amount by leaving the field blank. |
Employer Contribution | The employer contribution amount uses the currency and frequency to determine the contribution. |
Frequency and Currency | This field is used by the employee contribution field and is also related to the contribution maximum. It specifies what frequency the maximum applies to. For example, enter a contribution maximum as a monthly max or an annual max. The contribution maximum applies to the sum of the employee contribution only. |
Retirement Savings Setup
Retirement savings plans are also considered defined contribution plans. These plans allow employees to set aside a portion of their pre- or after-tax salary in an account to save or invest. When setting up a retirement savings plan, the first step is the same as most other types of benefits. It requires a provider, coverage type, and participating benefit groups. After you complete this step, the remaining configurations are relatively intuitive. Based on your unique business requirements, you can configure the Auto Enroll option and enter employee and employer minimum and maximum percents and amounts.
You will populate additional fields that are unique to setting up a retirement savings plan. These fields include currency and frequency fields, as well as the Employee and Employer Contribution section. There is no employer match within the setup of the retirement savings benefit plan. However, you can create an employer match within the Workday Payroll deduction associated with the plan. A deduction calculation will determine the employer's match amount.
Below is a description of these fields:
Field | Description |
|---|---|
Currency | The currency of the employee contribution. This only applies to flat amount contribution limits. |
Frequency | The frequency in which you set minimum or maximum limits. |
Employee Contribution | Employees can enter their contributions as a maximum percentage, maximum amount, or both. In addition, you can set a minimum percentage or amount. If your benefit plan allows employee contributions to be a percentage or a flat amount, you must enter a contribution percentage maximum and a contribution amount maximum. The employee will have the option to enter either a percentage or a flat amount during enrollment. The same rule applies to the minimum as the maximum. Enter an amount as well as a percentage minimum. Depending on the employee contribution type selected, Workday will use the appropriate minimum. It is also possible to not enter an employee contribution and have only an employer contribution. |
Employer Contribution | In addition to the employee contribution, you can create an employer contribution as either a percentage of an employee's salary or as a flat amount. The employer contribution can be passed to a payroll interface for integration with third-party payroll systems, as well as Workday Payroll. |
Employer Match | There is no employer match within the setup of the retirement savings benefit plan. However, you can create an employer match within the Workday Payroll deduction associated with the plan. Note : A deduction can be set up to use the employee's deduction calculation to determine the employer's match amount. This is not available for payroll interface. |
In the Employee Contribution section of a Retirement Savings Plan, you can enable workers to automatically increase retirement savings contributions. Select the Auto Contribution Increase checkbox to enable employees to opt in or out of automatic retirement savings plan contribution increases during an enrollment event. Also consider the following options when you configure retirement savings plans:
Field | Description |
|---|---|
Auto Contribution Percentage | Use this field to specify the default contribution percentage amount of the worker's initial enrollment. This can be a value between 3% - 10%. The field is only available when you enable the Auto Contribution Increase checkbox. |
Yearly Auto Contribution Increase Percentage | In addition to the default contribution percentage, use this field to specify how much the percentage will increase each year. |
Auto Increase Percentage Maximum | Use this field to specific the maximum percentage at which the yearly increase stops. |
Employee and Employer Allocation Across Multiple Providers
Retirement savings plans may need to allow an employee to allocate contributions to more than one plan of the same coverage type. These plans can also control the employer contributions. When you configure
Maintain Retirement Savings Allocation Across Multiple Providers
, the Employee Contribution, or Employer Contribution section. The system enables the allocation and triggers the use of a section on the retirement savings enrollment form during an enrollment event. Configure the Maintain Retirement Savings Allocation Across Multiple Providers
task to enable allocations during an enrollment event.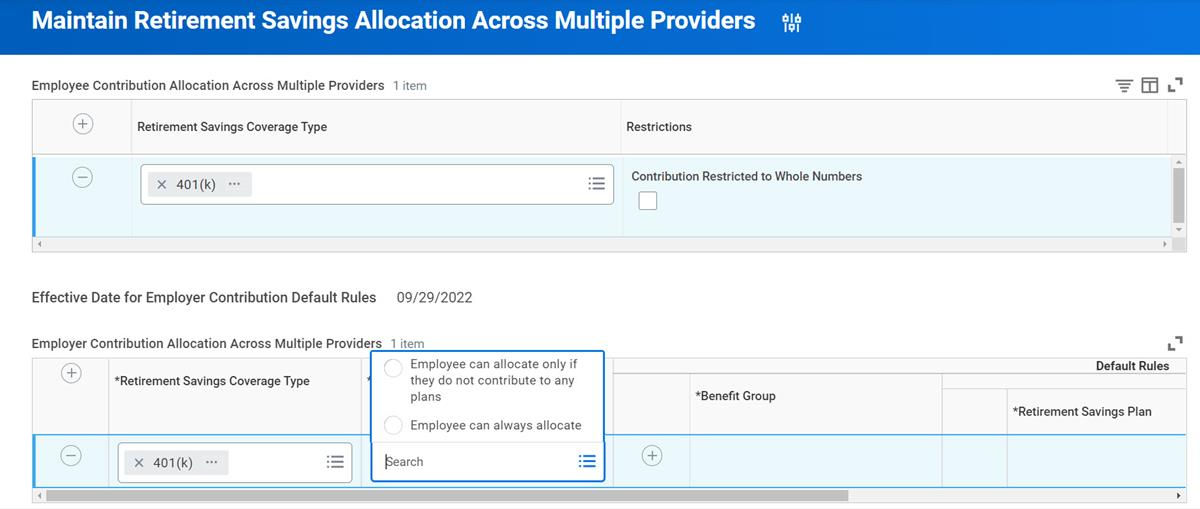
The
Maintain Retirement Savings Allocation Across Multiple Providers
provides the following fields:Field | Description |
|---|---|
Contribution Restricted to Whole Numbers | Select to restrict an employee's contribution as whole numbers, not allowing decimals. |
Employer Contribution Allocation Rules | There are two options:
|
Priority | Define the default order of the employee's benefit plan on the enrollment form. The lower the number is, the higher the priority. |
Employer Contribution Percent | Enter an employer contribution if allocation percentages for a plan automatically populate in the Employer Contribution Allocation field on the Enrollment form. |
Note
: A deduction calculation can determine the employer's match amount. This is not available for Payroll Interface.Insurance Setup
Insurance benefit plans have many configuration options defining levels of coverage and rates. The related rate values must exist before creating the insurance plan.
To create an Insurance plan, select a Provider, Benefit Plan Type, and Coverage Type. As part of this configuration, you will populate unique fields such as including the Employee Cost is Pre-Tax and Employer Cost is Non-taxable checkboxes, Insurance Coverage Level, Insurance Coverage, and Benefit Rate fields.
Insurance Coverage Level
You can create three types of coverage levels:
- Multiplier-Based Coverage Levels
- Percent-Based Coverage Levels
- Amount-Based Coverage Levels
When you create coverage levels, you build a primary list of levels for multiple insurance plans.
The first type of coverage level is Multiplier-Based Coverage Levels, which is a multiple of the employee's salary. When configuring the insurance coverage for a plan, you will define the salary and calculations. The screenshot below displays an example of a multiplier based coverage level ranging between 1x and 5x an employee's salary.
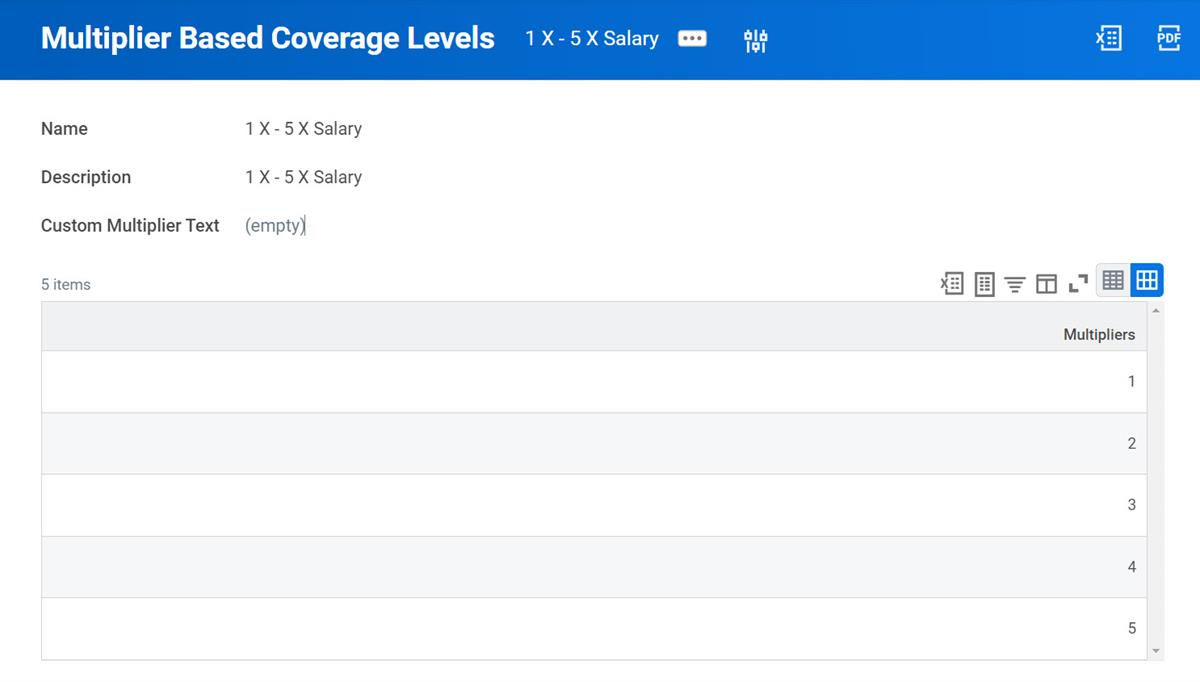
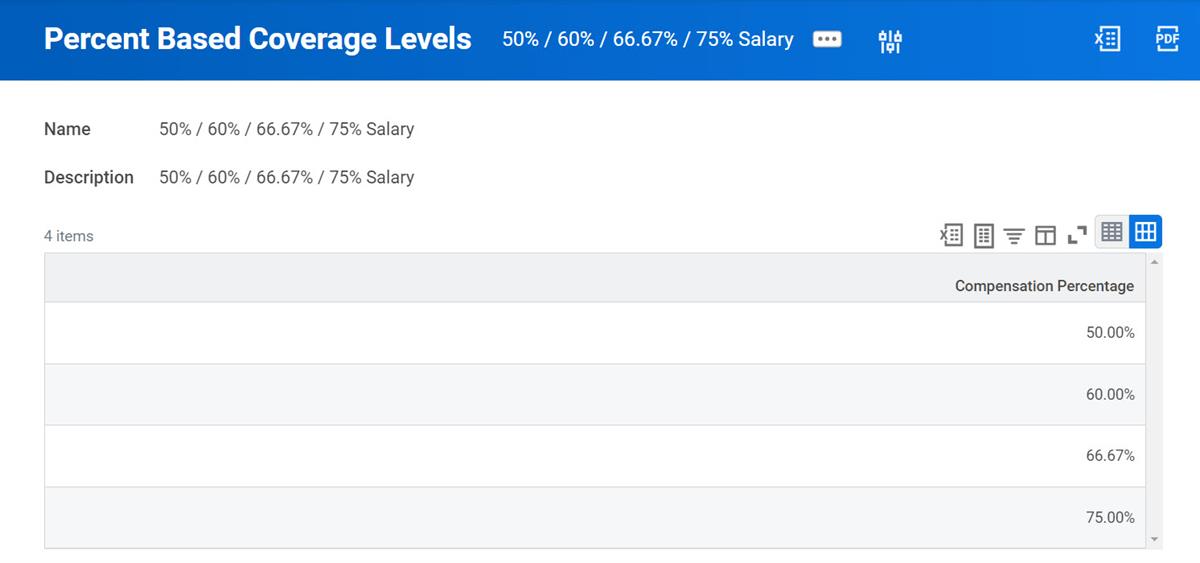
The second is Percent-Based Coverage Levels, which specify a percent of the employee's salary. The screenshot below displays an example of a percent based coverage level ranging between 50 percent to 75 percent.
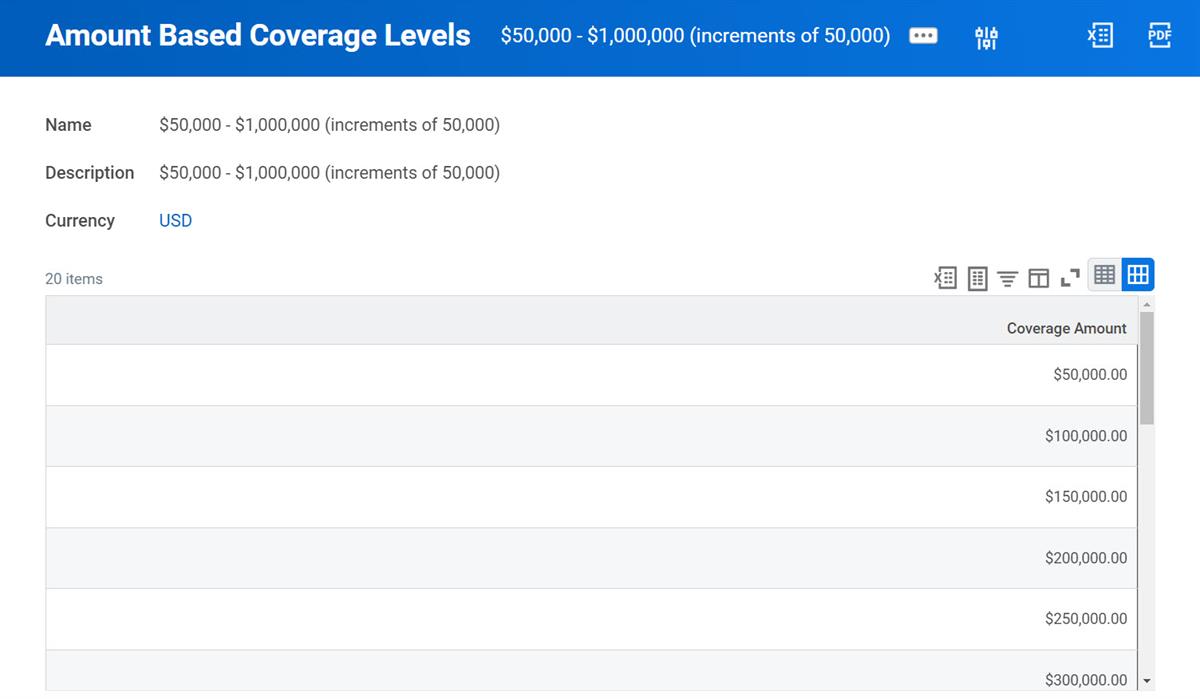
The last option is Amount-Based Coverage Levels, which could be one or more flat amounts of coverage. All three types of coverage levels are in one or more insurance plans. Once you associate the coverage levels with an insurance plan, you select which levels you want to include in that plan.
For example, if a supplemental life insurance plan offers coverage levels of $100,000 to $500,000 in increments of $100,000, you could use the following coverage levels and select only the five levels for the plan: $100,000, $200,000, $300,000, $400,000, and $500,000.
The screenshot below displays an example of an amount based coverage level ranging between 50,000 to 1,000,000 USD in increments of 50,000.
Note
: Coverage Level is a required field when you create insurance coverage.Insurance Coverage
Insurance coverage types provide details for calculating insurance coverage. In Workday, you use the different levels of coverage to inform the system how to calculate the amount of a worker's insurance coverage. The coverage options are listed in the table below.
Insurance Coverage Type | Description |
|---|---|
Increment of Currency Coverage | Defines coverage options based on increments of amounts. For example, $50,000, $100,000, $150,000 uses increments of $50,000. |
Multiples of Dependent Coverage | Define coverage options based on multiples of dependent coverage. For example, if a worker selects 2x coverage for themselves, then the 2x applies for their spouse and each dependent child. |
Multiples of Salary Coverage | Define coverage options based on multiples of salary. For example, 1x, 2x, 3x, and 4x an employee's salary. Additionally, when configuring the insurance coverage for a plan, you will specify how to define and calculate the salary. |
Percent of Salary Coverage | Define coverage options based on a percentage of salary. For example, 60% of salary, 70% of salary, and so on. Additionally, when configuring the insurance coverage for a plan, you will specify how to define and calculate the salary. |
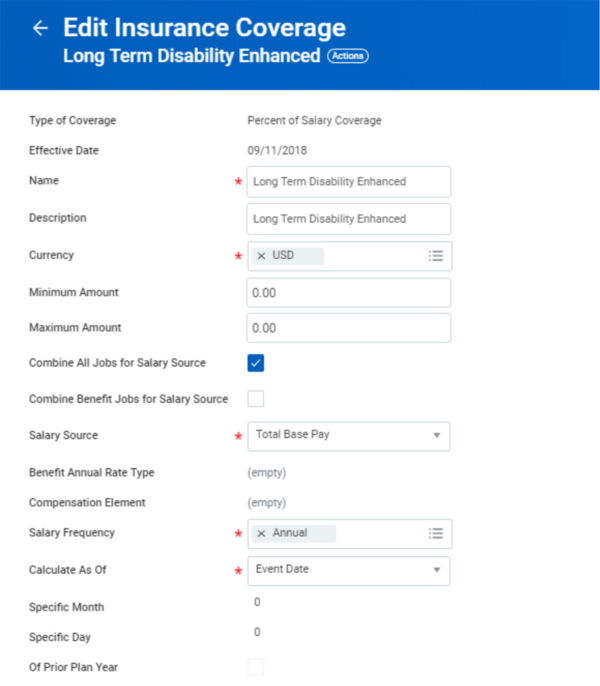
For each of these types of coverage, the configuration options will change appropriately. For example, when you create the insurance coverage as an Increment of Currency, Workday will automatically require the Amount Based Coverage Levels Name and Coverage Amounts fields. The screenshot below displays an example of Coverage Amounts between $50,000 to $500,000 in increments of 50,000 for Voluntary Supplemental Life Insurance Coverage.
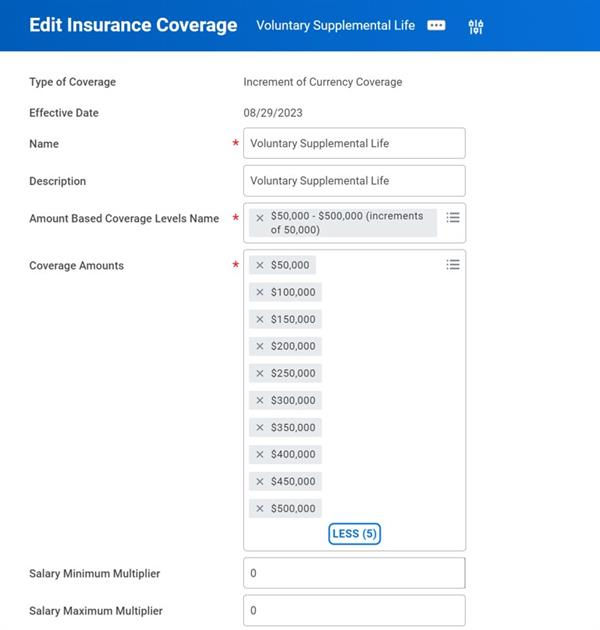
The red asterisks indicate a required field that default with prepopulated value. All the other fields on this page are optional. The system only uses these fields if the insurance coverage uses a Salary Minimum or Maximum Multiplier; otherwise you can ignore the defaults.
You can use the Salary Maximum Multiplier field when coverage cannot exceed an amount equal to a multiple of the employee's salary. Insurance providers will often require a definition of that salary. The Salary Minimum Multiplier is less common, but the functionality is available if needed.
Select the Combine All Jobs for Salary Source checkbox when using multiple jobs and when the calculation needs to include the salary of each additional job.
Select the Combine Benefit Jobs for Salary Source checkbox when using multiple jobs and when the calculation needs to include the salary of each additional job that is designated as a benefit job.
If you require a salary multiplier, you may need to further define the salary:
- Is it equal to Base Salary or is it Base Salary plus another compensation component, such as a housing allowance?
- Is it based on the employee's monthly salary or their annual salary?
- Since salaries can change during the year, is it the salary as of the moment the coverage calculates, as of the beginning of the year, or as of a specific date of the current plan year?
Review these configuration options:
Salary Source options: (Salary definition)
- Total Base Pay (default)
- Benefits Annualized Rate or Total Base Pay - If there is no BAR entered for an employee enrolled in the plan, the system will use the Total Base Pay. You can define and associate Multiple Benefits Annualized Rates Types with an employee.
- Benefits Annualized Rate or Compensation Elements - If there is no BAR entered for an employee enrolled in the plan, the system will use the specified compensation elements. You can define and associate Multiple Benefits Annualized Rates Types with an employee.
- Compensation Elements
Calculate As Of options: (To determine salary as of what date?)
- Beginning of Plan Year
- Coverage Begin
- Coverage Begin or Plan Year Begin - Used for new hire or newly eligible for the plan
- Coverage Begin or Specific Date - Used for new hires or newly eligible for the plan
- Event Date
- Specific Date
If you create the insurance coverage as Multiples of Salary, Workday will require the Benefit Multiplier Order, Multiplier-Based Coverage Levels Name, and Compensation Multipliers fields. The Compensation Multipliers field can have more than one value selected, allowing an employee to select one level of coverage from a configured list. In addition, Workday will apply fields such as Minimum Amount, Maximum Amount, and Salary Source to further define the salary used in the calculation.
Rounding Rule options: (Calculating multiplier times salary definition)
- Round Down: Uses the Round Amount To number and will round down to the nearest 1,000, 100, 10, etc.
- Round Up: Uses the Round Amount To number and will round up to the nearest 1,000, 100, 10, etc.
- Round Up on Number: Makes the Round on Number field available to populate.
Benefit Multiplier Order:
- Multiply then Round Result.
- Round Amount then Multiply.
If you create the insurance coverage as Percent of Salary, Workday will require the Percent-Based Coverage Levels Name and Compensation Percentages fields.
Select the Allow Coverage Up To Maximum checkbox to allow the employee's election to cap at maximum. Otherwise, the system will not allow enrollment into a coverage option exceeding the limit. For example, when a plan, such as employer-paid basic life, is offered at 2x salary with a maximum of 200,000 and an employee receives 150,000 annually, the employee will not be able to enroll in the plan if you select this checkbox.
Insurance Rates
When you create insurance plans, define rates separately from coverage levels and link them together to establish coverage costs. If you define rates and coverage levels separately, you can:
- Associate the same rate definition with multiple coverage definitions.
- Create a coverage definition and associate it with different rate tables to create various insurance plans.
In Workday, you can define the following types of rates:
Rate | Rate Calculation |
|---|---|
Amount of Coverage | 0.01 x $1,000 of coverage |
Amount of Salary | 0.15 x $1,000 of salary |
Flat Amount | $2.50 per month for dependent life |
Flat Amount per Covered Dependent | $2.50 per month per covered dependent |
Within each of these rates, there are several rate bands for demographic factors, such as age, salary, or length of service, as well as gender and tobacco use. There are configuration options for the demographics including:
Age: (Age as of what day)
Use employee or dependent age
: If you use age to calculate the rate for Spouse Life, for example, is the rate based on the employee's age or the age of the spouse?- Use Age as of:Defines the age as of a certain point in time.
- Beginning of Plan Year
- Coverage Begin
- Coverage Begin or Plan Year Begin - Used for new hire or newly enrolled
- Coverage Begin or Specific Date - Used for new hire or newly enrolled
- Event Date
- Specific Date
- Salary (Definition of Salary)
- Salary Source: What compensation components will define salary?
- Total Base Salary
- Compensation Elements
- Benefits Annualized Rate or Total Base Salary
- Benefits Annualized Rate or Compensation Elements
- Calculate as of: Defines the salary as of a certain point in time.
- Beginning of Plan Year
- Coverage Begin
- Coverage Begin or Plan Year Begin - Used for new hire or newly eligible for the plan.
- Coverage Begin or Specific Date - Used for new hire or newly eligible for the plan.
- Event Date
- Specific Date
Benefit Annualized Rate
Workday uses BAR in several areas, such as calculating a rate or calculating a coverage cap using a multiple of salary. Each use of a benefit annualized rate allows you to define a unique rate for that purpose. Use the
Maintain Benefit Annual Rate Types
task to name rate types.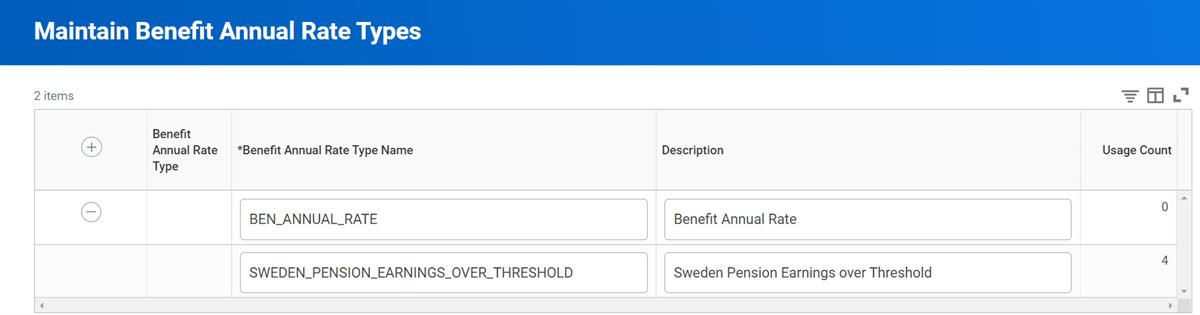
The steps to using the BAR are:
- Set up theMaintain Benefit Annual Rate Typesand name them according to their use.
- Use the rate type when creating the insurance coverage or insurance rate.
- Populate the BAR for the appropriate employees. (This is often complete using an EIB.)
Touchpoint
: If you use compensation data to define a calculated rate, you must update the Workday compensation data so it is accurate.Insurance Plan Setup
Once you create the Coverage Level, Insurance Coverage, and Benefit Rate, creating the actual insurance plan is only selecting these components on the benefit plan.
Age-Based Insurance Adjustment
You can configure an insurance coverage increase or reduction based on an employee's age. Relative to employee rates, you have the option to use the full or reduced coverage amount. Additionally, you can configure the employer rates to use the full or reduced coverage amount.
Age is based on the Calculate As Of date. On that date, the system automatically reduces the employee's coverage, and possibly rate, accordingly. The change in coverage does not need a benefit event to occur.
Spouse Life Age-Based Reduction Based on Employee Age
There is an option to apply age reduction on a Spouse Life Plan based on the employee's age. This functionality allows you to choose either the employee or spouse's age as the basis for age reduction.
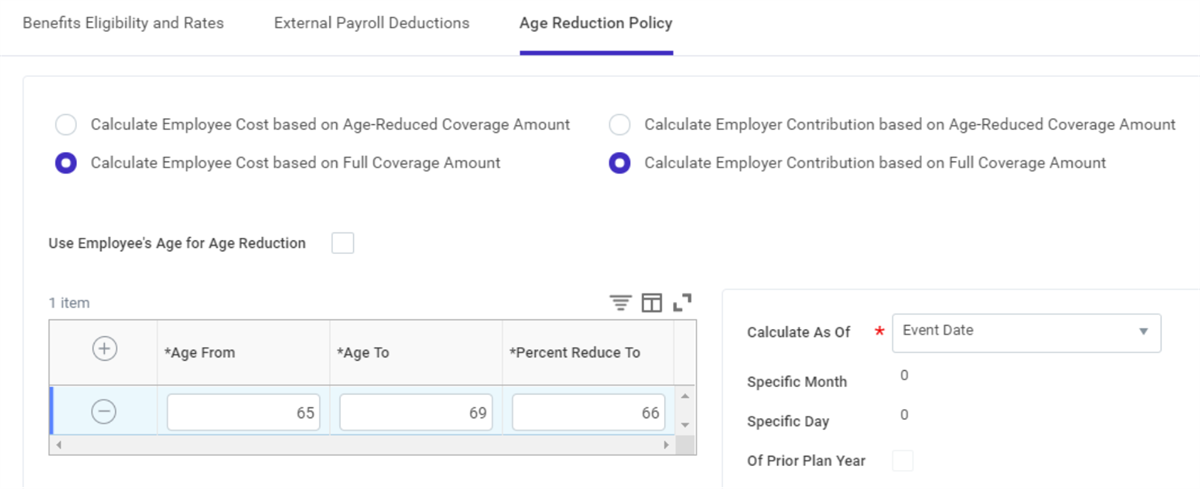
On the Age Reduction Policy tab on the Insurance Plan, there is a Do Not Round Final (If Age Reduced) checkbox on the Insurance Coverage page. If you select the checkbox on the Insurance Coverage page, Workday will not round the age reduced value. If you leave the checkbox clear, Workday will round the reduced age.
Additional Benefits Setup
An Additional Benefits plan is a non-traditional benefit that does not fall into the previous categories of coverage discussed. When you track commuter spending participation, a gym membership, or pet insurance, you define unique benefits.
Another common use for an additional benefits plan is Long-Term Care Insurance, which would use the Individual Rate functionality to enter a rate at the employee level.
Most types of plans have attributes that are unique to that benefit category. In contrast, an Additional Benefits plan has a relatively simple structure, but requires you to configure the benefit coverage type with the appropriate setup. For example, are you using targets? Is this a flat rate or should the plan use a range of amounts or a range of percentages? Your answers to those questions will impact how to configure your coverage type.
Additional Benefit Coverage Targets
Use the
Maintain Additional Benefits Coverage Targets
report to create a comprehensive list of all targets that the additional benefit plans need, including setting up the display order and coverage target names.Select values from this list when you create the benefit plan if you select the Use Coverage Target checkbox on the
Maintain Benefit Coverage Type
report.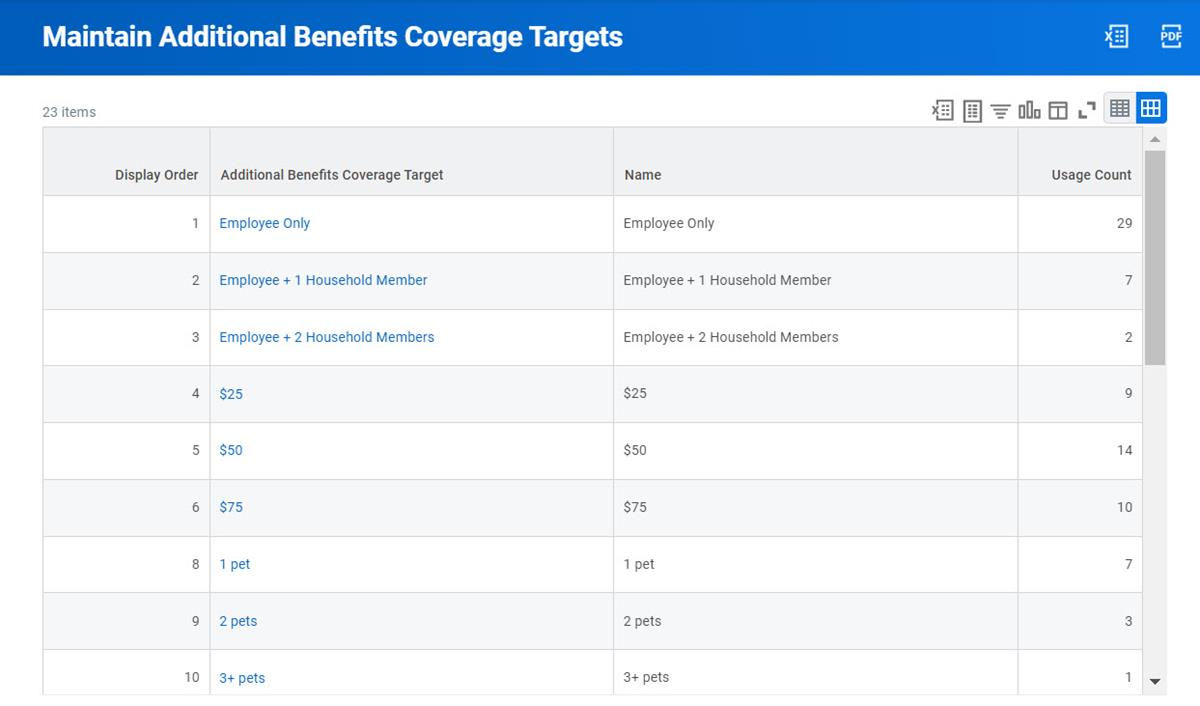
Creating the Plan
Before you create an additional benefit plan, you must create a Provider, add the Benefit Coverage Type, and build the additional benefit coverage targets. Then you are ready to create the plan.
Create the benefit coverage type correctly to ensure the appropriate fields are available on the benefit plan. For example, select the Use Coverage Target checkbox to use multiple targets.
When do you want the new benefit plan to be available for employees to elect?
To be consistent, you may want to create new benefit plans using the same date used to do the original deployment load. For example, 01/01/1900 is a common effective as of date. When you create a benefit plan, make sure all required data, such as Provider and Benefit Group, have an effective date that is equal to or earlier than the effective date of the benefit plan.
Percentage or Amount
Configure additional benefit plans to allow employees to enter a percent or flat amount as a contribution. You can also define minimum and maximum parameters to enforce during enrollment.
If the Benefit Coverage Type configuration allows a percentage range, the Plan Costs section will include percentage minimum and percentage maximum fields:

If the Benefit Coverage Type configuration allows an amount range, the Plan Costs section will include amount minimum and amount maximum fields:

Use Individual Rates
Most additional benefit plans will have a flat rate based on the number of people covered or amount of coverage. An exception to this would be a benefit plan that you create either with no defined rate, or with a default rate that the employee can override. An employee elects coverage, and then you can determine the rate and enter it in the system using the
Manage Individual Rates
task.The
Manage Individual Rates
task has 14 columns of information, so scroll to the right to find the Email Notification checkbox. This allows you to individually select employees to send emails to as needed.Note
: Additional Benefit plans that you configure to use rates may only use flat rates or individual rates. Calculated rates are not available. Also, you cannot enroll dependents or designate beneficiaries for these plans.Reset Individual Rates on Plan Year Begin
You may need to enter individual rates each year. In this case, turn on the Reset Individual Rate and Plan Year Begin so that at the end of the plan year, the system resets the rate to zero. When you select the Use Individual Rates checkbox, a warning message will display. It states: "If you use Individual Rates and change the rates midyear, the new rates do not affect employees currently enrolled in the benefit plan. The new rates only affect new enrollment events."
Benefits and Deductions
When using Workday Payroll, you must set up the deduction to define how and when the deduction is taken and map it to the benefit plan. Deductions and earnings include both effective dated and noneffective dated details. When creating a deduction, you need to address three effective dated sections: Criteria, Calculation Details, and Limits. You do not need to use all the fields within each section. For example, Limits might only apply to retirement savings plans.
Benefit Plan
If you do not create the benefit plan when you create the deduction, there is a deduction field on the benefit plan that links them together. Workday Payroll uses the Coverage/Cost As Of Payment Date field to determine if a deduction is based on the period end date or payment date.
Resource
: For more information on how to set up earnings or deductions for benefits, refer to the Workday Administrator Documentation on Workday Community.Maintain Deduction Priorities
Typically, a benefits partner or a benefits administrator cannot access the
Maintain Deduction Priorities
report. The Payroll group configures this report, but since it involves benefits, it is an important touchpoint. Once you set up the benefit deductions, you must prioritize the order.Touchpoint
: While the deductions and earnings are in Payroll, Benefits send the actual amounts with the associated codes to Payroll. Benefits and Payroll work together to determine deduction and earnings priorities for each plan.