
Enrichment
Overview
In this chapter, you will explore the concept of enrichment within Workday Accounting Center. Enriching data enhances and refines your source data so that you can use it in detailed and summarized accounting. It is a continuous process you may perform in order to meet Accounting Center requirements. We will cover the various ways to enrich data in this chapter.
Objectives
By the end of this chapter, you will be able to:
- Create mapping table elements.
- Create, insert, and edit derived datasets.
- Explain Accounting Center enrichment options.
- Enrich derived datasets.
- Sync accounting source stages.
- Prevent, identify, and correct source stage errors.
- Configure custom dismissal using Workday business process framework.
Enriching Data
Enriching the dataset is a continuous process. You might have to perform these tasks to enrich your data to meet Accounting Center requirements:
- Map worktags: Assign worktags to your transactional data to use in detailed accounting and reporting.
- Add fields or data using stages and Prism-calculated fields in the enrichment derived dataset.
- Reformat or remove fields.
- Create multiple-derived tables based off the ingestion table.
- Create and join other tables or datasets (containing Workday data) to convert external text data to Workday instance data.
You can create instance mapping to enrich your data by assigning worktags or ledger accounts to your transactional data that you can use in detailed accounting and reporting. You can also use account posting rules to derive ledger accounts.
Mapping Table Elements
Use the following tasks to create instance mapping:
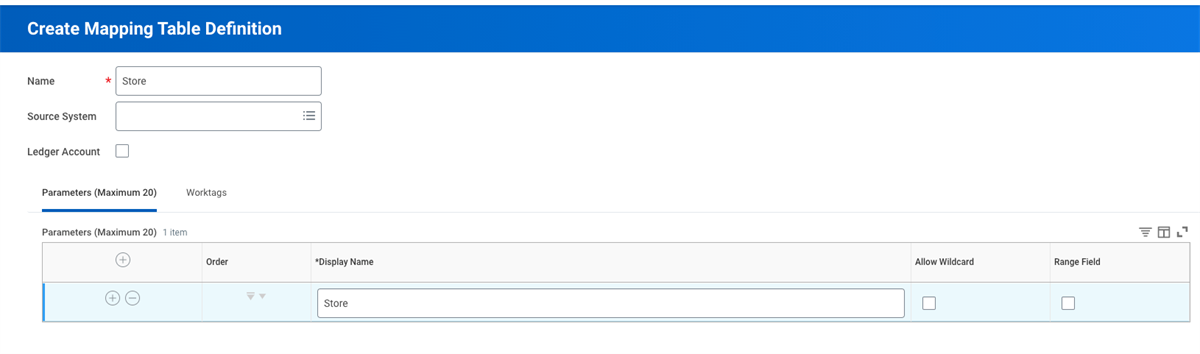
- Create Mapping Table Definitiontask to define a structure for your mapping table rules.
- Create Mapping Tabletask to define rules to map your worktags).
From the
Data Catalog
report, right-click the dataset that you want to use the mapping functionality, and select Edit. Select Add Stage
and select Value Mapping
to add a new Value Mapping stage.Workday populates the worktag instances for each transactional line per the mapping rules you defined.
Create Mapping Table Definition
Use the
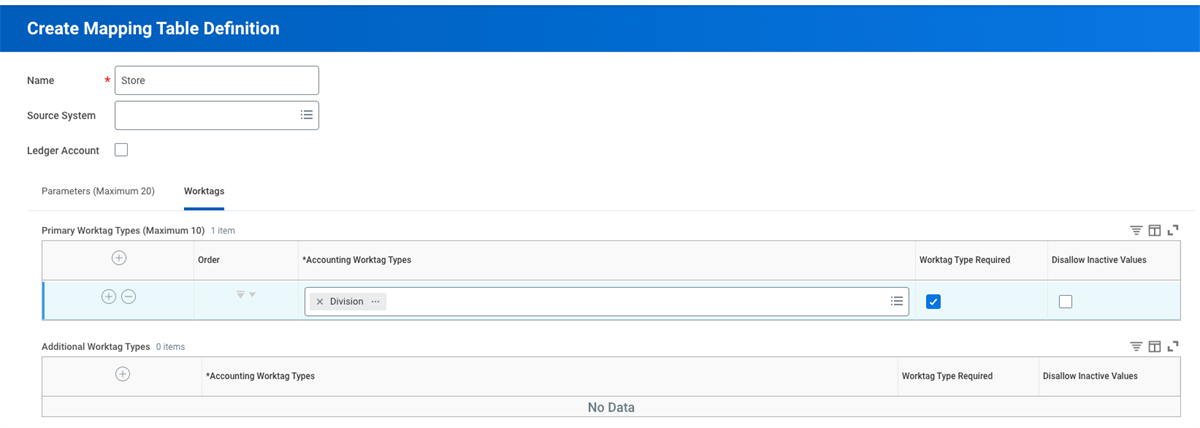
Maintain Worktag Usage
task to enable worktags as either primary or alternate dimensions for the taggable type of mapping table definition.You can create a mapping table definition to:
- Define the number of input values in your mapping table.
- Define the number and type of output values.
In addition to one-to-one mapping, you can also map:
- One input value to many output values.
- Many input values to one output value.
- Many input values to many output values.
You can also use the mapping table definition to configure how to define input values by using wildcards and ranges.
Create Mapping Table
After you create a mapping table definition, you can create a mapping table to define rules to map your input values to your target output values. Access the
Create Mapping Table
task. Select the mapping definition you previously created and select OK. Workday displays the mapping table with the structure of the selected definition. Once you create a mapping table based on the definition, you cannot edit the mapping table definition.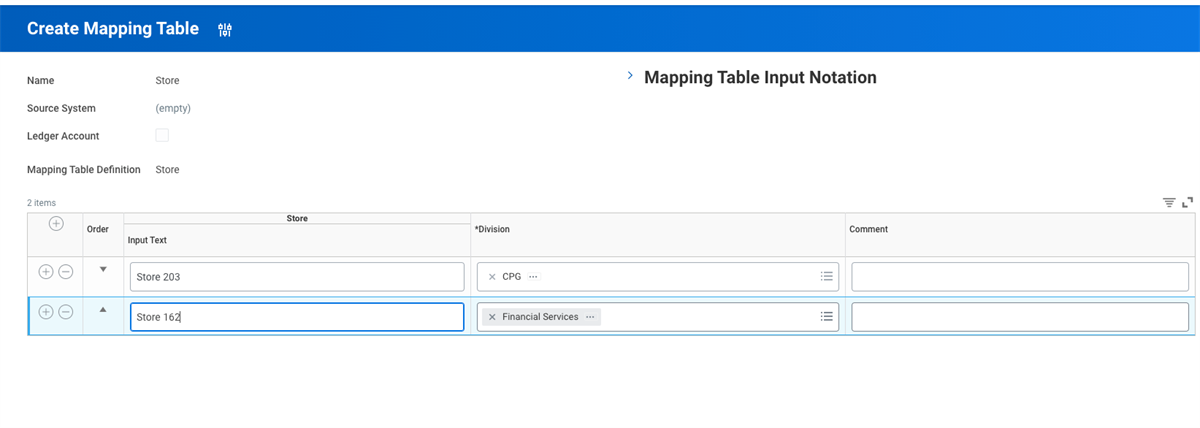
As you complete mapping inputs to target output values, keep these guidelines in consideration:
Mapping Functionality | Guidelines |
|---|---|
Input Values | For each row, enter a combination of input values that map to a particular output value. If you leave value blank, Workday will not evaluate the column for that row. |
Operators | When entering input values, you can use these operators: NOT: Checks whether a value is not equal to, OR is not like an input value. Examples: NOT abc, NOT ab? IS NULL: Checks whether a field value is empty. IS NOT NULL: Checks whether a field value is not empty. IN (list): Checks whether a value is within a set of values. Example: IN (abc, def, xyz). NOT IN (list): Checks whether a value is not within a set of values. Example: NOT IN (abc, def, xyz). |
Wildcard Expressions | If you select to include wildcards when defining a parameter on the mapping definition, use (?) to match any single character. Example: 10?0 matches these codes: 1020, 1030, 1080. Use * to match any number of characters. Example: A*00 matches all codes starting with A and ending with 00, such as A100, A1000, A1100, A1200. |
Range Expressions | If you select Range Field on the mapping table definition, enter a Range Start and Range End value. You can enter alphanumeric ranges - (e.g., A100 - D300). Workday evaluates range expression as a string. Example: Value of 5 falls outside a range of 1-19, but value of 05 falls within a range of 01-19. |
Output Values | Select the desired output value resulting from the combination of input values. |
Note
: Workday evaluates rules from the top down. Once it finds the mapping, it stops further evaluation. Therefore, order rules from most to least specific using Order.Once you create all rules, select
OK
and then Done
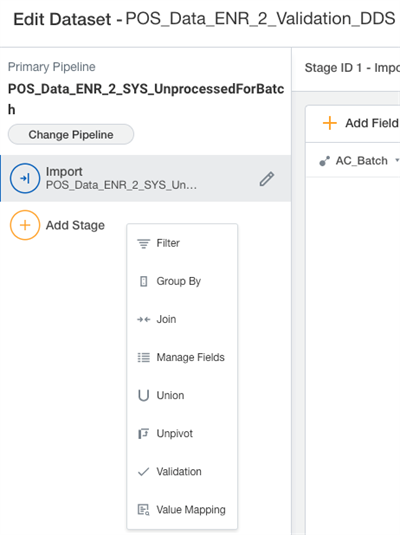
.Stages: Value Mapping, Joins, and Validation to Derived Dataset
Stages
A stage is a pipeline object that takes in data, transforms it in some way, and outputs modified data. Pay attention when enriching data through the stages. Confirm that the number of transactions in your ingested data does not change as a result of the enrichment process. In the absence of a Transaction Grouping ID, Workday will use the AC_TransactionID field. (This field appends to the table schema in the initiation stage) as the grouping key making each record a transaction.
As you perform enrichment, consider the following:
- Filter - Filter out rows of data that met specific criteria. Because the number of transactions cannot change, be very careful when you apply a filter stage as it could change the number of transactions, which will cause the batch to fail.
- Group By - You can use grouping to provide summarization fields.
- Joins - Join a derived dataset into the ingested data to instantiate fields to Workday business object instances. Any join type but Left Outer Join could change the number of rows.
- Manage Fields - You can make changes to the table schema using the Manage Fields stage.
- Union - Union a derived dataset to enhance the ingested data. On the derived dataset, ensure no change to the transaction count.
- Unpivot - Unpivot will convert fields to rows. Ensure no change to the transaction count.
- Validation - Validation is a prism stage available for Accounting Center only. You can use Validation to error out transactions that meet a specific criteria.
- Value Mapping - Value Mapping is a prism stage that is available for Accounting Center only. Value Mapping uses Mapping Tables to derive worktags and ledger accounts from ingested data.
As you create multiple enrichment stages in a dataset, ensure the number of fields flow through each stage correctly. An example of this process is when you add a join stage after the import stage, and then add a field to the import stage. As a result, you must edit the join stage to select that field in order for it to flow through the pipeline.
Joins
You can use Prism Join to derive an instance of a Workday business object for use in your accounting source configuration. Joins require a common field by which to join. Join fields are case- sensitive and the field type must be the same. You could join a text field to another text field but could not join a text field to a numeric field. You could use a Manage Field stage prior to the Join stage to ensure/ change field types to match and then continue on with the Join stage.
Examples:
- You can match field values in your Prism dataset with custom list values. This matching enables you to populate the instances of the custom account posting rules dimensions created from these custom list values in your Prism dataset. You can then use these instances as custom dimensions for a custom accounting posting rule type configured for an accounting source.
- If you have a text value in your Accounting Center source system that represents a Workday worktag value, you don't need to maintain a separate mapping table. You can instead use Join to instantiate it.
Join Pipeline
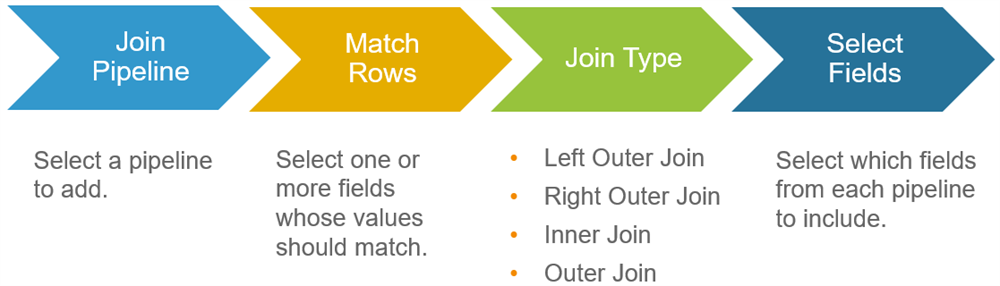
To define a join, add a join stage to a derived dataset:
- Create a custom report on the object you desire to instantiate or bring meaning/value to. Include the text name of the field as well as the instance. Note that for Custom Account Posting Rule Dimensions, you can use the custom list report data source that has a field, Custom Account Posting Rule Dimension Value, created for this purpose.
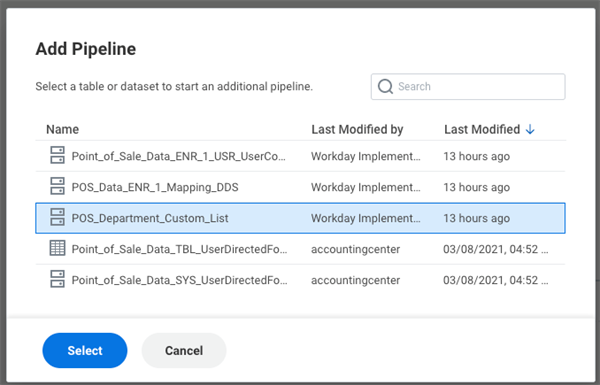
- Select a dataset pipeline to join with the primary pipeline. Note that you may select Add Another Pipeline to import a dataset and create a pipeline.
- Select one or more fields whose values should match. Defining matching rows is similar to defining a primary key or foreign key relationship in relational database terms.
- Select the join type to determine which rows from each dataset pipeline to include in the join result. In order to maintain the integrity of the ingested data, Left Outer Join is the most common join type to use. Beware of using other join types as they may result in changing the number of transactions.
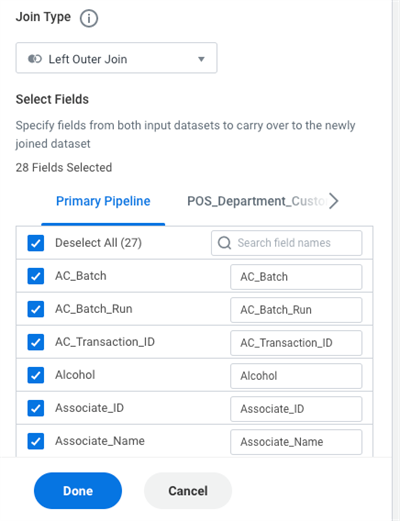
- Select the fields from each pipeline to include in the join result. This step to rename fields as necessary. When renaming is necessary, do not include any spaces in the name. Any field you do not include here drops from this stage in the pipeline and all later stages.
Tip
: In the field selection section, clear the matching fields from on of the pipelines to avoid duplicate fields in the join result.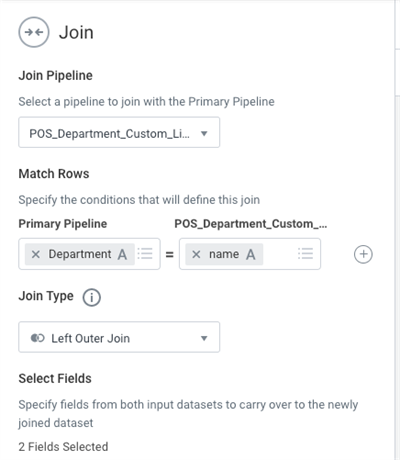
Note
: The join fields have to be the same type. You need the custom report to have the text "name" field with instance.Validations to Derived Datasets
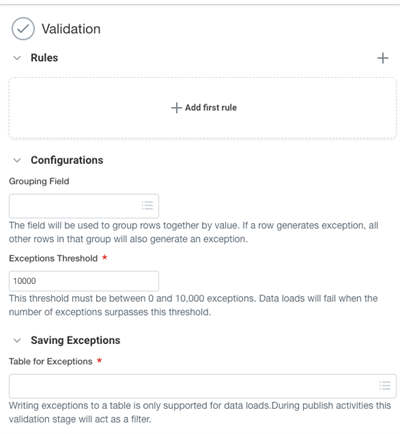
You can create validation stages and include rules in your enrichment data in Prism Analytics. You can then include transactions identified by these validation rules in an error dataset to prevent them from progressing to detailed accounting.
Workday recommends you create a new dataset containing your validation stages between the System Filter {_UnprocessedForBatch} and the User dataset {_UserConfiguration}. Workday also recommends you add the validation stage on the second Enrichment stage.
As you configure the validation, consider the following:
Option | Description |
|---|---|
Rules | To add validation rules, select the plus sign. To identify the validation, specify the:
To add multiple rules, repeat the process. Breaking up rules will make it easier to troubleshoot errors. |
Grouping Field | Use only when expanding one record per transaction into many records per transaction in Enrichment. Workday uses the field to group rows together by value. If a row generates an exception, all other rows in that group will also generate an exception. Note : If you use Grouping Field, you must map the field you select for Grouping Field under Field mapping. |
Exceptions Threshold | Workday automatically populates the amount. We recommend that you do not change the amount. If errors exceed the threshold, Workday will stop processing the transactions. |
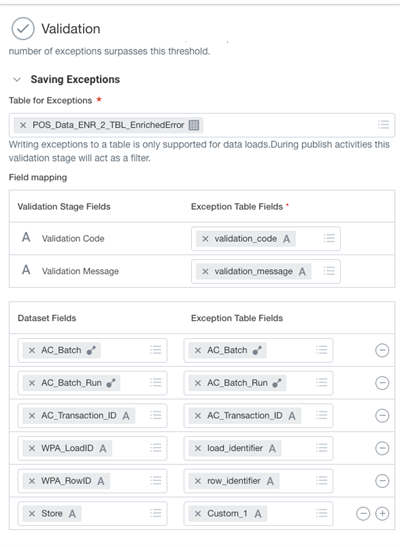
Table for Exceptions | Select the error table in your accounting source to which you want to send the invalid transactions. Note : Enter the correct error table; otherwise, all subsequent validations will fail. It should be same as the error table for the stage that is displayed in the Error Datasets column on the View Accounting Source Stages report. |
Field Mapping | Displays only when you select the Exception table.
Workday recommends that you use the custom fields to retrieve key information to help troubleshoot errors. |
![The "Add Rule" validation form displays exception identifiers and specifies the condition "[Division] IS NULL" in a text field.](/content/dam/ilx/workday-education/en-us/course-manuals/accounting-center-for-administrators/media/f37c8102-d626-4b0e-abb2-d8deeaa49594.png)
Custom List
You can create custom lists to create dimensions that you can use to map data and generate detailed accounting using account posting rules.
Once you have custom lists created, you will need to create a custom report to map and join in a dataset.
Note
: You will also need to create custom reports to map and join Workday Delivered Worktags to values from external data.Account Posting Rules
Account posting rules, in general, direct where transaction journals post in the company ledger accounts. You create custom dimensions and custom account posting rule types to create rules for additional transactions you want to bring into Workday.
Note
: Workday does not support resulting worktags configured on custom account posting rule types or other account posting rules in Accounting Center.To create custom dimensions and custom account posting rule types, please refer to the following steps:
Access the Create Custom List task. Use this list to create custom dimensions. Use a join to map this custom list to the corresponding column in your raw dataset in Prism. The map enables you to instantiate the value in your enriched data source. Workday makes the value available that you can use in Posting Rules.
Access the Create Custom Account Posting Rule Dimension task. Use the task to enable the custom list objects as your custom dimension.
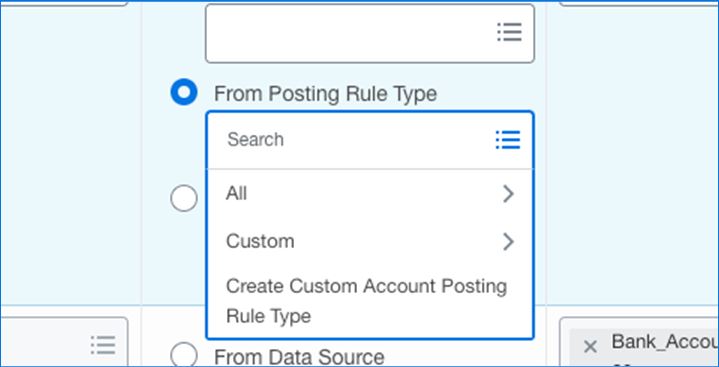
Access the Create Custom Account Posting Rule Type task. Use the task to create a custom account posting rule type and link the custom posting rule dimension. To add the custom account posting rule type automatically to the existing Account Posting Rule set, save the custom account posting rule type.
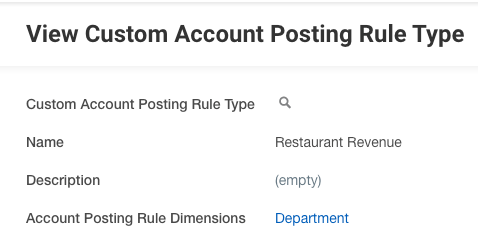
Access the View Account Posting Rule Set report. Select the custom posting rule type you created and select Edit Posting Rule to add the detail to the posting rule to determine the ledger account. You can now use this posting rule type to build your accounting source configuration.
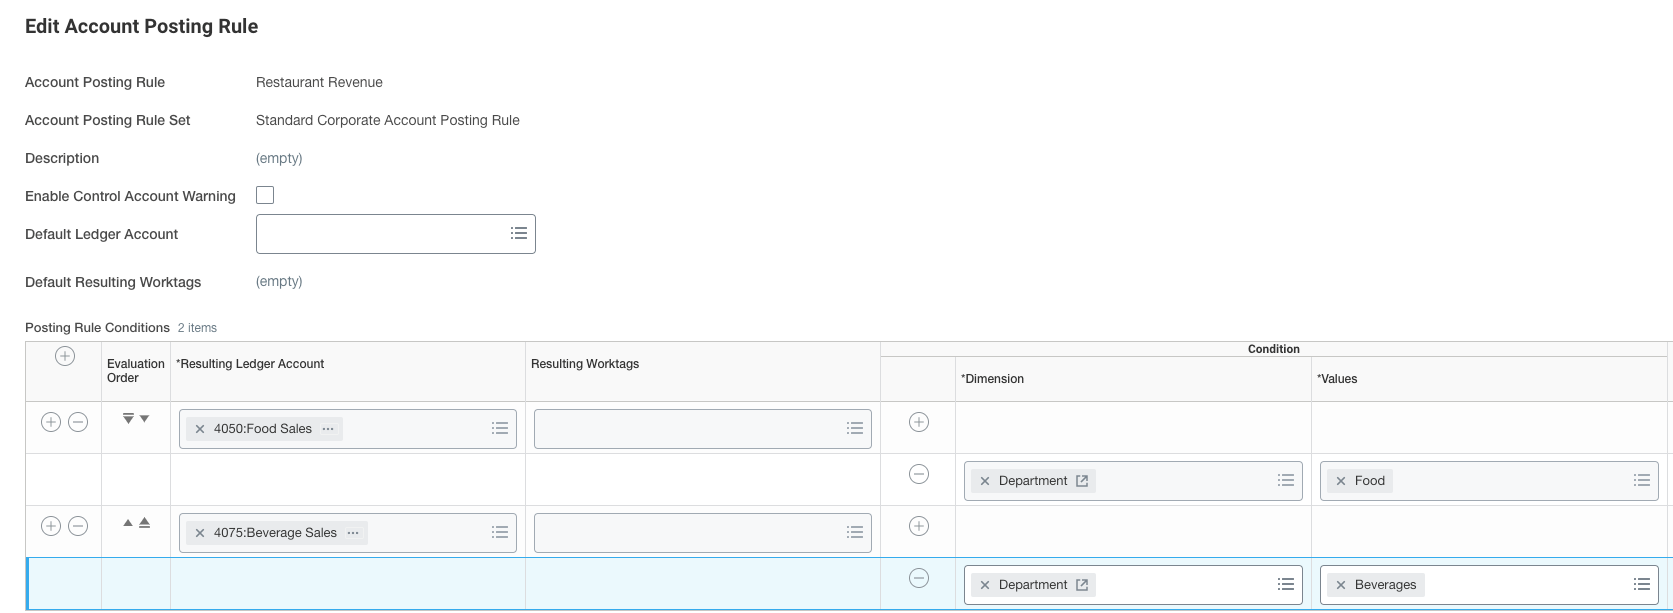
Value Mapping
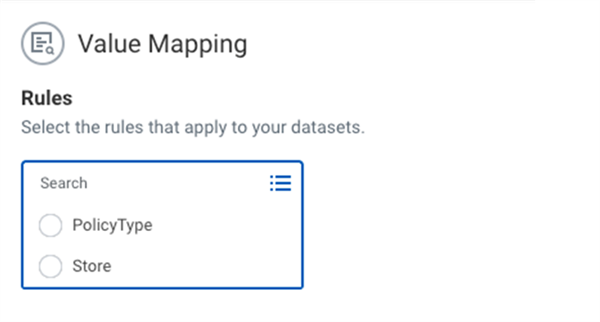
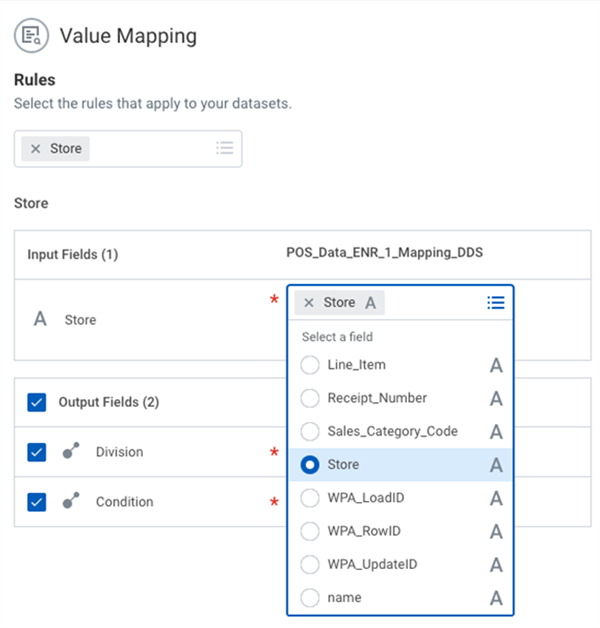
To insert mapping tables, edit the derived dataset to reference the mapping table. You can use mapping tables in multiple accounting sources. Map the input fields from the mapping table definition to the fields in the enrichment dataset. The output fields are additional fields in the enrichment dataset. The condition output field will display the row in the mapping table that resulted in the specific worktags.
Sync Accounting Source Stages
You can edit an enriched dataset to further prepare your data for detailed and summarized accounting. For example, you can add worktag types, such as cost center, to each individual transaction for greater granularity. When you add fields to the enrichment stages, the datasets in later sets become out of sync. Add these fields into the datasets of the accounting source stages.
Synchronize the schema to include fields added in the Join stage. Add mapping and calculated fields to the schema of the output dataset.
Follow these steps:
1. Access the View Accounting Source report.
2. Select the accounting source for which you created a Join stage.
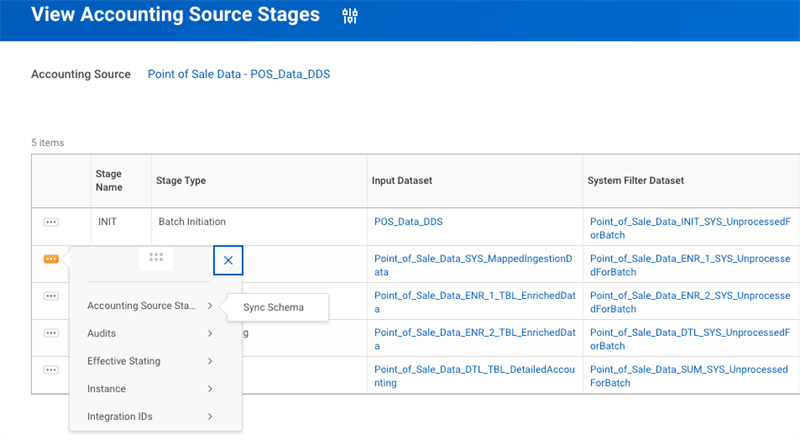
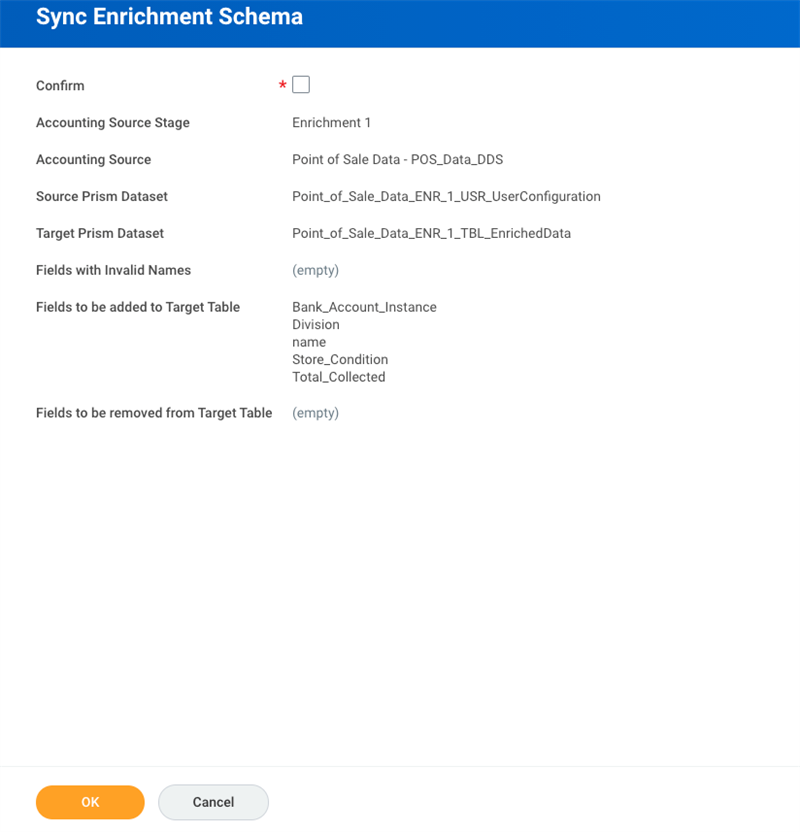
3. From Enrichment stage's Related Actions menu, select Accounting Source Stage > Sync Schema.
4. Select Confirm, and then select
OK
.Workday synchronizes the schema of the Enrichment table to include or exclude fields added or removed in your User dataset. For example, if you create a new field for Total_Collected and forget the underscore, the sync will fail.
Custom Validations and Custom Dismissal
Based on your requirements, you can create custom validations to display error messages when transactions in detailed accounting meet certain conditions. Custom validations prevents Workday from processing transactions in detailed accounting that you identify as invalid. You can share these validations in accounting journals as long as the fields exist in both places.
To create custom validations, you will select the Accounting Center Detailed Journal type of transaction.
Workday displays an error message when it processes the transactions that meet the conditions for the validations.
Optionally, you can configure the business process definitions for both the enrichment and detailed accounting to dismiss specific Accounting Center transactions from a batch. This configuration enables you to dismiss transactions that the regular Accounting Center error process might not otherwise dismiss.
Example uses include:
- Dismiss success transactions that are related to dismissed error transactions in order to group these transactions for error handling.
- Dismiss and terminate bad data ingested from a source system.
Workday, by default, runs custom dismissal processing before error dismissal processing. Therefore, if you direct an error transaction for custom dismissal, Workday:
- Dismisses the error transaction by custom dismissal processing.
- Excludes the error for delivered error dismissal processing.
You can, if required, configure the business process so that custom dismissal processing runs after error dismissal processing.
For example, you can create a condition rule of Transactions In for a Stage = Success Transactions for a Stage. Then apply the entry condition on the business process step for the Request Dismiss Transactions task. Configuring the step condition enables you to run the Request Dismiss Transactions task after Workday dismisses the error transactions for the stage.
To dismiss transactions for enriched data, you will want to do the following:
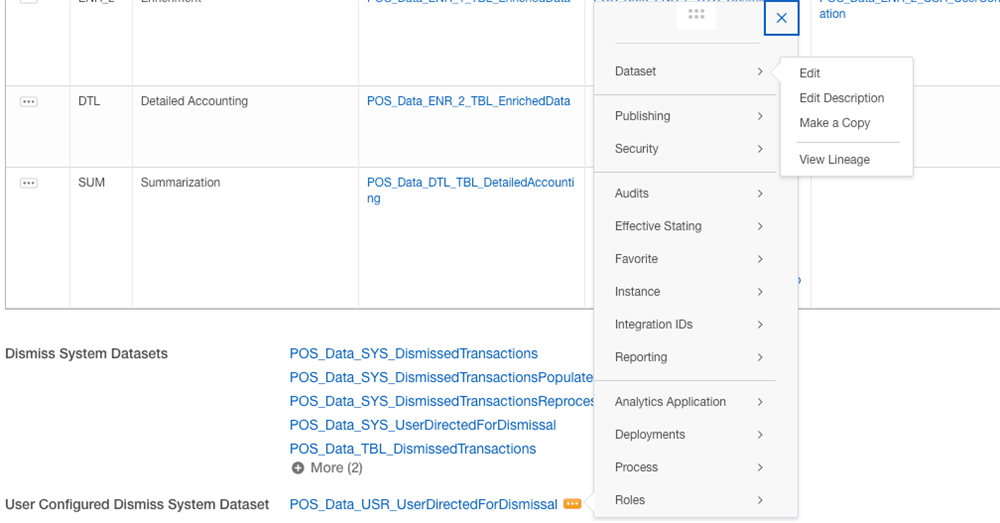
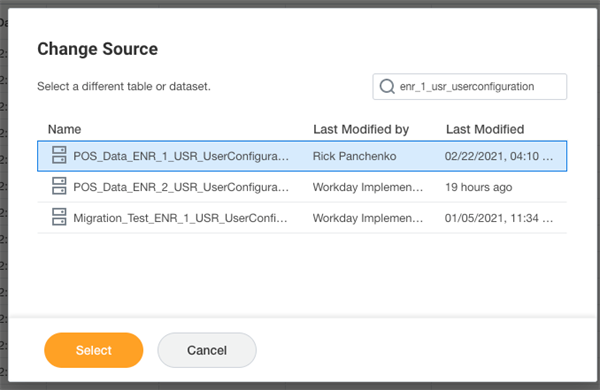
- Configure your USR_UserDirectedForDismissal dataset to include the AC_Transaction_IDs of what you want to dismiss.
- Configure theAccounting Center Enrichment Eventbusiness process definition with Batch/Job and Integration types.As you configure the business process definition, consider these guidelines:TypesName and DescriptionGuidelinesIntegrationCustom integration.Use it to identify transactions you want to dismiss and populate the AC_Transactions_IDs of the identified transactions in the USR_UserDirectedForDismissal dataset.
- Configure the business process definition so that the integration runs before the Request Batch/Jobs. This configuration ensures that the Request process can access the dismissed transactions in the USR_UserDirectedForDismissal dataset.
- Configure the integration to run after the Accounting Center enrichment process.
Batch JobRequest Dismiss Transactions and Process with Future Batch (Enrichment).Request Dismiss Transactions from Further Processing (Enrichment).Request Dismiss Transactions from the Batch (Enrichment).Retrieves AC_Transaction_IDs from the USR_UserDirectedForDismissal dataset for custom dismissals and stores them in the TBL_UserDirectedForDismissal.Configure only one of the Request Batch/Jobs. Configure to run the Batch/Job after the Accounting Center enrichment primary process.If the request job fails or aborts, you can either:- Select Retry to process the batch again.
- Select Force Complete to complete the batch run.
- Select Cancel to cancel the batch.
- Configure a condition rule to specify when Request Dismiss Transactions will run.Example: Create a condition rule that states that the Request Dismiss Transactions job will run when the Enrichment stage is complete. Example: (Transactions In for a Stage = Success Transactions for a Stage). Configuring the rule enables you to run Request Dismiss Transactions as the last step in the Enrichment stage, before progressing to Detailed Accounting.
To dismiss transactions for detailed accounting, you will want to do the following:
- Configure theAccounting Center Detailed Accounting Eventbusiness process definition with Batch/Job and Integration types. As you configure the business process definition, consider these guidelines:TypesName and DescriptionGuidelinesTerm IntegrationCustom Integration.Use it to identify transactions you want to dismiss and populate the AC_Transactions_IDs of the identified transactions in the USR_UserDirectedForDismissal dataset.Configure the business process definition so that the integration runs before the Request Batch/Jobs. This configuration ensures that the Request process can access the dismissed transactions in the USR_UserDirectedForDismissal dataset.Configure the integration to run after the Accounting Center detailed accounting process.Batch/JobRequest Dismiss Transactions and Process with Future Batch (Detailed Accounting).Request Dismiss Transactions and Remove from Further Processing (Detailed Accounting).Request Dismiss Transactions from the Batch (Detailed Accounting).Retrieves AC_Transaction_IDs from the USR_UserDirectedForDismissal dataset for custom dismissals and stores them in the TBL_UserDirectedForDismissal.Configure only one of the Request Batch/Jobs.Configure to run the Batch/Job after the Accounting Center Detailed Accounting Process.If the request job fails or aborts, you can either:
- Select Retry to process the batch again.
- Select Force Complete to complete the batch run.
- Select Cancel to cancel the batch.
- (Optional) Configure a Condition Rule to specify when Request Dismiss Transactions will run.Example: Create a condition rule that states that the Request Dismiss Transactions job will run when the Detailed Accounting stage is complete.
Result: If the Request Batch/Job identifies transactions for dismissal, Workday initiates the Accounting Center job with the Dismiss Transactions processing option.
Depending on which Request Batch/Job you initiate, Workday automatically processes your requests as described in this table:
Request Batch/Job | Processing Options |
|---|---|
Request Dismiss Transactions and Process with Future Batch (Enrichment). | Workday runs the Dismiss Transactions and Process with Future Batch process for the specified stage. |
Request Dismiss Transactions and Process with Future Batch (Detailed Accounting). | Workday dismisses the selected transactions from the batch and processes them with a future batch. |
Request Dismiss Transactions from Further Processing (Enrichment). | Here Workday runs the Dismiss Transactions and Remove from Further Processing process for the specified stage. |
Request Dismiss Transactions from Further Processing (Detailed Accounting). | Workday removes the selected from further processing. |
Request Dismiss Transactions from the Batch (Enrichment). | Workday removes dismissed transactions from the batch and sends them to the Accounting Center Error Manager for resolutions. |
Request Dismiss Transactions from the Batch (Detailed Accounting). | Workday removes dismissed transactions from the batch and sends them to the Accounting Center Error Manager for resolutions. |
Accounting Center Event Business Process Types
Use the
Create Business Process Definition
task (Default Definition) in the initial process orchestration step. You will create default business process definitions for the following four business process events:Business Process Events |
|---|
1. Accounting Center Batch |
2. Accounting Center Detailed |
3. Accounting Center |
4. Accounting Center |
Enter an effective date to match the Accounting Center effective date. For reference, 01/01/1900 works as an effective date.
Each Accounting Center Batch processes by a series of Runs. Each Run has a processing option that describes what to do in the Run, such as Process Unprocessed Transactions, and Process Errors Only.
A Run is a business process event that, at a minimum, has one step that executes the Primary Process. The Primary Process is the job that provides the core Accounting Center functionality for each stage.
Each Accounting Center Stage has a Business Process Type associated with it. The feature allows the implementer to add steps with custom logic before presteps and after post-steps in the Primary Process. You create custom processing when you add steps to the Business Process Definition. Custom steps before the Primary Process are presteps and after the Primary Process are post-steps. Presteps and post-steps execution occurs on every run unless you add step conditions that prevent it.
A few examples of custom methods include:
- Publish a custom data source when the batch is
- Extract data to a downstream system when the batch is
- Provide custom error handling to reject records based on specific
Add Accounting Center Administrators and Implementers to the business process policy. You will usually initiate this business policy, and view all at least. At the minimum, View All if the initiate process is not available.