
Accounting
Overview
In this chapter, you will edit the accounting source to configure journal header and line rules. You will also edit account posting rules that drive the direction of accounting transactions into specific general ledger accounts in Workday. You will then execute accounting center batch runs; and identify and repair any batch errors. Lastly, you will view summarized accounting center journals.
Objectives
By the end of this chapter, you will be able to:
- Maintain accounting source and process configurations.
- Maintain account posting rules to support Accounting Center batch runs.
- Execute Accounting Center batch runs.
- Identify and repair Accounting Center batch runs.
- View summarized Accounting Center journals.
Account Posting Rules
Account posting rules, in general, direct where transaction journals post in the company ledger accounts. You create custom dimensions and custom account posting rule types to create rules for additional transactions you want to bring into Workday.
Note
: Workday does not support resulting worktags configured on custom account posting rule types or other account posting rules in Accounting Center.To create custom dimensions and custom account posting rule types, please refer to the following steps:
- Access theCreate Custom Listtask. Use this list to create custom dimensions. Use a join to map this custom list to the corresponding column in your raw dataset in Prism. The map enables you to instantiate the value in your enriched data source. Workday makes the value available that you can use in Posting Rules.
- Access theCreate Custom Account Posting Rule Dimensiontask. Use the task to enable the custom list objects as your custom dimension.
- Access theCreate Custom Account Posting Rule Typetask. Use the task to create a custom account posting rule type and link the custom posting rule dimension. To add the custom account posting rule type automatically to the existing Account Posting Ruleset, save the custom account posting rule type.
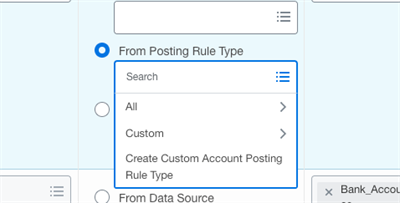
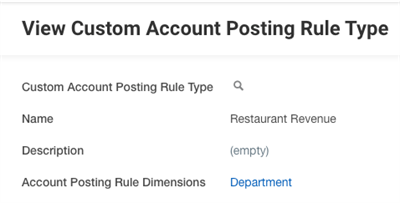
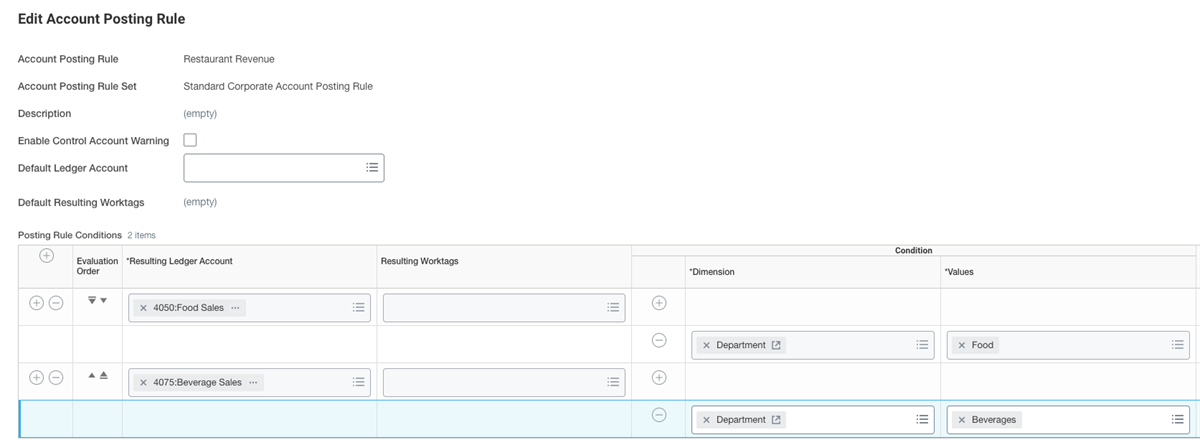
- Access theView Account Posting Rule Setreport. Select the custom posting rule type you created and select Edit Posting Rule to add the detail to the posting rule to determine the ledger account. You can now use this posting rule type to build your accounting source configuration.
Accounting Source and Process Configurations
The accounting source is the key to holding the accounting data.
You edit an accounting source to:
- Define accounting groups that contain journal header and header line rules.
- Define journal header and header line rules to generate detailed accounting.
- Enter an effective date for accounting groups.
- The As Of Date value for each transaction determines which version of the accounting source Workday uses at run time. The earliest effective date of the accounting source configuration should be earlier than the As Of Date values on the incoming data. You can create multiple versions of an accounting source configuration with different effective dates.
- Optionally, enter a transaction Grouping ID for the accounting source. When expanding 1 record per transaction into many records per transaction in enrichment, Workday recommends that you use Transaction Grouping ID as a unique ID for each row in your ingested data.
If you leave this field blank, Workday treats each enriched row in your data source as a unit of work. If you specify a grouping criteria, Workday creates a unit of work from many rows that share a Transaction Grouping ID value.
Example: Select Policy Number if you want to bring in multiple premium amounts for a specific policy number as a single transaction in detailed accounting. This will affect the Transaction Count on your Batch run, while the Record Count will count each row.
Enable Multicurrency Select
to enable the fields on your accounting source for multicurrency setup.Creating multiple accounting groups for an accounting source enables you to create efficient accounting source configurations to support your business needs. Example: Accounting for a single transaction under multiple book codes.
For each accounting group you can:
- Specify separate header and journal line configurations to generate detailed accounting for the accounting group.
- Configure different journal header rules (e.g. book code) and journal line rules.
- Create accounting group condition rules for a transaction.
- Generate more than one set of detailed accounting entries from a single transaction.
- Apply one or more accounting groups to each transaction in a batch to generate detailed accounting for each accounting group.
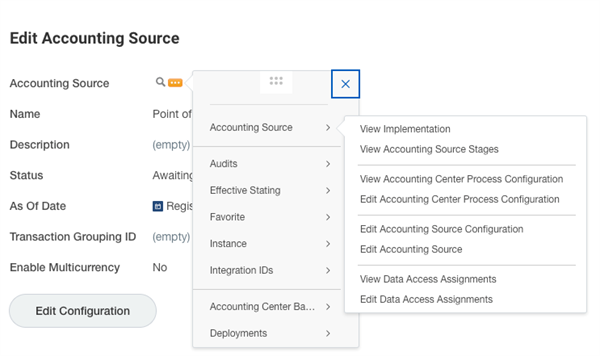
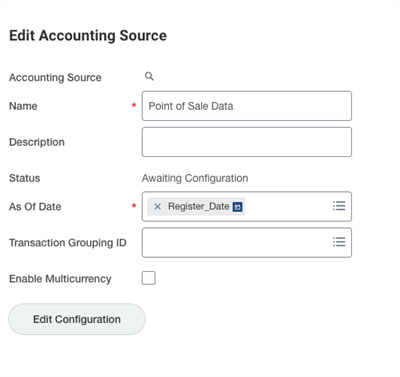
Follow these steps to edit an accounting source:
- (Optional) Create custom account posting rule dimensions and custom account posting rule types. Access theView Accounting Sourcereport.
- For Accounting Source, select the accounting source you previously created, and selectOK.
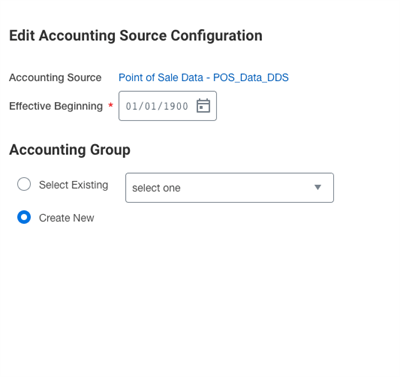
- SelectEdit Configuration.
- Enter an effective beginning date.Note: The effective date must be the same or earlier than the value in the As of Date field. Otherwise, you can have transactions that Workday cannot process, as the transactions do not find a matching configuration. Workday recommends you create your initial configuration with a date earlier than any transactions that you plan to bring into the Accounting Center.Note: Each time you select Edit Configuration on your accounting source, you create a new snapshot of your rules, effective as of the current date. Workday, therefore recommends that before you edit your configuration, you:1. Access theView Accounting Sourcereport.2. Select the Effective Date History tab to check if you have prior snapshots.If you create a snapshot with the same effective date as an existing one, the latter will be overwritten. Therefore, to edit a snapshot, enter the same effective date.
- SelectOK.
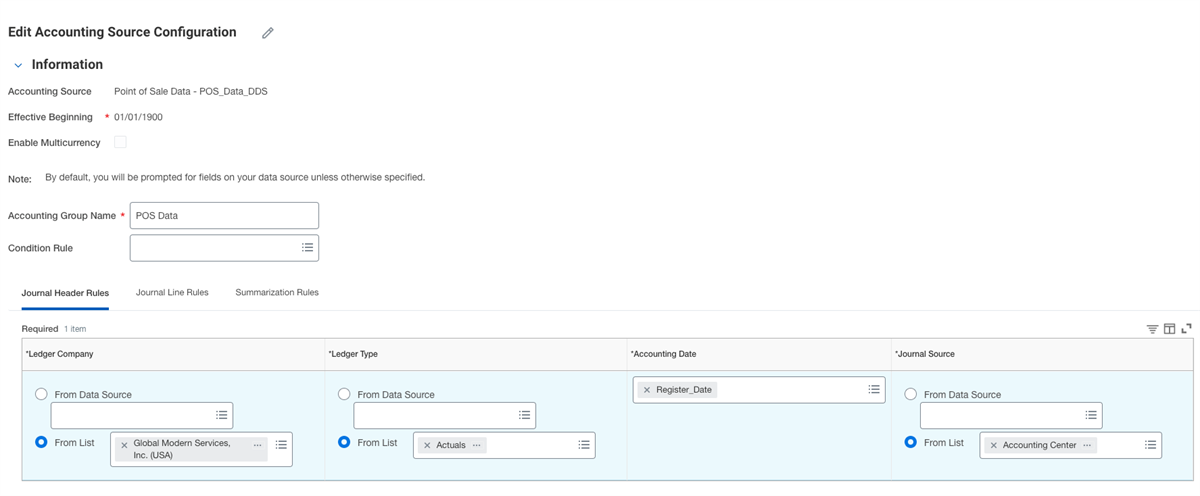
- As you create a new accounting group, consider the following:FieldDescriptionAccounting Group NameEnter a unique name for the accounting group.Condition RuleSelect a condition rule for the accounting group.Workday applies the accounting group condition rule to a transaction when meeting the condition rule.You can create condition rules for the accounting group from theCreate Accounting Source Configuration Ruletask, which you can also access from this field.If you do not select a condition rule, Workday applies the accounting group to all transactions in the batch.Note: For Many to One transactions, all rows with the same Grouping ID must pass the accounting group condition rule to generate detailed accounting.
- Select the Journal Header Rules tab.
- As you complete the fields of the Journal Header Rules tab, consider the following:FieldDescriptionLedger CompanyLedger TypeJournal SourceSelect values from either the enriched data source or a list of instance values in your tenant.Accounting DateSelect the date of the transactions from the enriched data source. Workday retrieves the value for the Date field in the enriched data source.Alternative Reversal DateIf you create reversal journals, the default reversal date is the first day of the next period. As an alternative, you can enter an alternate reversal date for the reversal journals. The alternate reversal date must be in your enriched data and formatted as a date.Alternate Currency Rate TypeThis option is available only when you select the Enable Multicurrency rate type.Select values from either the enriched data source or a list of values in your tenant. Select None of the Above to use the default currency rate in your tenant.
- Select the Journal Line Rules tab.
- As you complete the fields of the Journal Line Rules tab, consider the following:FieldDescriptionCondition RuleWorkday evaluates and posts transactions to specific ledger accounts based on rules you create.You can create condition rules from theCreate Accounting Source Configuration Ruletask, which you can also access from this field.If you do not create a condition rule, Workday processes this row for every data row in your file.Line CompanyLeave as the default value unless you are configuring intercompany accounting. Workday automatically populates the value from the Ledger Company on the Journal Header Rules tab.For intercompany transactions, you can select values either:
- From the enriched data source.
- From a list of values in your tenant.
Note: Companies with intercompany transactions must share the same ledger currency.Ledger AccountSelect a value from the data source, a list of values in your tenant, or a posting rule type (including custom posting rule type).Note: Workday does not support resulting worktags configured on posting rule types and custom posting rule types in Accounting Center.Posting Rule DimensionsEnter a value when you select a posting rule type in the Ledger Account field.Add dimensions from your posting rule type here, including configured custom posting rule dimensions.Do not add the Company dimension, as Workday automatically derives it.Transaction AmountSelect from the enriched data source. Unless you enable multicurrency for the accounting source, you must enter the transaction amount in the company ledger currency.Transaction CurrencySelect from the enriched data source or a list of values in your tenant.Ledger AmountLeave the field blank if you want Workday to convert source transactions to your ledger currency.If you have already converted to ledger amount, select from the enriched data source.WorktagsInclude one or more worktags that you want to persist on your summarized journal entries in the ledger. Worktags summarize your detailed accounting entries. Both detailed and summarized accounting will display the worktags you specify here.Enable Default Related WorktagsSelect to include related worktags on the journal.Additional AttributesInclude any other attributes you want to include in addition to worktags (e.g., Agent Number, Policy Number).Detailed accounting will display the additional attributes you specify here, but summarized accounting will not.Reconcile to BankSelect the checkbox if you want to reconcile summarized cash journal lines.Journal lines you select are available for reconciliation and display a Transaction Reference if one is available.You can then match the selected journal lines with your bank statement.Transaction ReferenceOptionally, assign a transaction reference to your cash journal line data, which can help in reconciling with your bank statement line.The field will display on the journal line during summarization. - SelectOKand thenDone.
- Select the Summarization Rules tab to review how Workday groups and summarizes journals:
- Summarized Journal Header fields: Displays journal header summarization logic.
- Summarized Journal Line fields: Displays journal line summarization rules, including worktags.
Note: Workday excludes additional attributes in summarization, but makes them available for reporting in your detailed accounting.
Accounting Center Process Configuration
You can configure the Accounting Center process to specify how you want Workday to process each batch for a stage.
Note
: Once you run the summarization, you cannot roll back and rerun the batch. Workday recommends you set detailed accounting to process manually during your testing and design phase.Follow these steps to configure the Accounting Center process:
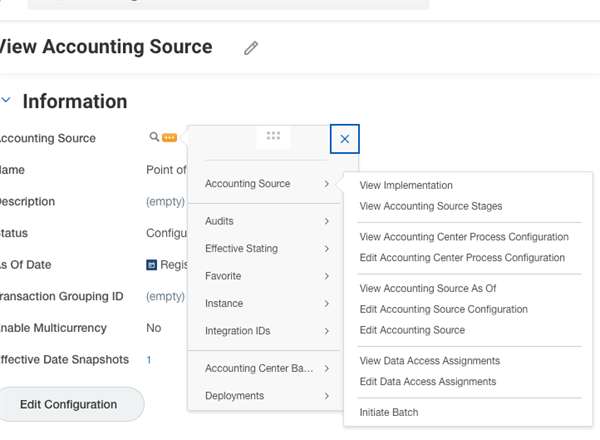
- Access theEdit Accounting Center Process Configurationtask.
- As you complete the configuration process for Accounting Center, consider the following processing options:OptionDescriptionProcessing OptionsSelect how you want to process batches for the next stage on completion of a stage.
- Select Manually Select Next Action if you want to start and process the batches for the next stage manually. Otherwise, Workday processes the next stage automatically.
- Select Always Advance to Next Stage and Dismiss Any Errors to Next Batch.
- Select Only Advance to Next Stage If No Errors if you want Workday to proceed automatically to the next stage when there are no errors.
- SelectAlways Advance to Next Stage and Dismiss Errors from the Batchif you want Workday to advance the batch automatically to the next stage and dismiss any errors in the batch to the Accounting Center Error Manager
Error ThresholdSpecify a threshold by count, percent or both when using a process option that advances to the next stage when there are errorsCountSpecify a threshold error count between zero and 100,000.PercentageSpecify a threshold percent of the transactions that are coming into a stage. The percent can be between zero and 100 percent. - SelectOK.
Accounting Source: Batch Processing Strategies
The
Processing Options
in an Accounting Source configuration determine how Workday Accounting Center
transitions between stages (Ingestion, Enrichment, Transformation). Selecting the right option is a strategic decision between production automation and testing control.Configuration Option | Primary Environment | The "Why" - Strategic Logic |
|---|---|---|
Always Advance & Dismiss to Next Batch | Production | Fix the Workday Config : Best for known configuration gaps (e.g., a missing Cost Center in a mapping table). Once the Workday configuration is updated, these records automatically retry when the next batch is run. |
Always Advance & Dismiss from Batch | Production | Fix the Data : Best for nuanced errors. This sends records to the Error Manager for a "scalpel" approach, allowing for individual record triage without holding up the entire pipeline. |
Manually Select Next Action | Testing | Granular Validation : The batch pauses after every stage. This allows for manual inspection of the output (e.g., after Enrichment) before the next stage begins. |
Only Advance if No Errors | Testing | All-or-Nothing : The batch "fails fast" and stops immediately upon an error. Essential for high-stakes loads like a Trial Balance where a single error should halt the entire process. |
The Error Manager: Three Paths for Remediation
When using the Dismiss from Batch option, errors are moved out of the batch flow and into the Error Manager, providing three distinct remediation paths:
- In-Line Editing: Ideal for low-volume data fixes where it is safe to correct the data directly within Workday.
- Dismiss from Batch: A permanent dismissal. Use this when the source record is "bad data" and a corrected version will eventually be resent from the source system to maintain synchronization.
- Process in Next Batch: If you determine the error was actually a Workday configuration issue, you can manually flag these specific records to be retried in the next batch run.
Accounting Center Batch Runs
Now that you have enriched the data, maintained an accounting source, and processed the Accounting Center configurations, it is time to execute Accounting Center batch runs. You create a batch to process a set of source transactions to:
- Enrich the data.
- Generate detailed accounting.
- Generate summarized accounting.
Validation Messages in Detailed Accounting
To ensure the data integrity of Accounting Center generated journals in detailed accounting, Workday provides additional validations to check whether:
- Worktag (Cost Center, Company, and Supplier) value is valid for use with the Line Company.
- Bank account value is valid for use with the Line Company.
- Ledger account is not restricted from use by the Line Company.
- Ledger account is valid for the Line Company account set.
- Ledger account is not retired.
- For nonmulticurrency transactions, we validate that the transaction amount from the source data matches the decimal precision of the ledger currency for the Line Company.
- For multicurrency transactions, we validate that the transaction amount from the source data matches the decimal precision of the applicable transaction currency.
- For multicurrency transactions, we validate that the ledger amount from the source data matches the decimal precision of the ledger currency for the Line Company.
- Combinations of worktag values on the detailed journal line are not restricted based on the allowed values of related worktag types.
- Alternate Ledger account is not restricted from use by the Line Company.
Here are the main steps to execute an Accounting Center batch run:
1. Initiate Accounting Center batch.
2. Create enriched data.
3. Create detailed accounting.
4. Create summarized accounting.
5. Cancel a batch (optional).
6. Review summarized journals for the batch.
Initiate Accounting Center Batch
When you initiate a batch, it:
- Associates the WPA_Row_ID and WPA_Load_ID on each ingested row from the source system to an:
- AC_Transaction_ID
- AC_Batch
- AC_Batch_Run
- Creates a persisted mapping table.
Follow these steps to initiate a batch:
- Access theInitiate Accounting Center Batchtask.
- As you complete the task, consider:FieldDescriptionAccounting SourceSelect the accounting source for which you want to initiate a new batch.Initiating StageWorkday automatically populates Batch Initiation.Process OptionsWorkday automatically populates Initiate Batch.ConfirmSelect
- Select OK and then Done.Workday:
- Initiates theAccounting Center Batch Initiation Eventbusiness process.
- Automatically launches Enrichment 1 to enrich data for detailed and summarized accounting.
- On the Initiate Accounting Center Batch page, select the batch.The View Accounting Center Batch page displays.
- Select Refresh.
- On the Current View by Stage tab, confirm that the Batch Initiation stage has an In Progress status.
- Select the View by All Runs tab and confirm that the Batch Initiation stage run event has a Primary Process In Progress run status.
- Refresh the page to confirm that the Run Status for the Batch Initiation stage run event has a status of Completed.
Once the Batch Initiation stage is complete, Workday automatically launches Enrichment 1.
Note
: The input table for the Enrichment stage is different from the output table of the Initiation stage.Create Enriched Data
When you enrich data, it prepares the data source for detailed and summarized accounting.
- On the View Accounting Center Batch page, select the Current View by Stage tab, and confirm that the Enrichment stage has an In Progress status.
- Select the View by All Runs tab and confirm that the Enrichment stage has a Primary Process In Progress run status.
- Refresh the page to confirm that the Run Status for the Enrichment stage has a status of Completed. If you have no errors, but still want to rerun the process:
- Select Run.
- For Process Options, select Rollback to Selected Stage and Reprocess.
- For Select Stage, select Enrichment.
- For Include Dismissed, leave cleared.
- Select OK.
- Workday rolls back the transactions to the Enrichment stage and reprocesses the transactions. If there are any errors in the run, a View Errors button for the stage results.
- Select View Errors to view, fix, and reprocess any errors.
Note
: Before you generate Detailed Accounting, ensure you have resolved or dismissed all errors from the Enrichment 1 stage.Create Detailed Accounting
You can generate detailed accounting for financial, operational, and managerial reporting.
- (Optional) Create custom validations.
- Access theFind Accounting Center Batchtask.
- Select the batch for which you want to create detailed accounting.
- On the View Accounting Center Batch page, select the Current View by Stage tab.
- For the Detailed Accounting stage, select Run. The Run Accounting Center Event page displays.
- As you complete the Create Detailed Accounting task, consider the following fields:FieldDescriptionAccounting SourceStageBatchWorkday automatically populates these fields:
- Accounting Source
- Stage
- Batch details
Process OptionsSelectRun Unprocessed Transactionsto have Workday create detailed accounting for unprocessed transactions. - SelectOKandDone. The process initiates an Accounting Center detailed accounting event.
- On the Current View by Stage tab, confirm that the Detailed Accounting stage has anInProgressstatus.
- Select the View by All Runs tab and confirm that the Detailed Accounting stage has a status ofCompleted.
- Refresh the page to confirm that the Run Status for the Detailed Accounting stage has a status of Completed. If you have no errors, but still want to rerun the process:
- SelectRun.
- For Process Options, select Rollback to Selected Stage and Reprocess.
- For Select Stage, select Detailed Accounting.
- For Include Dismissed, leave cleared.
- SelectOK.
Workday rolls back the transaction to the Detailed Accounting stage and reprocesses the transactions.If there are any errors in the run, you will notice a View Errors button for the stage. - Select View Errors to view, fix, and reprocess any errors.
Note
: Before you generate summarized accounting, ensure you have resolved or dismissed all errors from the Detailed Accounting stage.Create Summarized Accounting
You can generate summarized accounting to aggregate detailed accounting results.
Note
: Summarized journals will not check for budget check and will post even if they cause the budget to exceed.- On View Accounting Center Batch page, select the Current View by Stage tab.
- For the Summarization stage, selectRun. The Run Accounting Center Event page displays.
- As you create summarized accounting, consider the following:FieldDescriptionAccounting SourceWorkday automatically populates these fields:
- Accounting Source
- Stage
- Batch details
Process OptionsSelect Run Unprocessed Transactions to have Workday create summarized accounting for unprocessed transactions. - SelectOKandDone.The process initiates a Summarization event.
- On the Current View by Stage tab, confirm that the Summarization stage has an In Progress status.
- Select the View by All Runs tab and confirm that the Summarization stage has a Primary Process in Progress run status.
- Refresh the page to confirm that the Run Status for the Summarization stage has a status ofCompleted.If there are any errors in the run, you will notice a View Errors button for the stage.
- Resolve, fix, and reprocess any errors.
Note
: Before you can view summarized accounting, ensure you have resolved all errors from the Summarization stage.Cancel a Batch (Optional)
You can cancel an in progress or completed batch.
To cancel a batch, from the batch's Related Actions menu, select Accounting Center Batch > Cancel Accounting Center Batch.
When you cancel a batch, Workday:
In Progress Batches | Completed Batches |
|---|---|
Terminates new transactions from further processing | Terminates new transactions that were successful and any error transactions, which you dismiss from further processing. Reinsert the terminated transactions to process them in a subsequent batch |
Eliminates all successful and error transactions for both the enriched and detailed accounting stages | New and reprocessed error transactions, which Workday dismisses to an Error Manager will be available in Error Manager for you to resolve. |
Doesn't include the transactions in future batches and ignores original data permanently. If you need to use the data in future batches, you must prepare the data again for ingestion | New and reprocessed error transactions that Workday dismisses to a future batch are available in a new batch |
Workday will include transactions that were being reprocessed (prior dismissed transactions) for the canceled batch in a subsequent batch. | Reprocessed transactions that Workday includes in this batch and were successful are available for a new batch |
Note
: Workday will include transactions that were being reprocessed (prior dismissed transactions) for the canceled batch in a subsequent batch.Review Summarized Journals for the Batch
To review summarized journals for the batch, please do the following:
- From the batch's Related Actions menu, select Accounting Center Batch > View Accounting Center Summary Journals.
- Select the journal for which you want to view summarized accounting.
- To navigate back to the Accounting Center batch, from the journal's Related Actions menu, select Journal Entry > View Accounting Center Batch.
Maintain Accounting Center Processing Window
The
Maintain Accounting Center Processing Windows
task enables you to schedule a time to delay Workday Accounting Center upgrades. This task allows you to continue to run your scheduled business critical Accounting Center batches as planned.Correct Accounting Center Batch Errors
After you create an accounting center batch, configure the
Request
business process with these additional business objects; to track errors; and submit approval requests for error response:- Accounting Source
- Custom Account Posting Rule Dimension
- Custom Account Posting Rule Type
- Account Posting Rule Set
- View Mapping Table
You can review and resolve errors for each stage. After you resolve the errors, you can then reprocess them.
Here are the steps to view and resolve errors for enriched data:
1. Access the Find Accounting Center Batches report.
2. Select From date and select OK. The Find Accounting Center Batches page displays.
3. Select the batch for which you want to resolve errors. The View Accounting Center Batch page displays.
4. Select the View By All Runs tab.
5. For the Enrichment stage, select View Errors. The View Summary by Error Type page displays the summarized errors and the number of transactions with the error type.
6. For each error message, select View Details. The View Errors for Accounting Center Batch Run page displays all Transaction_IDs for the specific error. For more information on Transaction_IDs, review
View Detailed Accounting Results.
7. For each AC Transaction_ID, select
View Details
. The View Error Details page displays error details for the selected transaction, such as:- Transaction_ID
- Batch
- Batch Run
8. In addition, the View Error Details page also displays these two grids:
A. Error Summary: Expand the grid to display details for the Transaction ID error in the enriched dataset, such as:
Error Message.
Prior Stage WPA_Row_ID, that you can use to find the Actual Row ID of the input dataset for the stage.
Accounting Source Snapshot.
Account Group Name.
B. Prior Stage Transaction: Expand the grid to display details of the records included in the transaction from the prior stage. The number of lines displayed on the grid depends on the number of records in the specified transaction. If the transaction contains one record, the grid will display one line. If the transaction contains more that one record, the grid will display multiple lines.
9. Review and fix the errors before proceeding further.
10. On the View Accounting Center Batch page, select the Current View By Stage tab and select Run. For Process Options, select one of these options:
Field | Description |
|---|---|
Processing Options | To process errors:
|
Here are the steps to view and resolve errors for detailed accounting:
- On the View Accounting Center Batch page, select the View by All Runs tab.
- For the Detailed Accounting stage, select View Errors. The View Summary by Error Type page displays the summarized errors and the number of transactions with the error type.
- For each error message, select View Details. The View Errors for Accounting Center Batch Run page displays all Transaction_IDs for the specific error.
4. For each Transaction_ID, select View Details. The View Error Details page displays error details for the selected transaction, such as:
- Transaction_ID
- Batch
- Batch Run
5. In addition, the View Error Details page also displays these two grids:
A. Error Summary Grid: Expand the grid to display details for the Transaction_ID error in the Detailed Accounting dataset, such as:
- Error Message.
- Prior Stage WPA_RowID, that you can use to find the Actual Row ID of the input dataset for the stage.
- Accounting source journal line rule are rules that you specified on the Journal Line Rules tab when you configured your accounting source.Note: This value will be unavailable if errors occur at the journal header level or if condition rules fail to select a journal line rule.
- Accounting Source Snapshot.
- Accounting Group Name.
B. Error Details Grid: Displays these two tables that can help you to resolve errors. The tables display these details:
From the user configuration on the Accounting Source Snapshot.
On the user-defined Custom Validations.
Table | Description |
|---|---|
Configured Header and Lines | Displays results of merging your enrichment data with your configured accounting source snapshot. Not all fields contain an error; therefore, some fields can be blank. |
Expected Detailed Accounting Journals | Displays details of the expected detailed accounting journals. Not all fields contain an error; therefore, some fields can be blank. Additionally, this table will be blank if the errors only occur on the Configured Header and Lines table. |
You can use the Accounting Center Error Manager to track and resolve dismissed errors and custom dismiss transactions for completed and canceled batches in an accounting source.
Unresolved errors and custom dismiss transactions that you dismiss out of a batch will be visible in the Error Manager once the batch is complete. You can only select completed or canceled batches. In order to use Accounting Center Error Manager your Accounting Source must have the Accounting Center Process Configuration set as "Always Advance to Next Stage and Dismiss Errors from the Batch."
You can use the Accounting Center Error Manager to:
- View:
- Dismissed transactions by error.
- Nature of each error.
- Number of error transactions.
- Number of transactions pending resolution.
- Apply resolutions at the transaction level.
After you process error resolutions, Workday will remove them from the Accounting Center Error Manager.
Accounting Center Error Manager
You can use the Accounting Center Error Manager to track and resolve dismissed errors and custom dismiss transactions for completed and canceled batches in an accounting source.
You can use the Accounting Center Error Manager to:
- View:
- Dismissed transactions by error.
- Nature of each error.
- Number of error transactions.
- Number of transactions pending resolution.
- Use transactional data to filter and group error transactions in the error manager.
- Apply resolutions at the transaction level. The resolutions available are:
- Process with Next Batch: Workday will process the transaction in the next batch
- Terminate: Workday will terminate the transaction. It will no longer be available for processing. (Reinsert them for reprocessing).
After you process error resolutions, Workday will remove them from the Accounting Center Error Manager.
View Detailed Accounting Results
In order to review the detailed accounting created from the Accounting Source create a custom report. To view the detailed accounting results in the Accounting Source go to view the Accounting Source Implementation and click on the Detailed Accounting Output Dataset. Once in the dataset toggle to the Table View to see detailed accounting results.
Review some of the fields displayed:
Worktags and Additional Attributes
: Are displayed in the far right of your dataset, with Additional Attributes prefixed with AA.AC_Transaction_ID
: Is a system-generated field that uniquely identifies transactions. When each row of your enriched data generates a balanced entry, each row represents a single transaction for which Workday generates a unique transaction ID. When Accounting Center groups multiple rows to generate a balancing entry with a user-supplied Transaction Grouping ID, Workday generates a unique transaction ID using the user-supplied Transaction Grouping ID.Accounting Center Batch
: Indicates the batch number for the detailed transactions.Accounting Center Batch Run
: Indicates the Detailed Accounting Batch Run stage completed by the batch run.Accounting Source Snapshot
: Click the snapshot to view the accounting source configuration that generated this line in detailed accounting. The format of this value is: Name of the Accounting Source ,
Effective Date ,
Last UpdatedAccounting_Source_Journal_Line_Rule
: Refers to the row on your Journal Line Rules
tab when you configure your accounting source.- These fields might have Null values depending on your configuration.
- Null values aren't errors.
Original Date of Reversed Journal
: For reversal journals, displays the original date of the journal.Intercompany Affiliate
: For intercompany transactions, displays the name of the intercompany affiliate.Intercompany Direction
: Indicates whether line is an Intercompany Receivable or Payable.Intercompany Type
: Indicates intercompany accounting type. Workday supports the 2-sided use case and automatically generates both due-to and due-from entries in detailed accounting.Transaction Debit and Credit Amounts
: Amounts in your transaction currency.Transaction Currency
: The currency that you associate with a transaction when you create or edit it.Ledger Debit and Credit Amounts
: Transaction amounts in your ledger currency.These fields relate to currency conversion features:
Rounded as Biggest Line
Workday applies rounding adjustments to the largest line. Automatically populates to False.Currency Rate Type
: Type that identifies the source and purpose of a set of rates. Example: Current, Average, Historic.Currency Rate
: Rate used to convert transaction amounts to ledger amounts.WPA_LoadID and WPA_LoadTimestamp
: Are Workday generated columns.Delivered Reports:
You can access the
Workday Standard Reports
report to view all reports for Accounting Center.Batches Impacted During Disaster Recovery report | Enables you to identify batches impacted during disaster recovery. |
|---|---|
Run Time Metrics at Batch Level report | Enables you to monitor trending run time metrics at batch level. |
Run Time Metrics at Batch Stage Level report | Provides trending run time metrics for all stages in a batch or batches. |
Run Time Metrics at Batch Run Level report | Enables you to report on trending run time metrics at batch run event level. |
View Accounting Source Snapshot report. | Provides details of a specific effective dated accounting source snapshot configuration. |
Manual Accounting Center Detailed Journal
You can create Manual Accounting Center journal entries, including Additional Attributes, using the Accounting Center Detailed Journal Approval Event and Accounting Center Detailed Journal Batch Initiation Event.
First configure which Additional Attributes can be edited through a manual journal with the Configure Detailed Journal Additional Attributes task. You can have up to 10 additional attributes per Accounting Source.
Manual Accounting Center Journals do not post directly to the ledger and do not go through the enrichment process. Instead, the Journals are submitted into the Detailed Accounting and Summarization stages of the Accounting Source, and will go through batch processing for those stages. You can review the progress of the batch using Find Accounting Center batches. The Manual Detailed Journals batch type can identify the Manual Journals. The summary journal is posted to the ledger at the end of the batch process.
You can create custom validations for the Accounting Center Detailed journals but they do not support Additional Attributes.