
Absence Management Business Processes
Overview
Time off and leave business processes include the tasks that must be completed and the actions that must be taken for the absence event to occur. This chapter covers the primary time off and leave business processes that drive workflow within Workday Absence Management.
Objectives
By the end of this chapter, you will be able to:
- Identify and access time off business processes.
- Identify and access leave of absence business processes.
- Describe the Absence Calendar business process and explain its relationship to the Time Off and Leave of Absence business processes.
- Configure time off plan balance transfers.
- Configure time off plan termination payouts.
Time Off and Leave of Absence Business Processes
The business processes for Workday Absence Management Include:
- Time off business processes
- Leave of absence business processes
- The Absence Calendar business process
Time Off Business Processes
Time Off includes the following business processes:
- Request Time Off
- Correct Time Off
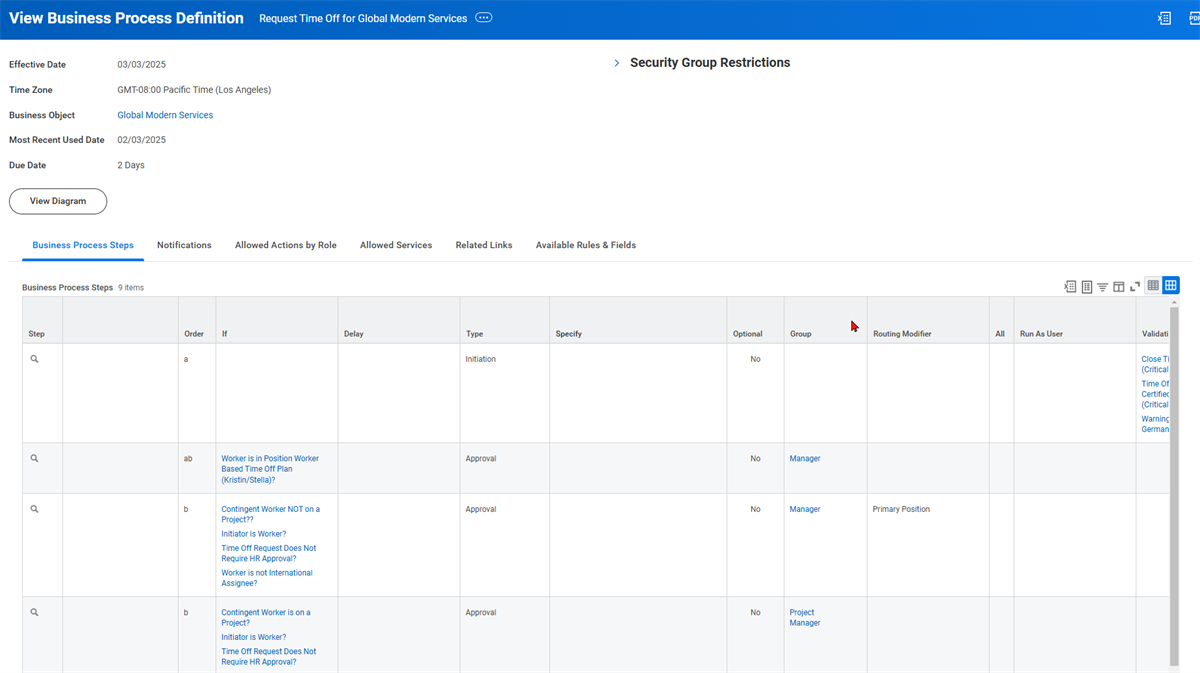
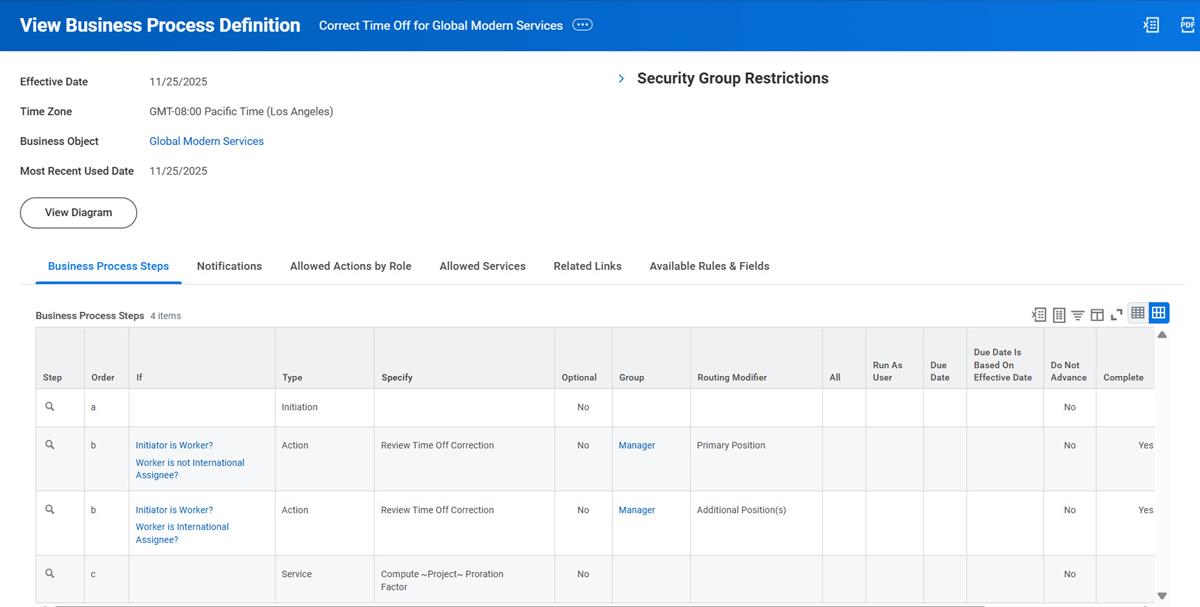
You can configure the time off business processes to include additional approval steps, specific validations, to-dos, notifications, and other actions. You can also include conditional rules to activate the steps after meeting the conditions.
Note
: To ensure time off requests route to the appropriate security groups for a worker on international assignment, you can add routing modifiers to the Request Time Off
or Correct Time Off
business processes. You can add a primary position or additional positions routing modifier to any step (other than initiation) in these business processes.When processed, a time off entry does not have a correct or rescind option in the worker history. Therefore, you will use the
Correct Time Off
business process to remove or update the existing time off.Leave of Absence Business Processes
Leave of absence includes the following business processes:
- Request Leave of Absence
- Request Return from Leave of Absence
By default, these business processes include the Review, To Do, and other steps. You can configure the business processes to include additional review, validation, or approval steps, as well as notifications and other actions.
Request Leave of Absence Business Process
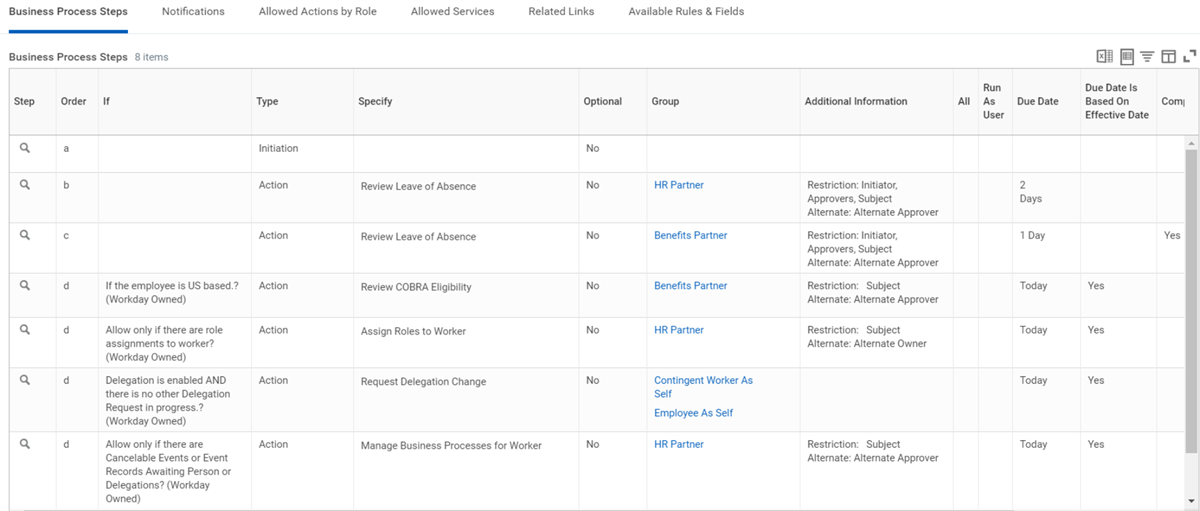
Request Leave of Absence Business Process Steps
You can configure Workday to allow workers and managers to submit leave requests through self-service. Based on the Request Leave of Absence business process, the system automatically routes the request to the appropriate manager or administrator for review. Reviewers can then approve, deny, or send the request back for revision. Administrators with the appropriate permissions can correct or rescind leave requests. If the leave type setting is to inactivate the worker, then once approved, Workday automatically sets the employee to inactive status.
Employees and managers can track the status of leave requests in delivered reports and queries.
Request Return from Leave of Absence Business Process
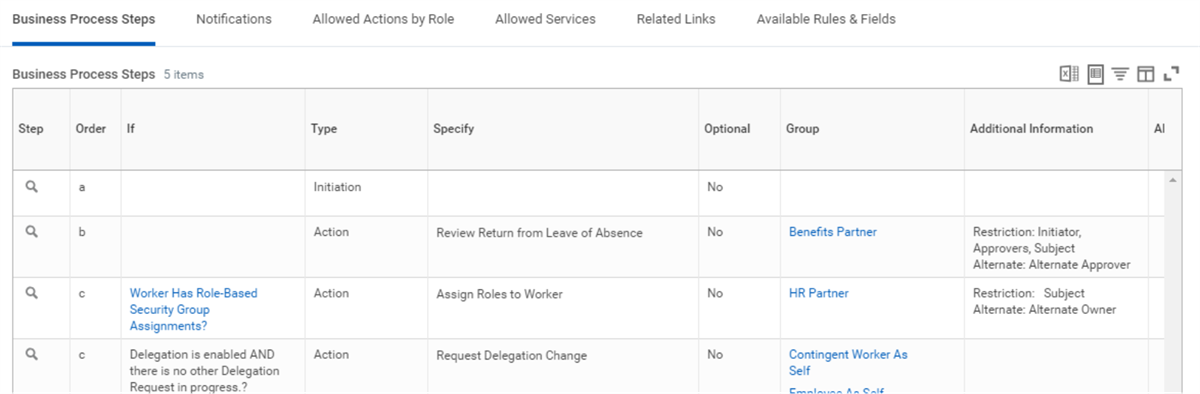
Return from Leave of Absence Business Process Steps
With a leave return, you must first submit a request to return the employee from leave. Reviewers can then:
- Approve the request.
- Deny the request.
- Send the request back for revision.
If you have set the leave type for a leave request to inactivate the worker, then, once you approve the leave return, Workday automatically sets the employee's status to active again. If necessary, you can correct or rescind the event as a related action on the leave return from the
View Worker History
task.Select the View Diagram button to view an illustration of the business process flow.
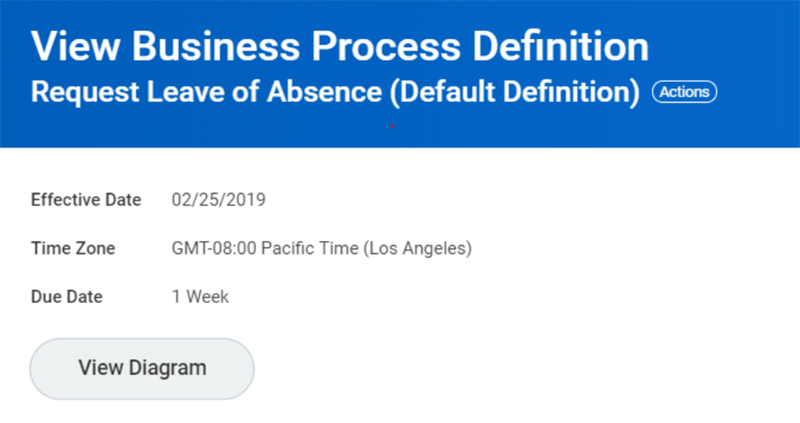
View Business Process Definition - Request Leave of Absence (Default Definition)
Adding a Routing Modifier
For a worker on international assignment, you can ensure absence requests route to the appropriate security groups by using a routing modifier. You can add a Primary Position or Additional Position(s) routing modifier to any step (excluding initiation) for the following business processes:
- Request Leave of Absence
- Request Return from Leave of Absence
Absence Calendar Business Process
The
Absence Calendar
business process contains an initiation step, which can be thought of as an initiating action for employees and managers for:- Request Time Off
- Correct Time Off
- Request Leave of Absence
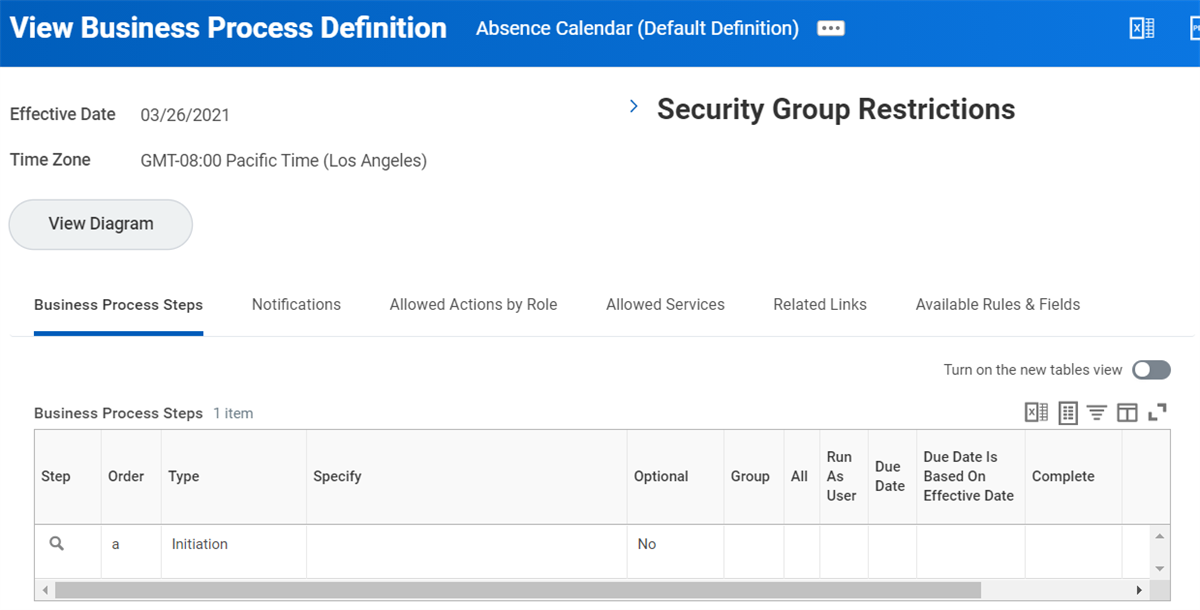
Business Process Definition - Absence Calendar (Default Definition) Business Process Steps
With the
Absence Calendar
business process, workers and managers submit and correct absence requests from the Absence Calendar. Workers access the Absence Calendar by using the Request Absence
or Correct My Absence
reports. Managers access the Absence Calendar by using the Enter Absence
or Correct Absence
reports. When employees and managers submit requests and corrections from the Absence Calendar, the following occurs:- A time off request triggers theRequest Time Offbusiness process.
- A time off correction triggers theCorrect Time Offbusiness process.
- A leave of absence request triggers theRequest Leave of Absencebusiness process.
Resource
: For more information about the Absence Calendar, visit Workday Community: Concept: Absence CalendarAbsence Calendar Experience
The Absence Calendar Experience (ACE) allows you to use the Request Absence micro calendar to enter and view absence requests. It also allows you to use the Manage Absence calendar to enter, view, correct, and cancel absence requests, as well as to perform other actions, including:
- Request Return from Leave of Absence
- Sell Time Off
- Access the Team Absence Calendar and the Time Off and Leave Calendar
- View Absence Thresholds
- View Teams
Enable ACE by configuring the initiating actions on the business process security policies for time off and leave. To configure the initiating actions:
- Search for and select the business process.
- From the business process's Related Actions, select Business Process Policy > Edit.
- Edit the business process security policies as follows:
- For theRequest Time Offbusiness process security policy, in the Who Can Start the Business Process section, add the security groups that have permission to start these initiating actions:
- Request Time Off for Self
- Request Time Off for a Worker
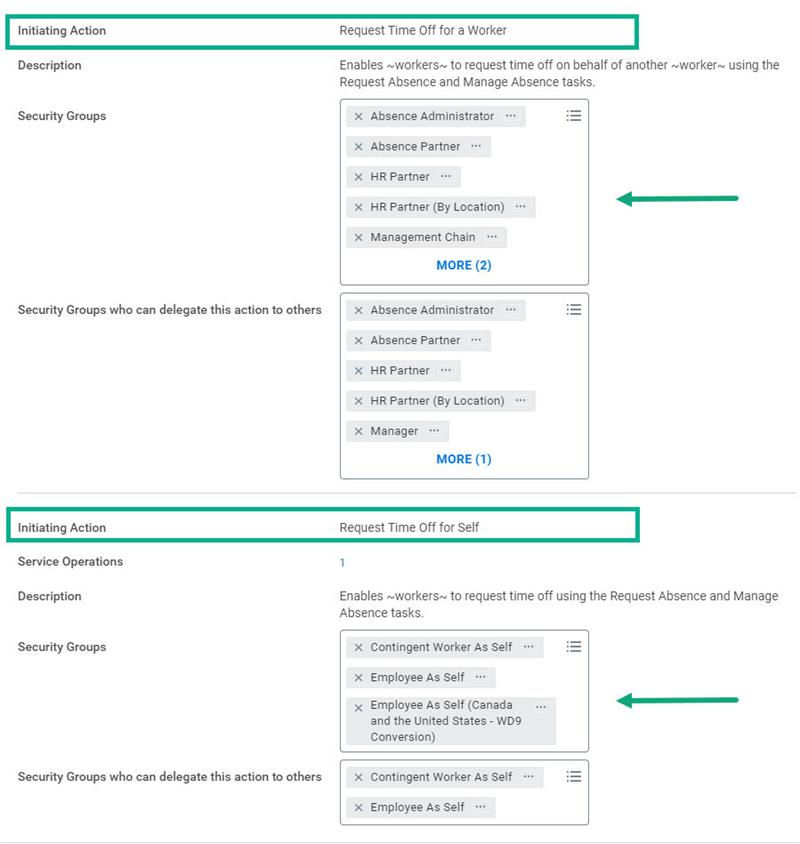
- For theCorrect Time Offbusiness process, in the Who Can Start the Business Process section, add the security groups that have permission to start these initiating actions:
- Edit Time Off for Self
- Edit Time Off for a Worker
- For theRequest Leave of Absencebusiness process, in the Who Can Start the Business Process section, add the security groups that have permission to start these initiating actions:
- Request Leave for Self
- Request Leave for Worker
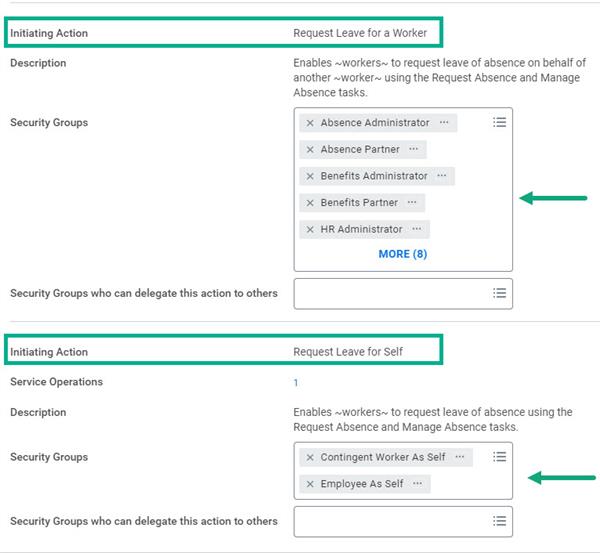
Resource
: For more information on configuring the Absence Calendar Experience, visit Workday Community: Steps: Set Up the Absence Calendar Experience.Adding Attachments
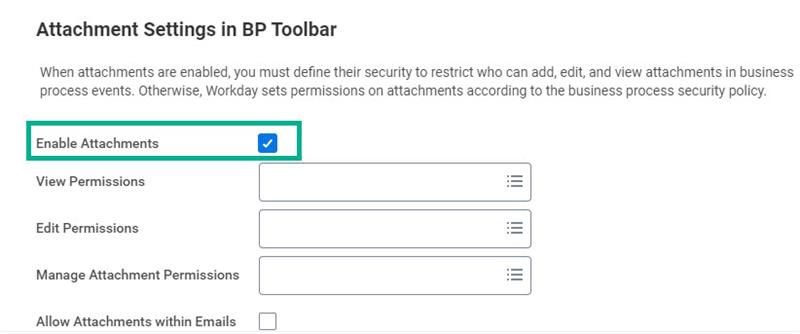
You can allow users to add attachments to their absence requests. To allow attachments to a time off or leave request:
- Enable at the tenant level, using theEdit Tenant Setup-Business Processestask and select theEnable Attachmentscheck box.
- Search for and select the business process to which you want to enable attachments.
- From the business process's Related Actions, select Business Process Policy > Edit.
- In the Attachment Settings in the BP Toolbar section, select the Enable Attachments checkbox.
Transfer / Payout Time Off Plan Balances during a Job Change
As transfers, promotions, and other staffing changes occur in your organization, workers may lose eligibility in one plan and gain eligibility in another.
The Time Off Transfer Balance feature allows you to transfer or payout time off balances when workers lose eligibility in one time off plan and become eligible for a different time off plan.
Update Time Off Requests
You can include the
Update Time Off Requests
subprocess in the Change Job
business process. This subprocess allows you to update a worker's future time off requests to compatible time off types in the worker's new time off plan as a part of the staffing change.Maintain Time Off Transfer Balances
You can also include the
Time Off Balance Transfer
subprocess in the Change Job
business process. This task will allow you to transfer a worker's current balance to the worker's newly eligible plans or pay out balances.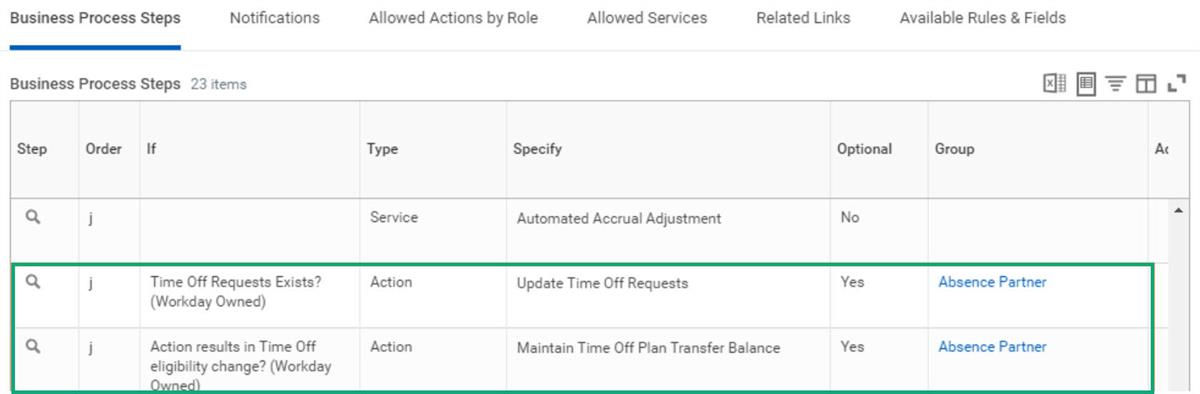
Maintain Time Off Unit of Time Conversion Calculations
When a worker loses eligibility for one plan and gains eligibility for another, it is possible the two plans will not operate using the same unit of time. Workday may calculate one plan in hours, while calculating another in days. Therefore, to transfer balances effectively, configure a time off conversion calculation to equate hours to days and vice versa.
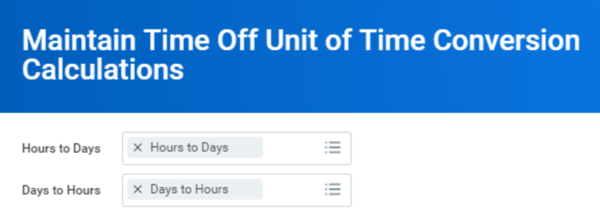
Maintain Time Off Unit of Time Conversion Calculations Task
Workday delivers the
Maintain Time Off Unit of Time Conversion Calculations
task with arithmetic calculations preconfigured for these conversions.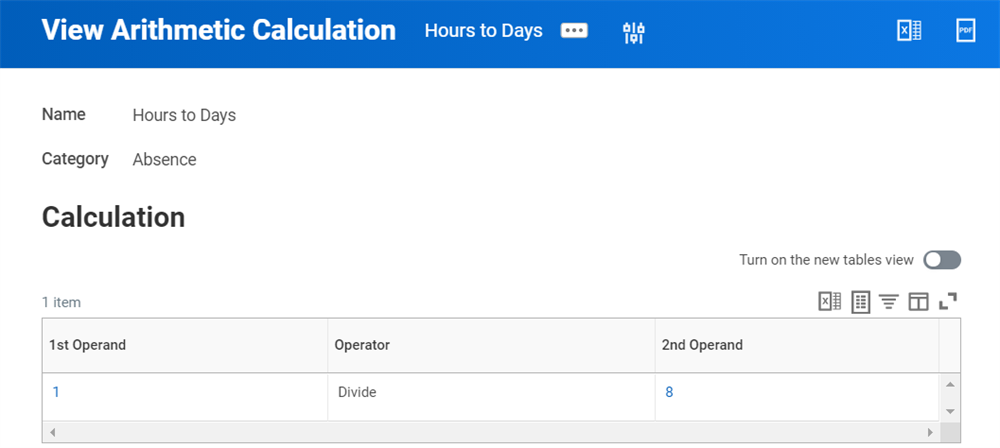
Arithmetic Calculation - Hours to Days
Time Off Plan Configuration
To facilitate the automation of balance transfer during the
Change Job
business process ,
there are several fields that you can configure on the time off plan.Field | Description |
|---|---|
Balance Transfer Defaults | This field is on the Balance tab of the time off plan. The field indicates the possible time off plans to which to transfer a time off plan's balance. These options will then appear in the pull-down list when selecting which plan to transfer a time off plan balance to. If a 1:1 relationship exists, the entirety of the balance from the old plan will automatically move to the new plan. Note : This field is not required. However, it can aid an administrator when transferring a worker. |
Time Off for Balance Transfer Adjustments | This field is on the Time Off tab of the time off plan and drives the ability to pay out a balance during a transfer. Select the time off that will create the payout adjustment once a transfer completes. |
Cascading Leaves
Cascading leaves streamline the process of moving employees from one leave type to another, such as from short-term disability to long-term disability. You define the sequence of leave types and conditions that end one leave type and begin the next. When a leave ends, Workday generates a request to return the employee from leave and a separate request to begin the next leave.
Defining Conditions for Triggering the Next Leave
Define the sequence of leaves by using the
Create/Edit Leave Type
task to identify the Next Leave Type for each leave.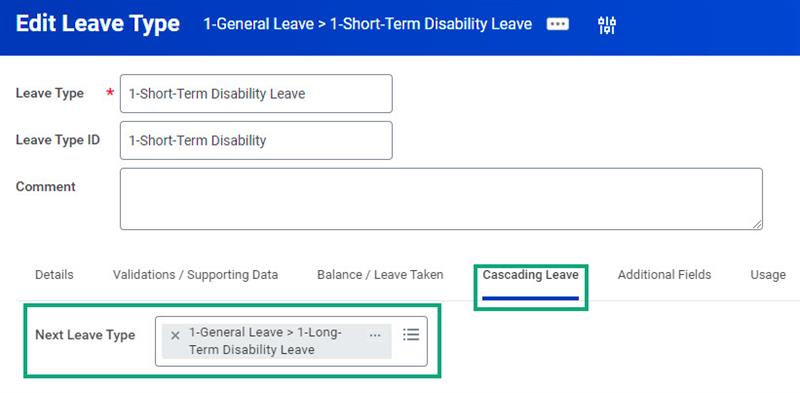
Then, after the completion step in the
Request Leave of Absence
business process, add the Automated Leave Processing service with a step delay.The Automated Leave Processing Service
The Automated Leave Processing Service generates a return request for all leaves, including leaves that are not part of a cascade.
- To limit automation of return requests to cascading leaves, add condition rules to the service step in the business process, specifying which leave types to include or exclude.
- The step delay controls when to generate requests to return employees from leave and start the next leave.
- Workday provides this report field for use in the step delay: Last Date of Entitlement or Estimated Last Day or Actual Return Date.
- You can also use calculated date fields to define different step delay rules for different sets of employees, leaves or both.
Important
: When a leave request reaches the completion step in the business process, the delay step sets the return date. The step does not adjust the date in response to subsequent changes. The delay step is based on the estimated last day of leave. For example, a leave request has July 11 as the Estimated Last Day of Leave. Once you approve the request and the business process is complete, even if the administrator changes the date to August 11, Workday still generates the return request for July 11.When an Employee's Leave Ends
Each day, the Automated Leave Processing service checks for employees who meet the conditions specified by the delay step for ending the leave. For employees who meet these conditions, Workday generates:
- A return request for all leaves, including leaves that are not part of a cascade. Workday sets the Actual Last Day of Leave to the date the employee sends the return request.
- A request to start the next leave type if the employee meets its eligibility requirements.
Preventing an Employee's Leave from Cascading
To prevent an employee's leave from cascading, you can do one of the following:
- Return the employee from leave before Workday generates the next leave request.
- Deny the next leave request.
- Rescind the employee's next leave if yourRequest Leave of Absencebusiness process sets leave requests to the completion step without requiring approval.
Leave Request Routing
The initiator of the original leave request is the initiator of:
- The return request.
- The next leave request.
To identify requests for cascading leave that you want to route differently from other leave requests, create a condition rule in the business process. You can use the Leave Event is Part of Cascade report field as the condition rule.
Report Fields for Cascading Leaves
The report fields for cascading leaves include:
- Cascading Leave Event - Succeeding
- Leave Type for succeeding cascading Leave Event
- Cascading Leave Event - Preceding
- Leave Type for preceding cascading Leave Event
- Leave Event is Part of Cascade
Viewing the Sequence of Leaves
To display the full sequence of leaves for a cascading leave, access the
View Leave Family
report or the All Leave Families
report.Important
: You can also add the Automated Leave Processing service step to the Terminate business process to automatically end any leave events for employees upon their termination.Automating Payout of Plan Balance upon Termination
A termination adjustment is a time off adjustment that Workday generates for employees upon their termination. It sets the employee's remaining time off plan balance to zero. It takes into account time offs, accruals, and any adjustments for dates on or before the employee's termination date.
To generate termination adjustments, a time off plan must specify which time off to use for termination adjustments. In addition, the
Termination
business process must include a step for these adjustments.Viewing Termination Adjustments
Use the
Maintain Accrual and Time Off Adjustments/Override
task to view an employee's termination adjustment. A Termination Adjustments tab appears as soon as an administrator approves the termination. The Reference Date column on the tab displays the termination date.Workday hides termination adjustments from employees until the day after their termination date. Employees continue to see their unadjusted balances and can request time off as before. They will not receive validation errors if their plan balance is too low to cover requests because of a termination adjustment.
Managing Termination Adjustments
Workday automatically updates termination adjustments in response to certain events that happen after an adjustment's creation. When Workday updates a termination adjustment, it considers any previous manual adjustments.
You cannot update a termination adjustment directly. However, you can use the Adjustment tab in the Maintain Time Off and Accruals Adjustments/Overrides task to enter a positive or negative time off adjustment to offset the termination adjustment.
Events that update termination adjustments (upon their approval) include:
- Time off requests or corrections for dates on or before the employee's termination date.
- Rescinded terminations. Workday restores the employee's plan balance and removes the Adjustments tab from the Maintain Time Off and Accruals Adjustments/Overrides page.
- Corrections to termination dates. For example, you correct a termination date of October 20 to November 15. Workday then updates the termination adjustment for any time off, adjustments, overrides, or accruals between the original and the corrected termination dates.
Events that do not update termination adjustments include:
- Manual adjustments.
- Accrual overrides and overrides to time off plan balances entered after Workday generates a termination adjustment.
- Requests to take compensatory time off (time off in lieu) entered through Workday Time Tracking.
Before you can automate a plan balance payout, you must complete the following steps:
- Update theTerminationbusiness process by adding the Adjust Time Off Balances service after the completion step.
- Select the time off to use to create termination adjustments for a plan.
- Review eligibility requirements for the time off plan and time off and update, if necessary, to cover employees who are terminated midperiod.
Note
: To receive a termination adjustment, an employee must be eligible for the time off plan and adjusting time off on the effective date of the termination.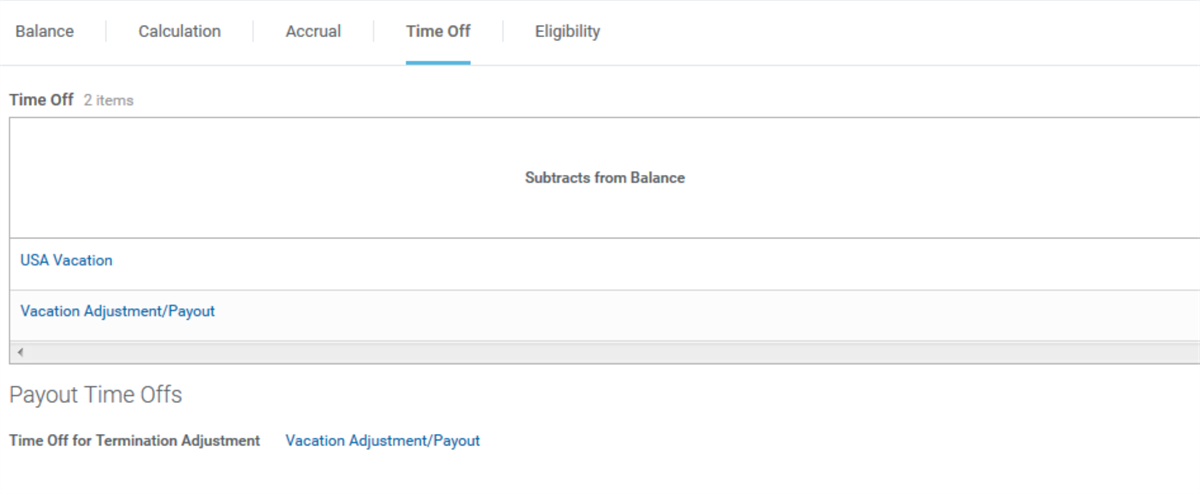
Time Off Plan - Time Off Tab with Time Off for Termination Adjustment Indicated
Automated Leave Processing for Terminations
When an employee is on leave and is terminated, the employee will need to be returned from leave to complete the termination process. You can synchronize termination and return from leave dates for employees terminated while on leave. To synchronize these dates, in the Termination Business process, add a Service step after the Completion step and specify Automated Leave Processing.
Absence Case Creation
Many countries have statutory requirements for the reintegration process for workers who are on long-term time off or leaves of absence. Use the
Absence Case Event
business process to track and assist workers who are on long-term time offs and leaves of absence in countries with statutory requirements. This business process allows you to:- Track workers' progress as they reach milestones and checkpoints in their path to rejoining the workforce.
- Define a checklist of various reintegration activities, such as meetings and compensation changes, and the timeline over which they occur.
Within Workday, you can automate or manually create absence cases.
Manual Absence Case Creation
If your business process or absence case group configurations do not apply to a worker's situation, you can manually initiate an absence case. Use the
Create Absence Case
task to manually initiate an absence case.Automated Absence Case Creation
To automate the creation of an absence case, first create absence case groups by using the
Create Absence Case Group
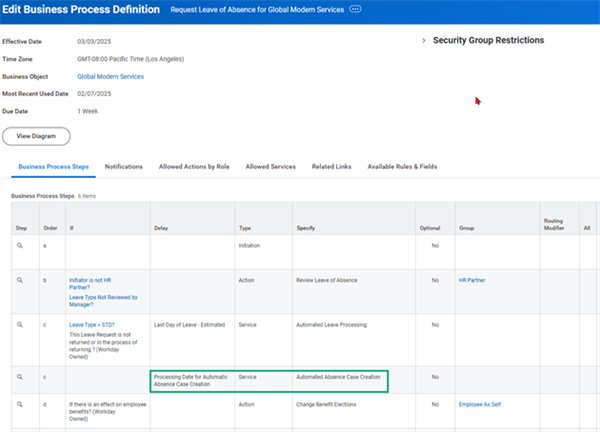
task. Absence case groups define the conditions that automatically initiate absence cases for workers. The groups are based on a set number of absence days in a defined period.After you create the absence group, add the Automated Absence Case Creation service step after the completion step on these business processes:
- Request Time Off
- Request Leave of Absence
The service step automatically initiates an absence case when a worker's time off or leave of absence meets the configured parameters for an absence case group.
To prevent the initiation of an absence case until workers meet their absence case group parameters, add a step delay to the Automated Absence Case Creation service step. Use the Processing Date for Automatic Absence Case Creation report field to add a step delay.
Note
: Without a step delay, the Automated Absence Case Creation service step initiates an absence case at the start of the long-term time off or leave of absence.