Absence Management Administration
Objectives
By the end of this chapter, you will be able to:
- Identify and describe common time off and leave administration tasks.
- Identify the available web services for performing time off and leave administration tasks.
- Describe the process for calculating time off plan balances.
- Explain time off security segment.
- Describe additional administration functions used to meet an organization's needs.
- Explain how to configure time offs for selling.
- Access the Absence Administrator Home page.
- Explain how to create custom labels to align absence management with your organization's terminology.
Overview
Workday Absence Management administration involves performing tasks to ensure the accurate entry and processing of employees' time off requests, balances, and accruals. It also involves performing tasks to manage employee leaves of absence. This chapter introduces you to common administrative tasks to manage and maintain employee absence information.
Common Time Off Administration Tasks
Common time off administration tasks include overriding and adjusting employees' time off, accruals, and time off plan balances due to:
- Job or employment status changes
- Company-wide changes
- Time off request and balance corrections
Workday allows you to perform these administration tasks manually or en masse through EIBs.
Maintain Employee Time Offs
The following table lists and describes the Workday tasks and EIBs for maintaining employees' time off information.
Task (Manual Update) | EIB (Mass Update) |
|---|---|
Request Absence > Request on Behalf Of, Manage Absence > Switch Worker or Enter Absence .Allows you to enter time off on behalf of an employee. These tasks follow the Request Time Off business process.Note : If your organization uses the Absence Calendar Experience, you will use the Request Absence micro calendar and Manage Absence calendar. If your organization uses the Absence Calendar, you will use the Enter Absence task. | Enter Time Off: Allows you to enter mass transactions that follow the Request Time Off business process. |
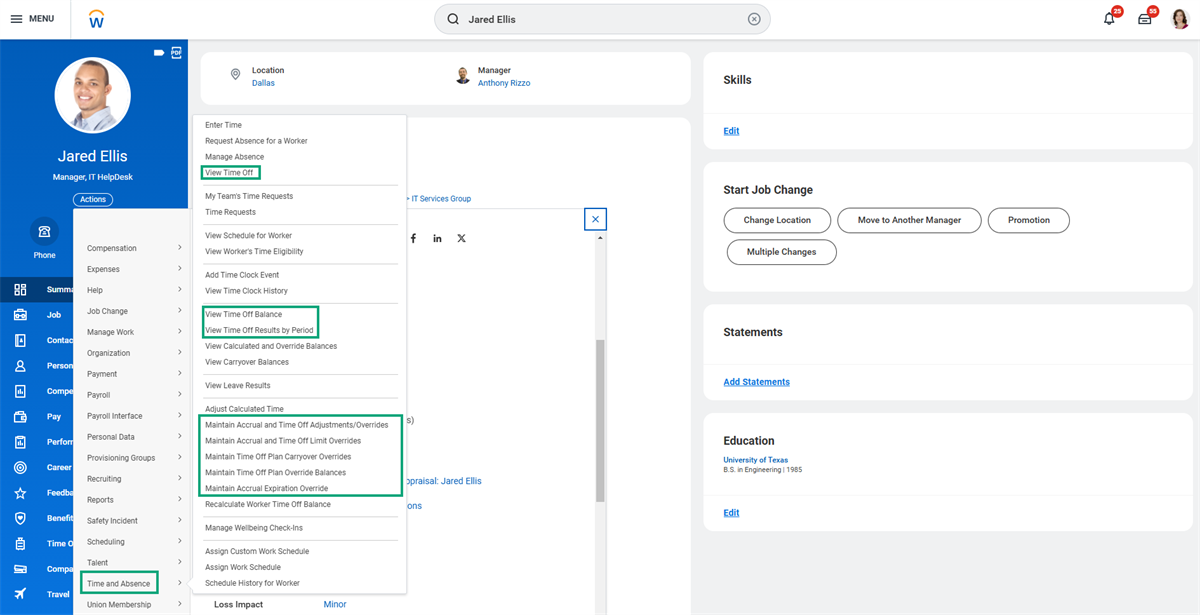
Maintain Accrual and Time Off Adjustments/Overrides Allows you to adjust an employee's time off for a single processing period. Time off adjustments subtract from the employee's time off balance. Note : Time off limits and the timing of accrual processing can reduce or eliminate an adjustment. |
|
Maintain Accrual and Time Off Limit Overrides Allows you to suspend the upper, lower, time off limit for a defined period. | Not applicable |
Manage Absence or Correct Absence Allows you to correct an approved time off entry. These reports follow the Correct Time Off business process.Note : If your organization uses the Absence Calendar Experience, you will use the Manage Absence calendar. If your organization uses the Absence Calendar, you will use the Correct Absence task. If your organization uses the Time Off and Leave calendar, you will use the Correct Time Off task. | Adjust Time Off: Allows you to enter mass transactions that follow the Correct Time Off business process |
Adjust Time Off
If the employee is not eligible for the time off you are adjusting, Workday will process the adjustment only if you modify the time off eligibility criteria.
To modify eligibility criteria:
- Access theEdit Time Off Plantask or theEdit Time Offtask, depending on where you defined eligibility for the time off.
- Add Absence Input (Period-Specific) Exists for the Job for Absence Component (a Workday-provided calculation) to the eligibility rules.Note: This rule works for both worker-based and position-based time off plans. For position-based plans, Workday looks for position input.
Maintain Employee Accruals
The following table lists and describes the Workday tasks and EIBs for maintaining employees' accrual information.
Task (Manual Update) | EIB (Mass Update) |
|---|---|
Maintain Accrual and Time Off Adjustments/Overrides Allows you to:
Important : Be sure to add any accrual and adjustment/override calculations on a separate row in the eligibility grid.Notes :
|
|
Maintain Accrual and Time Off Limit Overrides Allows you to suspend the upper limit of an employee's accrual for one or more absence processing periods. | Not applicable |
Maintain Accrual Expiration Overrides Allows you to override the expiration rules defined on an accrual to handle exceptions or special employee circumstances. Example: an employee on leave. |
|
Delete Accrual Adjustments/Overrides by Batch ID Allows you to delete accrual adjustments and or overrides. Note : Adjustments and overrides for deletion must have a batch ID. Workday automatically associates batch IDs with adjustments and overrides loaded using the Get Absence Inputs and Put Absence Inputs web services. You can also associate a Batch ID with manually entered adjustments and overrides. | Put Absence Input: Allows you to perform mass accrual override deletions. |
Adjusting an Accrual
If the employee is not eligible for the accrual, Workday processes the adjustment only if you modify the accrual eligibility criteria.
Note
: This rule does not apply to front-loaded or based-on-as-of-date accruals. You can only create adjustments for those accruals for which the worker is eligible.To modify eligibility criteria:
- Access theEdit Time Off Plantask or theEdit Accrualtask, depending on where you defined eligibility for the accrual.
- Add one or more of the following calculations, which Workday provides, to the eligibility rules:
- Absence Input (Ongoing) Exists for the Job for Absence Component
- Absence Input (Period-Specific) Exists for the Job for Absence Component
- Absence Input Exists for the Job for Absence Component
Note: These rules work for worker-based and position-based time off plans.
Accrual Adjustment during a Job Change
There are three available accrual configuration options that dictate how to prorate the accrual upon eligibility changes that occur mid-period. These options are:
- Front Loaded
- Based on As of Date
- None
Front-Loaded Accrual Adjustment
Often, an accrual configuration grants eligible workers the entire amount for the whole balance period up front as opposed to installments over the period schedule. As transfers, promotions, and other staffing changes occur in your organization, it is likely that workers may then lose eligibility for an accrual that they have already received.
Therefore, during staffing changes, it is possible to automate the proration of a worker's front-loaded accrual when the worker loses accrual eligibility due to an HR change.
To automate the proration of a front-loaded accrual, complete the following steps:
- Update theJob Changebusiness process by adding the Automated Accrual Adjustment service after the completion step.
- Indicate on the accrual that it is front-loaded by selecting the Front-Loaded checkbox. Workday then identifies affected accruals when it performs a front-loaded accrual adjustment due to a job change.
- Configure the following scheduling logic on the accrual:
- Scheduling: Front Loaded
- Scheduling: Annual - 1st Period of Year (based on Period End Date) or Mid-Period Hire or Termination
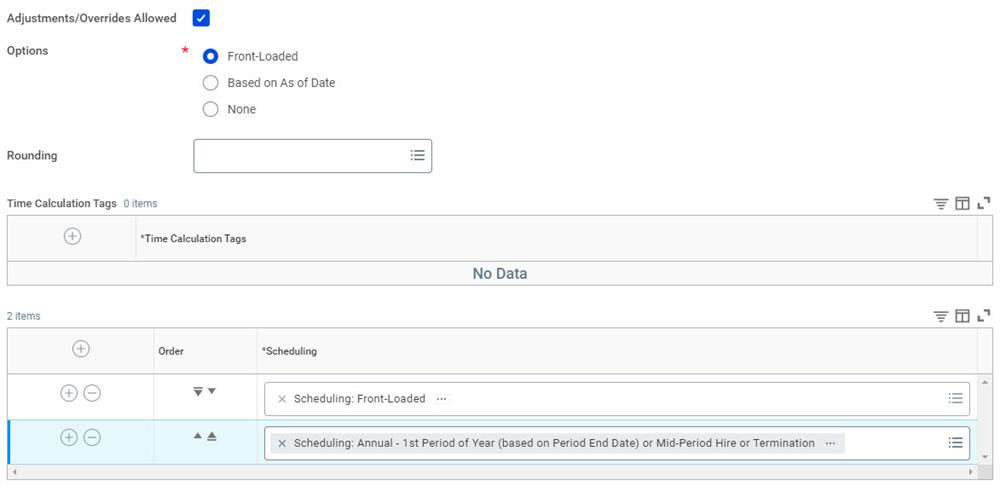
Front-Loaded Accrual
Based On As Of Date Accrual Adjustment
In the event of a mid-period eligibility change, you may want a worker's accrual to prorate to the day of the eligibility change. In this case, you would:
- Update theJob Changebusiness process by adding the Automated Accrual Adjustment service after the completion step.
- Indicate on the accrual that it is based on as-of date, by selecting the Based on As of Date checkbox. This selection allows Workday to identify affected accruals when performing an as-of accrual adjustment due to a job change.
As-of-date accrual prorations do not require scheduling. However, Workday respects scheduling if included.
Bulk Proate Accruals
Workday enables you to configure your staffing business processes to automatically bulk prorate accruals for workers in response to job and collective agreement changes.
In this case, you would:
- Update the Assign Employee Collective Agreement, Change Job or End Collective Agreement Assignment business process by adding the Bulk Automated Accrual Adjustment service step after the completion step.
The step creates automated adjustments in bulk for all eligible workers if the accrual is configured as Based on As of Date (for mid-period accruals) or Front-Loaded.
Maintain Time Off Plan Carryover and Balances for Employees
The following table lists and describes the Workday tasks and EIBs for maintaining employees' time off plan carryover and balances.
Task (Manual Update) | EIB (Mass Update) |
|---|---|
Maintain Time Off Plan Carryover Overrides Allows you to override the carryover amount and carryover expiration date for an employee. Notes :
Important : If you create carryover override rules in the past for workers, it may impact their balances. Therefore, you may need to rerun the calculated balances process. | Put Carryover Override: Allows you to perform mass carryover overrides. |
Maintain Time Off Plan Override Balances Allows you to override an employee's overall time off plan balance as of the start date of any period for which the employee is eligible. Workday will use the new balance amount as the starting point to calculate the balance from that period forward. Important : If you override an employee's time off plan balance, Workday will not update the balance again for the override date or for dates before the override. Even if there are retroactive time off entries, Workday will not update the balance again. To prevent users from entering time off requests for dates before the balance override date, select the Time Off Date Before Maximum Override Balance Not Allowed validation option on the time off definitions. | Put Override Balance: Allows you to perform mass balance overrides. |
Storing Absence Balances
When you access a report to view accrual, time off, or time off plan balances, Workday dynamically calculates the balances based on the time off plan's rules. To optimize performance, Workday runs a monthly background process to store the balance as of 13 months before the run date. Workday then uses the stored balances as the starting point for subsequent dynamic calculations. It does not go back to a worker's initial processing period.
Example
: If the run date is October 1, 2025, Workday stores balances as of September 1, 2024. When you check a worker's balance on October 15, 2025, Workday starts with the worker's September 1, 2024 balance and dynamically calculates the balance from that point up until October 15, 2025.In addition to the Workday monthly process, you can use the
Schedule Time Off Calculated Balance Process
task to calculate balances more frequently. If you run your own processes, Workday uses the stored balance with the most recent date to dynamically calculate balances.Note
:- You can store balances as of the start date of any period within a time off plan's period schedule.
- Whenever Workday stores a time off balance, it also persists all unstored accrual amounts in the six-month period before the stored balance date.
- Workday does not store accrual amounts for position-based balances.
Considerations for Running the Schedule Time Off Calculated Balance Process
There are factors that can add to the complexity of time off balance calculations. Therefore, consider the following to determine whether you must run the process more often for some or all plans:
- Period schedule frequency (e.g., weekly or monthly)
- Limits (upper, lower, and carryover)
- Multiple accruals associated with the balance
- Multiple time offs associated with the plan
- Plan balance that is dependent on other plan balances
- Number of periods processed in the period schedule
- Number of employees eligible for the plan
- Volume of overrides and adjustments
- Volume of time off requests entered through Workday Time Tracking
- Volume of time off and corrections loaded through web services
Recommendations for Running the Schedule Time Off Calculated Balance Process
For optimal performance, Workday recommends that you manually schedule processes customized for your time off plans and business requirements. When you run the Schedule Time Off Calculated Balance Process:
- Include each plan in one schedule only.
- Set the days to run at 91 days or greater. Anything less than 91 days may cause performance issues.
- Do not run the process for the current period or future periods.
- Do not run the process more often than the frequency of the period schedule. For example, do not run the process monthly for plans with a quarterly period schedule. Because the process calculates and stores balances as of the start of the period, there is no advantage to running the process more often than the period schedule frequency.
- If the process takes longer to run than you expect, try editing the schedules to process fewer plans at the same time or increase the recurrence frequency.
- Coordinate the schedule outside of worker time off entries.
- Schedule the process to run at night.
Benefits of Regularly Storing Absence Balances
The benefits of regularly storing absence balances include:
- Faster run times for returning absence balances
- Better customer experience
- More performant tenant when accessing Workday Absence components in the worker profile
- Cross-functional performance improvements across the tenant
If you do not store absence balances on a regular basis, you may experience performance issues.
Example
: Payroll processing could take much longer if you reference absence balances on payslips and you have not stored absence balances on a regular basis.Resource
: For additional information on storing absence balances, go to Guidelines for Storing Absence Balances in Workday Community.Manage Leave of Absence
Workday provides the following tasks and actions for managing leaves of absence.
Workday Task/Action and Description | Details |
|---|---|
Request Absence > Request on Behalf Of or Enter Absence Use this task to place employees on leave on their behalf. |
|
Request Return from Leave of Absence Use this task to return employees from leave on their behalf. |
|
Cancel a Leave Request Use this action to cancel a leave request. |
|
Cancel a Return from Leave Use this action to cancel a return from leave. |
|
Correct or Rescind a Leave Request Use these actions to correct or rescind a successfully completed leave request or a leave request that is still in progress. |
|
Correct or Rescind a Return from Leave of Absence Use these actions to correct or rescind a successfully completed return from leave request or a return from leave request that is still in progress. |
|
Additional Absence Administration Functions
Workday provides additional absence administration functions to help meet your organization's needs. These functions include:
- Absence thresholds
- Segmented security for time off
- Absence occurrences
- Absence data purging
Absence Thresholds
Absence threshold schedules allow managers and team leaders to enforce a limit on time offs and leaves of absence for their organization. When you enable absence threshold schedules, the Absence Calendar displays the View Thresholds button. Workers and managers can select the View Thresholds button to determine whether their team has reached the threshold limit for a given day. Depending on how an administrator sets up the time off or leave of absence thresholds, Workday issues an alert or error when a manager or worker submits a time off or leave of absence request that has reached the threshold limit for the day requested.
To configure absence threshold schedules, you must:
- Enable the following domains and add the relevant security groups:
- Set Up: Absence Threshold Schedule
- Reports: Absence Threshold Schedule
- In Edit Tenant Setup - HCM task, in the Time Off Threshold section, configure Absence Threshold display options under the section Time Off: Threshold.
- Create absence threshold schedules for relevant worker populations, organizations, job profiles, job classifications, and date ranges.
- Add values for Absence Settings, Threshold Quantities, and Threshold Overrides.
Note
: You can use the Get Absence Threshold Schedules
and Put Absence Threshold Schedules
web services to mass load absence threshold schedules.Resource
: For more information about absence threshold schedules, visit Workday Community: Steps: Set Up Absence Thresholds.Segmented Security for Time Off
Time off segmented security allows you to control who can request or correct time off types. Segmented security for time off removes the need for warnings and errors that control access on several business processes, streamlining your configurations.
When you have enabled and opted in to Segmented Security for Time Off:
- You can create time off segments to provide access to specific time offs for different groups of users, including time offs that are part of an absence table.
- When you create a time off, you must add it to the appropriate security segment so that groups secured to the segment can request or correct the time off.
To configure Segmented Security for Time Off:
- Access theDomain Security Policies for Functional Areareport to review the segment-based security groups on the Access Time Off (Segmented) domain security policy. This domain enables you to configure access to security segments for time offs and absence tables. which control who can request or correct specific time offs.
- Access theCreate Time Off Security Segmenttask. Select the time offs that you want to secure to the segment from the Time Offs prompt. For absence tables, you will select all of the tier time offs or none when providing access for certain security groups. Workday reevaluates all tiers on an absence table after a manager or administrator approves a time off request, including tiers that workers cannot access.
- Use theCreate Security Grouptask to create segment-based security groups that will grant specific security groups access to the new time off security segment.
- Edit permissions for the Access Time Off (Segmented) domain in the Time Off and Leave functional area to grant the segment-based security groups access to the time offs, using the Domain Security Policies for Functional Area report.
Resource
: For more information about Segmented Security for Time Off, visit Workday Community: Steps: Set Up Segmented Security for Time Off.Absence Occurrences
Absence occurrences allow you to:
- Monitor and report on workers' absences, including:
- Number of times and consecutive days workers are absent during a period
- Types of absences workers take
- Report on workers who have and have not taken the legally required number of consecutive days of absence during a period.
Example
: Switzerland requires workers to take 10 consecutive vacation days. Absence occurrences allows you can track workers who have or have not complied with this requirement.When you enable absence occurrences, Workday automatically creates an occurrence based on leave events and individual time offs. Workday uses the Days to Include value from each absence type to automatically group absence occurrences for:
- Time offs.
- Leave types.
- Absence tables.
You can create custom absence occurrence types that define which days to include. In addition, you can group:
- Absences that occur on either side of nonworking days into one consecutive absence.
- Different types of absences together into one occurrence.
Workday groups such days together even when workers or managers enter them as one or more requests.
With absence occurrences enabled:
- Workday automatically flags absence occurrences when there are changes to:
- Holiday calendar events.
- Work schedule calendar events or patterns,
When you create or change a holiday or work schedule calendar with a date more than 13 months before the current date, Workday only flags occurrences within the previous 13 months. - You can validate absence data being entered based on number of times the absence has already been requested and/or based on the length in consecutive days if entered in separate requests.
Absence Occurrences Setup
To take advantage of Absence Occurrences functionality, you need to configure absence occurrences. You also need to enable and edit the related domain security policies.
To set up absence occurrences:
- Access theConfigure Absence Occurrencetask, and then select the time offs and leave types to enable for absence occurrences.
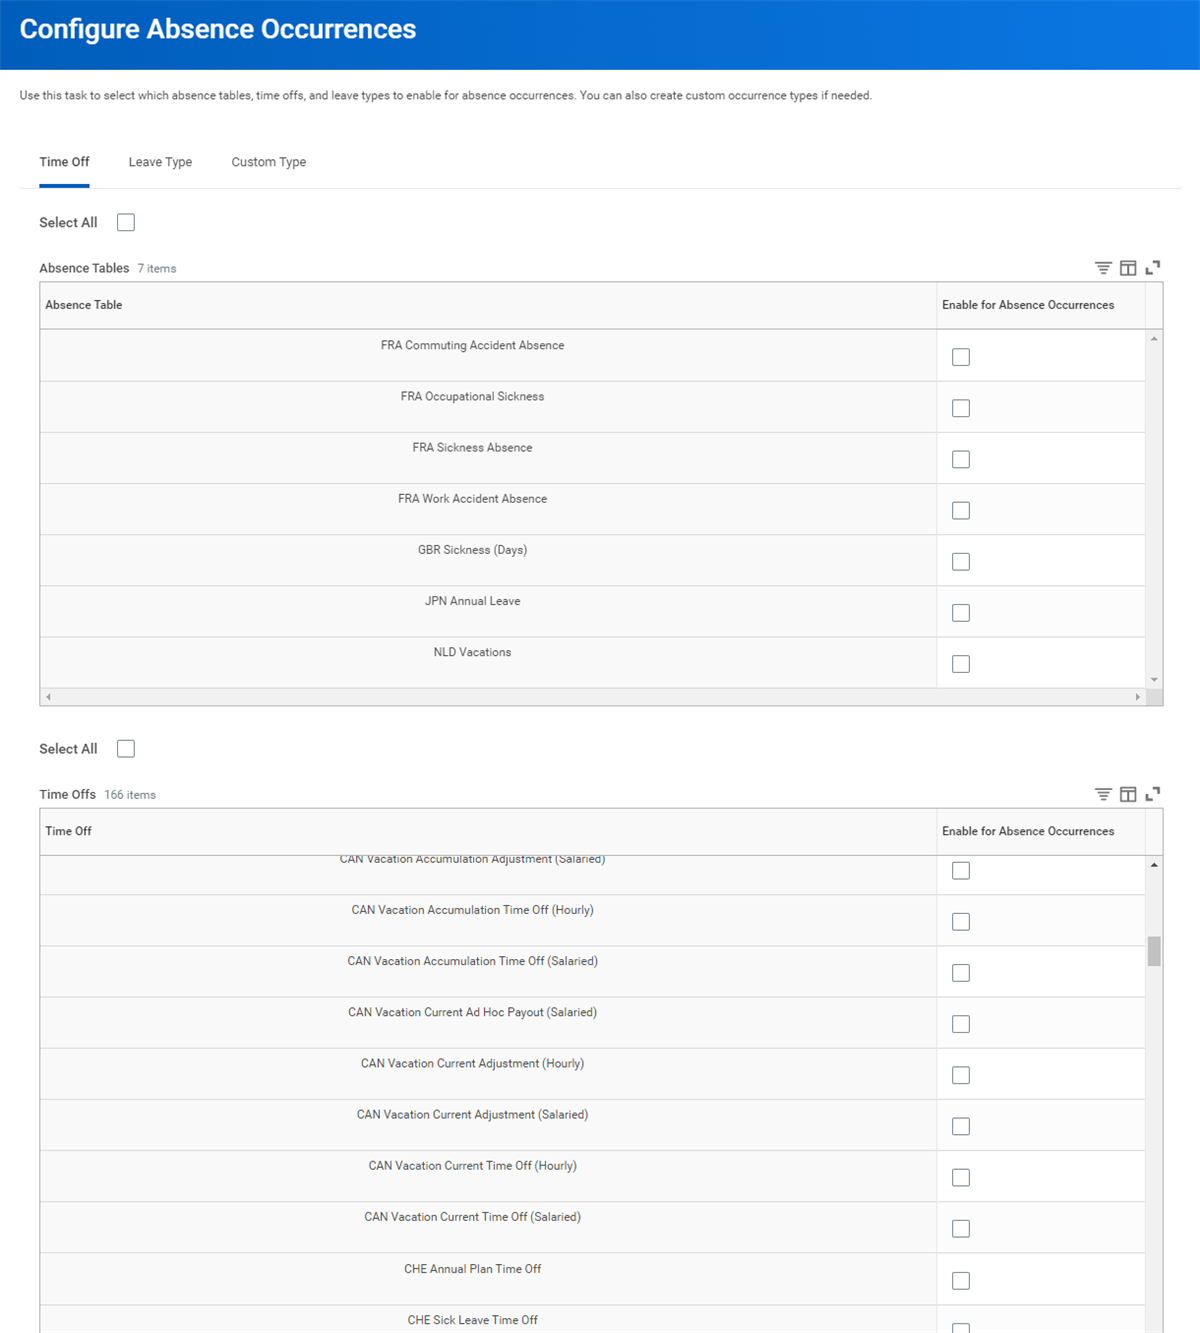 Configure Absence Occurrences Task - Time Off Tab
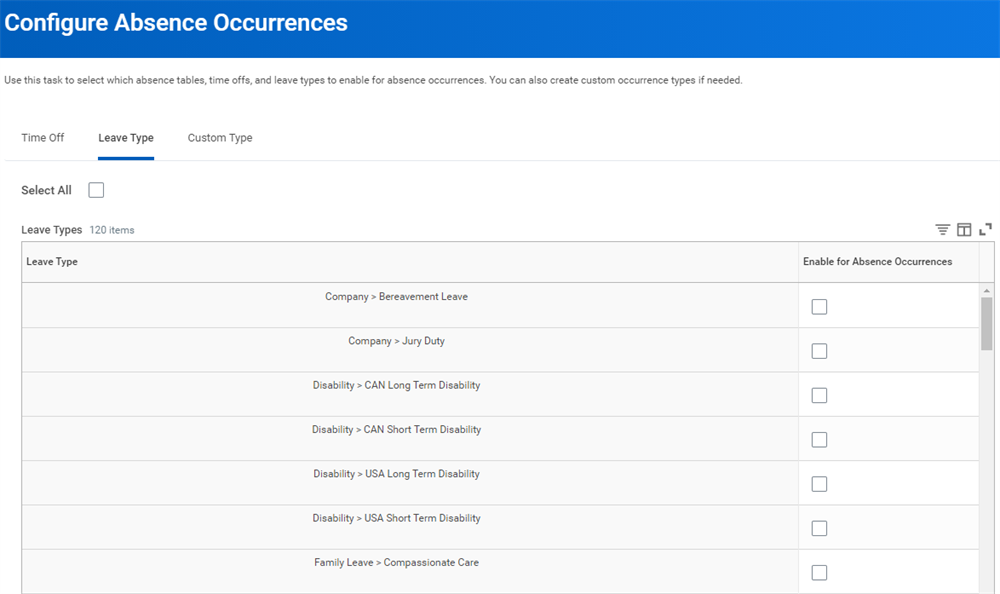 Configure Absence Occurrences Task - Leave Type TabNote: To access this task, you must have security access in these domains in the Time Off and Leave functional area:
- Set Up: Leave of Absence
- Set Up: Time Off
- If needed, select the Custom Type tab to create custom types for groups of absence types.
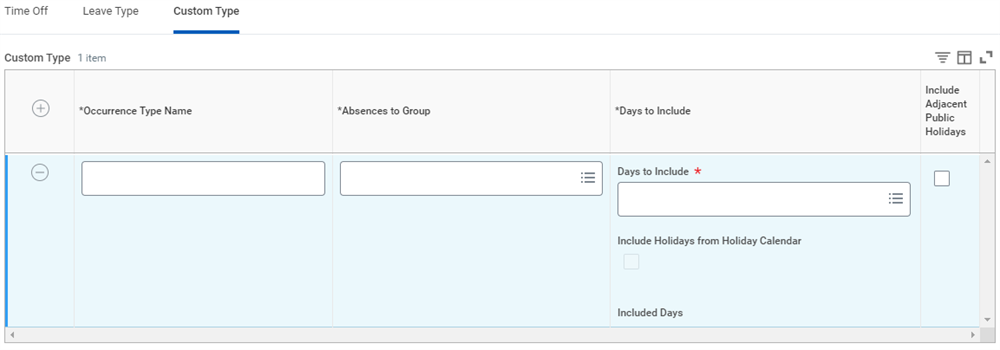 Configure Absence Occurrences Task - Custom Type TabNote: After configuring absence occurrences, you can run theView Absence Occurrence Typereport to view the types of absences that you enabled. If you enabled an absence type in error, access theConfigure Absence Occurrencetask again, and then clear the Enable for Absence Occurrences checkbox beside the absence type.
 - Optionally, convert the existing absence data in your tenant into absence occurrences.Note: Workday recommends that you run this conversion to enable reporting on absence occurrences as of a specific date. The conversion does not change the existing absence data, instead, it creates absence occurrences for the existing absence data.
- In the Time Off and Leave functional area, enable these domain security policies:
- Worker Data: Absence Occurrences
- Worker Data: Absence Occurrences (Manager View)
- Edit the domain security policies to give View and Modify permissions to the security groups that need to access absence occurrence reports.
- Access theActivate Pending Security Policy Changestask, and then select the Confirm checkbox to activate your changes.
Absence Occurrences Reports
When you have absence occurrences configured, you can access the following reports:
Report | Description |
|---|---|
View Absence Occurrence Type | Displays the details of your absence occurrence types. Use the Absence Occurrence is Overlapping Date Range field to highlight occurrences that are partially outside the date range of your absence occurrences report. |
View Absence Occurrences Detail | Displays the details of workers' absence occurrences, which allows you to perform compliance analysis. The report displays the occurrences by absence type, organization, and date range. It can also display workers with no absence occurrence. |
View Absence Occurrences Summary | Displays the count of workers absence occurrences in your supervisory organization. The report displays the occurrences by absence type and date range. It does not count unapproved leave of absence or unapproved time off. |
Absence Data Purging
To assist you in responding to the customers' right to be forgotten and General Data Protection Rules (GDPR) requests, you can purge absence data for terminated workers. You can only purge data for:
- These data types:
- Absence Case Events for Worker
- Absence Occurrence
- Worker's Absence Balance Components
- Worker's Leave of Absence Events
- Worker's Time Off Events
- Workers' absence data after the following amount of time has passed after a worker's termination date:
- Three years for the USA
- Five years for France
- Six years for the UK
- Seven years for Canada
To purge absence data, you need to:
- Create an advanced custom report with the Purge tag selected to identify the terminated workers whose data you want purged.
- Access theCreate Purge Plantask, and then select:
- The Absence Purgeable Data Types you want to purge.
- The custom report you created to identify the terminated workers.
- Access thePurge Person Datatask, select your purge plan, and then run the purge.
Sell Time Off
Workday allows you to configure time offs for selling so that workers can sell back a portion of their accrued time off. Workers can manage their time off balance and get paid when they sell their time off. Workday automatically adjusts the workers' time off balance when they sell their time off, saving administrators time and effort.
When you set up Sell Time Off, Workday enables you to configure the:
- Time off type available to your workers to sell.
- Minimum balance to maintain after selling time off for workers.
- Time off increments allowable to sell.
- Worker eligibility rules for who can sell time.
- Maximum limit on time off available to sell.
- Time period when workers can sell their time offs.
To configure time off for selling:
- If you want workers to sell time off during a Fixed Period, access the Create Schedule for Selling Time Off task.
- Create a time off, and then do the following:
- Select the Allow to Sell Time Off checkbox.
- Configure the Sell Options tab.
- On the Time Off Plan Overrides tab, configure the Value field.
- Link the time off to a worker-based time off plan.
- (Optional) Set up segmented security for time off so that workers can only sell the time offs that they have access to.
- Create a default definition for the Sell Time Off business process.
- Access Configure Worklet > Absence (or Time Off and Leave), and then select Sell Time Off (if you want the task to show up in the application for the worker).
- Access Configure Profile Group > Absence for Worker Profile, and then select Time Off Sold (if you want this tab to be displayed to workers)
Resource
: For more information on configuring time offs for selling, visit Workday Community: Steps: Set Up Sell Time Off.After you have configured time offs for selling, workers can access the Sell Time Off task from the following:
- Search
- Absence or Time Off application
- Related Actions on their worker profile
Buy Time Off
With Buy Time Off, your workers can buy time off when needed and pay off the bought time in one or more periods. Workday automatically adjusts the workers' time off balance when time off is bought. Administrators and managers cannot buy time off on behalf of workers.
Workday give you the ability to configure time offs that your workers can buy when you select the Allow to Buy Time Off check box on the Create Accrual task. On the Buy Options tab, you can configure the following:
- Time period when workers can buy time offs.
- Limit or maximum quantity of time off that workers can buy.
- Period which the maximum limit applies to.
- Allowable time off increments for workers to buy.
- Time when worker's time off balance is updated.
- Time when payroll adjustments start and end.
- Pay rate to use for payroll adjustments.
To configure buying time off:
- Set up security for the Buy Time Off business process security policy.
- Create an accrual, and then do the following:
- Select the Allow to Buy time Off checks.
- Configure the Buy Options tab.
- Link the accrual to the time off plan.
- Access the Create Schedule for Buying Time Off task to create a schedule for buying time off.Resource: For more information on buying time off, visit Workday Community: Steps: Setup Buy Time Off.
Absence Administrator Home
From the Global Navigation menu, you can add the Absence Admin app to your menu.
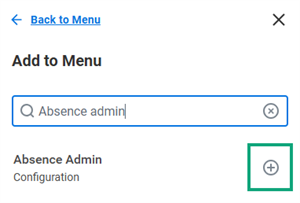
Once added, you can select it to access the Absence Administrator Home page, which provides access to core and frequently used Absence Management objects. You can create new Absence Management objects and view existing objects and their associations. The security on your profile governs access to the various cards and the tasks within them. Customers with Community access can navigate directly to the Absence Management Roadmap, Absence section of the Administrator Guide, and Absence Management page.
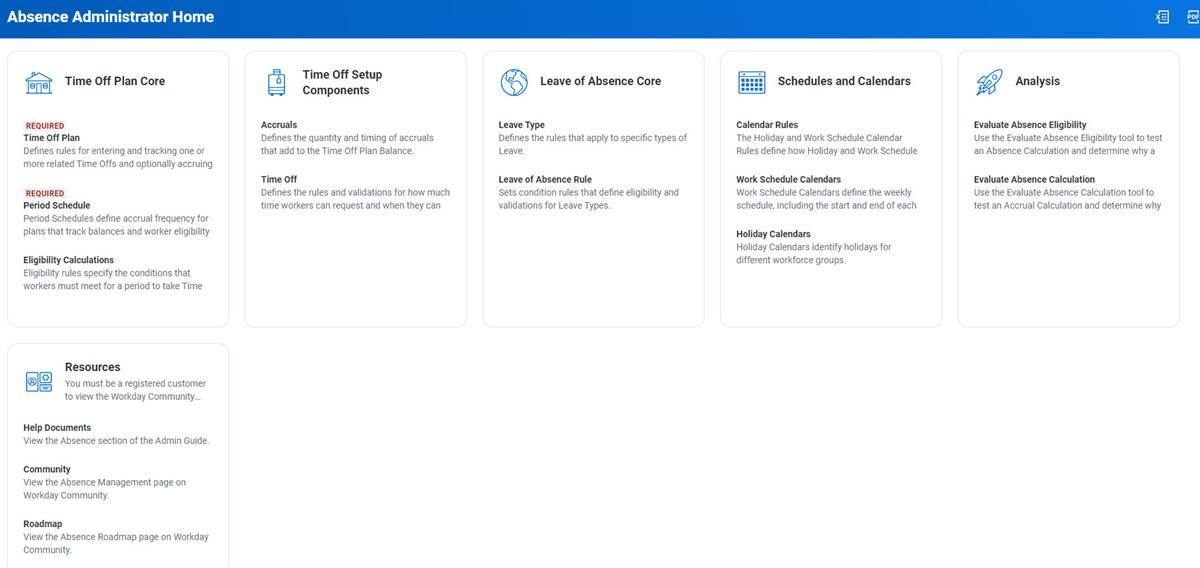
Absence Administrator Home
Custom Labels
You can align absence management with your organization's terminology by creating custom labels for terms related to time off and leave of absence.
To create custom labels for terms related to time off:
- Access theMaintain Custom Labelstask.
- In the Term Context field, selectAbsence Management.
- SelectOK.
- In the Override Value column, enter the term to use instead of the default value.
- If necessary, in the Preserve Case column, select the checkbox to set the custom label case (e.g., UPPERCASE, lowercase, or Initial Caps).
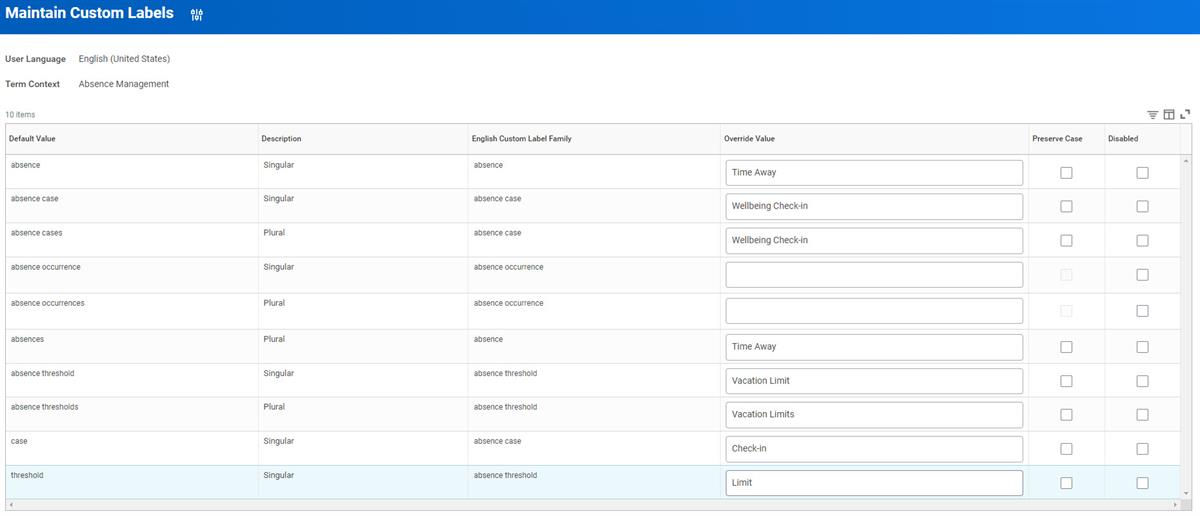
Workday displays the custom labels only for employee and manager self-service tasks and reports. In this example, the custom label replaced the term "absence" with "time away."
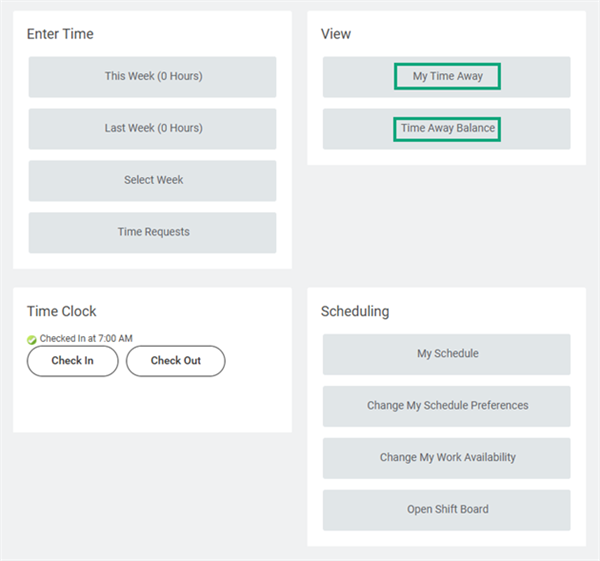
For administrator-related tasks and reports, Workday continues to display the base values as shown in the following example.