
Report Administration
Overview
This chapter explores the ways you can schedule reports and use report results throughout Workday. Configure alerts that notify users based on the results of a report, independent of a business process. Group reports together and schedule them as one unit, to be output to Microsoft® Excel or in Portable Document Format (PDF). Use report bursting to generate multiple versions of a report for different audiences.
Objectives
By the end of this chapter, you will be able to:
- Schedule reports.
- Configure alerts to notify users of report results.
- Use a report group to group several reports and schedule them as one unit to be output as a Microsoft® Excel file or in Portable Document Format (PDF).
- Apply an Excel template to a report or report group to write the output of the reports to one Excel workbook.
- Use report bursting to generate multiple versions of a report.
Scheduling a Report
Use the
Schedule a Report
task to schedule a report or report group to run. Report groups allow you to run multiple reports as a single unit.You can set the run frequency to run now, run once in the future, daily recurrence, weekly recurrence, monthly recurrence, dependent, or custom recurrence. Scheduled reports run in the background.
Note
: You can also get to this task from the report's Related Actions.Report Criteria
Define default values on the Report Criteria tab for prompts that are visible to users when running the report.
These are the report criteria options:
Option | Description |
|---|---|
Value Type | Select whether you want to specify a value for the prompt field or have the value calculated at runtime based on the value of another field. |
Value | When the Value Type field is Specify Value, select the prompt value to use when the report runs. When the Value Type field is Determine Value at Runtime, select the field that should determine the prompt value when the report runs. |
Schedule
Define the schedule on the Schedule tab if you are scheduling a report to run later.
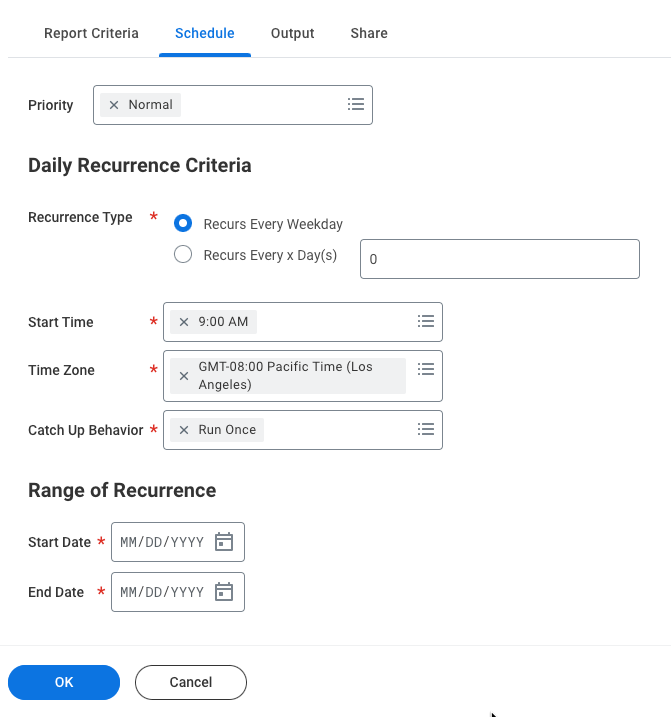
Schedule priority allows you to set the priority of schedules to run during periods of high system resource utilization. The schedule options themselves vary depending on the run frequency:
Run Frequency | Schedule Criteria |
|---|---|
Run Once in the Future | Specify the Start Date, Start Time, and Time Zone. |
Daily Recurrence | Set the Recurrence Type to Recurs Every Weekday or Recurs Every x Day(s). If you select Recurs Every x Day(s), enter a number between 1 and 366 to specify the number of days between recurrences. Specify the Start Time, Time Zone, Start Date, and End Date. |
Weekly Recurrence | In the Recurs Every x Weeks(s) field, enter a number between 1 and 52 to specify the weekly frequency. In the Day(s) of the Week field, select one or more days of the week to schedule each recurrence. Specify the Start Time, Time Zone, Start Date, and End Date. |
Monthly Recurrence | Set the monthly recurrence criteria to Every Month or Month(s). If you select Month(s), specify one or more months to schedule each recurrence. Set the Recurrence Type to Day(s) of the Month or Day of the Week. Specify the Start Time, Time Zone, Start Date, and End Date. |
Dependent | Runs the report based on a specified criteria based on conditional dependencies. Set the process type, and triggering status. You can also set additional time delays. |
Custom Criteria | Specify the Start Date and Custom Start Time of reports to recur at nonstandard intervals and for multiple recurrences. |
Note
: Workday lets you select an End Date that allows five executions of any recurring report beyond December 31 of the following
year.Output
Define the report output options on the Output tab.
These are the report output options:
Option | Description |
|---|---|
Output Type | Select Excel, Report (PDF), or Text (CSV). |
Report Tags | Associate report tags with the report output to make the file easy to find. |
File to be Deleted After (Days) | Specify how many days Workday should keep the report output before deleting it. |
Do Not Output an Empty Report | Select this option to suppress the creation of an empty file on the My Reports menu if there is no report output and eliminate the corresponding email notification. |
Hide Prompt Values | Hides the prompt values of the output type of Excel or Text (CSV). |
Share
Share the report output with authorized users and security groups from the Share tab.
These are the sharing options:
Option | Description |
|---|---|
Don't share report output | Report output is not shared. Only the user scheduling the report notices the report output file. |
Share report output with other users | Report output is shared with any of the authorized users and Security Groups that you specify. Select the "I agree to the statement above" checkbox to acknowledge that you understand the implications of sharing report output with other users. |
Important
: By sharing report output you specifically authorize the specified users to view the report and its data exactly as you view it, regardless of their Workday security.Security Note
: You must have access to the Report Output Sharing security domain to share scheduled output and bypass security.Users access the report output from their Notifications, from the My Reports menu, or by running the
My Report Output Files
report. Users are able to search for report output using report tags when running the My Report Output Files
report or viewing More Reports
on the My Reports menu.Scheduled Future Processes
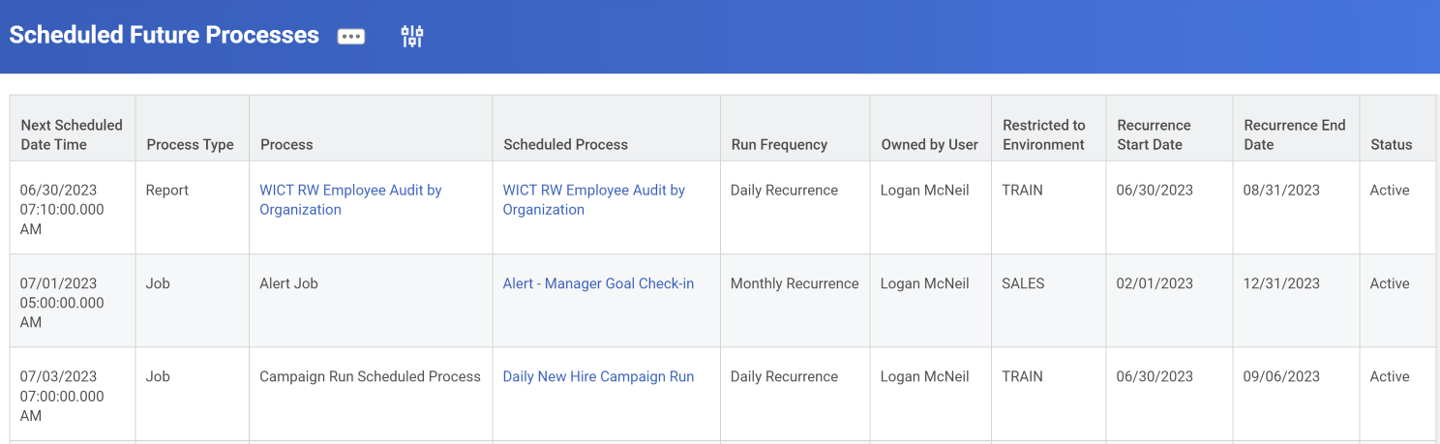
Use the
Scheduled Future Processes
report to view all background processes scheduled to run but have not yet done so. The report includes integrations, batch processes, and reports scheduled to run either once in the future or on a recurring basis.Select
Schedule Future Process
from the request name's Related Actions to:- Edit or delete a scheduled request.
- Suspend or activate a scheduled request.
- Transfer ownership of a scheduled request (if someone leaves the company).
Process Monitor
Run the
Process Monitor
report to view all background processes that are running or have run.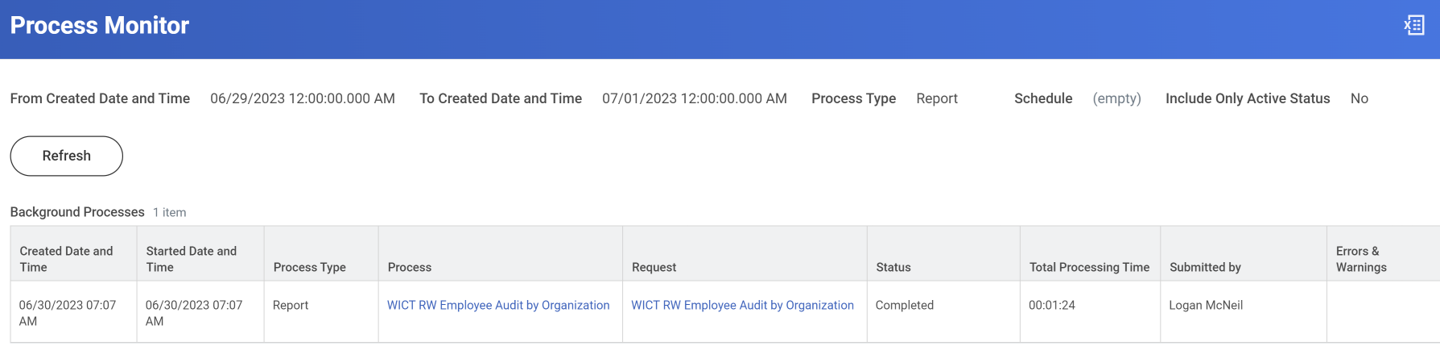
Workday Alerts
You can generate notifications outside of a business process using the Workday alerts framework. Similar to business process notifications, you can send these notifications to your Workday Inbox as well as to your email (depending on tenant setup).
Use the
Edit Tenant Setup - Notifications
task to configure notification preferences for alerts. If you can set preferences, configure alert notification delivery preferences at the Workday Account level under Change Preferences.You can generate alerts using a custom report, enabling relevant business information to send out based on any condition for which you create a report in Workday. Since alerts are configurable, alerts appear in your Inbox instead of you having to manually access the information or running a report to obtain the related information.
Examples include:
- Key metrics reached or milestones met.
- Items overdue, like a project timesheet.
- Exceptions, like credit card transactions with no expense reports.
- Birthday and employment anniversary reminders to managers.
- Time off reminders to your team.
Configuring Alerts
The
Configure Alert
task requires you to define the report and the frequency. Alerts can be one-time or recurring. Monitor the status of an alert using the Process Monitor
report. The Notification Alerts
security domain secures the Configure Alert
task.Task or Report | Description |
|---|---|
Create Custom Report | Filter criteria defines the conditions for the alert. |
Configure Alert | Include recipients, message, and schedule. |
Process Monitor | Shows the status of configured reports. |
The filter criteria in the custom report defines the conditions by which you want to alert. Alert configurations include the ability to specify:
- Report Parameters (if report has prompts)
- Include Tasks (Optional)
- Configure Recipients
- Recipients (using available fields for context of report, e.g., Worker, Project Manager)
- Security Groups (e.g., HR Administrator, Security Administrator)
- Subject & Body of alert notification using static text or fields
Workday generates a notification for each instance of the underlying report output. Workday groups notifications by recipient if more than one instance per recipient. Once scheduled, you can View Alerts and edit the details of the alert similar to other scheduled processes. Use the
View Alerts
report to determine all the existing alerts, including the Run Frequency and the Status.Alert Example
A common use case for an alert is upcoming birthdays for a manager's direct reports. Two standard Workday-delivered reports drive the delivered birthday and anniversary alerts. To use these alerts, copy each associated report to a custom report to use for the alert configuration.
Use the
Birthdays for this week and next
report in an alert that executes once a week to notify the manager about a worker's birthday.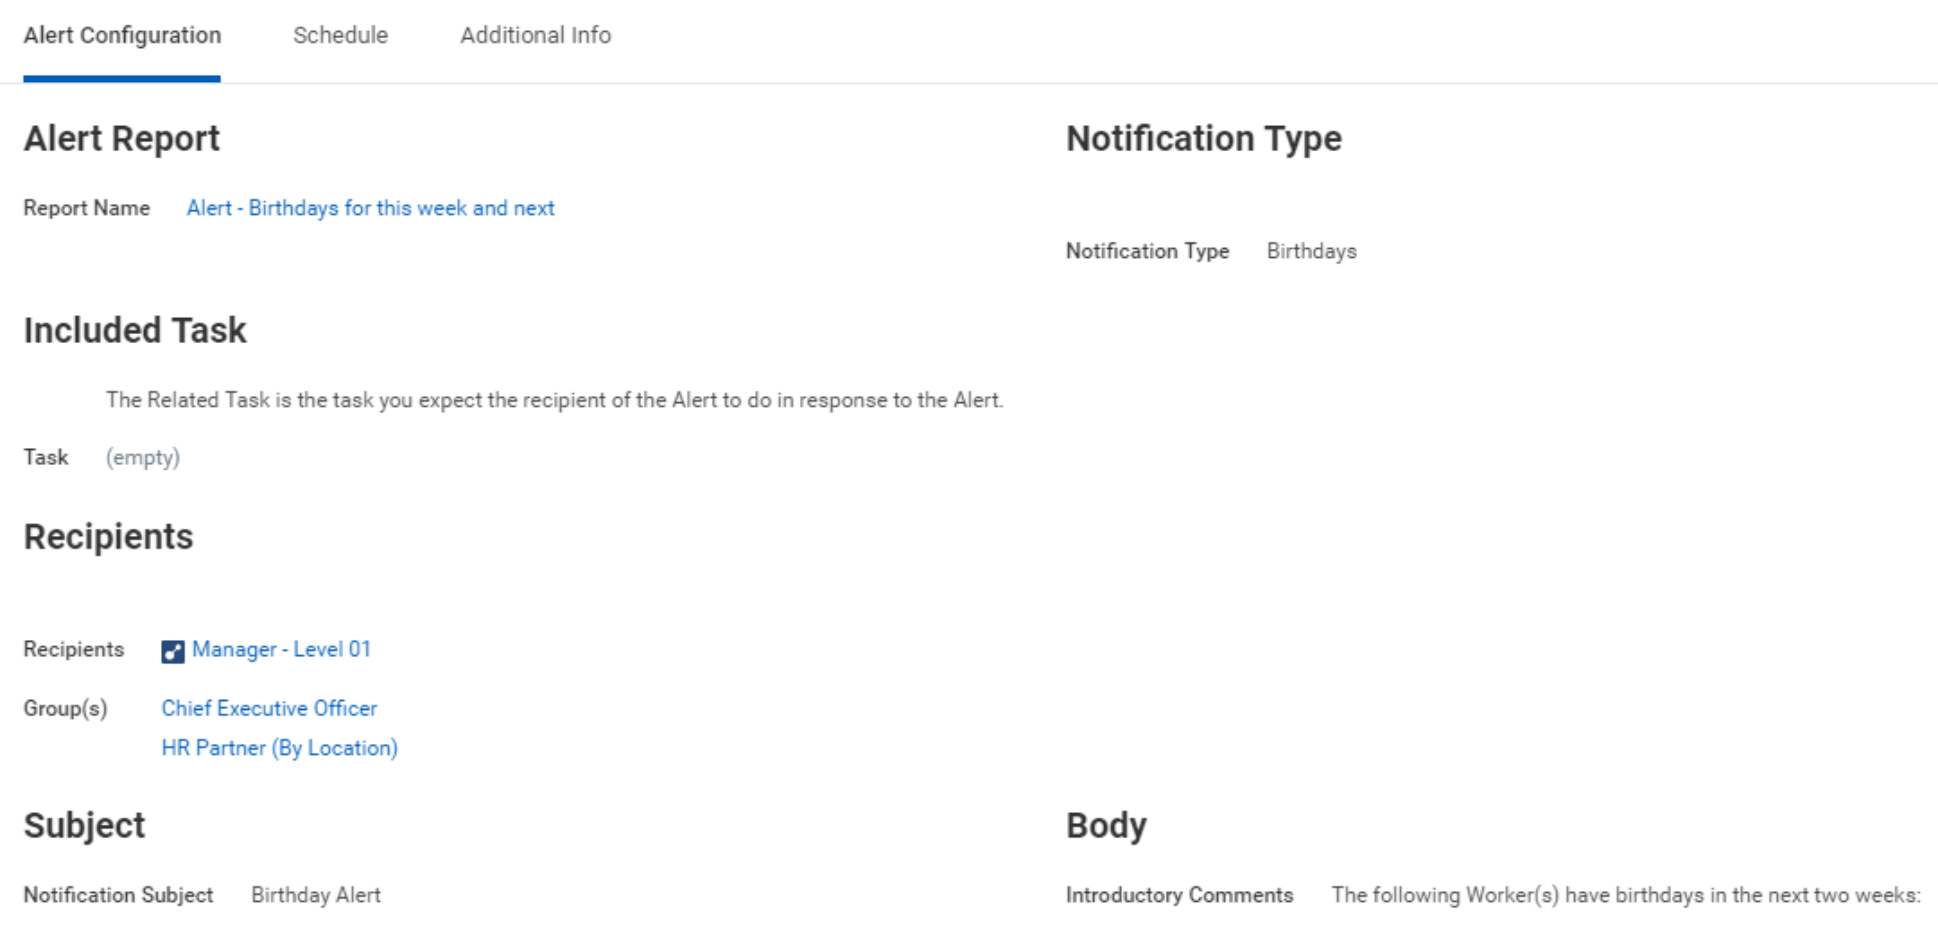
The Alert Configuration tab includes the details of the alert. The Recipients section shows which users and groups will receive the alert. The Subject and Body sections allow you to configure a custom message for the text of the alert. In this case, the alert has introductory comments and populates the details section with the worker name and birth date. Doing so allows the manager to easily determine whose birthday is coming up and the exact date.
The Schedule tab indicates how often the process runs and the range of recurrence (specify a Start and End Date). The Additional Info tab includes other information about the alert such as the creator of the alert.
Mass Update Tasks
For Advanced Reports, you can mass update reporting items making it easier and faster to update fields and view the reporting mass action history. This feature allows Report Administrators to replace references from one report class field to another in Advanced Reports. This saves time when a user needs to replace a field on their advanced reports, especially for a field marked as Do Not Use.
To perform a mass update, access the
Reporting Mass Action
task. Select the Original Report Field and the Replacement Report Field as shown in the image below.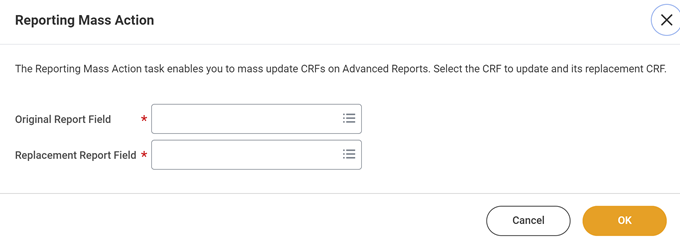
Note
: To make sure you select the right report field, access the fields from the View Report Field task. Using the field's Related Actions copy the Integration ID or WID. Then paste the Integration ID into the original or replacement report fields. To replace a DNU field, you must use its WID.Once you select the original and replacement report fields, Workday generates a list of all reports using the original report field. This list provides the report definition and all the areas where the field is used, such as a column field and sort field. It also shows who the report owner is, who it was last run by, and the date last run.
After selecting which reports to replace the report fields, validations are run to make sure the new field is valid and will not break the report definition. If an error occurs, the task will state the report causing the error. It will not state which validation is failing within the report. If you get errors, clear the rows that produce the errors, and run the task again.
Note
: When a Class Report Field is part of an Analytic Indicator and you use this task to update the Class Report Field, you have to manually update the Class Report Field within the Analytic Indicator.Run the
View Reporting Mass Action History
report to check all report definitions updated in a given timeframe.Report Groups
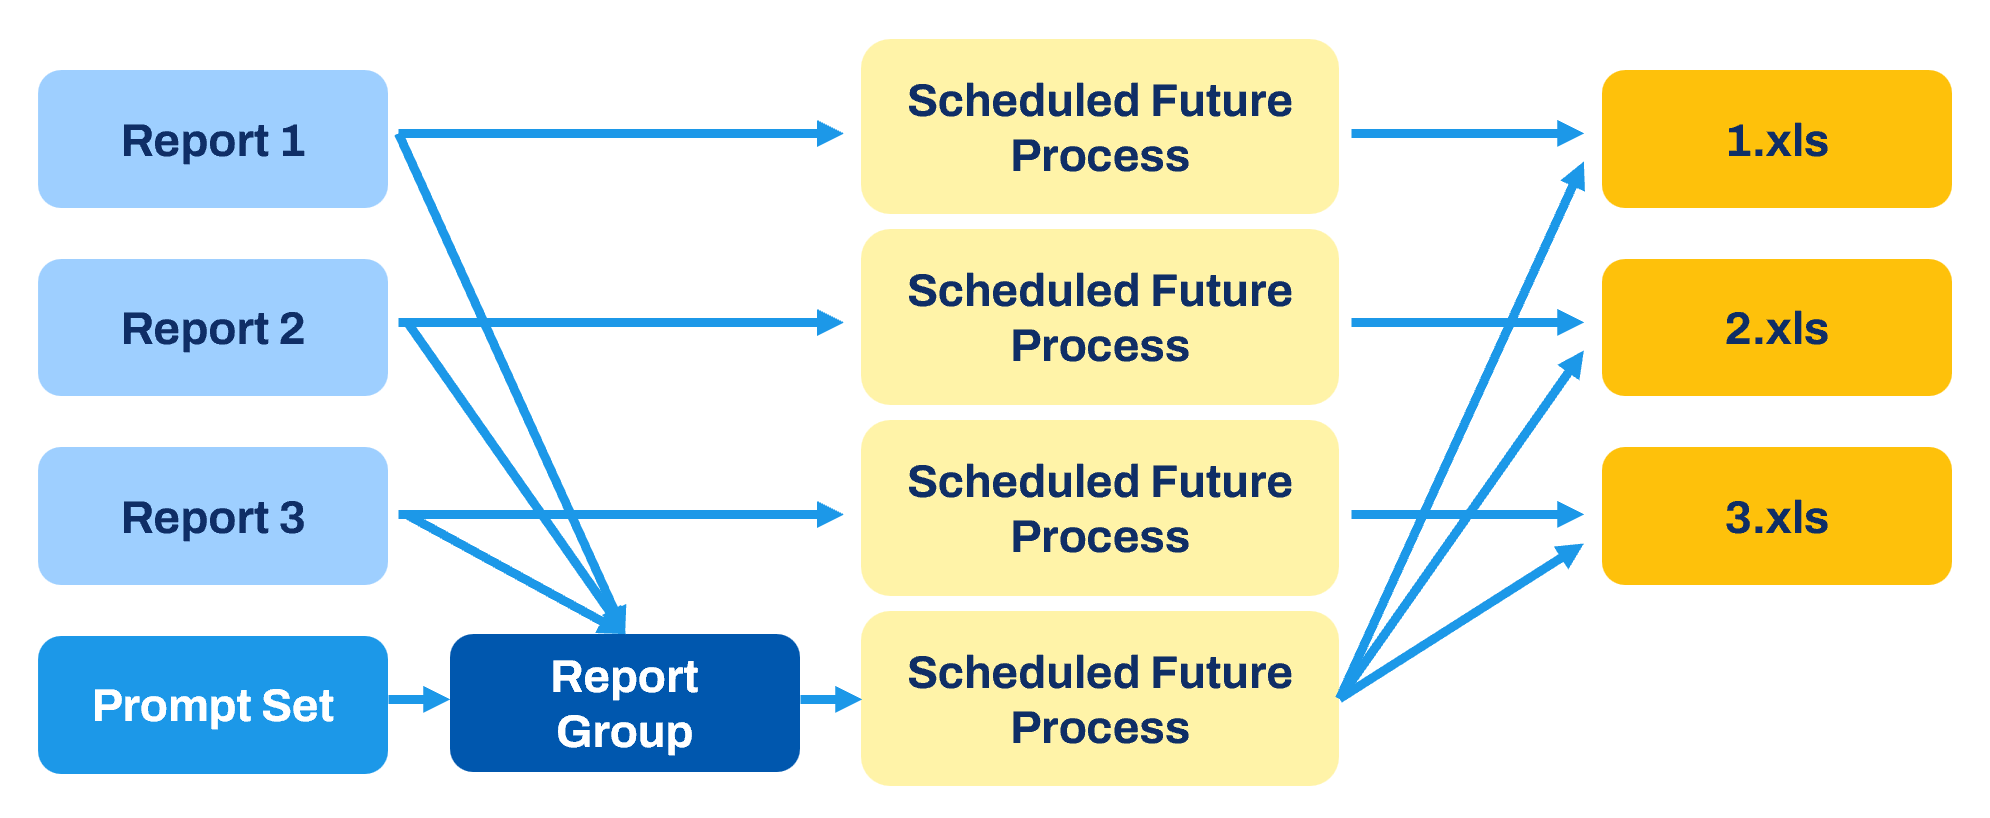
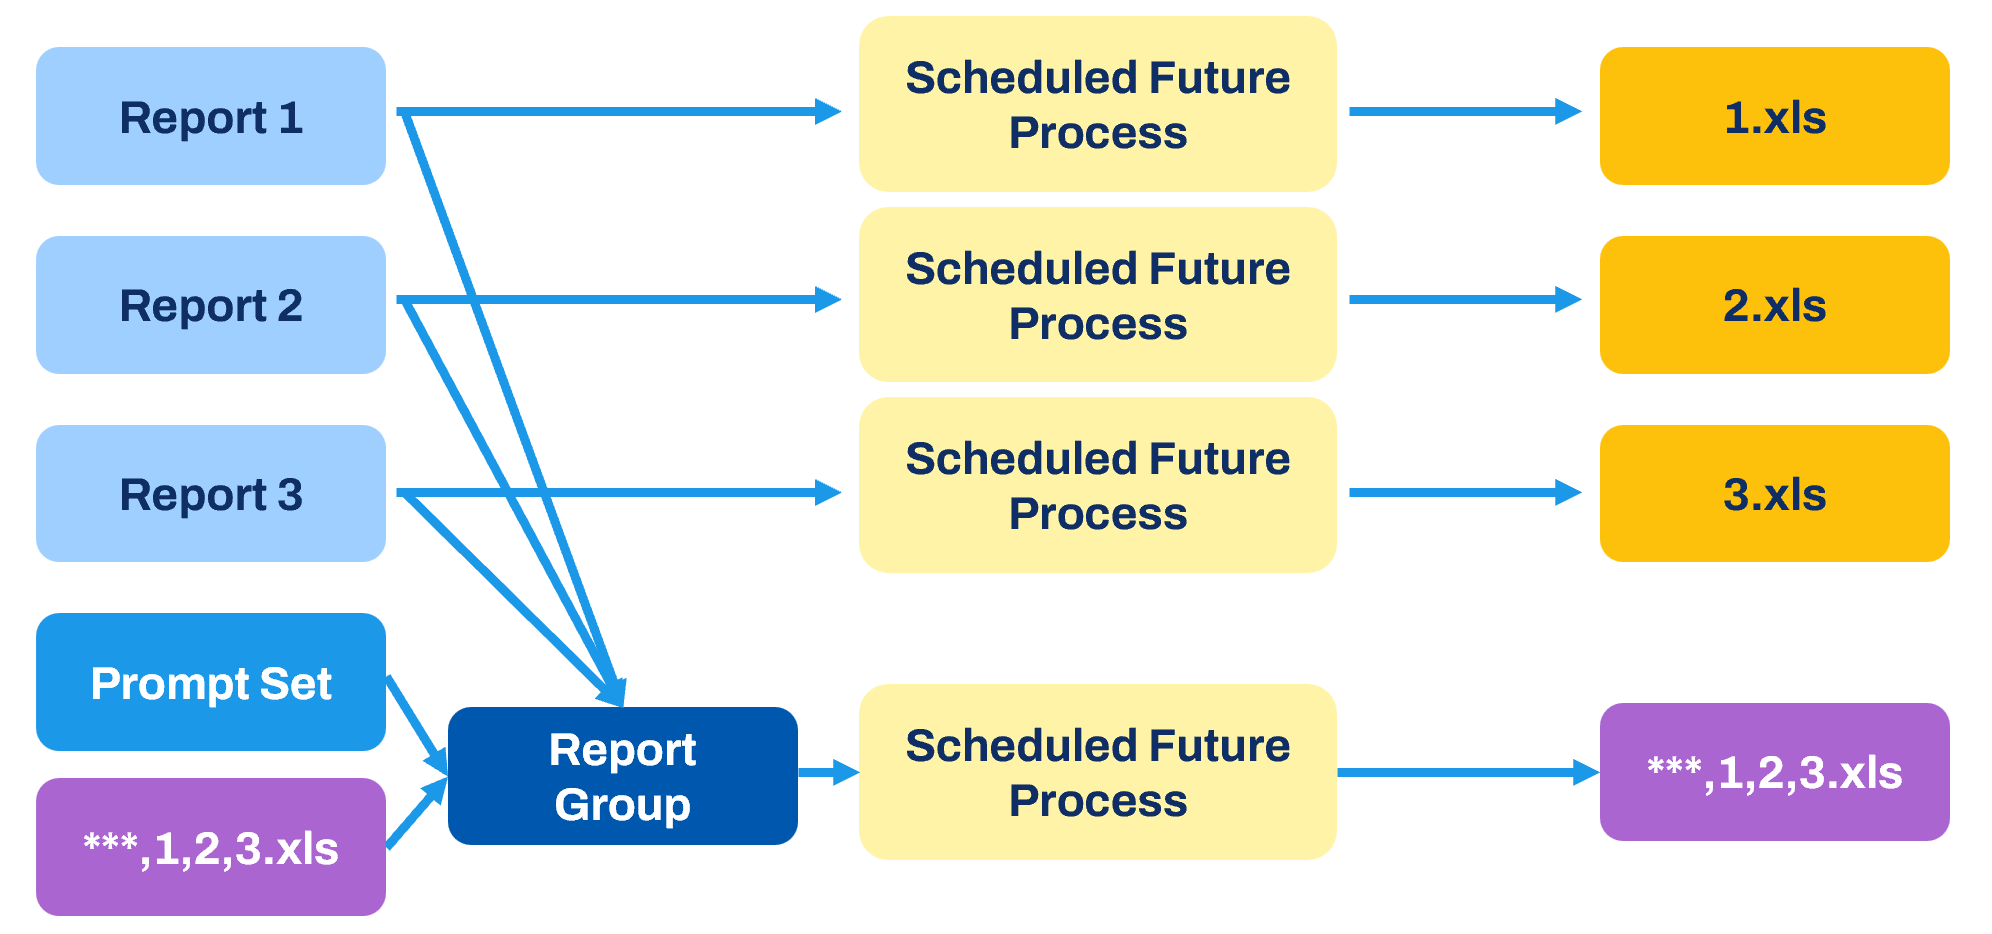
Report groups allow you to group several reports and schedule them to execute as one unit. Users most commonly access report groups for Workday Financial Management, especially when needing to run a set of reports at the end of a fiscal period.
When reports in a report group share common prompt fields, prompt sets can serve as an effective way to populate and pass needed values to those reports. Doing so means not having to configure the prompts at each report level. Report groups can reference an Empty Prompt set if not needed and you are not going to share the report group definition.
To add a report to a report group, you must configure the Enable Save Parameters option for a report, along with at least one saved filter.
By default, report groups produce one file for each report that can be output as an Excel file or as a PDF. Optionally, you can apply an Excel template to the report group.
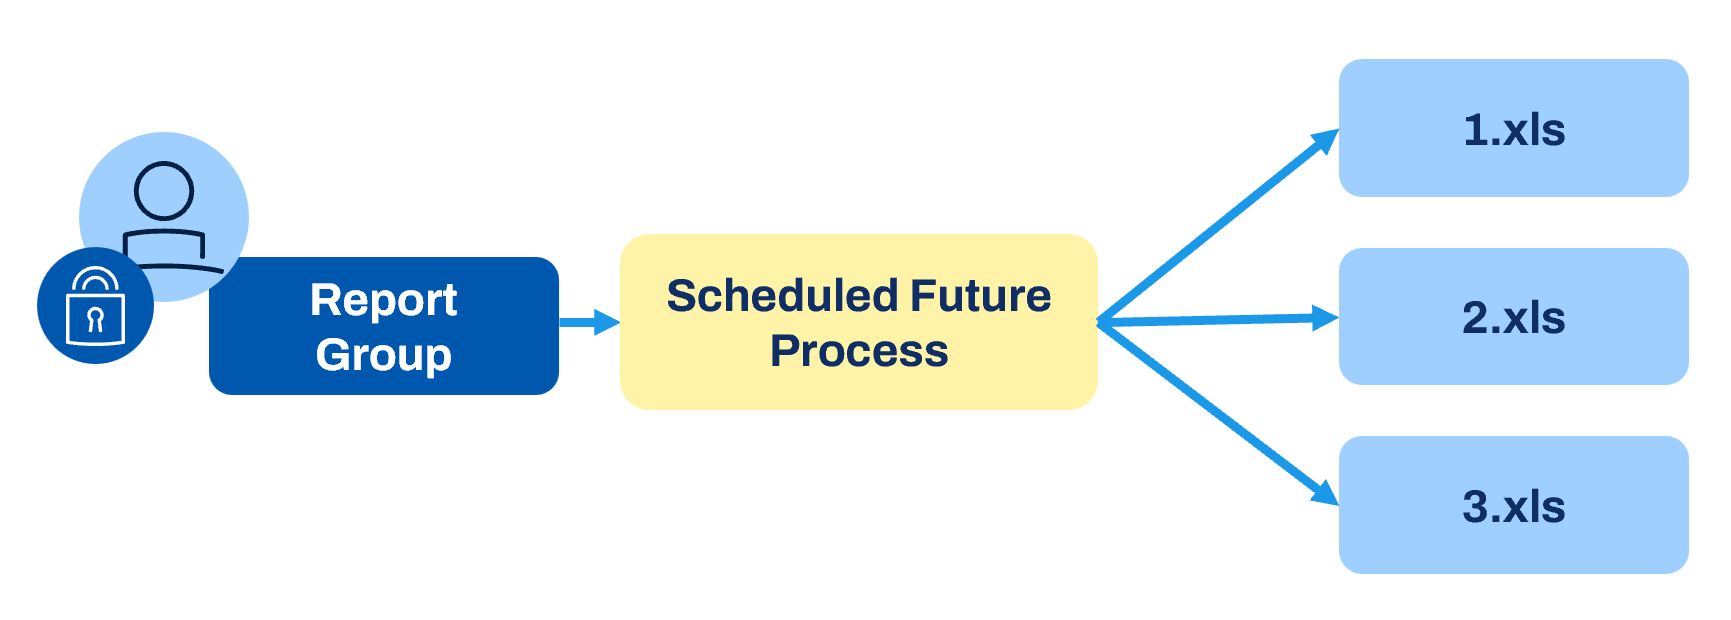
You can share report group output files with other users by configuring the Share Output tab of the report group. When a report group executes, it runs using the security of the user who scheduled the report group. Shared users will notice the output files using the security of that user. Use the output sharing option with caution, as any user with whom you share report output will notice the same output, regardless of their Workday security. Shared users will receive a notification and the reports will be available on their My Reports page.
Similar to report scheduling, when scheduling a report group, the Share Output tab is only available to users with access to the Report Output Sharing security domain.
Optionally, you can share report output based on a securing entity. It is common to share based on securing entity when using report bursting. The upcoming section on report bursting discusses this option.
Share Report Group
The owner of a report group can optionally share the report group with other users so that they can view the definition and schedule the report group. The sharing options are similar to sharing a report definition:
- Sharing with all authorized users includes all users who can access all reports within the report group.
- Sharing with specific authorized groups and users allows you to manually select specific groups and users. However, the user must have security access to all reports in the group to be able to access the report group.
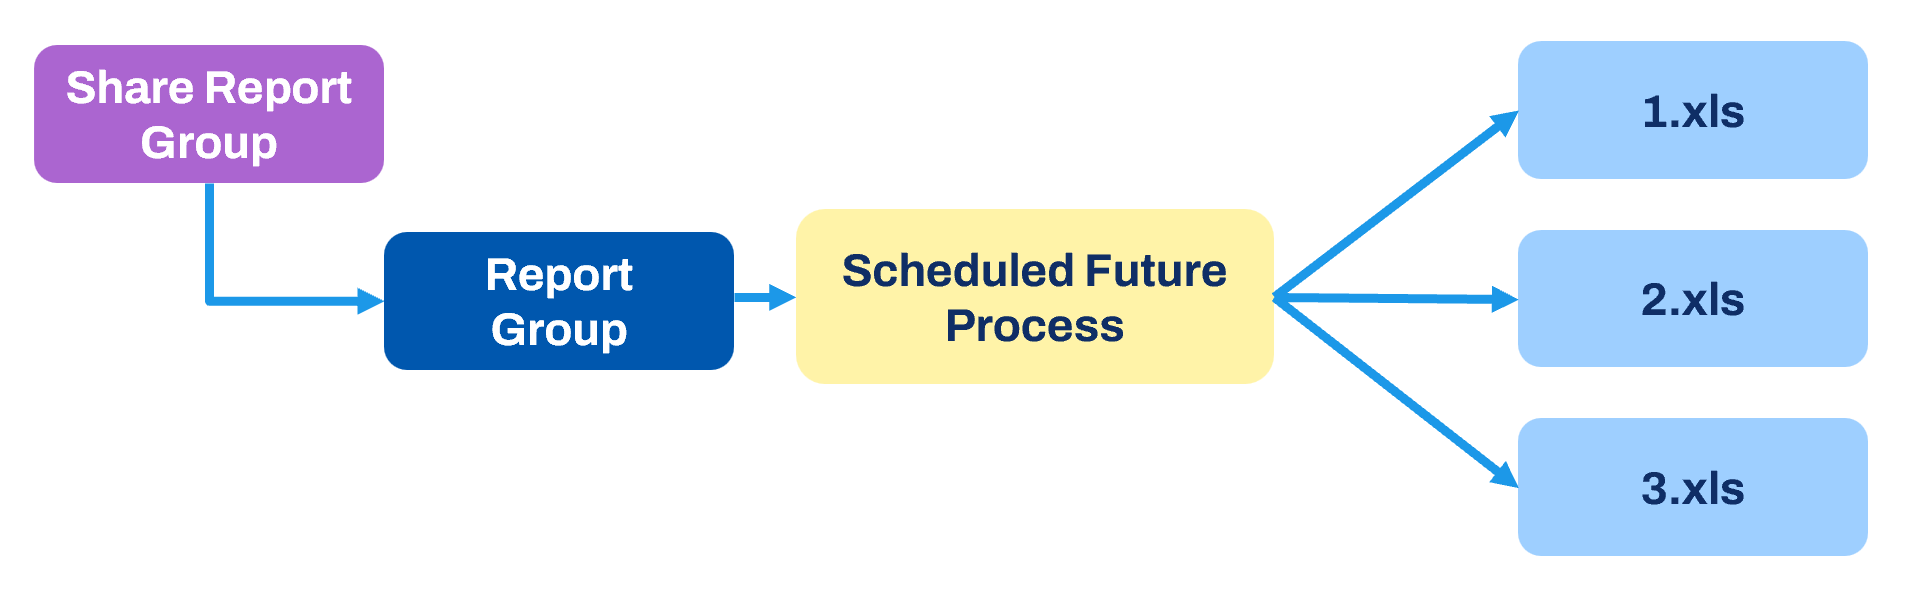
Sharing a report group also shares any saved filters on the reports. Workday recommends mapping prompts to individual reports using the prompt set. When another user schedules the report group, they can select field values in the prompt set. The reports will execute based on the security of the user scheduling the report group, not the report group owner.
Transfer Report Group
You can transfer report groups to a new owner, so that when an employee leaves their role you do not need to recreate report groups. To do so use the
Transfer Ownership of Report Group
task.Maintain Excel Template
Workday allows you to attach an Excel file to a custom report or report group definition. The system writes the output of the scheduled report or report group to the attached Excel file. The tenant secures the file to the My Reports page of authorized users.
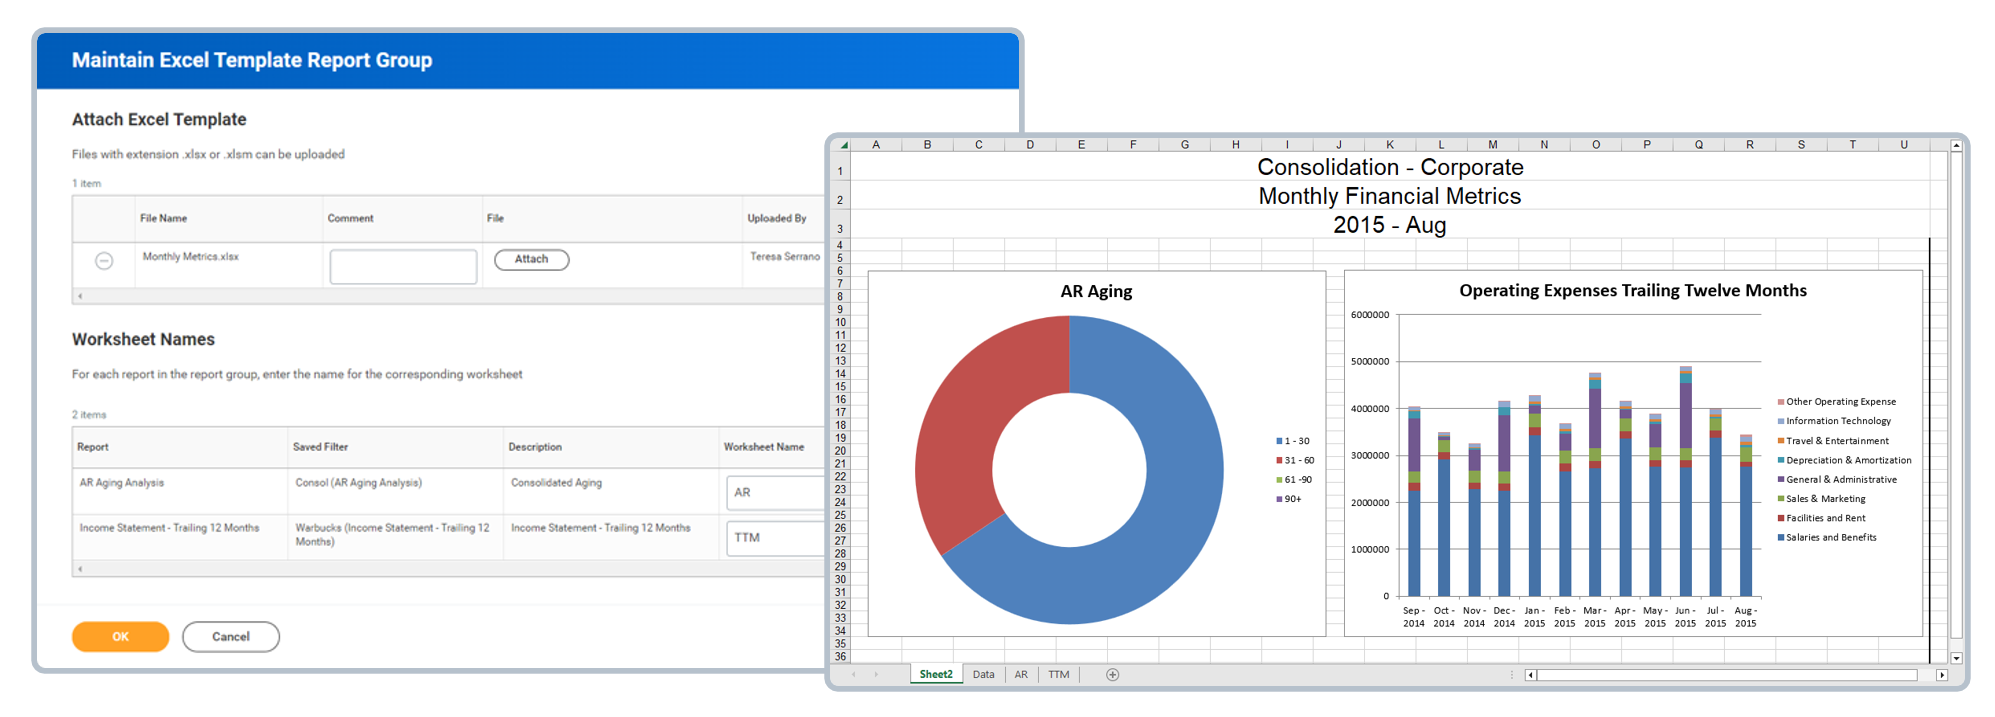
The Maintain Excel Template option for a report group allows the tenant to write all reports in the report group to one attached Excel workbook. Doing so instead of generating separate Excel files. You can configure up to 200 reports in a report group using the Excel template feature.
Excel Formatting
You can also use the
Maintain Excel Template
option to automate Excel processing and formatting when exporting a Workday custom report. This feature reduces the time and effort needed to deliver Excel workbooks based on Workday custom reports. It is especially so in cases where you export a report on a regular basis and then reformat the data in Excel.Using the
Maintain Excel Template
option, you can attach an Excel file to a custom report or a report group. Doing so where the Excel file has predefined worksheets that reference the Workday written report data and apply needed formulas, macros, formatting.It is important to note that the attached Excel file should have reserved worksheets for the Workday report (or reports of a report group). Format additional worksheets that reference the Workday report data.
Follow these steps to configure an Excel template with formatting for a custom report:
- Schedule the report (or report group) to output as an Excel file.
- Download the output file and examine how Workday writes the output in Excel.
- Note the worksheet names. It should default to the Workday report names. Always include a worksheet in the workbook where Workday will write the report output upon execution.
- In the same Excel file, create a separate worksheet (or worksheets) that pulls in the report output and apply any needed formatting and data manipulation.
- Save the file.
- Attach the file to the report definition (or report group) in Workday (Custom Report>Maintain Excel TemplateorReport Group>Maintain Excel Template).
- Confirm the worksheet name for the report (or for the reports in the report group).
- When the report executes again, the system writes the output data to the report output worksheet, and the additional sheets will then pull in the data and apply the needed formats. The desired Excel output file is available in tenant (My Reports) and you can share it with Workday users.
Workday ensures that your report data is output as a sheet into the Excel workbook that you associate with the report. You are responsible for designing and troubleshooting any Excel macros and formulas in the Excel template workbook that you create for use with this feature.
Report Bursting
Use a bursting set to generate multiple versions of a report upon execution of a report group. When you schedule and run the group, the background job iterates through each instance of a bursting set field to produce one report for each value.
For example, you can generate multiple versions of financial reports that prompt on a company field, automatically producing one version of the selected report for each company value. Doing so eliminates the need to run each report individually for each company. Use a bursting set to generate multiple versions of reports based on any prompt set. Optionally, use an empty prompt set and define the bursting set based on the report prompts.
Example
: A common use case for report bursting is to send transactional data by organization. 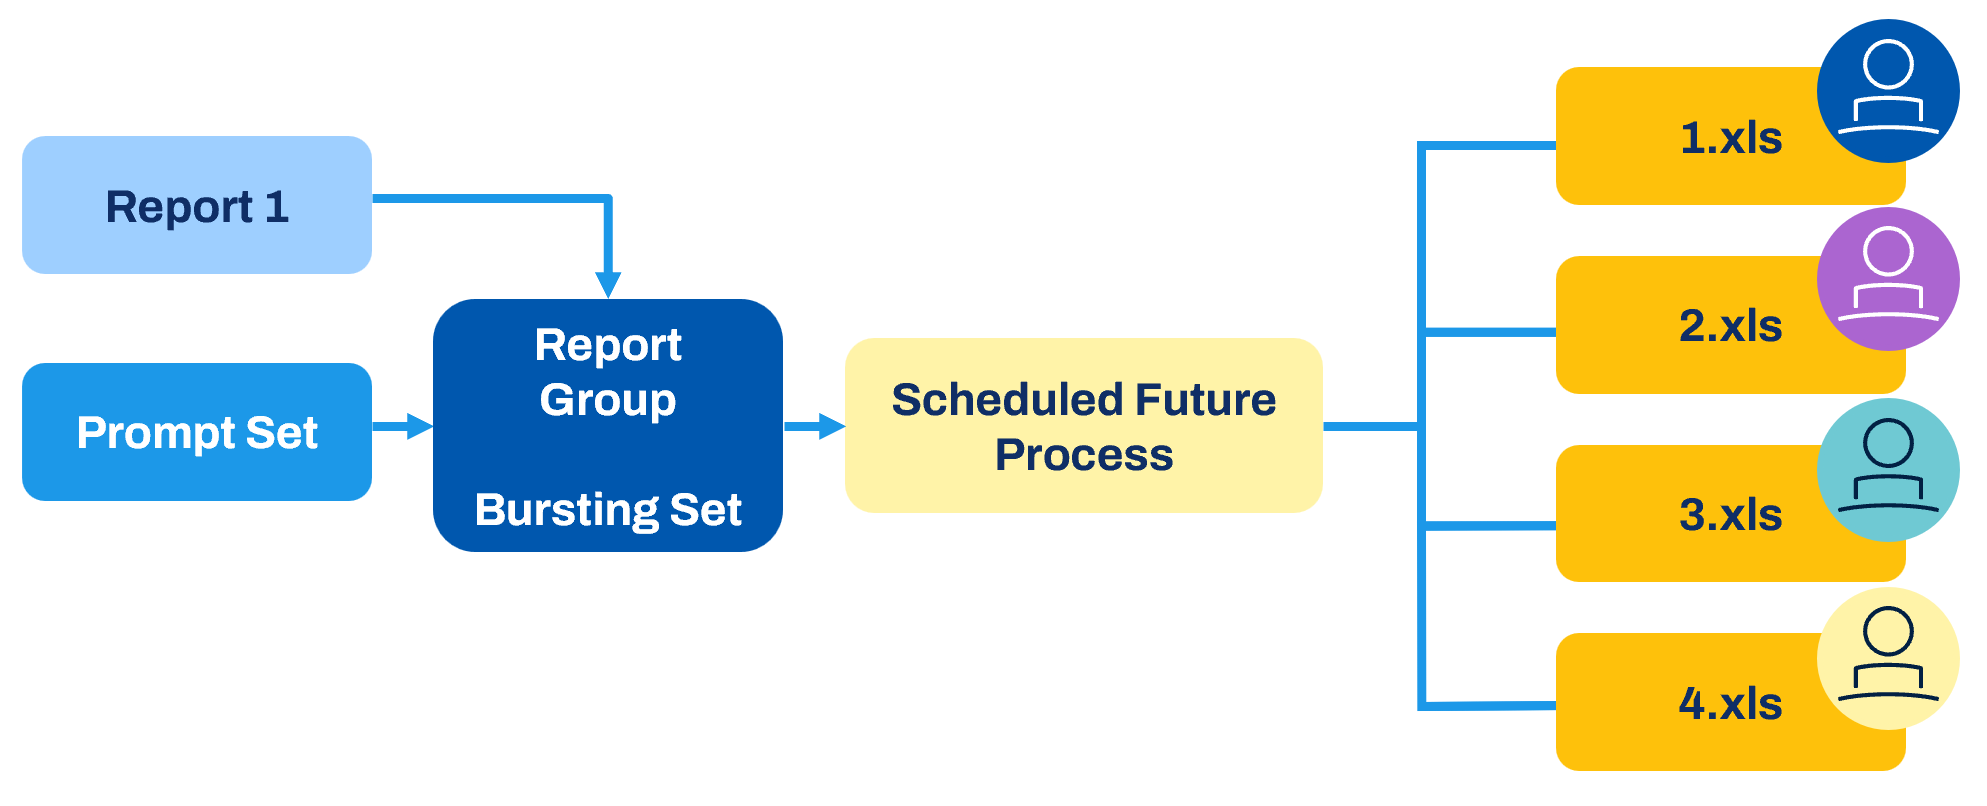
Bursting Sets
When configuring the reports within a report group, you must define Bursting Set as the value type for the report prompt. Specify a field to use as the list of instances for bursting. The bursting set value can be a global field such as Active Companies.
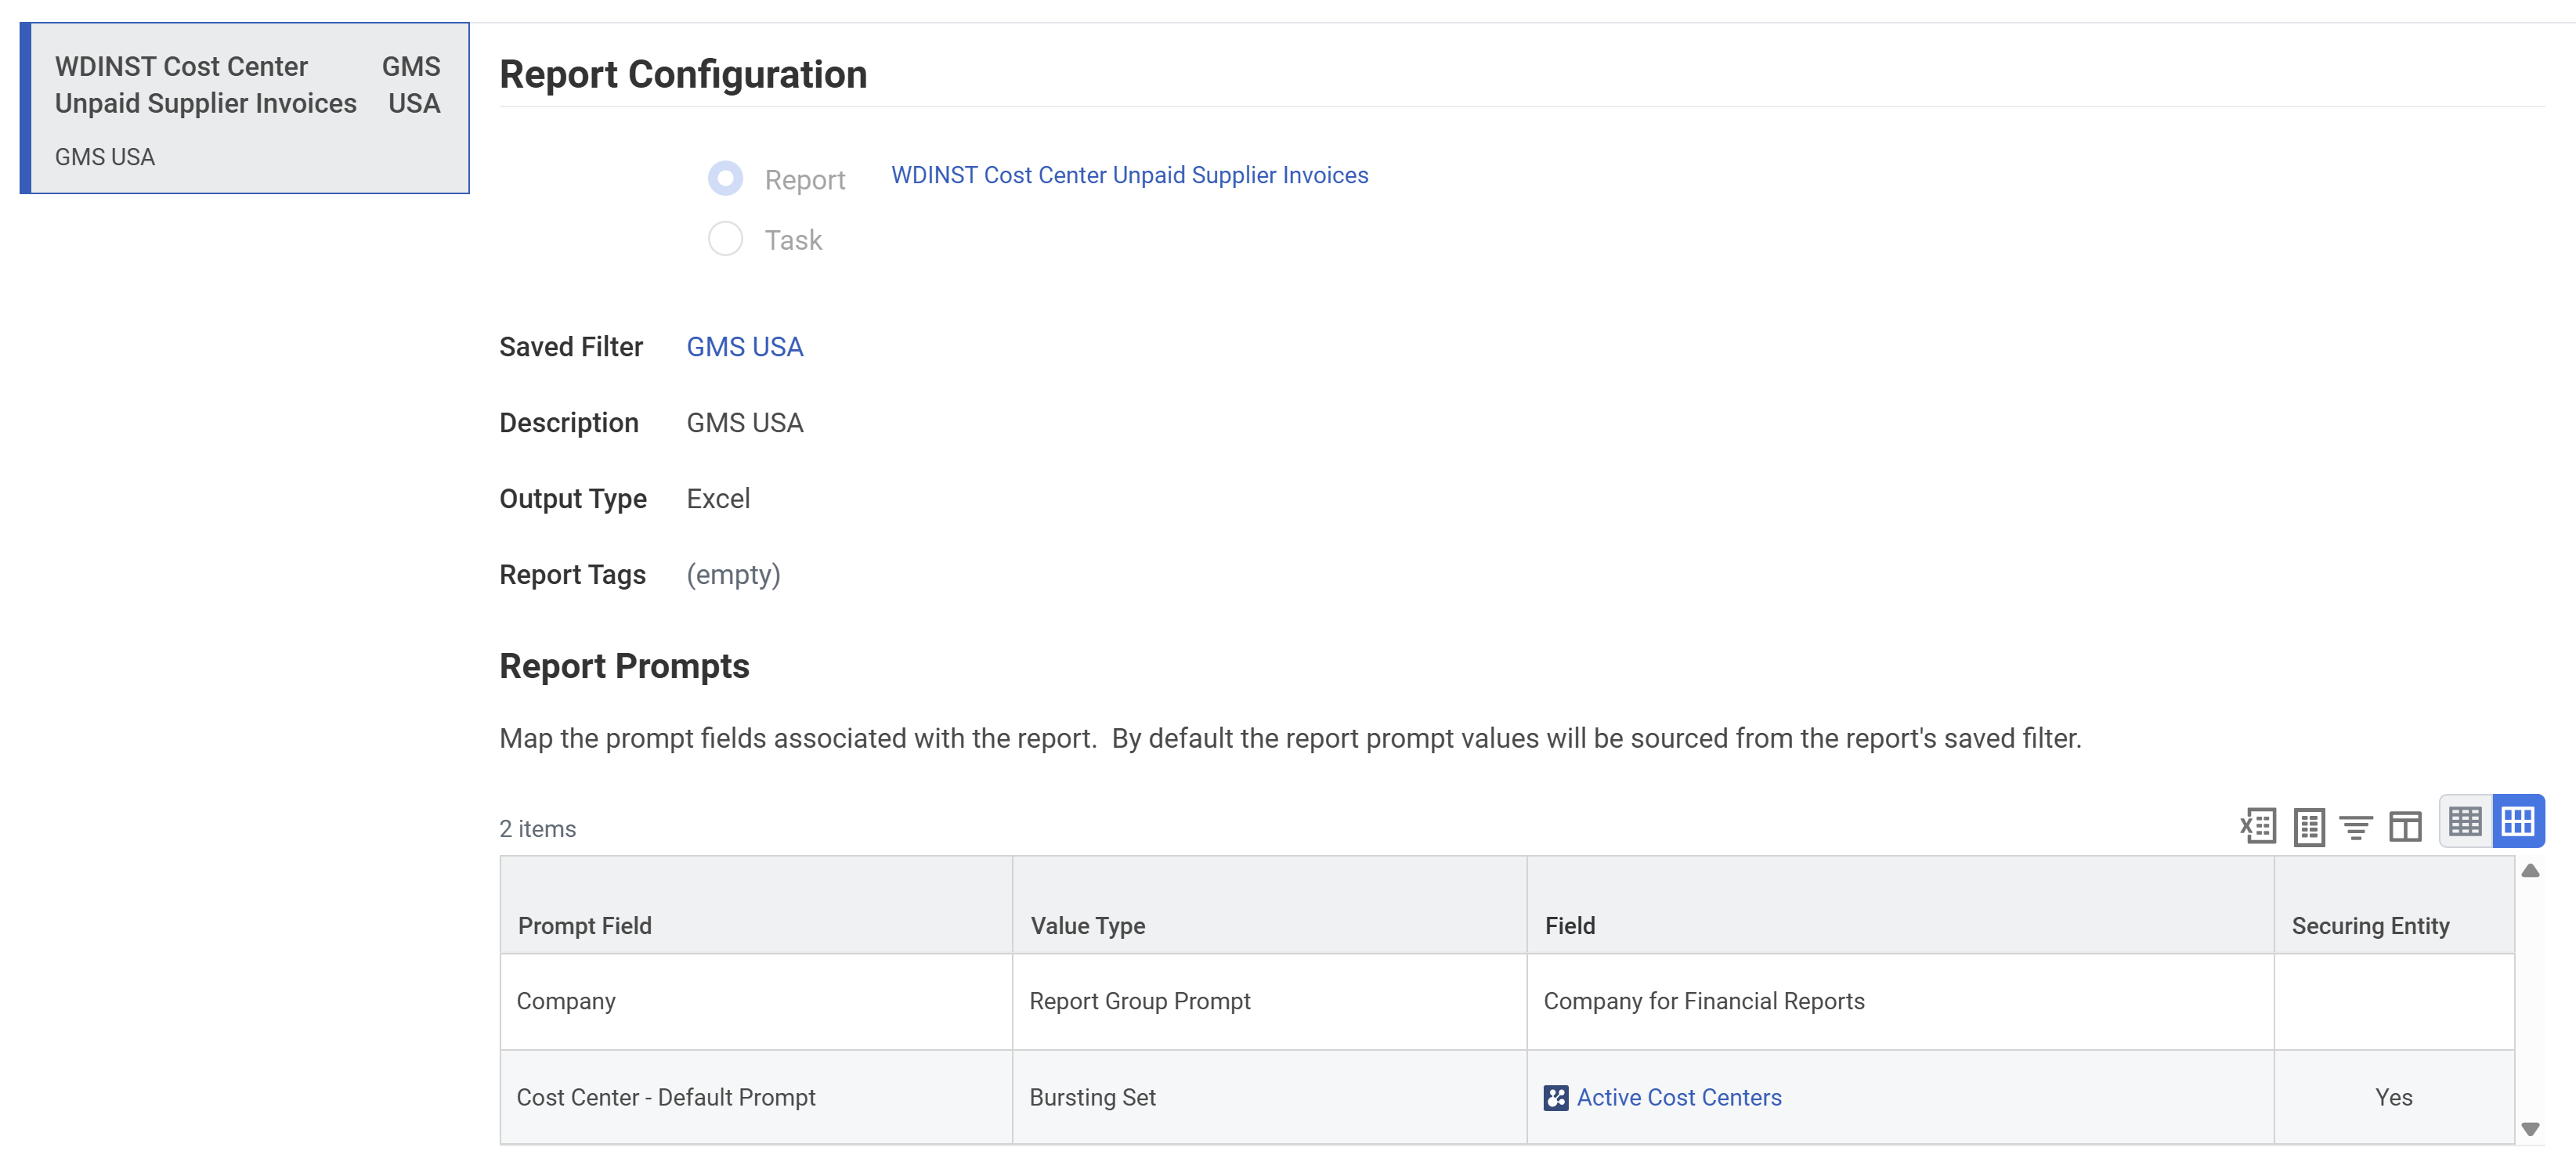
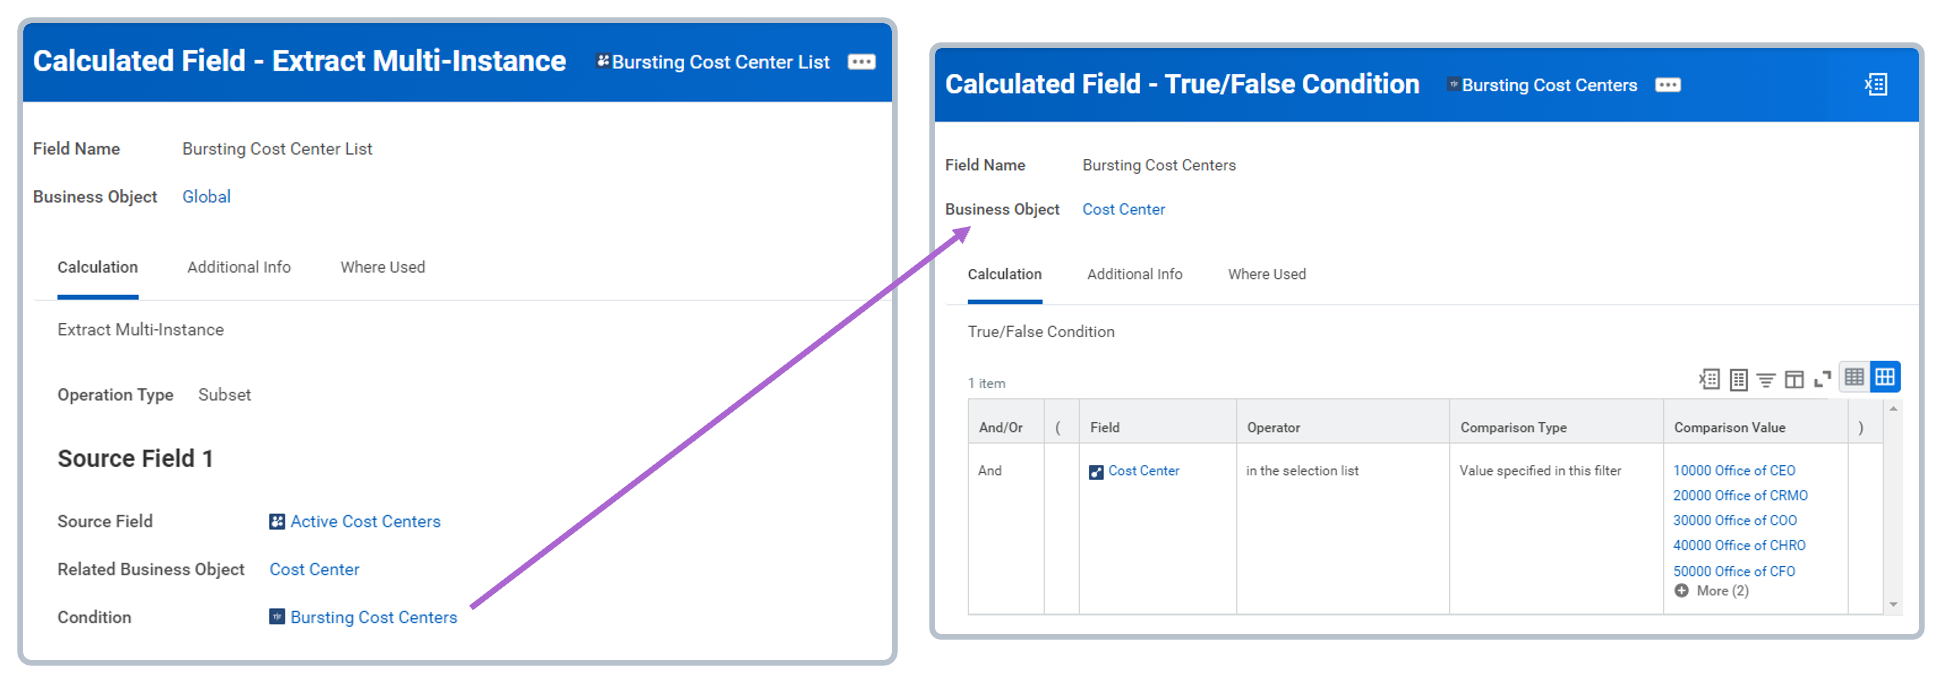
You can also configure your own bursting set fields using calculated fields to extract instances of organizations. You can use the Extract Multi-Instance function (for example, using certain cost centers, companies, or custom organizations).
Burst by Securing Entity
The bursting set field can also serve as the securing entity, such that the system sends the report output to a security group relative to the securing entity. As each iteration of the report is "burst," the system delivers the output to a security group relative to the securing entity. For example, you could send the report output for a given company to the "company costing manager" security group for that company.
Bursting with Excel Template
Report bursting using a report group with an Excel template attached produces a single Excel workbook with one sheet per iteration of the bursting set value up to a maximum of 200 sheets. Users with whom you share the report group receive one workbook. This use case may apply to a super user who needs to view multiple versions of the report in a single workbook. In addition, when shared to groups based on a securing entity, users will notice worksheets in the workbook to which they have access based on the securing entity.
Analytics and Reporting Hub
The Analytics and Reporting Hub is a centralized workspace designed for report authors and administrators. It streamlines access to reporting-related tasks, reports, and processes, enhancing productivity and simplifying administrative tasks.
Key features include:
- Centralized Access: All reporting-related tasks and information are available in one location, reducing the time spent searching for features.
- Enhanced Navigation: Users can add a worklet for the hub to their global navigation menu for direct access from their homepage.
- Support for Various Tools: The hub is enabled for Worksheets, Discovery Boards, Prism, and Office Connect tasks.
- User Customization: New overview pages allow users to customize navigation within the hub.
To enable the Analytics and Reporting hub:
- Ensure that users who need access are in a security group that has view and modify permissions for the newView: Reporting and Analytics Hubdomain.
- After adding the users and security groups, enable the security policy.
- Use theConfigure Global Navigationtask to add the hub worklet to the global navigation menu.
Chapter Summary
- Simplify report processing by scheduling a report group and using an Excel template to format the results.
- Use report output throughout Workday by scheduling alerts.
- Burst reports based on a prompt field to eliminate the need to run reports individually for each organization.