
Accounting Journals
Overview
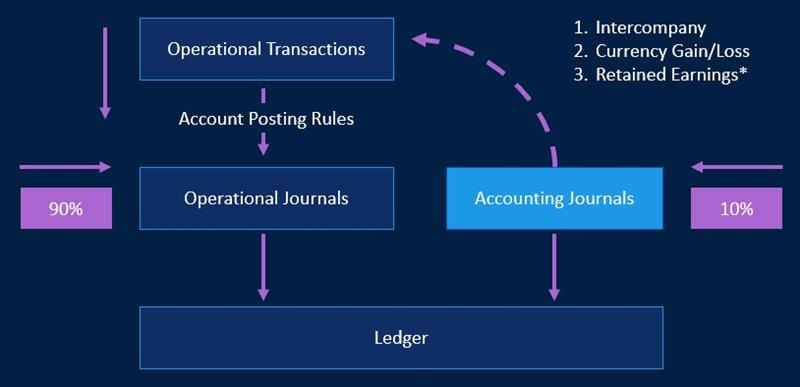
Workday automatically generates accounting for operational transactions, intercompany, allocation, depreciation, accruals, and reversals. Accounting is based on accounting policies and rules defined by your accounting and control team. Workday also accepts accounting generated in third-party systems-or spreadsheet uploads-and through an intuitive journal user interface.
Workday creates journals behind the scenes for operational transactions using posting rules to interpret the business events into debits and credits, and accounts. Workday posts journal entries to a ledger defined for each company.
Objectives
By the end of this chapter, you will be able to:
- Identify the required security groups for accounting journal creation.
- Describe how each journal type posts to the journal.
- Create a journal and reversal journal.
- Create an EIB and populate the template.
Security Policies
As you deploy Workday, you will configure security policies to ensure the appropriate security groups have the right permissions. This chapter covers the following security groups, domains, and business processes.
Security Groups
- Accountant: This role-based security group performs accounting functions for assigned organizations. They can also view reports and transactions related to accounting journals for analysis and reporting. Assign this role at the company or company hierarchy level.
- Accounting Manager: This role-based security group can view reports and create transactions. Transactions relate to accounting journals for analysis and reporting and open/close ledger periods and years for assigned organizations.
- Controller: This role-based security group can view all financials & spend management setup and operational data for assigned organizations. The role also may have approval authority for financial and compensation business processes.
Domains
Topic | Functional Area | Domain |
|---|---|---|
Journals | Financial Accounting | Process: Journals - Cancel Process: Journals - Copy Process: Journals - Core Process: Journals - View |
EIB | Integrations | Integrations: EIBs |
Business Processes
- Accounting Journal Event
- Accounting Journal Unpost Event
Journal Setup
Workday accepts multiple types of journals to the ledger. You can manually enter or upload journals. You can enter journals for month-end adjustments or depreciation, or to record accrued liability for purchase items received but not paid for. You can automatically reverse journal entries for accruals. Journal entries post to a ledger defined for each company.
Term | Definition |
|---|---|
Accounting Journals | You can create accounting journals (generally referred to as "journals" in Workday) to directly record accounting data not associated with operational transactions. |
Adjustment Journals | You can mark an accounting journal as an Adjustment Journal. |
Pro Forma Allocations | In Workday, you can process allocations many times during a period so that you notice the impact of allocations when you view your financial results. The operational journals that the allocation processing creates have a status of pro forma (rather than posted). You can include pro forma operational journals in reporting throughout the period to determine the allocation impact. |
Recurring Journals | Recurring journals are journals you need to create on a regular basis. They have the same journal lines for the same accounts and amounts. You can create future-dated recurring reversal journals. When the reversal period opens, use the Mass Post Reversal Journals task to post the reversal journals. |
Reversal Journals | Select the Create Reversal checkbox and enter the Reversal Date on or after the accounting date to create a reversal journal. If the accounting period is not open, Workday creates a journal in Created status. When the reversal period opens, you can use the Mass Post Reversal Journals task to post the reversal journals. You can only post intercompany reversal journals if all companies in the journal have the period open. |
Note
: Carefully consider the use of cost center as a dimension in journals posting to balance sheet accounts. Occasionally, if cost center is on a journal line with a balance sheet account, you may need to take steps to manually remove it later for accurate reporting. For best practice, ensure you only include cost centers in accounting lines for income and expense accounts.Journal Sources
You can define journal sources to indicate where or why you created the journal. You can define journal sources separately for accounting journals and operational journals, or use the same journal source for both journal types.
Before you define your journal sources for operational transactions, Workday recommends that you review the list of operational transactions. Each operational transaction can have only one journal source, so by reviewing the list in advance, you can better understand the journal sources that you need to define. Access the
Maintain Journal Source Mapping to Operational Transactions
task to find the list.For operational journals, you will select a source to indicate the type of transaction that the journal originated from such as customer invoices, supplier invoices, and expense reports. Workday assigns journal sources to operational journals based on the mapping that you establish between operational transactions and journal sources.
Once this mapping is complete, you are able to assign a journal source to the accounting journals that you create. Instead, Workday can automatically derive it from operational transactions determined during setup.
Use the
Journal Source Mapping to Operational Transactions
report to view the journal sources that Workday automatically applies to journal entries for each of the various operational transactions. Details include a list of every operational transaction and its matching journal source.For accounting journals, you can create as many journal sources as necessary. Accountants can then select from the predefined list of journal sources when they create their accounting journals. Edit and delete journal sources when no longer in use. Typical journal sources include accrual, beginning balance, equity pickup, manual journal, recurring, revaluation, and year-end.
Use the
Journal Sources
report to view a list of all journal sources so that you can review what values exist. Details include whether you used the source for operational journals or accounting journals.Journal Statuses
Workday provides multiple statuses for journal documents to allow for tracking of preliminary creation, approval, and cancelation of journal documents. The status determines the operations you can perform on a specific journal.
The following is a list of activities and whether Workday permits it in each journal status:
Status | Explanation |
|---|---|
Created | A journal you have saved but not submitted for approval will have a status of Created. Journals in this status can be:
|
In Progress | Journals you have submitted to the business process but where the business process has not completed will have a status of In Progress. This point is when Workday assigns the journal ID. Workday would not yet include the journal in the financial statements. Journals in this status can be:
|
Posted | A posted journal is one you have posted to a ledger and is included on financial reports. Posted journals are journals you submitted that have completed the business process. You can only unpost a posted journal. |
Unposted | Unpost a posted journal before you can take action on it. You can only unpost a journal if you have not closed the period. Journals in this status can be:
|
Canceled | If the journal is in progress, created, or unposted, you can cancel it since it never affected the financial reports. To cancel a posted journal, first unpost it, then change the status to cancel. |
Note
: You can always copy a journal, regardless of status.Custom Validations
Custom validations allow you to define validation logic to control data quality on your financial transactions. For example, a custom validation might ensure that a supplier invoice transaction includes both a cost center and region worktag but only if you choose company ABC.
You can create custom validations to:
- Warn users when entering invalid transactions.
- Prevent users from submitting invalid transactions.
- Alert transaction approvers to conditions that need more careful review.
A custom validation contains:
- Transaction type.
- Validation type.
- Error message.
- Condition rules.
Custom validations will generate errors or warnings when you submit the transaction. Errors occur at the header and line level of the journal.
Custom Validation Transactions and Types
Each type of transaction has its own set of custom validations and the list of transactions, which allow for custom validations is Workday delivered. You can create custom validations for numerous transaction types, some of which include:
Transaction Type | |||
|---|---|---|---|
Accounting Journal | Ad Hoc Bank Transaction | Ad Hoc Payment | Cash Sale |
Customer Invoice | Customer Invoice Adjustment | Customer Refund | Expense Report |
Purchase Order | Supplier Invoice | Supplier Invoice Adjustment | Timesheet |
*For a complete list reference the Maintain Custom Validations report.
Configure custom validations as either Critical or Warning severity type. Workday executes both types when you submit the transaction, not during data entry.
- A Critical custom validation is a hard stop and you must resolve the error before the user can continue.
- A Warning is a message to the user they can bypass.
Using the existing Maintain Custom Validations task, you can create or edit critical errors and warning messages for transactions based on rule conditions that you establish. When your users perform these transactions, Workday validates them against the current custom conditions. Approvers also receive any warnings in the transaction they receive for review.
Custom Validation Condition Rules
A condition is part of the custom validation and consists of one or more rules. You can create condition rules describing the criteria required to generate an error or warning during transaction validation. Essentially, you are writing the condition rule to search for a time when something is wrong with the transaction. Custom validations are resolving to a negative.
For example, you may want a custom organization or custom worktag on every supplier invoice for a specific company. To address the need, you write a custom validation to determine if a custom organization or custom worktag is missing, because the error is conditional and not tenant-wide. If a custom organization or custom worktag is missing from the transaction, for that specific company, the custom validation will display the error message.
You can write custom Validation rules to generate an error or warning if a certain combination of data is present. For example, on a customer invoice for WOK, if the Revenue Category is Other Income, then Workday will not allow Core Financials or Programming Basics course names.
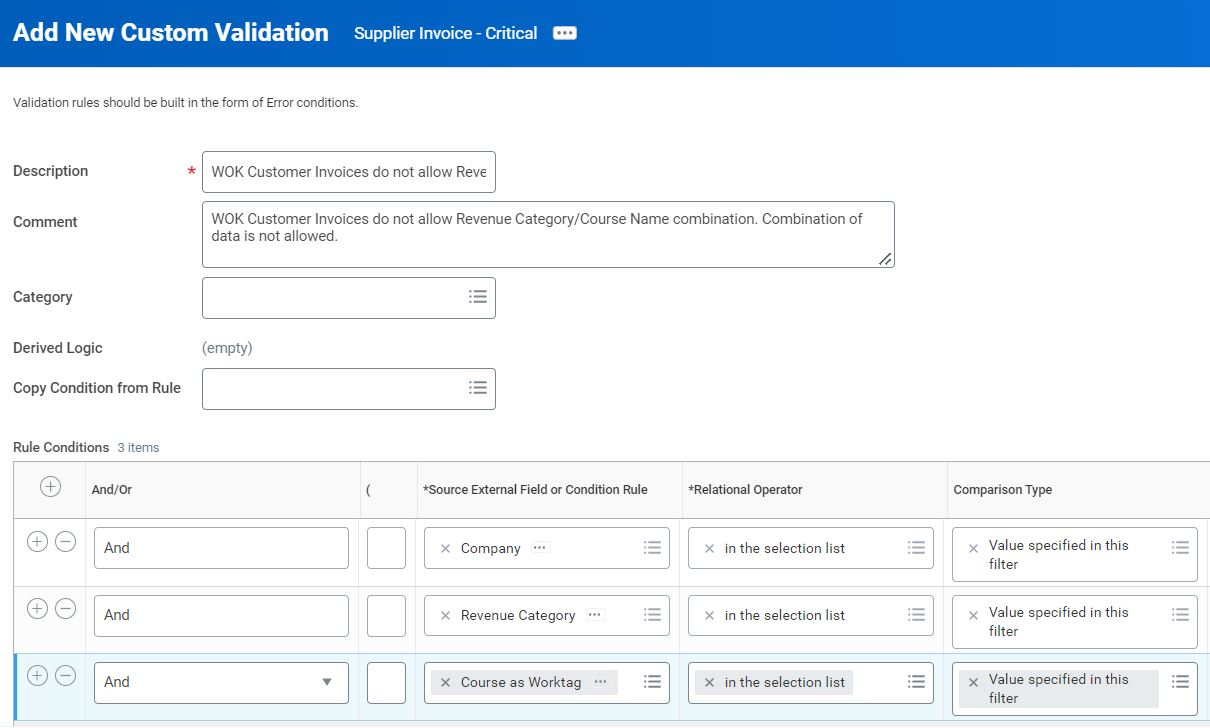
WOK custom validation
You can write custom Validation rules to generate an error or warning if a combination of data is not present. Example, when creating a customer invoice for WOK, if the Revenue Category is Course Delivery, then Course Name cannot be blank.
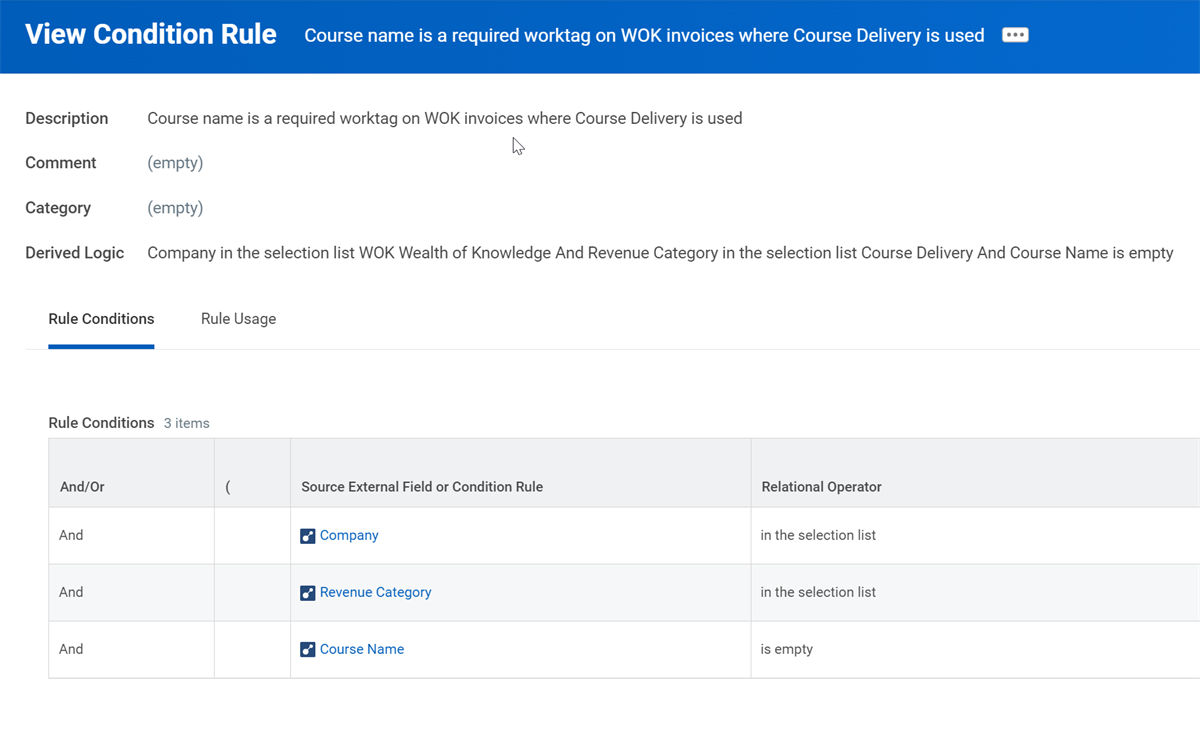
View Condition Rule
You can write Custom Validation rules to generate an error or warning when data is not present under a specific circumstance. For example, when creating a Supplier Invoice for WOK you must have a custom org.
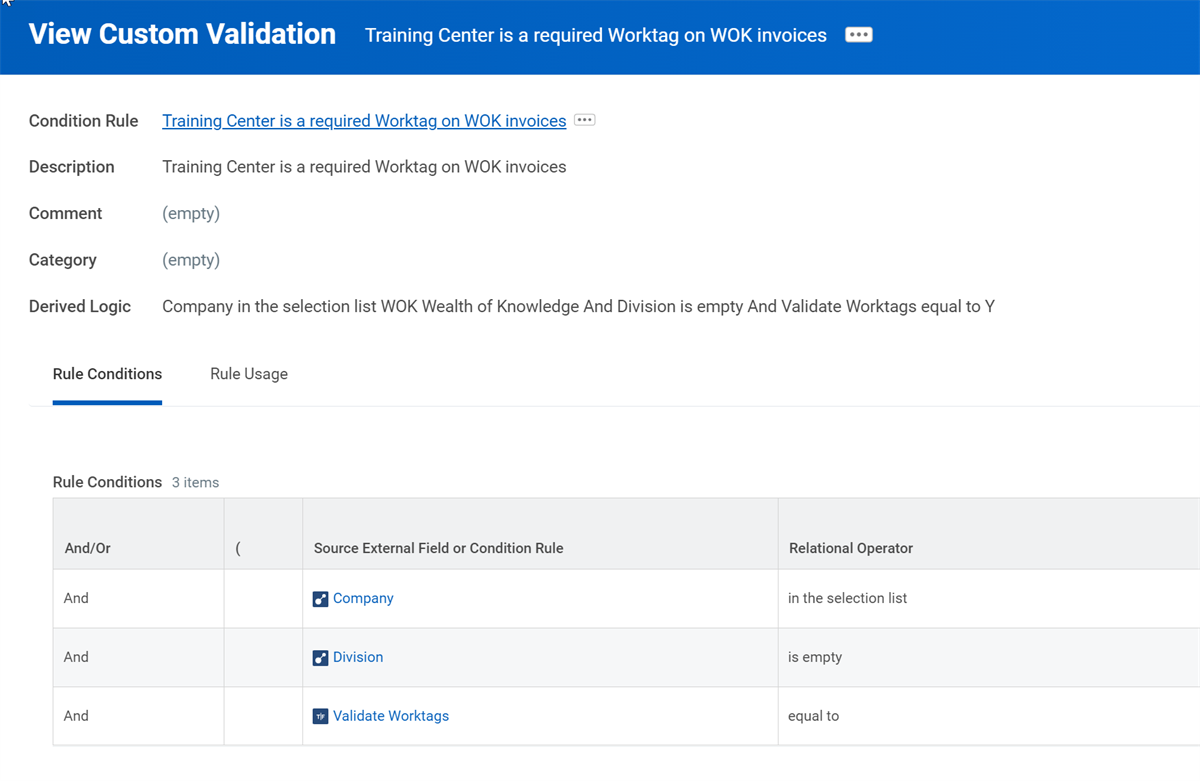
Training Center is Required
When you are writing custom validations, the following fields are available:
Field | Description |
|---|---|
Description | The default message that displays to users if you do not configure a validation message. If you do not create a custom message, Workday instead displays the description of the custom validation. |
Category | Assigning a category makes the validation rule easier to find later. A Business Process Administrator can create Custom Validation Rule categories using the Maintain Condition Rule Categories task. |
Derived Logic | The statement that you have defined through the rule conditions. This statement displays for existing rules and after you save new rules. |
Copy Condition from Rule | You can copy and modify an existing validation rule to create a new one. |
A condition rule can consist of one or more logical statements, separated by the logical operators AND/OR. When creating your conditions, you will be able to specify:
Term | Definition |
|---|---|
And / Or | When two (2) or more statements exist in the expression, set this condition to control how the statements relate to each other. |
( ) | Use parentheses when you have three (3) or more statements and a combination of And/Or conditions Ex: A and (B or C). |
Source External Field or Condition Rule | The field or condition rule you select as the source determines which other options are available. The context where you use this condition controls the available fields and their values. The selection list includes calculated fields associated with the same type of business object to which this condition is relevant. |
Relational Operator | These options depend on the data type. For example, an amount field would have a "greater than" option but a text field would not. |
Comparison Type | Specifies whether Workday should compare the source to another field or to a value that you enter in the Comparison Value column. |
Comparison Value | Based on the Comparison Type, select a comparison field or enter a value to compare to the source. |
When you use conditions to select from several courses of action, Workday examines the conditions in order until it finds a match and then stops. If you have a variety of conditions, always put the most specific conditions first. Otherwise, a more general condition will always match before Workday gets to a more specific condition.
As you complete the Rule Conditions, consider the maintenance of the condition rules and updating of data. Use hierarchies whenever possible to minimize maintenance.
Edit a Custom Validation
You can update the custom validation and its condition rules. Use the Related Action off the validation and select Validation > Edit Condition Rule.
Use an Existing Custom Validation
If you have written a custom validation you can use on another transaction type, you do not need to write another one. You can choose to use the same custom validation on other transaction types. Doing so allows you to reuse and only maintain one custom validation.
If for example, a cost center validation on the supplier invoice already exists. If you require a cost center on a supplier invoice adjustment, you can reuse the existing validation.
In this example, Supplier Invoice Adjustment does not contain any custom validations. To use an existing validation, select the Maintain Validations button to access the Edit Validations Rules screen.
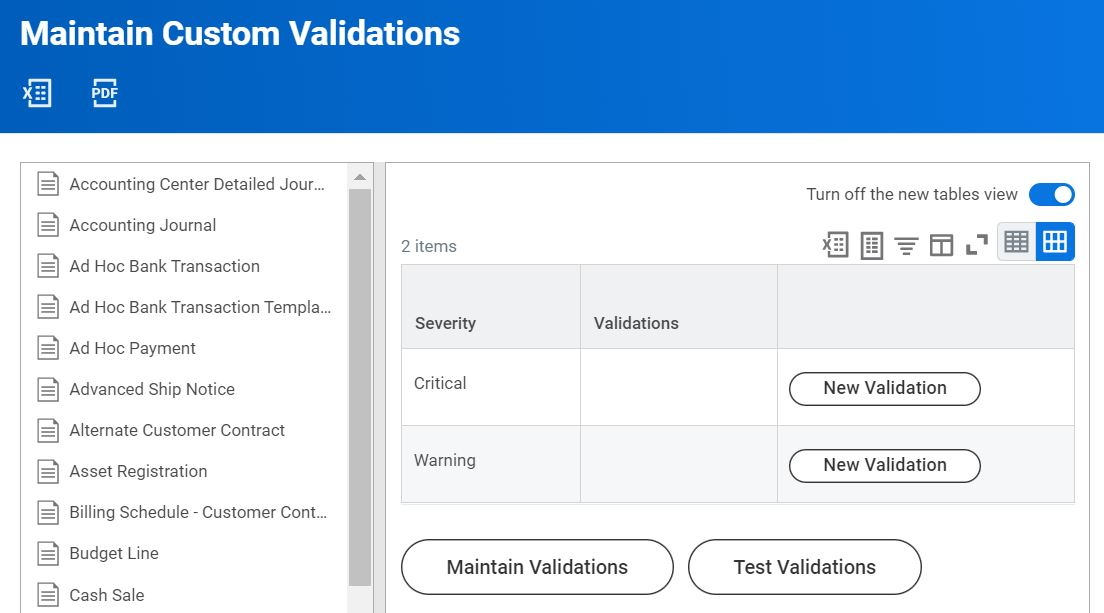
Maintain Custom Validations for Supplier Invoice Adjustment
Here you can add an existing condition to the Critical or Warning rule types. You can also use this screen to remove an existing validation.
Custom Validation Messages
By default, Workday displays the default message from the custom validation. You can create a custom validation message for more descriptive text.
- Access the Maintain Custom Validations report.
- Select the type of transaction.
- From the Related Action on a validation, select Validation > Configure Validation Message.
- Enter a custom validation message.
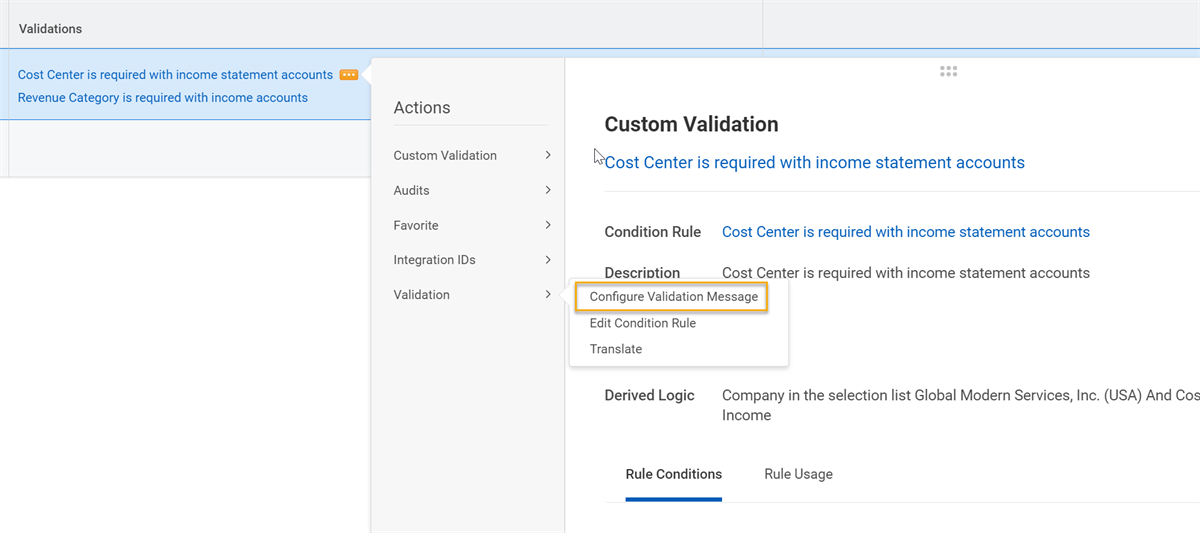
Configure Validation
Maintain Worktag Usage
What appears on a transaction drives financial accounting and reporting. For example, if you plan to run period close reports by Cost Center you will need a cost center on every transaction that might affect period close. If you know that a project determines spend rules, make sure you include a project on each supplier invoice and supplier invoice adjustment.
While you cannot technically make a new field required, only Workday can do that, you can choose to make a worktag required. Worktag Usage and Custom Validations allow users to set rules that require specific worktags on a transaction. When a specific worktag or piece of data is missing, Workday displays an error to the user prompting them to complete the required data.
Worktag Usage, Related Worktag Usage, and Custom validations help users catch transaction issues up front. Doing so ensures that data required for business process routings, account posting rules, and financial reports is on the transaction.
For each type of financial transaction that uses worktags, you can choose the worktag types that you want to be available in the transaction. Doing so simplifies worktag selection because only the worktags that make sense for your business appear.
Workday delivers the allowed worktag types that are available for each transaction type. Use the Maintain Worktag Usages task to view the allowed worktags and modify them as needed.
In addition, you can specify whether a worktag is a Primary or Additional Worktag and whether you require the worktag or not.
Primary Worktags
Adding the worktag as a Primary Worktag presents the worktag as an individual field or column. You can choose the order in which this worktag displays and on which transaction you enable the worktag. You can specify up to 10 Primary Worktags on any transaction.
Additional Worktags
You can set up other worktags that you may want on a transaction as Additional Worktags. Workday presents these other worktags in a multiselect field. Marking an Additional Worktag as required places an asterisk (*) on the Additional Worktag field/column. Searching within the prompt will also mark the worktag type with an asterisk (*).
Error Messages
Workday will show the user an error message if any required worktags are missing. Highlighted fields indicate missing values. If you configure a worktag as required, you will not be able to save the transaction with a missing value - not even save for later.
Tenant Wide
Any worktag setup as Primary will display for that transaction type throughout the tenant. If you have multiple companies in a tenant, Workday will prompt all companies for the same required worktag setup through Maintain Worktag Usage. If you need to require a specific worktag only on one company and not throughout the tenant, you can use Custom Validations.
Maintain Related Worktag Usage
You can define worktag usage at the transaction level as described in the previous section. Related worktags are related to other business objects in the tenant. For example, on a Cost Center, you can relate a specific Region worktag value. When you use a cost center on a transaction, Workday automatically populates the related Region worktag that you configured using the Maintain Related Worktag Usage task. Below is a list of several objects that you can configure with a related worktag (the list is not comprehensive):
- Cost Center
- Customer
- Project
- Region
- Revenue Category
- Spend Category
Note
: When maintaining related worktag usage for a business object such as Customer, it is important to note that you can set the values to Default Required.
Workday will require a default value for the worktag type in every instance of that object.Additionally, you can set the worktag type to
Required on Transaction,
which will require that a value for that worktag type be on all transactions.EIB – Upload a Journal Entry
Use the Enterprise Interface Builder (EIB) to build simple inbound and outbound integrations between Workday and external endpoints. EIB gives you a framework to build your own integrations based on your unique business needs.
Integration Type | Description | Examples |
|---|---|---|
Inbound (import data) | Upload data into Workday by using:
A file transfer from an external SFTP, FTP/SSL, or FTP endpoint. | Import accounting journals into Workday from an Excel spreadsheet that you provide as an attachment. Import data into Workday from an Excel spreadsheet to perform a bulk business process. Import transactions for expense credit cards from a card issuer. You can then process the transactions in Workday Expenses. |
Outbound (export data) | Export data from Workday in various formats, such as:
Then send the data to an external endpoint by using various protocols, such as:
| Export all active employees from Workday in XML format and send it to an external endpoint with SFTP. Export employee hours and billing rates from Workday in CSV format and send it to an external endpoint with SFTP. Export employee headcount and contribution data from Workday in CSV format and send it to a life insurance provider by email. Note : Outbound EIBs cannot export data in Microsoft Excel format. Export data in CSV format, then open the CSV file using Microsoft Excel. |
Workday represents the integration as an enterprise interface, which you build and configure before the integration is ready to launch. You can design an enterprise interface by using a wizard design method. Create simple inbound or outbound integrations in a few steps with the wizard, which guides your setup with appropriate options based on the data flow.
EIB Components
An EIB has three components:
Component | Description |
|---|---|
Get Data | This component can indicate:
|
Transform | This component converts the data into a format that Workday or the receiving external endpoint can understand. Workday provides some delivered transformations, but you can also create your own transformations. |
Delivery | This component defines how Workday imports data from or exports data to an external endpoint, e.g., email, sFTP, and web services. |
Import Accounting Journal
Use EIB to upload accounting journal data from a spreadsheet. When successfully completed, the upload automatically triggers the
Accounting Journal Event
business process. To automatically complete approvals, bypass reviews and To Do tasks, then skip notifications in the Accounting Journal Event
business process. Also, set the Automatically Complete field to Y when you prepare the spreadsheet.Note
: You need to specify object's Reference IDs while populating the EIB spreadsheet. Running the Integration IDs
report can quickly display all reference IDs for a specific object.EIB Steps
- Setup Step 1: Create the EIB - set up the EIB upload process.
- Setup Step 2: Generate a spreadsheet template for the upload.
- Ongoing Step: Populate the spreadsheet with data.
- Ongoing Step: Launch the upload and verify the results.
Handle Import Processing Errors
A
Handle Import Processing Errors
check box is located on the Integration Criteria
table on the Launch/Schedule Integration
task. The check box is selected by default. When selected, it enables Workday to report these types of processing errors:- Update conflict errors. Example: Duplicate record inserts.
- Custom validation errors.
There is also a
Handle Import Processing Errors
field on the View Background Process page. Integrations may still fail because of these processing errors. However, Workday reports the specific error on the View Background Process page.EIB Errors
If your integration has a
Completed with Errors
status, you can use the Number of Errors information to view the error messages.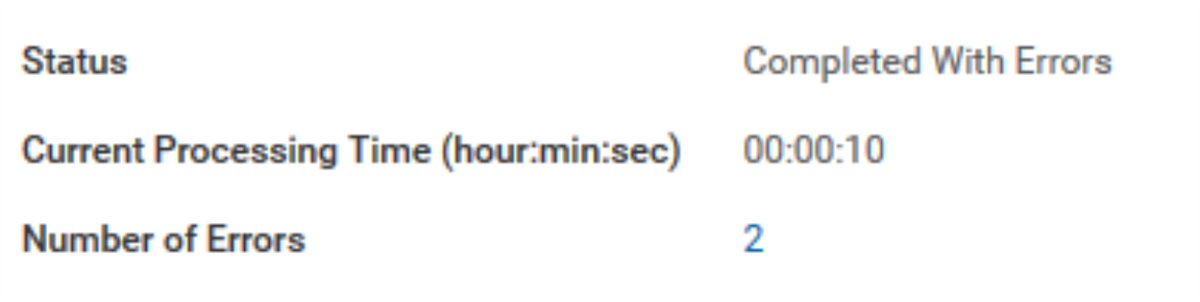
completed with errors screen shot
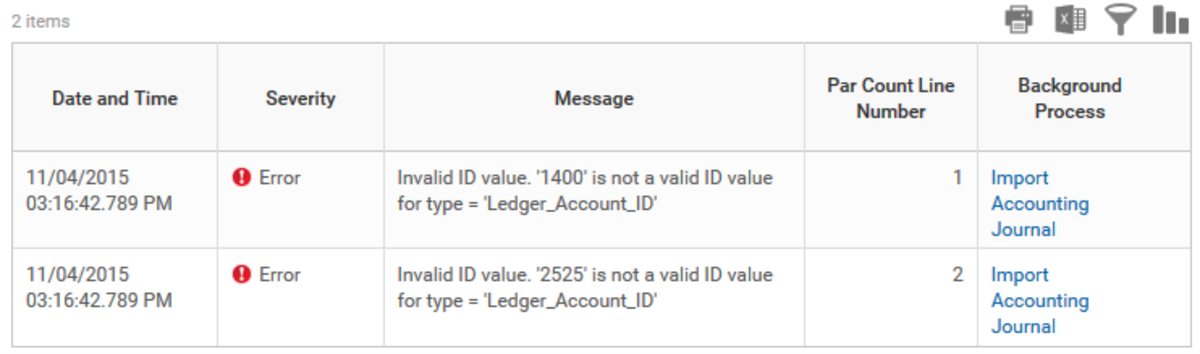
Two error messages
If you had errors, open the spreadsheet, resolve the errors, and repeat the launch integration steps to bring the corrected spreadsheet into the Workday system.
The following two cases show the different errors you may encounter for the Company_Ref in the EIB errors. Each error refers to a different issue.
Case 1: "Invalid ID Value. "WOK is not a valid ID value for type = "Company_reference_ID." This message means the company reference ID is not correct. The data entered in the company reference ID column of the spreadsheet does not match the REFERENCE ID of a company in Workday.

Error Message - invalid ID value
To correct this error:
- Check the reference ID for your company.
- Check the spelling of the company ref ID in your import sheet.
This case shows you the invalid ID as well as saying
Company_Reference_
ID
in the error.Case 2: "The entered information does not meet the restrictions defined for this field. (Company_Reference)."
In this case, the user that launched the EIB does not have the security necessary to create the transaction in the company referenced in the excel sheet.

Error Message
To correct the error:
- Check your sign-in name when launching the integration (For accounting journals the name should normally be the accountant).
- Try creating a manual journal as the person you logged in as. The company you are trying to upload against will not be available to select.
- If you logged in as your accountant, then check that you have assigned the Accountant role to that company.
This error does not tell you an incorrect value, and it does NOT say ID after Company_Reference.