
Customer Invoices
Overview
Workday Revenue Management enables you to manage your customer accounts and associated revenue. When you sell items to your customers, you can use Workday to manage the invoices and sales terms, record customer payments and cash sales, and deposit money into the bank. Further capabilities enable you to record invoice adjustments, write off bad debt for unpaid invoices and adjustments, place overpayment balances on account, and create refunds for invoice adjustments and on-account balances. Use actionable reports anytime throughout the cycle to track and analyze your customer account data. Key integration points give you further flexibility to manage customer revenue.
Objectives
By the end of this chapter, you will be able to:
- Identify customer invoice domain and business process security policies.
- Print customer invoices.
- Edit customer invoice layout rules.
- Configure emailing customer invoices and attachments.
- Maintain invoice adjustment reasons.
- Perform customer invoice maintenance.
- Create customer invoice adjustment.
- Cancel customer invoices.
- Adjust customer invoices.
- Explain multicurrency invoicing functionality.
Security Policies
As you deploy Workday Revenue, there are some customer invoice security policies that you will need to configure to ensure the appropriate security groups have the right permissions.
Domains
Topic | Functional Area | Domain |
|---|---|---|
Customer Invoices | Customer Accounts |
|
Business Processes
- Customer Invoice Email Event
- Customer Invoice Event
- Customer Invoice Intercompany Event
- Customer Invoice Maintenance Event
- Customer Statement Event
- Customer Refund Event
- Bad Debt Write off Event
- Customer Deposit Event
- Cash Sale Event
- Consolidated Invoice Email Event
- Customer Overpayment Event
- Customer Payment Application Event
Account Posting Rules Used
- Revenue
- Receivables
- Retained Earnings
- Transaction Tax
- *Deferred Revenue
Maintain Worktag Usage
What appears on a transaction drives financial accounting and reporting. For example, if you plan to run period close reports by Cost Center you will need a cost center on every transaction that might affect period close. If you know that a project determines spend rules, make sure you include a project on each supplier invoice and supplier invoice adjustment.
While you cannot technically make a new field required, only Workday can do that, you can choose to make a Worktag required. Through the use of Worktag Usage and Custom Validations, you can set rules that require specific Worktags on a transaction. When a specific Worktag or piece of data is missing, Workday displays an error to the user prompting them to complete the required data.
Worktag Usage, Related Worktag Usage, and Custom validations help users catch transaction issues up front. Doing so ensures that the data required for business process routings, account posting rules, and financial reports is on the transaction.
For each type of financial transaction that uses Worktags, you can choose the Worktag types that you want to be available in the transaction. Doing so simplifies Worktag selection because only the Worktags that make sense for your business appear.
Workday delivers the allowed Worktag types that are available for each transaction type. Use the Maintain Worktag Usages task to view the allowed Worktags and modify them as needed.
In addition, you can specify whether a Worktag is a Primary or Additional Worktag and whether you require the Worktag or not.
Primary Worktags
Adding the Worktag as a Primary Worktag presents the Worktag as an individual field or column. You can choose the order in which this Worktag displays and on which transaction you enable the Worktag. You can specify up to 10 Primary Worktags on any transaction.
Additional Worktags
You can set up other Worktags that you may want on a transaction as Additional Worktags. Workday presents these other Worktags in a multiselect field. Marking an Additional Worktag as required places an asterisk (*) on the Additional Worktag field/column. Searching within the prompt will also mark the Worktag type with an asterisk (*).
Error Messages
Workday will show the user an error message if any required Worktags are missing. Highlighted fields indicate missing values. If you configure a Worktag as required, you will not be able to save the transaction with a missing value - not even save for later.
Tenant Wide
Any Worktag setup as Primary will display for that transaction type throughout the tenant. If you have multiple companies in a tenant, Workday will prompt all companies for the same required Worktag setup through Maintain Worktag Usage. If you need to require a specific Worktag only on one company and not throughout the tenant, you can use Custom Validations.
Custom Validations
Custom validations allow you to define validation logic to control data quality on your financial transactions. For example, a custom validation might ensure that a supplier invoice transaction includes both a cost center and region Worktag but only for ABC company.
You can create custom validations to:
- Warn users when entering invalid transactions.
- Prevent users from submitting invalid transactions.
- Alert transaction approvers to conditions that need more careful review.
A custom validation contains:
- Transaction type.
- Validation type.
- Error message.
- Condition rules.
Custom validations will generate errors or warnings when a user submits the transaction. Errors occur at the header and line level of the journal.
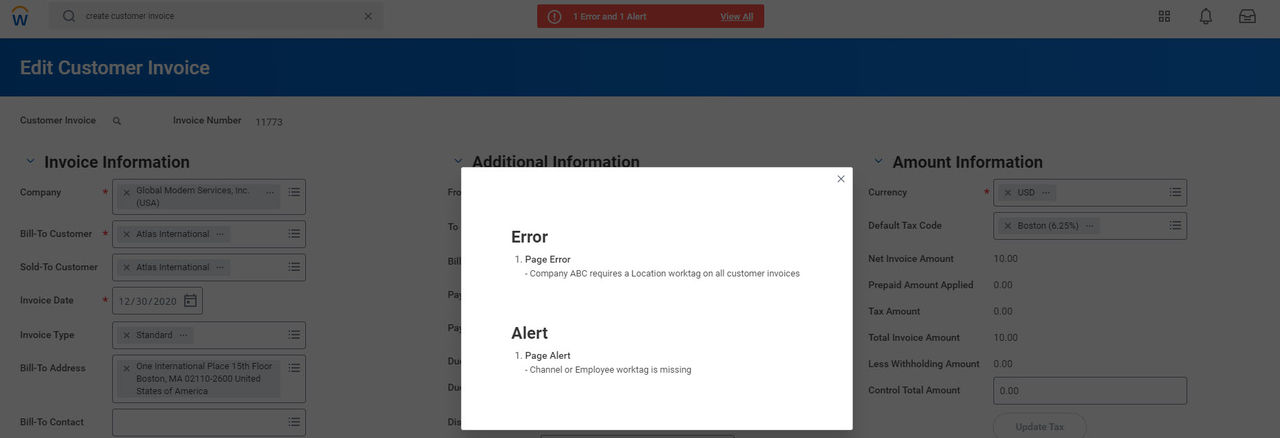
Each type of transaction has its own set of custom validations and the list of transactions, which allow for custom validations is Workday delivered. You can create custom validations for numerous transaction types, some of which include:
Transaction Type | ||
|---|---|---|
Customer Invoice | Customer Invoice Adjustment | Customer Refund |
Customer Payment | Customer Contract | Customer Contract Amendment |
*For a complete list, reference the Maintain Custom Validations report.
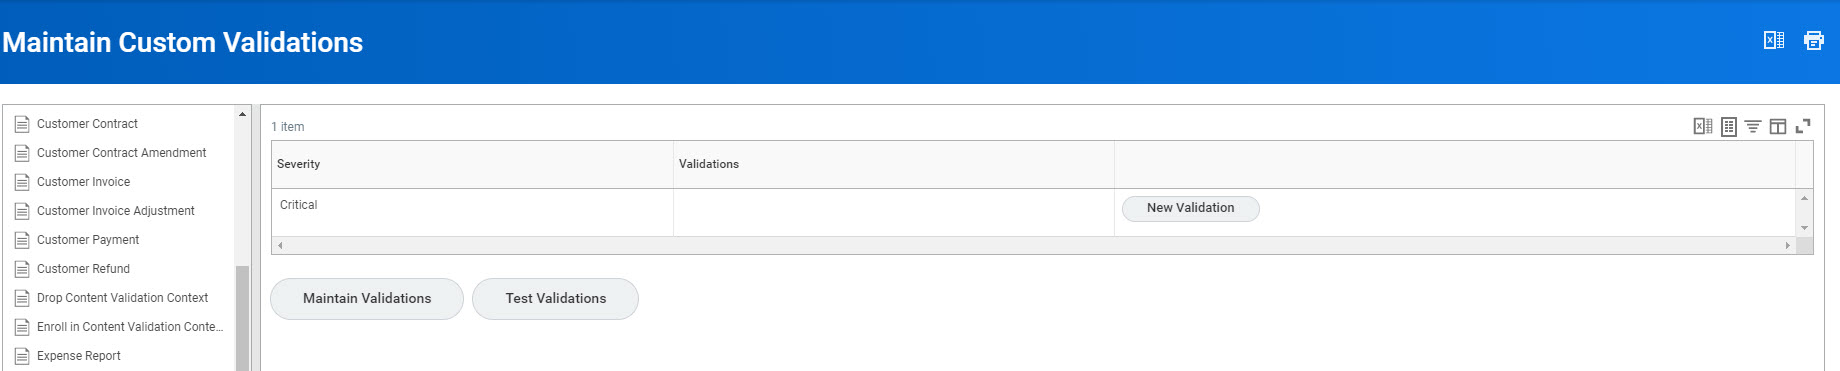
You can configure custom validations as either Critical or Warning severity type. Workday executes both types when the user submits the transaction, not during data entry.
- A Critical custom validation is a firm stop. The user must resolve the error before they can continue.
- A Warning is a message to the user they can bypass.
Using the existing Maintain Custom Validations task, you can create or edit critical errors and warning messages for transactions based on rule conditions that you establish. When your users perform these transactions, Workday validates them against the current custom conditions. Approvers also reference any warnings in the transaction they receive for review.
Custom Validation Conditions
A condition is part of the custom validation and consists of one or more rules. You can create condition rules describing the criteria required to generate an error or warning during transaction validation. You are writing the condition rule to search for a time when something is wrong with the transaction. Custom validations are resolving to a negative.
For example, you may want a custom organization or custom worktag on every supplier invoice for a specific company. Thus, you write a custom validation to determine if a custom organization or custom worktag is missing because the error is conditional and not tenant-wide. If a custom organization or custom worktag is missing from the transaction, when you use that specific company, the custom validation displays the error message.
You can write Custom Validation rules to generate an error or warning if a certain combination of data is present. You can also write Custom Validation rules to generate an error or warning if a combination of data is not present. For example, when creating a customer invoice for WOK, if the Revenue Category is Course Delivery, then Course Name cannot be blank.
You can write Custom Validation rules to generate an error or warning when data is not present under a specific circumstance.
When you are writing custom validations, the following fields are available:
Field | Description |
|---|---|
Description | The default message that displays to users if you do not configure a validation message. If you do not create a custom message, Workday instead displays the description of the custom validation. |
Category | Assigning a category makes the validation rule easier to find later. A Business Process Administrator can create Custom Validation Rule categories using the Maintain Condition Rule Categories task. |
Derived Logic | The statement you defined through the rule conditions. The statement displays for existing rules and after you save new rules. |
Copy Condition from Rule | You can copy and modify an existing validation rule to create a new one. |
When creating your conditions, you will be able to specify:
Term | Definition |
|---|---|
And / Or | When two (2) or more statements exist in the expression, set this condition to control how the statements relate to each other. |
( ) | Use parentheses when you have three (3) or more statements and a combination of And and Or conditions. For example, A and (B or C). |
Source External Field or Condition Rule | The field or condition rule you select as the source determines which other options are available. Workday controls the available fields and their values by the context of the condition. The selection list includes calculated fields associated with the same type of business object to which this condition is relevant. |
Relational Operator | These options depend on the data type. For example, an amount field would have a "greater than" option but a text field would not. |
Comparison Type | Specifies whether Workday compares the source to another field or to a value that you enter in the Comparison Value column. |
Comparison Value | Based on the Comparison Type, select a comparison field or enter a value to compare to the source. |
When you use conditions to select from several courses of action, Workday examines the conditions in order until it finds a match and then stops. If you have a variety of conditions, always put the most specific conditions first. Otherwise, a more general condition matches before Workday gets to a more specific condition.
As you complete the Rule Conditions, consider the maintenance of the condition rules and updating of data. Use hierarchies whenever possible to minimize maintenance.
Edit Custom Validation
You can update the custom validation and its condition rules. Use the Related Action off of the validation and select Validation > Edit Condition Rule.
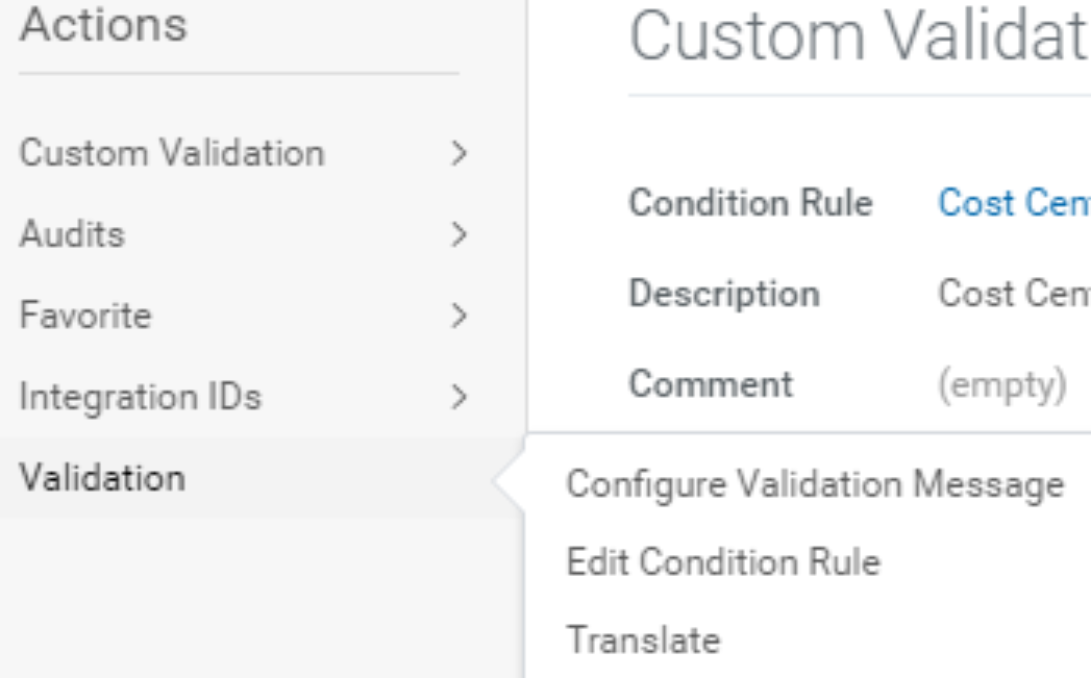
custom validation screen shot
Use Existing Custom Validations
If you have written a custom validation you can use on another transaction type, you do not need to write another one. You can choose to use the same custom validation on other transaction types, which allows you to reuse and only maintain one custom validation.
For example, you have a cost center validation on the supplier invoice transaction. You know the company requires a cost center on a supplier invoice adjustment. You can reuse the existing cost center validation.
In this example, Supplier Invoice Adjustment does not contain any custom validations. To use an existing validation, select the Maintain Validations button to access the Edit Validations Rules screen.
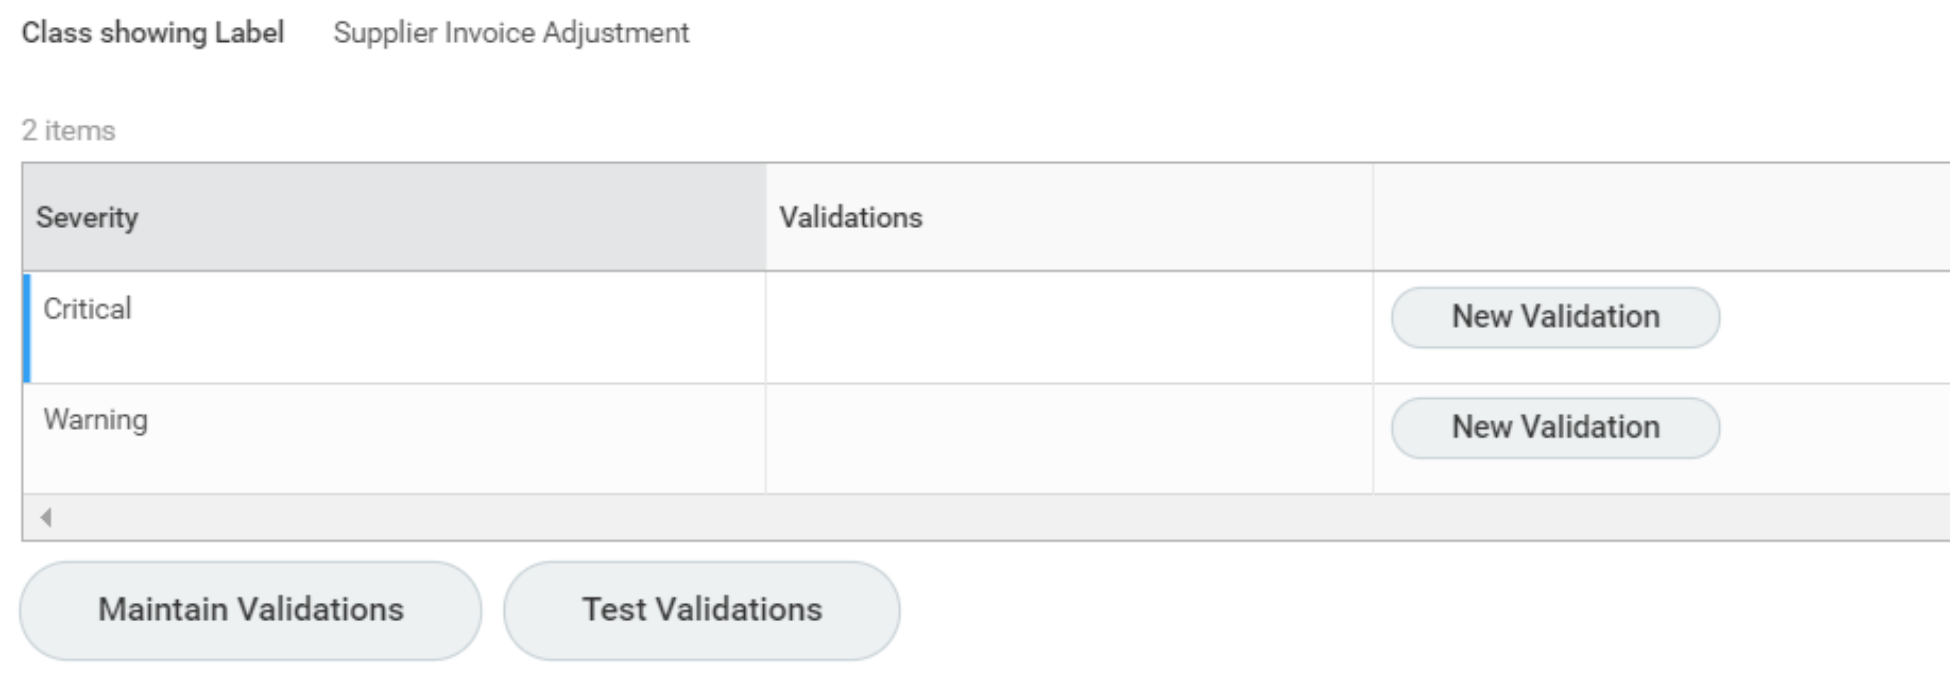
critical warning label screen shot
Here you can add an existing condition to the Critical or Warning rule types. You can also use this screen to remove an existing validation.
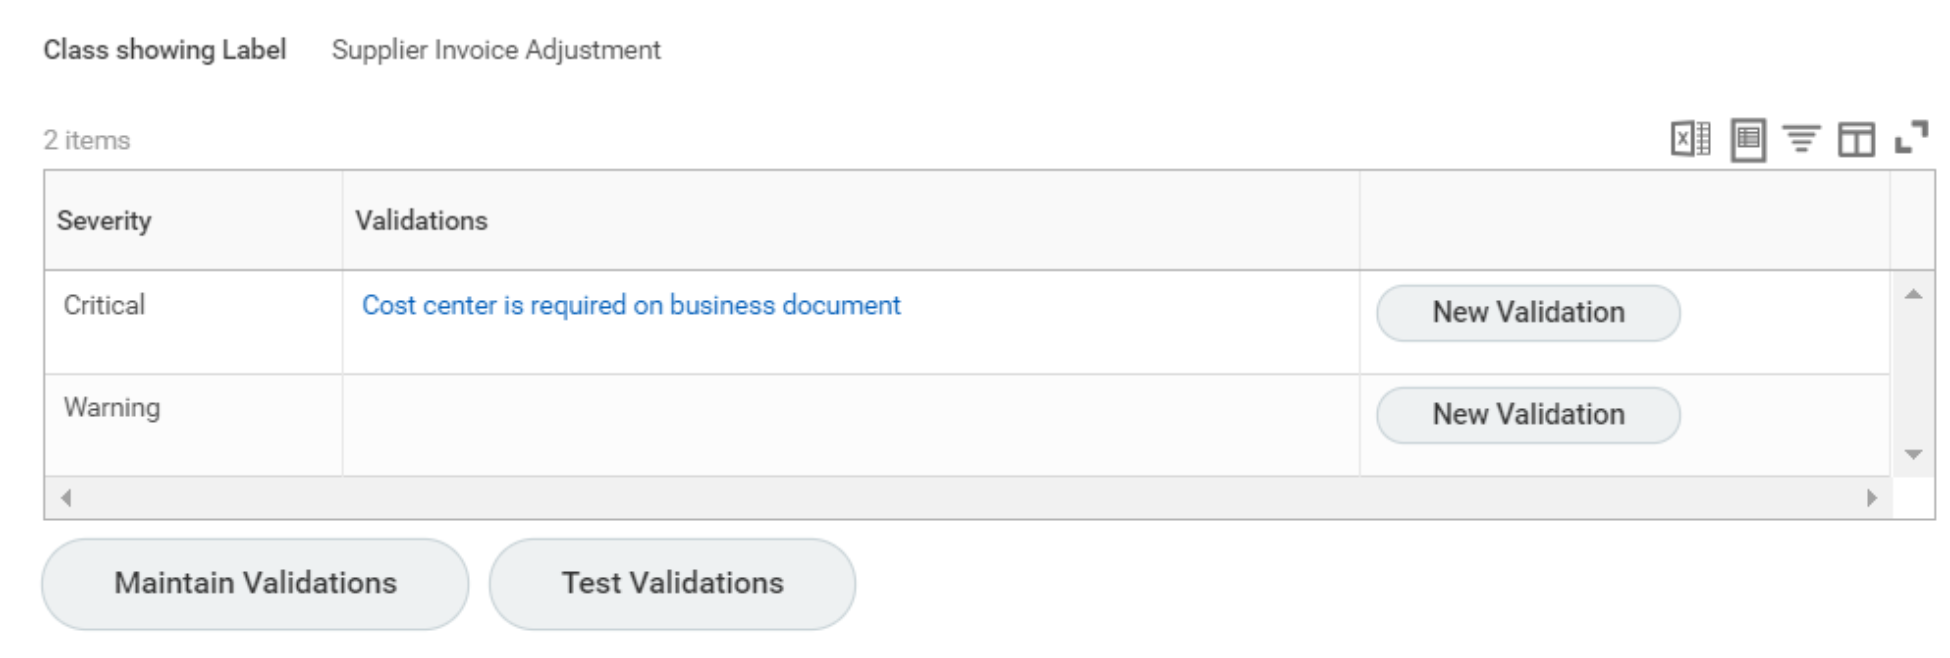
class showing label screen shot
Custom Validation Messages
By default, Workday displays the default message setup in the custom validation. For more descriptive text, you can create a validation message.
- Access the Maintain Custom Validations report.
- Select the type of transaction.
- From the Related Action on a validation, select Validation > Configure Validation Message.
- Enter a custom validation message.
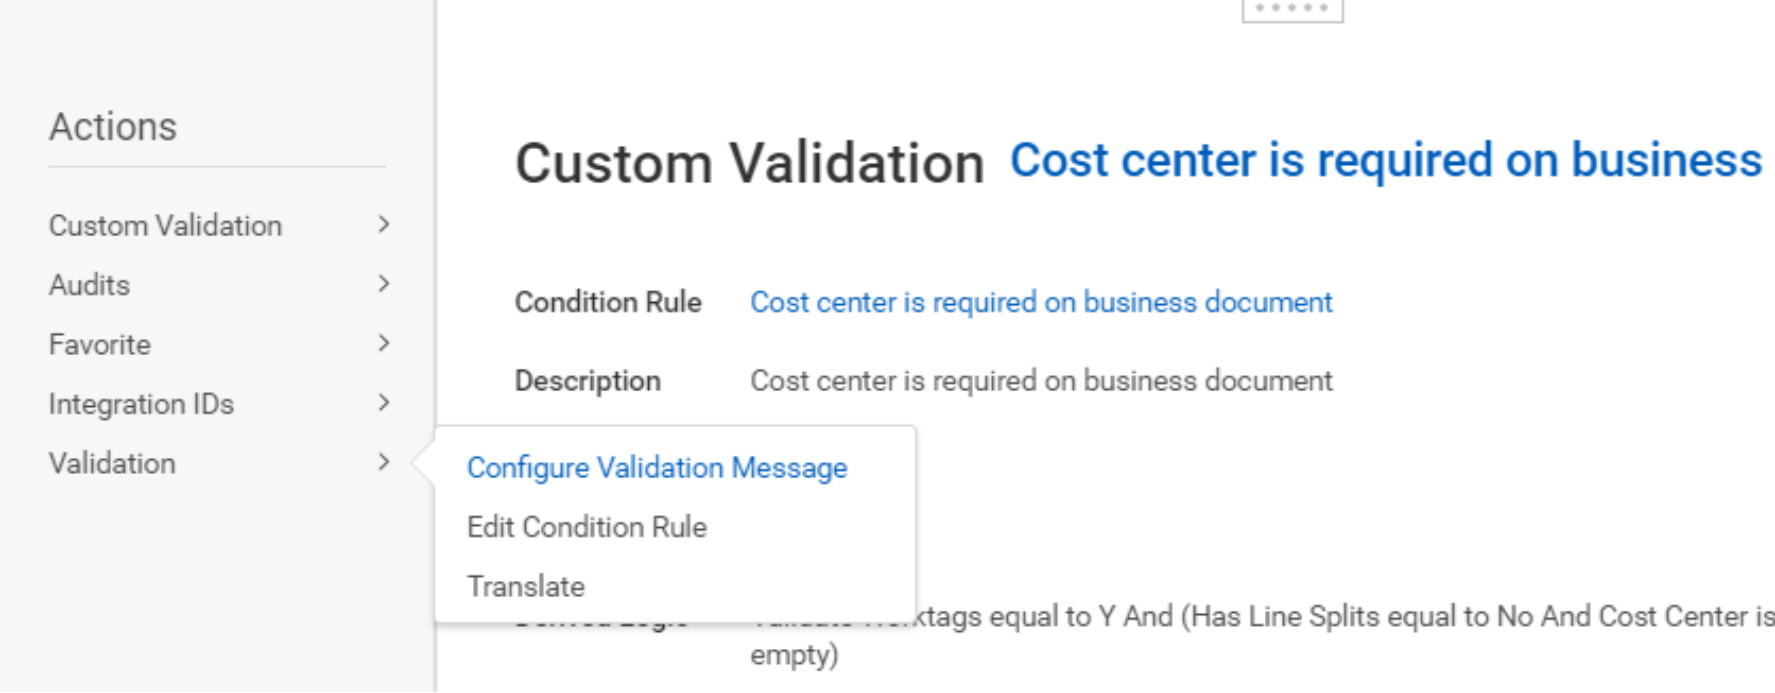
configure validation message screen shot
Customer Invoices
A customer invoice enables you to record a sales event and create the ensuing receivable accounting. Use the Create Customer Invoice task or the associated web service to create a customer invoice for the shipment of physical goods, the delivery of a service, or a predefined/contractual billing schedule for an ongoing project, subscription, or membership. Customer invoices can also be created from Customer Contract Billing Schedules.
Once the invoice transaction is complete, Workday generates accounting entries. Customer Invoice transactions will run through the Account Posting Rule set. Receivables balances and details are always available in context wherever Workday displays a customer, and through delivered or customer created reports.
Customer invoices can be printed and emailed to customers with associated attachments. You can email up to 10,000 customer invoices (or customer invoice printing runs) at one time. This aligns the email customer invoice task volumes with the print customer invoice task volumes.
The Customer Invoice Event business process can be configured to automatically email customer invoices after they have been printed. Use the Email Customer Invoice Service step on the business process after the Print Customer Invoice Service step.
The
Perform Customer Invoice Maintenance
task allows you to create new write offs and apply existing customer invoice adjustments for a given customer and company. This task also allows you to specify a transaction date when you apply adjustments to the invoices. This gives you the flexibility to backdate adjustment applications when you apply adjustments.The creation of write offs can be done through the standalone Write Off Customer Invoice task, which uses the associated Bad Debt Writeoff business process.
The
Manage Customer Invoice
task allows you add follow up dates, put invoices in/out of dispute, collections, hold from payment, and include/exclude from dunning letters.You can consolidate up to 1,000 individual invoices into one invoice using the
Consolidate Customer Invoice
task, simplifying presentation and payment. When a customer makes a payment, they can reference the consolidated invoice. You can now automate the printing process for consolidated customer invoices by scheduling a run frequency. This saves time and effort when sending out the consolidated invoices.You can then apply the payment to the individual invoices that make up the consolidated invoice. You can consolidate invoices that are:
- For the same customer.
- In the same currency.
- For a parent customer and any of its child customers.
- From different billing schedules.
- In approved, unpaid status.
- Not already consolidated.
- Not part of another consolidated invoice.
This task doesn't support:
- Consolidating customer invoices that use retention.
- Direct intercompany invoices.
You can also include invoice adjustments and negative invoices to display an accurate balance. After you include an invoice adjustment in an approved consolidated invoice, you can't cancel, change, or update adjustment lines.
When you don't immediately apply a credit adjustment to a customer invoice, Workday creates a credit memo. You can then apply this adjustment, partially or fully, to a single invoice or across multiple invoices. You can also apply adjustments to customers other than those the adjustment was originally created for.
Steps:
1. Access the
Perform Customer Invoice Maintenance
task.2. To apply adjustments created for other customers, select the
Include Invoice Adjustments from Other Customers
check box.3. Select the invoices that you want to apply the credit memo to.
4. Select the Invoice Adjustment(s) that you want to apply to each invoice. Use the Adjustments by Customer option to select adjustments from other customers.
You can configure your companies to operate as customers, suppliers, or both, enabling them to do business with each other through direct intercompany transactions. This arrangement eliminates the need to create separate customer and supplier invoices, saving you time and improving your data integrity. Use the
Maintain Companies as Customers or Suppliers
task.Intercompany transactions arise when one unit of a single legal entity does business with another unit of the same entity. Intercompany transactions can occur between two divisions, two subsidiaries, or a parent company and a subsidiary, improving the flow of finances and assets between the companies.
In Workday, you can perform direct intercompany transactions and on-behalf-of intercompany transactions.
With direct intercompany transactions, you can produce the Accounts Payable and Accounts Receivable documents you need for your global organization. You can also define the relationships between affiliate companies in greater detail, and automate the generation and delivery of intercompany documentation.
Example: Global Modern Services (GMS) USA and Global Modern Services (GMS) France are affilitate companies. GMS USA manufactures and sells office furniture. It also supplies the furniture to its affiliate companies. In this case:
- GMS USA operates as a supplier and generates a customer invoice to record the sale to GMS France.
- GMS France operates as a customer and generates a supplier invoice to record the purchase from GMS USA.
- GMS France pays GMS USA through a settlement run.
- GMS USA records an intercompany receipt to accept the payment from GMS France.
To process direct intercompany transactions, you must:
- Configure intercompany profiles.
- Set up the customer and supplier relationships between your companies.
- Map sales items to purchase items.
- Configure revenue category and spend category.
- Create transfer pricing rate sheets for your intercompany project workers to apply to the intercompany contract.
- Configure account posting rules to record intercompany receivables and payables.
- Configure business processes to record intercompany receipt.
- Define elimination rules for intercompany balances remaining at a period close to avoid dual accounting when you create consolidated financial reports.
Steps to consider when setting up intercompany transactions:
- Define Intercompany Profiles
- Add the Direct Intercompany dimension to the Intercompany Payables/ Receivables account posting rules (Optional)
- Maintain Companies as Customers or Suppliers task
- Map purchase items to sales items.
- Map revenue and spend categories.
Creating a Customer Invoice
Depending on how you process invoices, there are multiple ways to create a customer invoice in Workday. You may create invoices manually, using the task
Create Customer Invoice.
You may also Create Customer Invoices from Billing Installments
as a task or directly from the Customer Contract Work Area. If you manage a high volume of customer invoices, you can upload invoices into Workday or manage multiple customer invoices at once.When creating a customer invoice, consider the following:
Option | Description |
|---|---|
Company | If you allow intercompany transactions, you have more than one choice. |
Sales Item | Your selection populates other line details based on the sales item definition, such as revenue category, tax applicability, and unit price. |
Unit Price | Populates from the sales item. If the currency for the sales item and invoice differs, Workday automatically converts this value to the currency of the invoice. Workday uses the current currency conversion rate as defined by the default currency rate type for the tenant. |
Extended Amount | The quantity multiplied by the unit price. For sales items with bulk pricing, Workday calculates the extended amount in this way: (Unit Price x Quantity)/UOM Priced at Quantities of = Extended Amount. For prepaid invoices, if you enter an amount that is greater than the amount in the customer Advanced Payments Received account, Workday triggers an error indicating the amount available to invoice. |
Deferred Revenue | There are two ways this flag can default:
|
Ship-To Customer
Ship-To Address | Workday populates these fields from the invoice header for new lines. You can change the shipping customer and address for each invoice line, to any ship-to connection setup for this customer in the Connection Map on the customer profile. Ship-to address values that display in the prompt come from the ship-to customer. If you apply segmented security, the ship-to customer and their addresses only display to users that are able to access the customers. If you reference a Contract Line on the invoice line, Workday creates the ship-to customer and address from that line. This feature does not apply to Sponsors. |
Tax Applicability | Indicates whether the invoice line is taxable or not. Retrieves the value based on the invoice line sales item or revenue category. If Tax Code populates on the invoice line, you must enter a value. |
Tax Code | For new invoice lines, Workday populates the tax code value from the invoice header default tax code. If you select a Ship-To Customer on the invoice line, Workday derives the tax code from the Ship-To Address on the invoice line using values configured with the Tax Rule for Country task. |
Worktags | Add worktags to the invoice line to:
Related worktags default from data selected on the invoice. When related worktags of the same type exists on both sales items and revenue categories, the one from the sales item takes precedence because it is more specific. The latest default for a worktag type overrides any preceding value. |
Invoice Adjustments
To decrease or increase the amount due from a customer, you can create a customer invoice adjustment using the
Create Customer Invoice Adjustment
task.Customer invoice adjustments can be tied to an existing invoice or multiple invoices, created as a standalone adjustment, or can be tied to an invoice(s) later using the
Perform Customer Invoice Maintenance
task.When you don't immediately apply a credit adjustment to a customer invoice, Workday creates a credit memo. You can then apply this adjustment, partially or fully, to a single invoice or across multiple invoices. You can also apply adjustments to customers other than those the adjustment was originally created for by using the "Include Invoice Adjustments from Other Customers" check box available on the
Perform Customer Invoice
Maintenance
task. Lastly, you can apply multiple adjustments to a single customer invoice in bulk, enabling you to apply large numbers of invoice adjustments more efficiently.Create Invoice Adjustment Reasons
Adjustment reasons are available to use in customer and supplier invoice adjustments. Use the task
Maintain Invoice Adjustment Reasons
to add new user-defined adjustment reasons.Consider the following usages as you add a new reason:
- Payables Use - Check this box if this reason is for supplier invoices.
- Receivables Use - Check this box if this reason is for customer invoices.
Create Invoice Adjustment
An adjustment is a new transaction. It has its own document number that is separate from, but can link to, the original invoice. Considering the following as you complete customer adjustment fields:
Field | Description |
|---|---|
Adjustment Date | Workday uses this date to post the adjustment to the first open ledger period. If Workday does not find an open ledger period, it sets the adjustment status to Error . |
Debit (Increase Amount Due) | Select to indicate that this adjustment is a debit memo. |
Credit (Decrease Amount Due) | Select to indicate that this adjustment is a credit memo. Issue credit memos for returns, damaged merchandise, price adjustments, and so forth. |
Reference Invoice | (Optional) The customer invoice related to this adjustment. |
Auto-Apply Adjustment to Invoice. | Select if the adjustment is to decrease liability and the referenced invoice uses the same currency as the adjustment. When using worktag balancing and submitting a customer invoice adjustment that references the original customer invoice, select this checkbox to have Workday perform smart matching. This option automatically applies credit amounts from the invoice adjustment to the correct lines on the referenced invoice (up to the open receivable amount for each line). Matching worktag balancing values between the two documents helps to accomplish this. |
Once submitted, the
Customer Invoice Event
business process launches.For an intercompany transaction, Workday also launches the
Customer Invoice Intercompany Event
business process.If you created a credit memo, you can select it more than once while applying it to open invoices in the
Perform Customer Invoice Maintenance
task. Validation ensures that no credit memos are over-applied.Once complete, Workday creates operational journals in the company currency for approved transactions. If the transaction and company currencies differ, Workday converts the amounts.
Credit Rebill and Customer Invoice Amendments
If you billed an invoice incorrectly and want a single corrected 'gapless' invoice, then use credit and rebill. There will be the original invoice, an adjustment to the original, and a singular invoice with all of the corrected information in one single step.
This task creates the credit adjustment, applies it to the originating invoice, and submits the rebill invoice. Workday automatically approves the credit adjustment created through this task, and applies it to the originating invoice when you submit the rebill.
To decrease or increase the amount due to a customer, you can create a customer invoice adjustment. An adjustment is a new transaction with its own document number that is separate from, but linked to, the original invoice. Decrease the amount due to create a credit memo. Increase the amount due to create a debit memo. Customer invoice adjustments can also be a standalone transaction.
Credit and Rebill cannot be used if an invoice originated from a billing installment.
Customer Invoice EIB
Workday Enterprise Interface Builder (EIB), allows you to add new customer invoices or update existing customer invoices in Workday from a spreadsheet. The spreadsheet includes sections for customer invoice data and invoice line data. The spreadsheet also includes worktags for you to assign invoice headers and line data to specific business objects, such as locations, cost centers, or projects. You can choose to submit the invoices or save them in draft mode, and you can optionally lock the invoices in Workday to prevent editing or cancellation.
When successfully completed, depending on your EIB configuration, the upload automatically triggers the Customer Invoice Event business process.
After you successfully load the data into Workday, you can view the customer invoices by accessing the
Find Customer Invoices for Company report
. You can also view invoices for a specific customer from the Customer Profile.The Enterprise Interface Builder (EIB) tool provides an easy-to-use graphical and guided interface to define outbound and inbound integrations with little to no programming. Both IT users and business experts can use EIB to address simple integration needs.
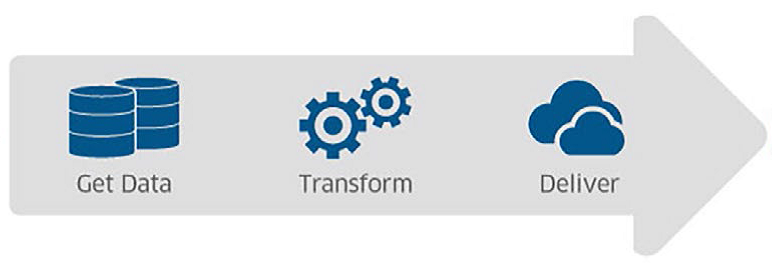
EIB 3 step pattern: Get Data, Transform, Deliver
You may use EIB for both exporting and importing data.
Direction of Integration | Description | Example |
|---|---|---|
Outbound | Export data from Workday in various formats, such as:
Send the data to an external endpoint by using various protocols, such as:
| Export all active Workday employees in an Excel spreadsheet to E*Trade® Equity Edge® via sFTP. |
Inbound | Upload data into Workday by using:
| Import Employee Bonus data into Workday from an Excel spreadsheet that you provide to Workday in an attachment. |
Customer Invoice Supply Location Options
Workday enables you to configure company billing and shipping supply locations on customer invoices and invoice adjustments. This streamlines the user experience and increases compliance with local tax regulations.
You can opt into displaying these new prompts on customer invoices and invoice adjustments:
- Bill-From Address
- Ship-From Address
To opt in, select a new
Enable Bill-From Address and Ship-From Address on Customer Invoice
check box in the Invoice Options
section on the:- Edit Customer Account Optionstask.
- Put Customer Account Optionsweb service.
Once you opt in, we display new
Bill-From Address
and Ship-From Address
prompts when you select a company in the invoice header section on these tasks:- Create Customer Invoice
- Create Customer Invoice Adjustment
The prompts are also accessible when you edit or change customer invoices and invoice adjustments from the related actions menu of your invoice or adjustment.
You can view applicable
Bill-From Address
and Ship-From Address
fields on these business processes and report:- Review Customer Invoice
- Review Customer Invoice Adjustment
- Revise Customer Invoice
- Revise Customer Invoice Adjustment
- View Customer Invoice
There is a
Ship-From Address
column in the Invoice Lines
grid on these tasks, business processes, and report:- Create Customer Invoice
- Create Customer Invoice Adjustment
- Review Customer Invoice
- Review Customer Invoice Adjustment
- Revise Customer Invoice
- Revise Customer Invoice Adjustment
- Update Customer Invoice Lines
- Update Customer Invoice Adjustment Lines
- View Customer Invoice
This column is also available when you edit or change customer invoices and invoice adjustments from the related actions menu of your invoice or adjustment.
The following report fields are available on the Customer Invoice Document business object (secured to the
Public Reporting Items
domain) that you can use in custom reports to view the bill-from and ship-from addresses at a customer invoice header:- Company Bill-From Address
- Company Bill-From Address Formatted
- Company Ship-From Address
- Company Ship-From Address Formatted
The following report fields are available on the Customer Invoice Line business object (secured to the
Public Reporting Items domain
) that you can use in custom reports to view the ship-from address at customer invoice lines:- Company Ship-From Address
- Company Ship-From Address Formatted
The following web services support the
Bill-From Address
and Ship-From Address
fields at the customer invoice header and the Ship-From Address
field on the customer invoice lines:- Get Customer Invoice
- Get Customer Invoice Adjustment
- Import Customer Invoices
- Submit Customer Invoice
- Submit Customer Invoice Adjustment
You can also check whether all bill-from and ship-from addresses at the customer invoice header and lines for companies in the same country are associated with the same transaction tax ID when you create customer invoices and invoice adjustments using Workday tasks and web services. You can view tax IDs on the
Address Level Tax Details
tab on the View Company Tax Details
report that you access from the related actions menu on a company profile.Printing Customer Invoices
Workday generates customer invoices as PDF files for you to print or email. Using the task
Print Customer Invoices
, you can select multiple invoices for printing. You can also print invoices individually as a Related Action off an individual customer invoice.The Printing Runs tab of the
View Customer Invoice
report shows all invoice print and email activity.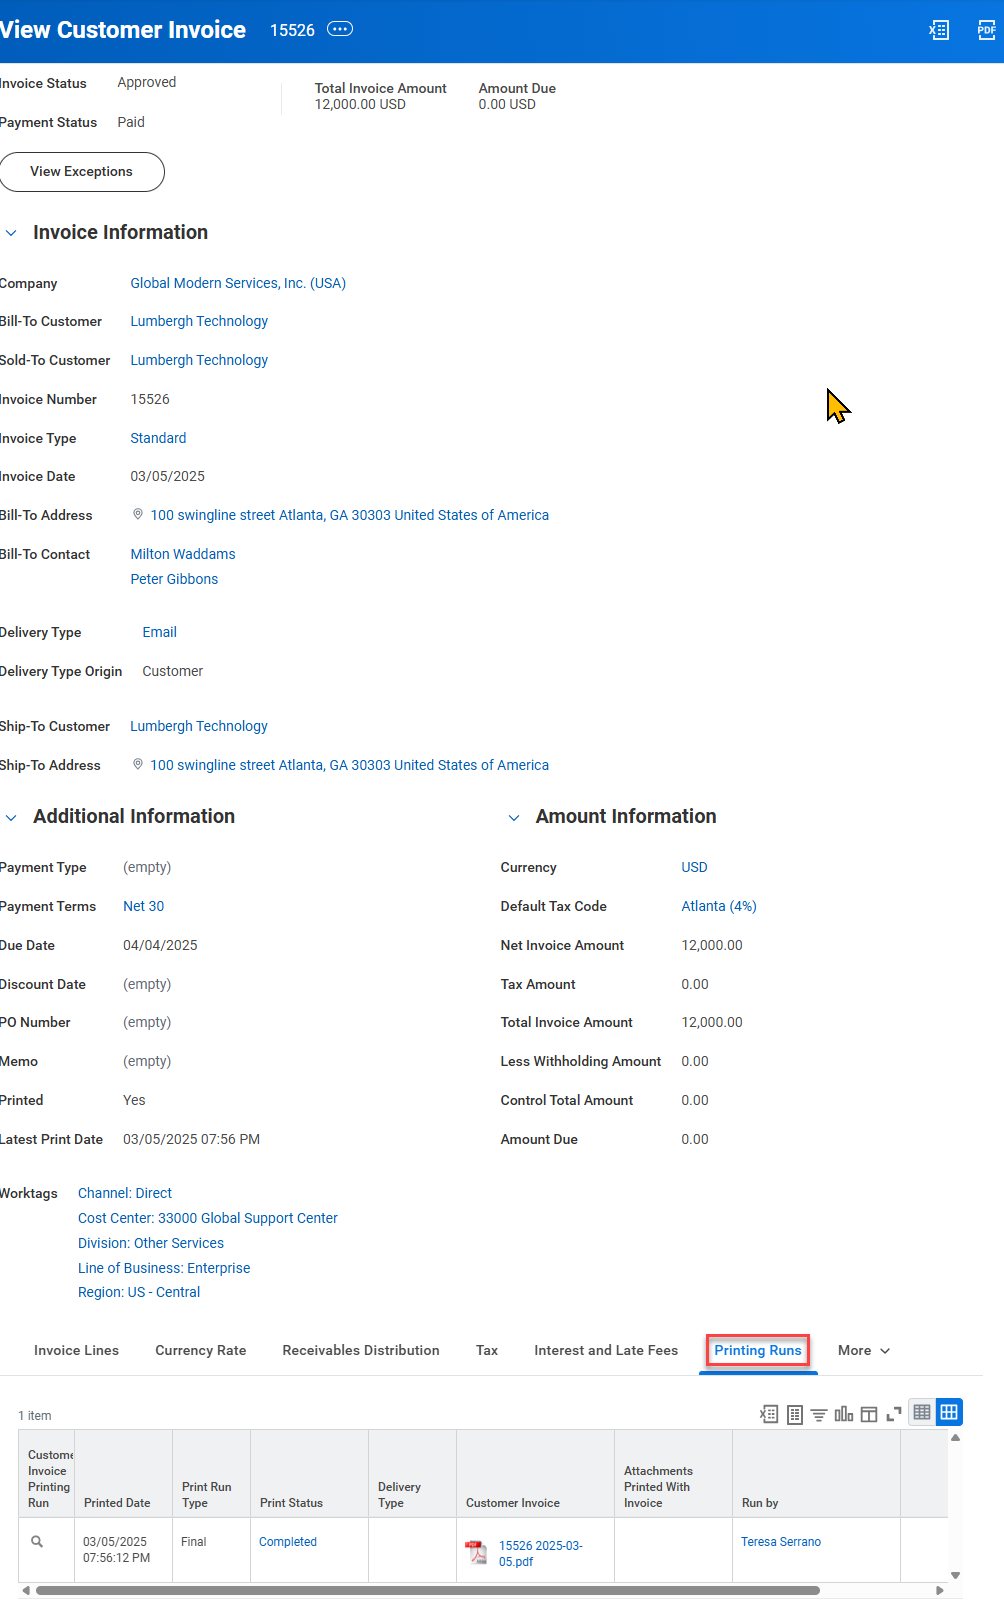
Invoice Layout Rules
Before creating a PDF, you can personalize the Workday delivered invoice layouts with customer logos or create custom invoice forms. Assign specific layouts to invoices by Company, Invoice Type, Customer, Customer Group, Customer Category, and Currency using the
Customer Invoice Layout Rule task
.You can also customize your customer invoice file names for emailing or printing. Include the following elements in the name:
- Customer Name
- Invoice Date
- Invoice Amount
- Currency
- Printed Date
To ensure file names are unique, include the customer invoice number following the customer name.
Emailing Customer Invoices
You can configure invoices and their associated attachments to automatically email to customers through the Workday notification engine or alternatively, Workday can manually email them.
From the task
Print Customer Invoices
, generate the desired invoices. Once the PDFs are 100 percent complete, you can open the PDF and email them manually. You may also select the Email Customer Invoice
button to send the invoice through the Workday system.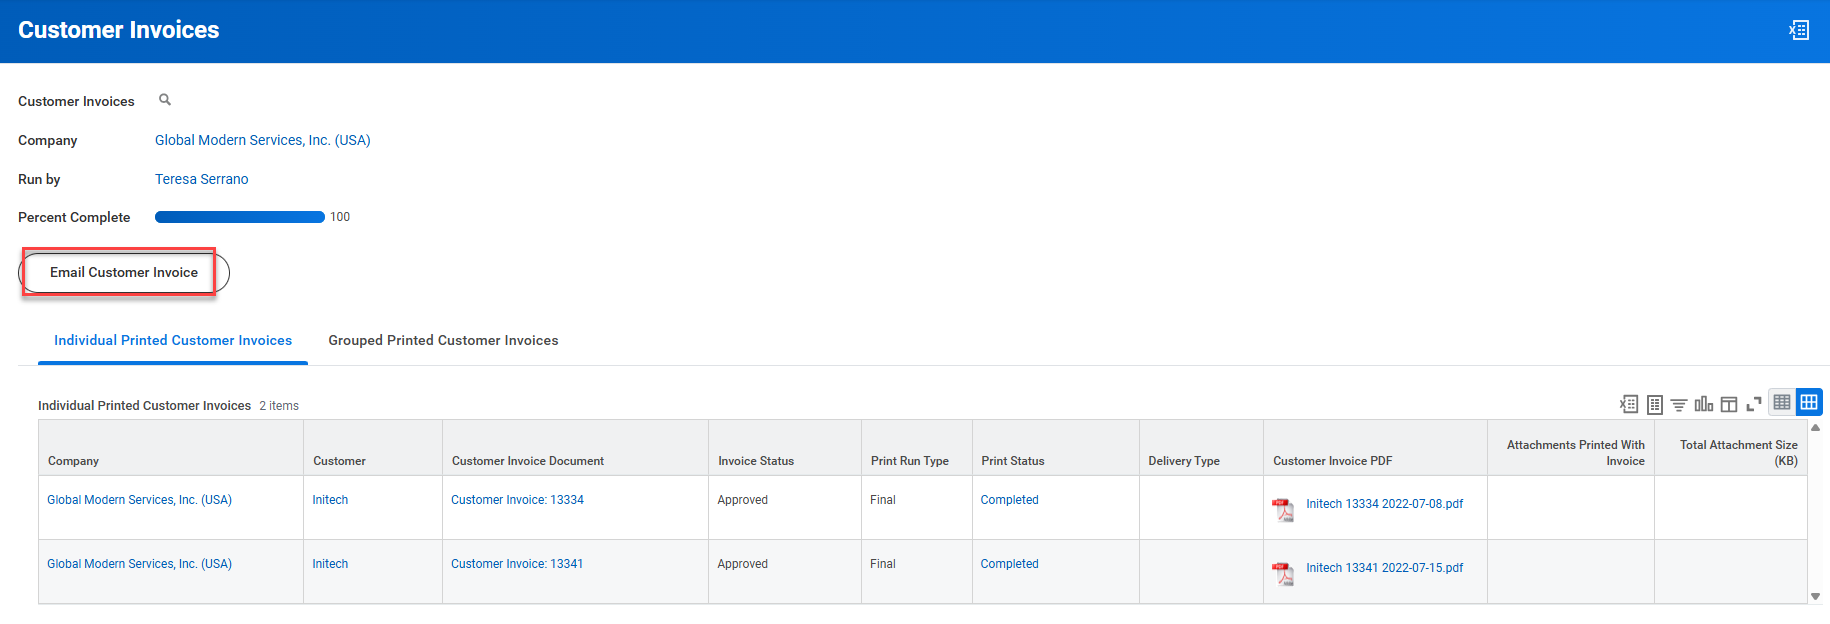
Once initiated, Workday initiates the
Customer Invoice Email Event
business process to email the invoice and any attachments to the customer. Workday sends a My Tasks item to the reviewer to approve or deny the request, and the reviewer selects the Email Delivery Method
during the approval process. The customer does not receive an email until the approval process is complete.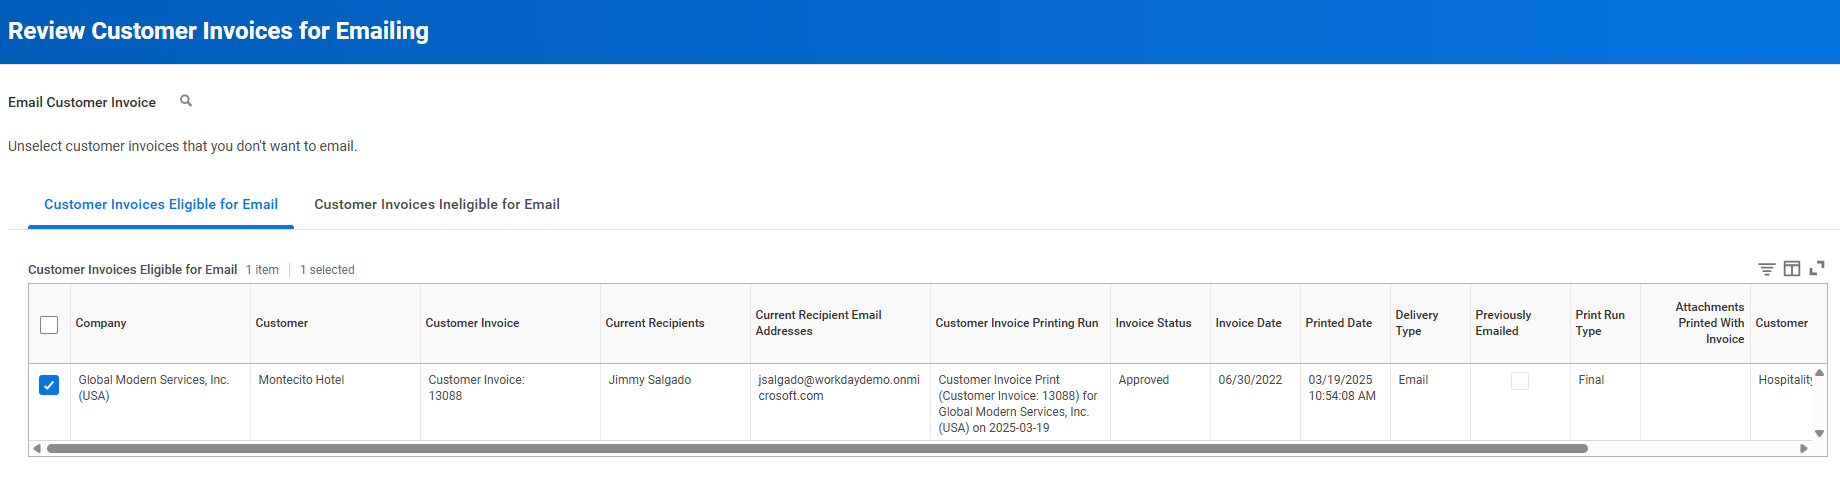
You can view the email invoice activity on the Printing Runs tab of the
View Customer Invoice report
.Configure Emailing Customer Invoices and Attachments
To enable emailing customer invoices and attachments, you must configure both system and customer.
Tenant Setup
You need to configure your tenant to enable attachments within emails. In
Edit Tenant Setup - System
, you will find a checkbox located in the System Setup section to allow attachments within emails sent from Workday.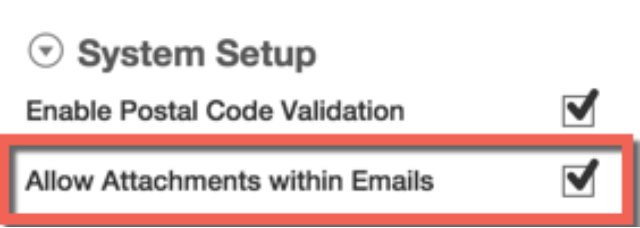
This section of tenant setup also indicates additional details for attachments in Workday:
- Allotted attachment storage: 100 GB
- Maximum attachment size: 30,720 KB
- Files will be deleted after: Five days
Business Process Notifications
In the business process Customer Invoice Email Event, you will configure custom notifications to add invoices and attachments to a notification during the business process.
For example, after completing a step to review the customer invoice, the customer receives an email notification including a PDF of the customer invoice.
You have six options for the type of attachment you can include:
Option | Description |
|---|---|
Attachments Associated to Invoice Marked As External for BP | The external attachments associated with the customer invoice when Consolidate and Include and Print flag is No. When the said flag is set to Yes, external attachments are not returned since it is already printed with customer invoice. |
Attachments Associated to Invoice Marked As Internal | All internal attachments associated with the customer invoice. |
Attachments Linked to Invoice | When you select this option, Workday ignores the attachment flag you specify on the invoice. Instead, it includes all attachments associated with the customer invoice in the email. Select this option if you generate your invoices using third-party software. |
Attachments Not Provided to Customers | Workday doesn't provide any direct or referenced attachments to customers. |
Attachments Provided to Customers but Not Included in Printing Run | The direct and referenced attachments provided to customers but not included in printing run. |
PDF for Printing Run Business Process Notifications | Includes all attachments in the PDF file when you print the invoice. |
From the Notifications tab on the business process, select the Related Action
Edit Notification
. You can determine notification content, recipients, when the notification will trigger, and the type of attachment(s) to include.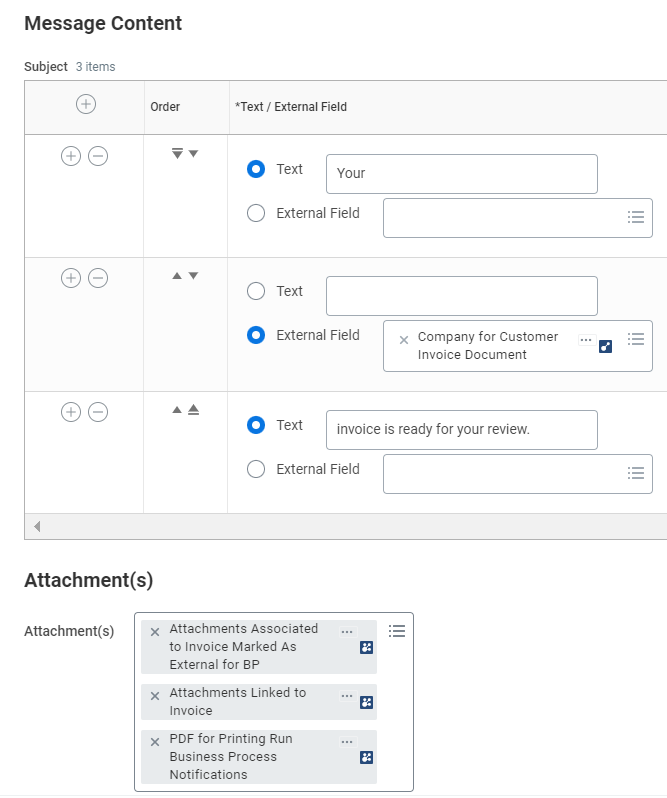
Customer Setup
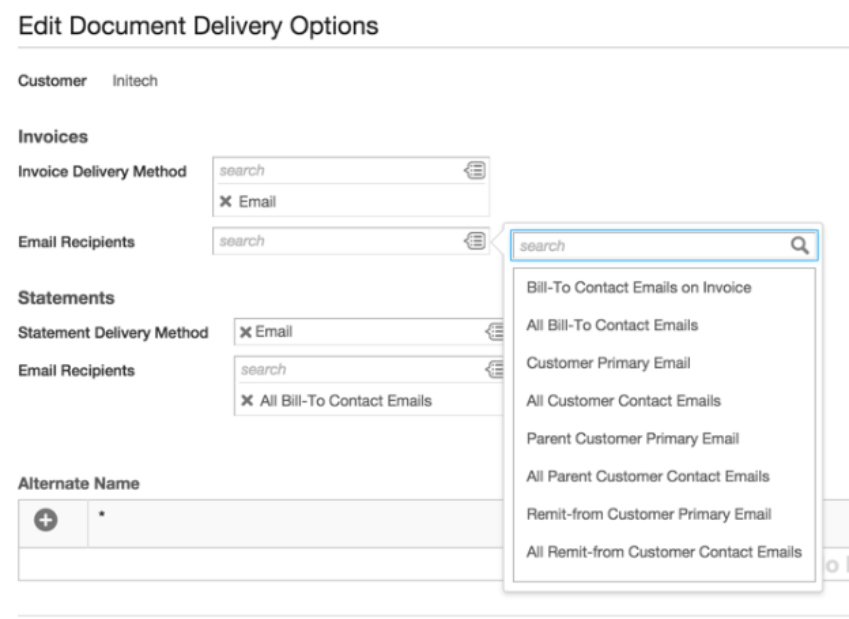
You need to configure your customers to ensure their invoice delivery method is set to Email.
First, from the Addresses and Contacts tab, configure Customer Contacts with the appropriate contact email addresses.
On the Document Delivery sub tab of Address and Contacts, you can indicate for both invoices and statements the preferred delivery type. You can also select the appropriate recipients from your list of configured contacts.
For each document on the customer profile, you can add only one Document Delivery Type. Workday automatically associates the Delivery Method of Mail and Email to Delivery Types of Mail and Email respectively. You can not inactivate or change these default settings. Use "Maintain Document Delivery Types" to create custom document delivery types can be configured and mapped to Workday delivered Document Delivery Methods. Print tasks display the document delivery type to make filtering and selection results for reporting easier.
Multicurrency Invoicing
Workday supports multiple currencies to allow you to record and process business transactions that occur in a currency other than the base currency of the recording company.
The currency of a submitted transaction is the transaction currency. This currency remains in place throughout the lifecycle of the transaction. Upon transaction approval, Workday generates operational journals and converts the transaction currency, if different, into the company currency for accounting purposes. When you create accounting journals, Workday also converts their currency into the company currency.
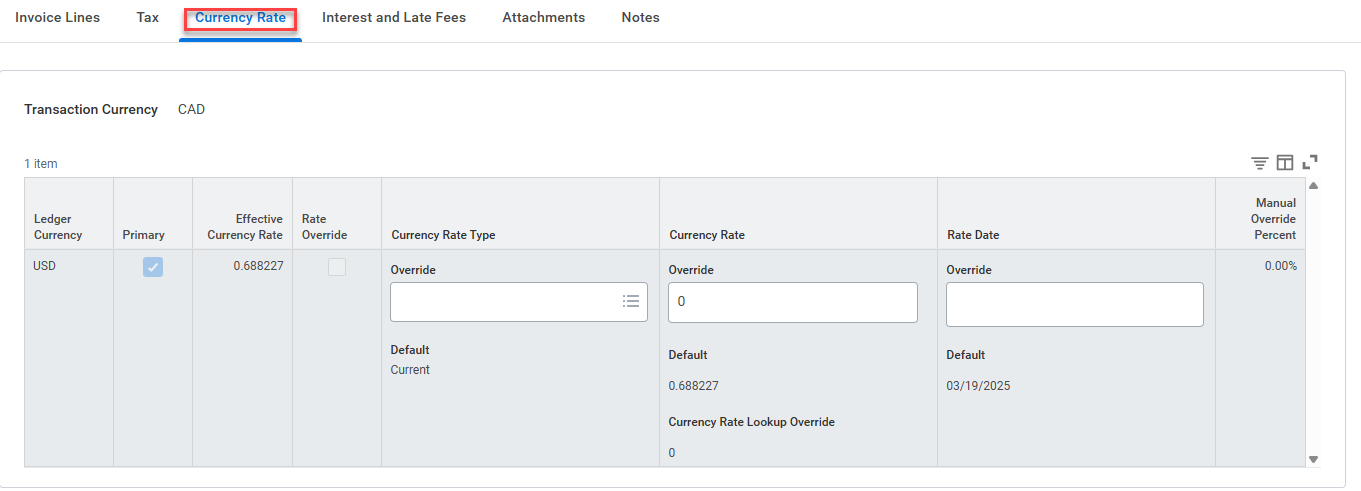
When creating a foreign currency invoice (the invoice currency differs from the company ledger currency), you can use the Currency Rate tab to:
- Manually override the exchange rate between transaction and ledger currency for this one invoice.
- Override the date and rate type used to find exchange rates.
- Manually enter the rate when a default rate is not available.
When reporting, you can report in another currency. Workday uses translation rules that you define to determine conversion rates, and then uses these rates to translate the company currency into a reporting currency.
Consolidated Invoices
You can consolidate up to 1,000 individual invoices into one invoice, simplifying presentation and payment. When a customer makes a payment, they can reference the consolidated invoice. You can then apply the payment to the individual invoices that make up the consolidated invoice. Use the Create Consolidated Customer Invoice task. You can consolidate invoices that are:
- For the same customer.
- In the same currency.
- For a parent customer and any of its child customers.
- From different billing schedules.
- In approved, unpaid status.
- Not already consolidated.
- Not part of another consolidated invoice.
This task does not support:
- Consolidating customer invoices that use retention.
- Direct intercompany invoices.
- Sponsor invoices or invoice adjustments.
Consolidated Billing
Billing Schedules can be created for customer contracts that dictate the number of billing installments, billing frequency, and amounts to be billed for a contract. You may consolidate transactions from multiple billing schedules into one customer invoice.
- Create a single invoice from multiple billing schedules.
- Schedule creation of invoices.
Managing Multiple Invoices
Billing Use Manage Customer Invoices task to perform operations on multiple customer invoices at once to save time. This would typically be performed by a Collector role. These actions include managing invoices in and out of dispute or collection, adding notes to invoices, assigning follow-up dates for future actions, or adding and removing holds from payment.
Audit Trail
Workday enables you to view audits of transactions within your tenant for every change made within its business services. Workday uses nondestructive updates to retain data and prevent data overwriting. When you update data, Workday business services record these changes in the secure Workday database. Only users in the Auditor security group can access this data. Workday records the details of every user-made change, including the new value, old value, the person who submits the change, and a timestamp.
For example, if a customer invoice is adjusted and then subsequently paid, the audit trail would show the following:
- The original invoice amount
- The adjusted invoice amount
- The user who made the adjustment
- The date and time of the adjustment
- The amount paid
- The user who made the payment
- The date and time of the payment
Customer Invoice FAQs
Question | Solution |
|---|---|
How do I cancel an unpaid customer invoice? | Task: Customer Invoice > Cancel A customer invoice cannot be canceled if:
|
How do I edit an unsubmitted customer invoice or adjustment? | Task: Customer Invoice > Edit The fields you can change are the same as when you created the invoice. |
How do I change a submitted customer invoice or adjustment? | Task: Customer Invoice > Change A submitted customer invoice or adjustment cannot change if:
After the invoice changes, the business process starts over as if the invoice was resubmitted. The fields you can change are the same as when you created the invoice. Note : There is an accounting impact if you change an invoice from a prior period. For the current period, Workday creates journal entries that reverse the previous entries and create a new set. |
How do I cancel a customer invoice adjustment? | Task: Customer Invoice Maintenance > Cancel Workday reverses the operational journal entries and updates the amount due on the invoice. This option is available for the invoice adjustments created using these tasks:
You cannot cancel a submitted customer invoice adjustment if:
|
Reports
Workday Standard Reports
- Customer Invoice Printing Report
- Customer Invoice Shipping Report
- Customer Invoice Types
- Customer Statement to Print
- Find Customer Invoice Maintenance Transactions
- Find Customer Invoice Print Runs
- Find Customer Invoices for Billable Project
- Find Customer Invoices for Company
- Find Customer Statement Print Runs
- Find Incomplete Customer Invoices
- Preview Customer Invoices for Billable Project Transaction
- View Customer Contract Line Invoice Application
- View Customer Invoice Layout Rules
- View Customer Statement Print Layout