
Introduction to Workday Studio Report Designer
Overview
Workday enables you to design and use business form layouts for meeting the exact layout specifications required by your organization. These specifications might include rich text formatting; headers and footers; page breaks; and exact placement of labels, data, spaces, and margins. Workday allows you to associate layouts with your custom reports, which it uses to generate PDF files. In Workday, these designs are known as business form layouts.
You can define a business form layout using the Report Designer provided as part your Workday Studio Eclipse development environment. Report Designer in Workday Studio enables you to use all these types of layout features and more. It is a graphical layout tool designed specifically for this purpose.
Objectives
By the end of this chapter, you will be able to:
- Understand web service enabled reports.
- Learn how BIRT uses xml and xsd files.
- Enable a custom report via web service.
- Review generated xml and xsd files.
- Learn how to navigate BIRT.
Report Designer Concepts
The Report Designer was originally created as part of the Business Intelligence and Reporting Tools (BIRT) Eclipse project.
The BIRT Report Designer can take information from a variety of sources. Within Workday Studio, we have adapted the Report Designer to focus on consuming information taken from custom reports within Workday. The Workday Report Data Source performs this task. This aspect of the Report Designer is specific to Workday.
When creating a report design for a Workday custom report in the Report Designer in Workday Studio, you will need a description of the structure of the Workday custom report and some sample data. The structure of the report is defined by its XML Schema and you can retrieve the sample data as an XML file.
The custom report must be exposed as a web service. When creating custom reports, specify a Report Type value of Advanced. After you create your custom report in Workday, you can access and download the XML Schema and XML file.
Building Custom Reports
Use the Workday Custom Report Writer to get the data you want, and use Report Designer to get the layout you want.
Report Designer is a powerful tool, and it might be tempting to use all of its capabilities, including the ability to filter and manipulate data. It is critical that you keep your report definition (in Workday) in sync with your custom business form layout (in Workday Studio).
In Workday, use the Custom Report Writer to create an advanced report definition that completely satisfies the data reporting requirements for a given report, including any filters, calculated fields, etc.
In Workday Studio, use Report Designer to manipulate the layout of the report. It is generally best to avoid using Report Designer to manipulate data, filter report results, or make calculations.
Access the Create Custom Report task and enter a unique report name. Select the Advanced Report Type and choose a data source. Since we intend to use this report with Report Designer, select the Web Service Enable option.
This makes a Column Heading Override XML Alias field immediately available on the Columns tab of the report definition, simplifying the creation of the web service XML schema. Additionally, we will need to provide Group Column Heading Override XML Alias labels for any related business objects and Label for Prompt XML Alias for any prompts referenced in the report.
The maximum output size for a web service enabled report is 2 GB.
Workday XML
When creating a report design in Report Designer, you will need a description of the structure of the report and some sample data. The structure of the report is defined by its XML Schema and you can retrieve the sample data as an XML file.
If your report has prompts, you will need to populate the values before you can view the URLs. The Workday XML option outputs the literal, and somewhat advanced, XML code used internally within Workday. The Workday XML output option provides three URLs:
- Workday XML: The pure XML output from a report that may be useful for REST-based integrations.
- XSD: The schema definition associated with the Workday XML.
- WSDL: Web services definition language, often used with SOAP.
The first time you select the Workday XML in your browser session, you will need to enter your username and password to access the XML document.
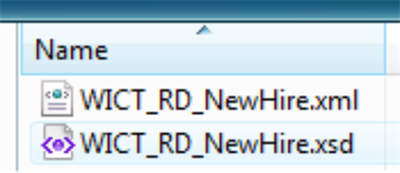
Generate both an XML file and an XSD file and save them to your hard drive. To save the file, select the appropriate menu, depending on your browser, for example:
Remember to add alt text in the Behaviors tab for the figure. Including alt text also allows the learner to zoom in on the image. If this is a decorative image, you can leave the Alt Text field blank.
The Workday XML option outputs the literal, and somewhat advanced, XML code used internally within Workday. The Workday XML output option provides three URLs:
- In Internet Explorer, select Save Target As.
- In Firefox, select Save Link As.
- In Safari, select Download Linked File As.
When you save the Schema document, you will need to change the file extension to .XSD from .XML
Note
: The New Workday Data Source Profile wizard in the Report Designer allows you to easily browse your Workday tenant to retrieve the description and sample data.Data Structure
In the Report Designer, data sets display the structure of the data in the report, which you created using the Workday Report Writer. Each data set displays the same list of fields defined for a primary or secondary business object in the report.
This report has a primary business object of Employee. The Worker business object contains several fields, for example, First Name, Last Name, Employee ID, Hire Date, and Position ID.
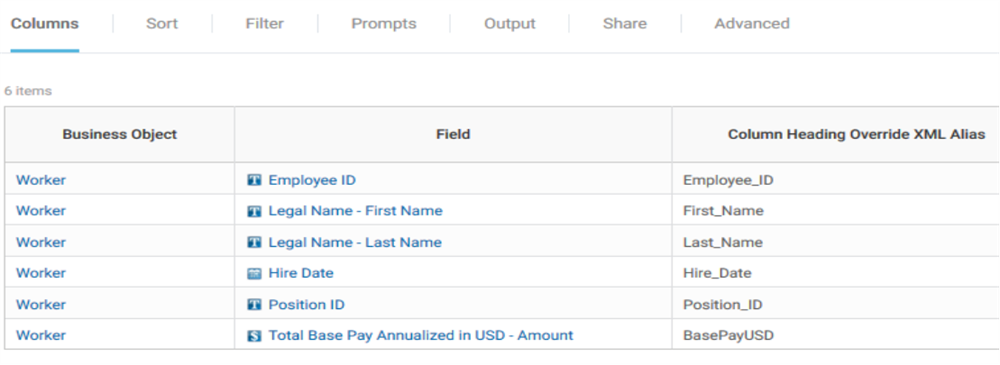
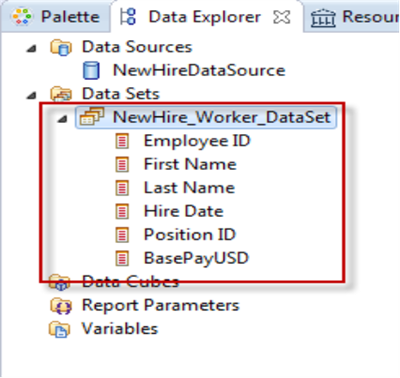
The report data is used to create a Data Set in the Report Designer. The Column Heading Override XML Alias labels are used for the field names in the Data Sets (underscores appear as spaces in Report Designer).
Getting to Know Workday Studio
Launching and Connecting to Workday Studio
Before you can deploy or launch a sample, you must connect to a Workday environment. You may access the Connection Details screen by navigating to Window > Preferences > Workday > Connections in Workday Studio.
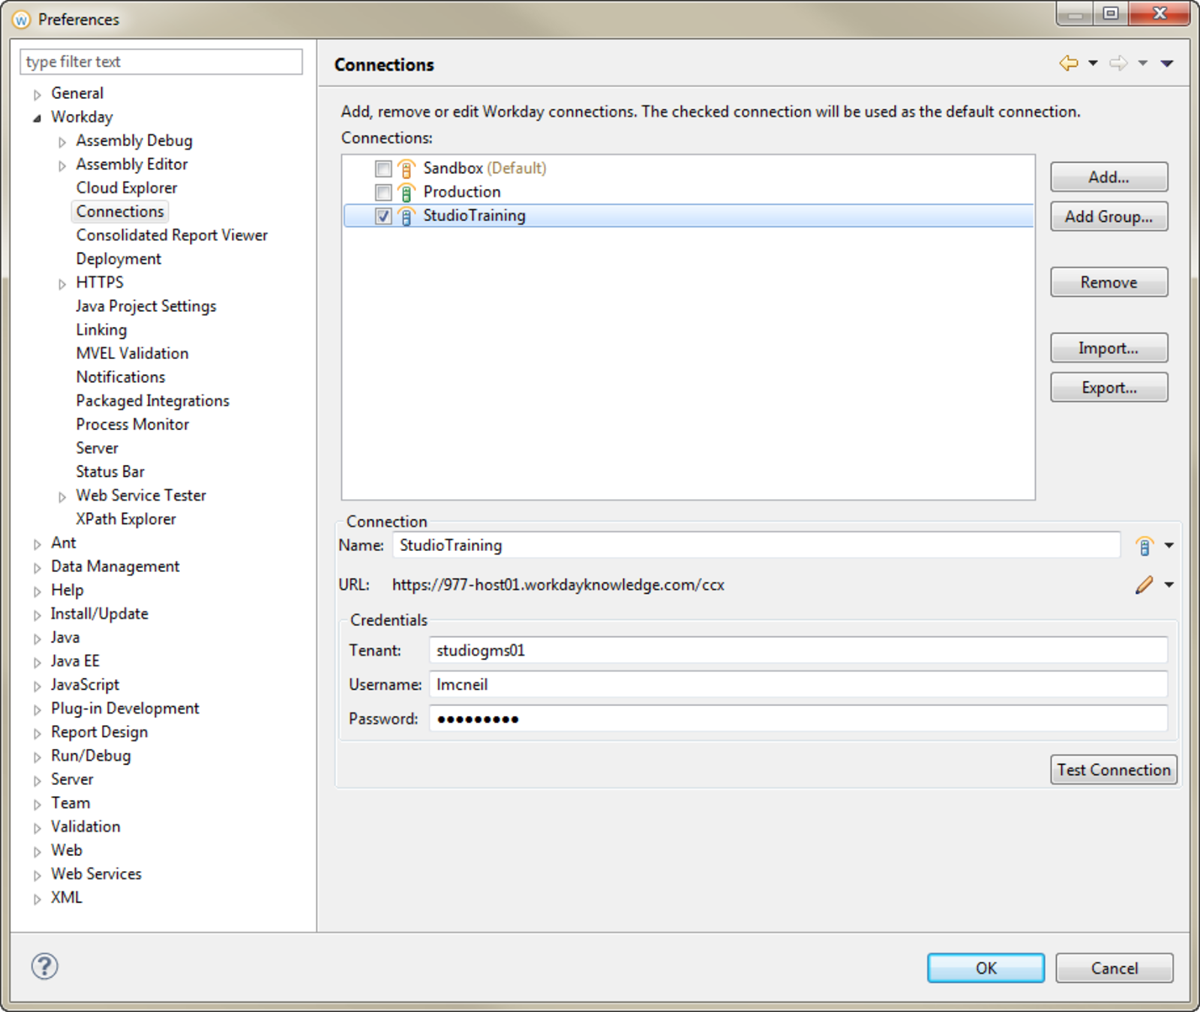
You can configure the existing Sandbox and Production connection or add a new connection with a name of your choice.
When you select the URL, you can choose based on the location of your data center for your Sandbox, Implementation, or Production tenant. If you have a URL not listed, select the pencil icon to enter your Host name value manually.
Since Workday Studio is installed locally on your computer and must connect to a Workday tenant, you may encounter network settings that prevent you from connecting. You may have to configure a proxy server or contact IT to help configure the network firewall. For assistance with resolving connection issues, please refer to Workday Studio Help Contents or the Knowledge Base on Workday Community.
Workday Studio Updates
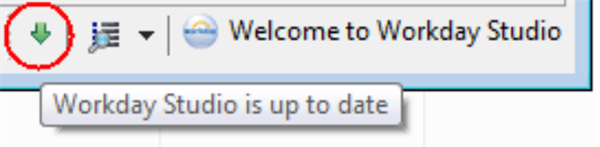
Workday Studio will automatically detect that an update or patch has been released the next time you use Studio or when you attempt to interact with the Workday runtime. Your Studio installation must be up-to-date in order to interact with the Workday runtime. Studio will automatically prompt you when an update is required. Studio's *One-Click Update* feature means that when you attempt to connect to a Workday environment, Studio checks that it is up-to-date, and updating is just a matter of clicking a button.
The update-status icon in the status bar indicates whether your version is up-to-date. When your software version is up-to-date, the arrow icon is displayed in green. If your version is out of date, the arrow icon changes to red.
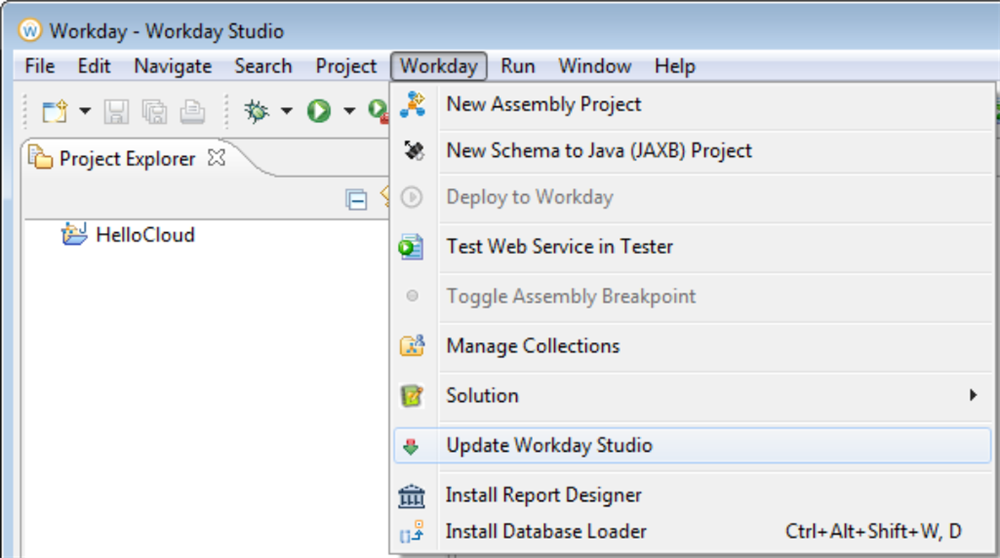
To update your software, select Update Workday Studio from the Workday menu.
If you are in the middle of something and do not need to connect to the Workday runtime, you can continue to use an out-of-date Workday Studio without updating or patching.
Workday Studio Navigation
Workspace
A workspace is a logical collection of projects. A workspace is a directory on your hard drive where Studio stores the projects that you define to it.
Your workspace path should not include spaces because the Studio Debugger will not work. Connection Details are associated with your current workspace. If you switch or create a new workspace, you will need to configure your connection details.
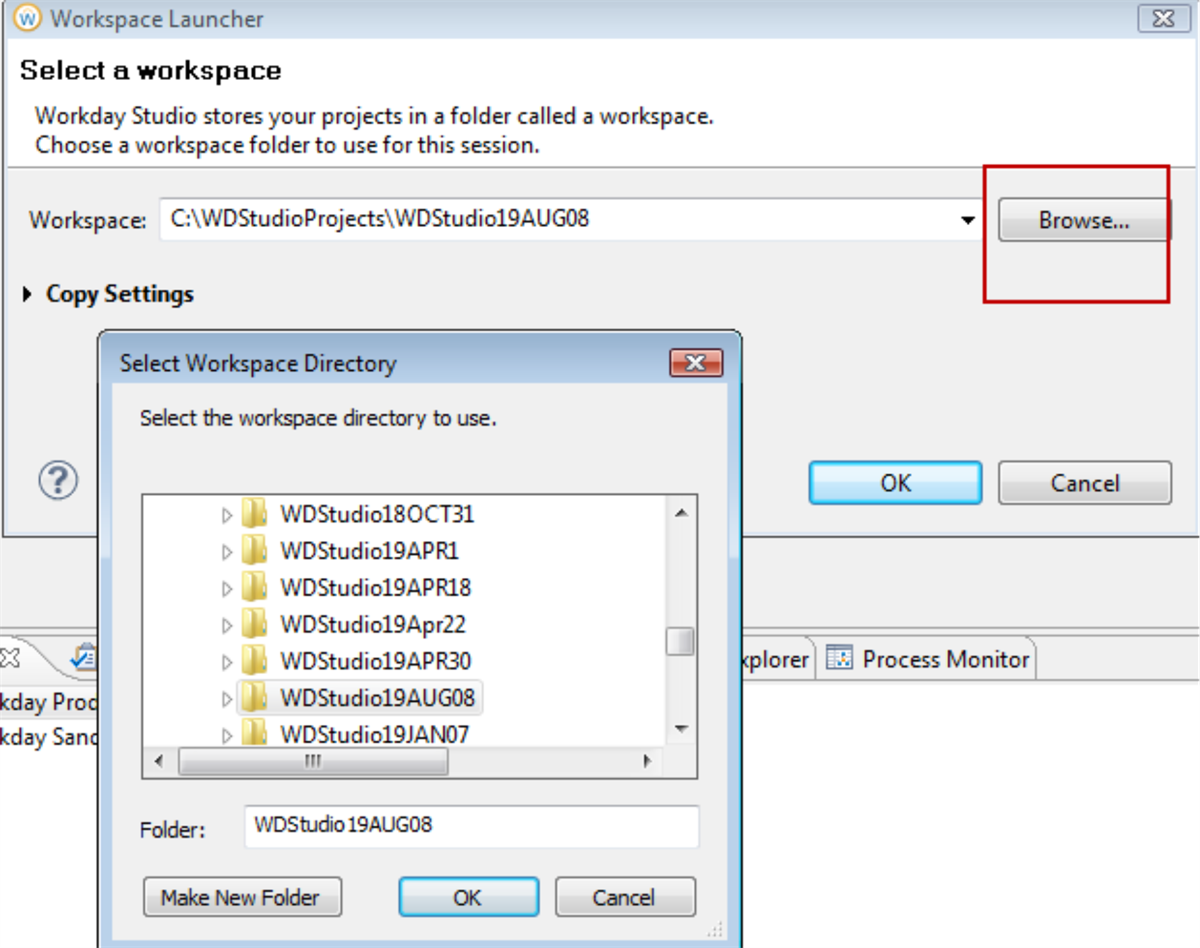
To change your workspace, or create a new one, navigate to File > Switch Workspace > Other. The Workspace Launcher dialog box will open and allow you to browse for or manually enter a new workspace location.
Perspective
Each Workspace window contains one or more perspectives. A perspective defines the initial set and layout of views in the Workspace window. Within the window, each perspective shares the same set of editors. Each perspective provides functionality aimed at accomplishing a specific type of task or works with specific types of resources. Perspectives control what appears in certain menus and toolbars.
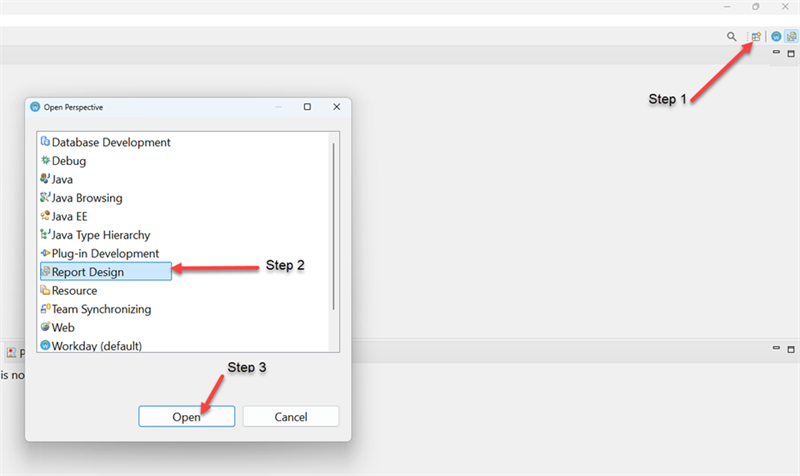
Workday delivers a custom perspective that defaults when you open Workday Studio. The Workday perspective provides one-click access to views/pages within the Workday application that are relevant for integration development, in general, and for specific Workday Studio cloud integrations. To access views relevant to creating report designs, open the Report Design Perspective. Window > Open Perspective > Other > Report Design
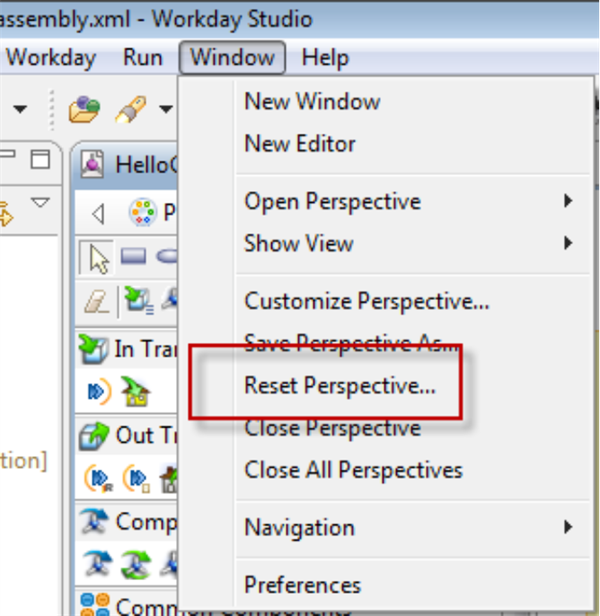
If you need to reset back to default, navigate to Window > Reset Perspective…
Creating The Report Design (6 Steps)
Report Design Steps
In the upcoming chapters, we will discuss the below six steps to create a report design in BIRT. You will learn how to use BIRT components to create your design and send it to the Workday tenant.
The
steps are:
six
- CreateReportProjectin Studio.
- Create.rptdesignin Studio.
- CreateData Source- Description and Sample Data required.
- XSD: Definition of the structure report
- XML: Sample data to preview the report design
- CreateData Set- To access data from the custom report.
- Formatreport design file (layout tab) and Preview Results (optional).
- Deploy.rptdesign from Studio to the Workday tenant. Workday will attach the.rptdesign to a business form layout then associate it with the custom report.