Global Payroll Connect
Overview
In this chapter, we will explore Global Payroll Connect (GPC). The various features in GPC will help you if you need to configure payroll for multiple different countries and third-party vendors.
Objectives
By the end of this chapter, you will be able to:
- Describe the advantages and core features of Global Payroll Connect (GPC).
- Set up external payroll vendors to work with GPC by configuring vendor mapping and pay group associations.
- Configure Event Outbound Notifications to notify the vendor about Hire and Termination events.
- Set up an integration to handle Data Changes on Demand (DCoD) requests from the vendor.
- Explore additional features including Additional Payroll Data (APD) and the Global Payroll Hub (GPH).
Using Global Payroll Connect
Global Payroll Connect (GPC) is a unified solution that simplifies payroll processing for organizations with a global workforce. GPC includes a variety of features that help streamline payroll for both vendors and customers. GPC helps you:
- Manage payroll processing across the globe by efficiently reviewing payroll related information to support decision making.
- Elevate the payroll experience for pay admins and workers with different features that provide a single view from multiple payroll vendors.
- Configure earnings, deductions, and payroll processing information.
- Set up integrations or APIs that send worker data, such as hire, compensation, benefits, time off, and termination events to third-party payroll vendors.
- Set up APIs to receive data from third-party payroll vendors, such as external payroll results, external payslips, tax documents, and other payroll documents.
- Reconcile data between Workday and third-party payroll vendors.
- Leverage powerful analytics to create and manage custom reports to assist in analyzing or auditing payroll data.
- Create and maintain payroll processing checklists for third-party payroll pay groups.
Common Setup Tasks
Create External Payroll Vendor
To configure GPC features, you will need to set up an external payroll vendor in Workday using the
Create External Payroll Vendor
task. Enter the name of the vendor and select the GPC features you would like to use.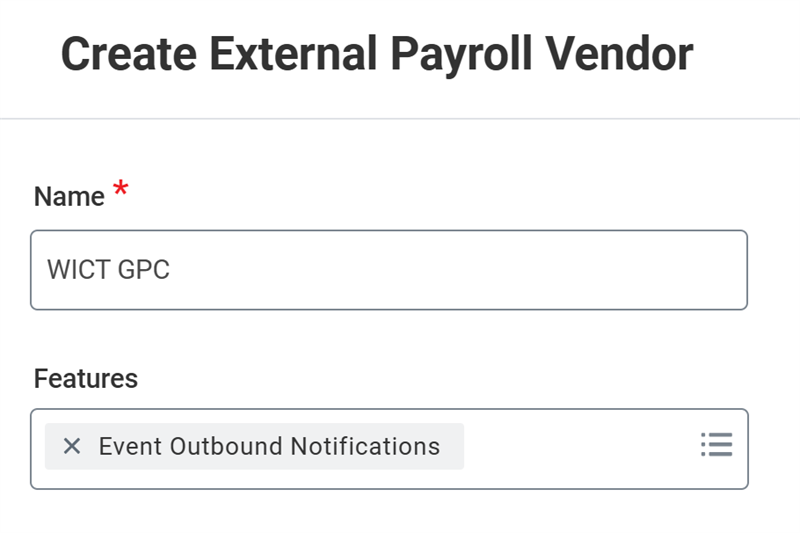
Create/Edit External Payroll Vendor Mapping
Once you have created your external payroll vendor in Workday, you will need to map your tenant to the external payroll vendor. Use the
Create External Payroll Vendor Mapping
task if you are creating mapping for the first time. Otherwise, you can update your existing mapping with the Edit External Payroll Vendor Mapping
task.
For each mapping, you must assign an X509 Key Pair. This key pair ensures that Workday securely authenticates with the external payroll vendor before exchanging data.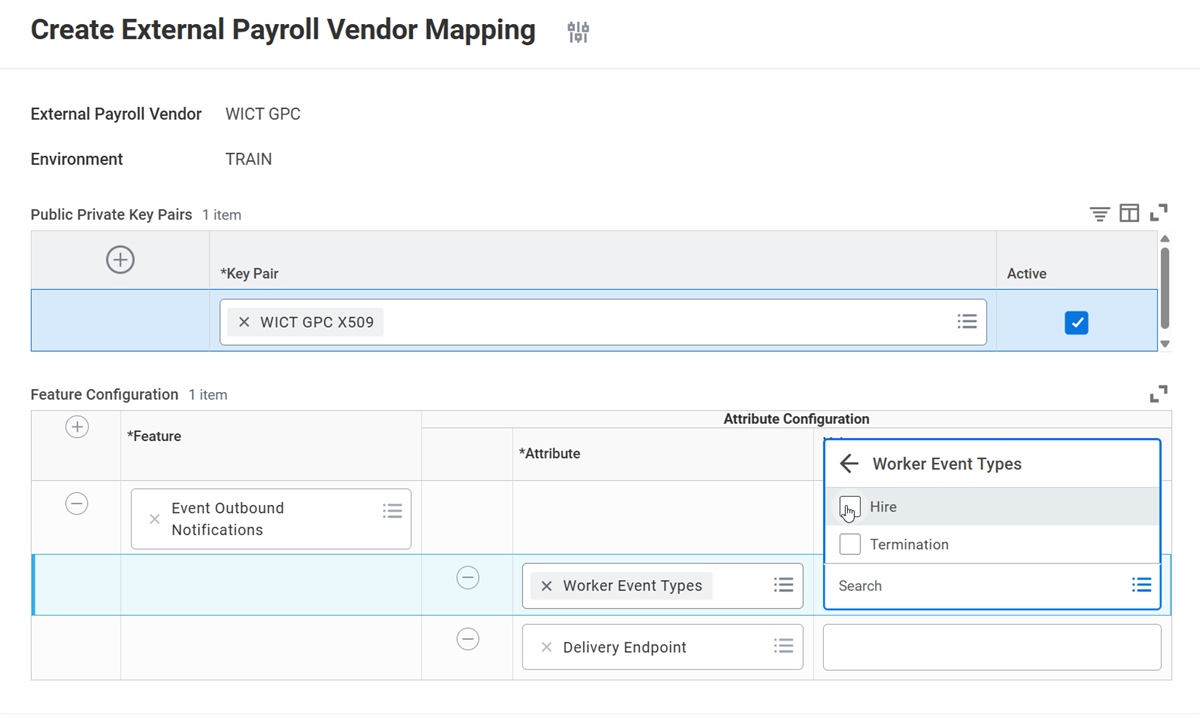
In the Feature Configuration section, you must configure attributes for each GPC feature enabled for your vendor. Add a new row in the Feature column for each GPC feature. Then, add rows in the Attribute column to fill in values for each attribute. The attributes are different for each feature and specify critical information including the endpoint for communicating with the vendor.
Maintain Pay Group Vendor Associations
The
Maintain Pay Group Vendor Associations
task establishes the link between a specific pay group in Workday and the external payroll vendor responsible for processing that pay group's data for a particular GPC feature. This ensures that when a specific feature is triggered, Workday knows which vendor system to communicate with.Note
:
You may only link each pay group to one external vendor.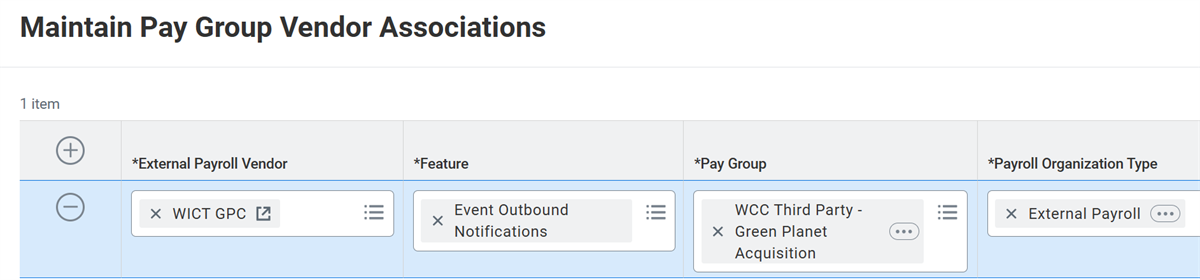
In the grid, specify the external payroll vendor you would like to configure. Then select the feature, pay group, and organization type you would like to associate with that vendor.
Event Outbound Notifications
Event Outbound Notifications will notify third-party payroll systems after Hire or Termination transaction events occur in Workday. We recommend you set up Event Outbound Notifications so that the vendor knows when to request Data Changes on Demand for a worker.
Note
:
The Event Outbound Notifications feature will report corrections for these event types but does not support rescinds.Outbound Notification Process
- A Hire or Termination event occurs in Workday.
- The Event Outbound integration processes the event information and sends a notification to the vendor when complete.
- The vendor receives the notification in JSON format.
- The vendor sends a response to Workday to indicate they received the notification.
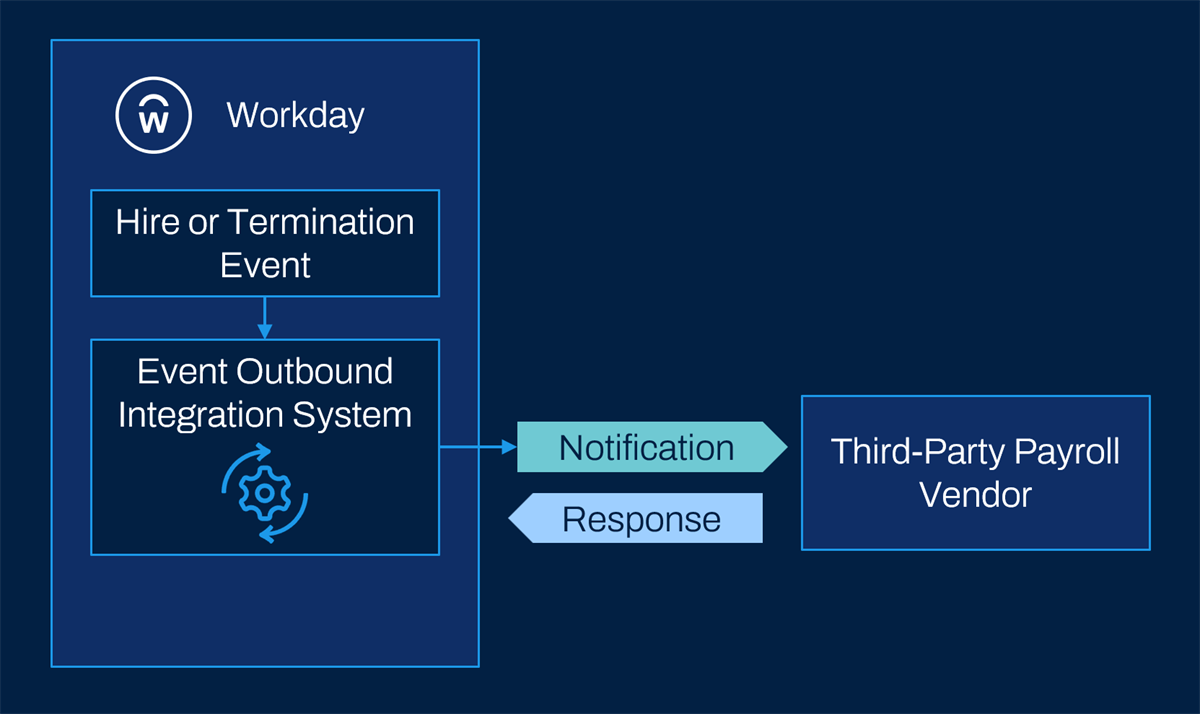
You can configure the Event Outbound integration system to subscribe to Hire and Termination events. When these events occur, the integration will automatically run and will send a notification to the vendor. You will not receive a notification in Workday. To verify if the integration ran successfully, use the
Process Monitor
report to search for integration events. From the Process Monitor, you can locate any runs of your Event Outbound integration.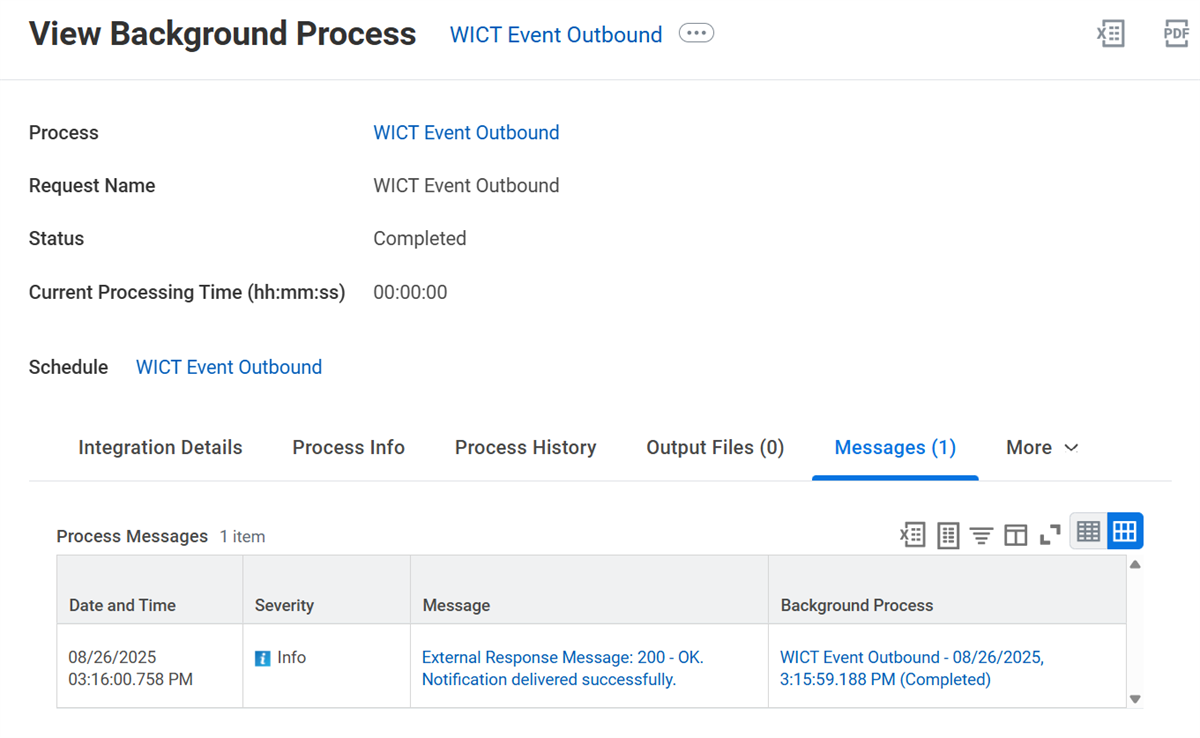
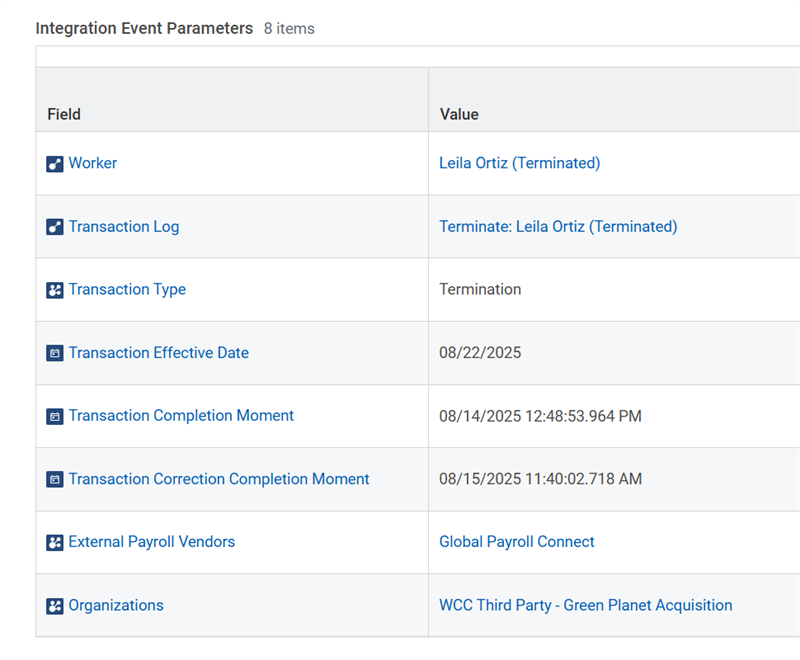
From the integration event, you can view details about the event and the worker in the Integration Details tab.
Workday delivers the corresponding information to the specified vendor endpoint.
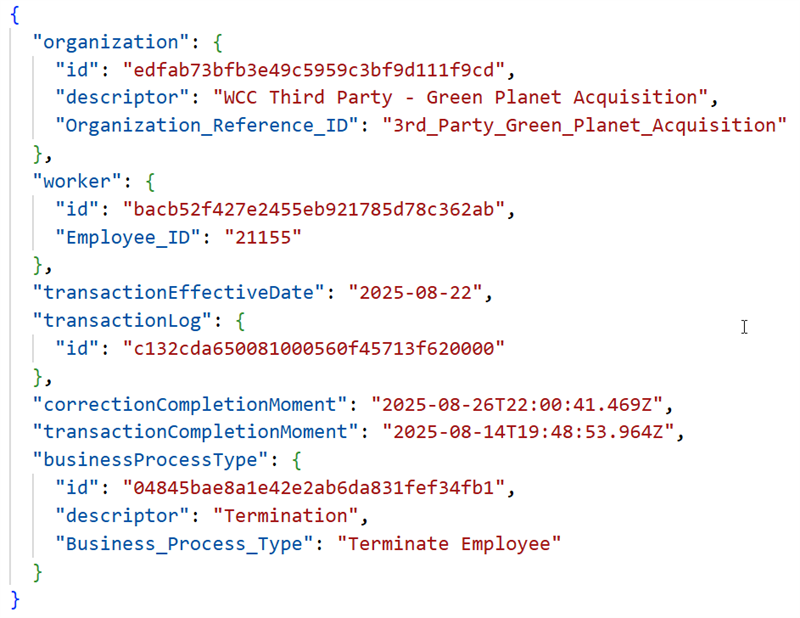
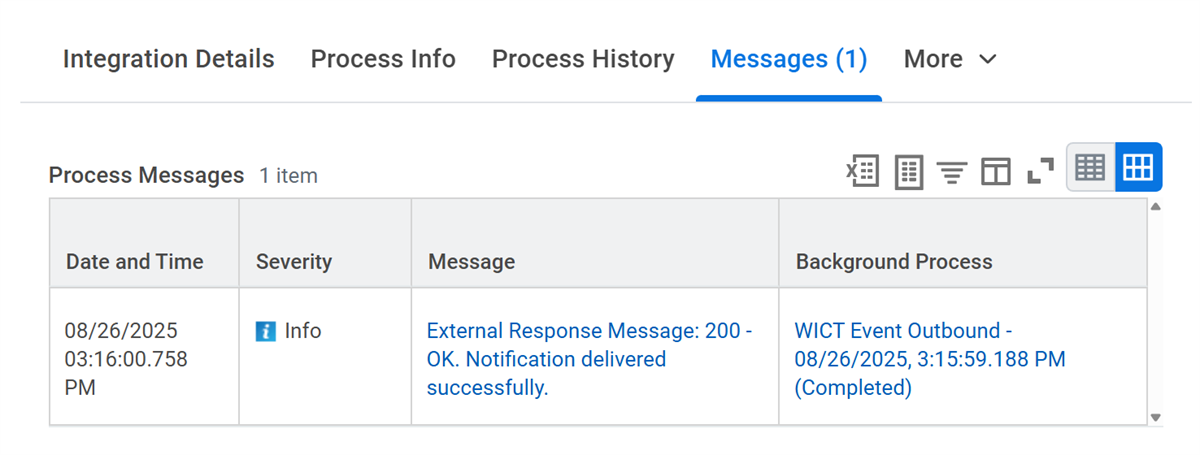
Then, the vendor sends a response to Workday. The HTTP status code 200 - OK indicates the message was delivered successfully.
Event Outbound Notifications Template
To set up Event Outbound Notifications, create a new integration system using the Event Outbound Notifications template.
Important
:
Each tenant can only contain one integration system using the Event Outbound Notifications template.You will need to create a new Integration System User (ISU) for this integration. Assign the ISU to a security group with the following permissions:
- View and Get - Business Process Administration
- View and Put - Integration Event
- View and Put - Integration Process
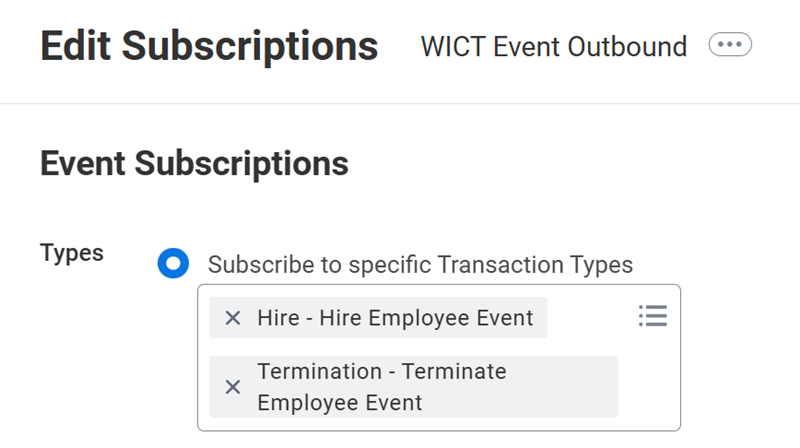
To configure the integration, select Related Actions > Integration > Edit Subscriptions. In the Event Subscriptions section, select Hire - Hire Employee Event and Termination - Terminate Employee Event for the Subscribe to specific Transaction Types field.
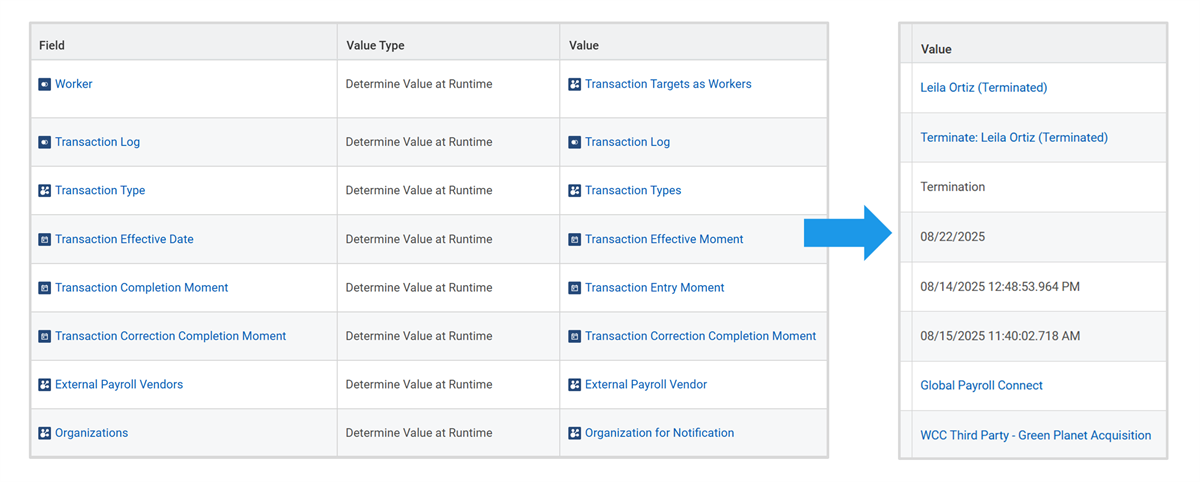
In the Integration Criteria grid, set all fields to Determine Value at Runtime and configure the values to output data for the transaction. When the integration runs, the integration event will show details in these fields including the worker, transaction type, dates, and organizations.
Data Changes on Demand
Data Changes on Demand (DCoD) allows payroll vendors to request data from Workday at any time. DCoD provides field level change detection and returns the current snapshot for each worker in raw JSON format. Vendors can request full pay groups and data sections or specify individual workers and felds.
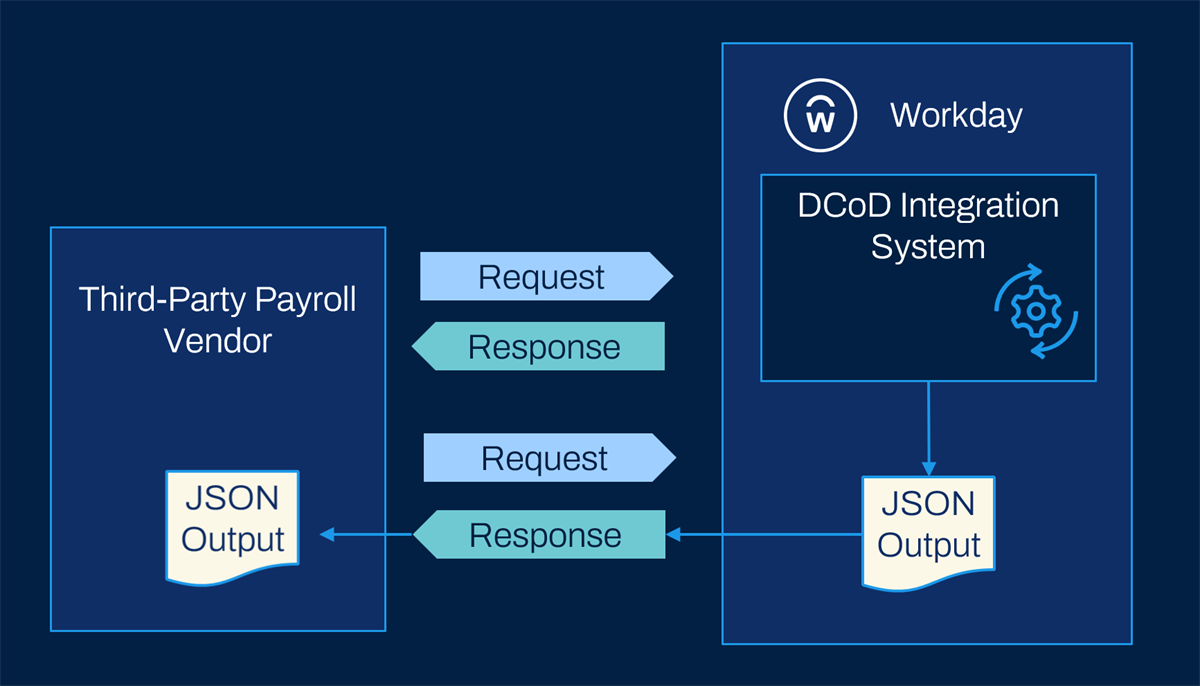
The Data Changes on Demand process is as follows:
- The vendor makes a request to Workday, specifying the workers and data they would like.
- Workday processes the request and runs the Data Changes on Demand integration system.
- The integration system produces a JSON output file and notifies the vendor when the process is complete.
- The vendor makes another request to retrieve the output file from Workday.
To use Data Changes on Demand, you must create an integration system using the Data Changes on Demand template. Similar to Event Outbound, you may only have one DCoD integration in any given tenant. You will need to create an Integration System User (ISU) and assign it to a security group with the following permissions:
- Get and Modify - Manage: Data Changes on Demand
- Get and View - Reports: Data Changes on Demand
- View access to Integration Build, Integration Debug, or Integration Event
You must also use the
Edit External Payroll Vendor Mappings
and Maintain Pay Group Vendor Associations
tasks to configure your external payroll vendor for DCoD.DCoD Requests
To initiate the Data Changes on Demand process, the third-party payroll vendor makes a REST API request to Workday. In the request, vendors specify the request criteria and what data to include.
Vendors can specify the following parameters:
Parameter | Type | Example | Notes |
|---|---|---|---|
entryMomentFrom | DateTime | YYYY-MM-DDT00:00:00.000 | Required. Specify the dateTime in Pacific standard time. |
entryMomentTo | DateTime | YYYY-MM-DDT00:00:00.000 | Required. Specify the dateTime in Pacific standard time. |
effectiveFrom | Date | YYYY-MM-DD | Required. |
effectiveTo | Date | YYYY-MM-DD | Required. |
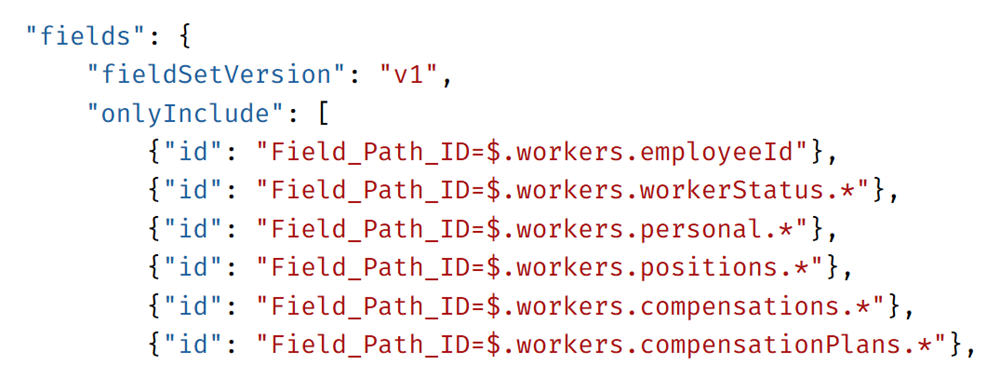
fields | Multi-instance | Field_Path_ID=$.workers.employeeId | Required. Specify which fields to include in the output. |
organizations | Multi-instance | Organization_Reference_ID=3rd_Party_Green_Planet_Acquisition" | Required. Must include one or more pay groups. |
workers | Multi-instance | Employee_ID=21155 | Optional. Configure specific workers to include. |
fullSnapshot | Boolean | true or false | Optional response filter. When true, the integration includes all workers in the request. When false, the integration only includes workers with changes. |
Resource
:
Vendors can specify many additional parameters and data sections in the request. For a full list, review the following Workday Documentation pages:- Reference: Data Sections for Data Changes on Demand
- Reference: Data Changes on Demand Request Criteria Parameters
Below is an example request from the vendor. After receiving an event outbound notification, the vendor wants to request updated information about a specific worker who was terminated. In the Organizations and Workers sections, they specify the pay group and the specific worker.
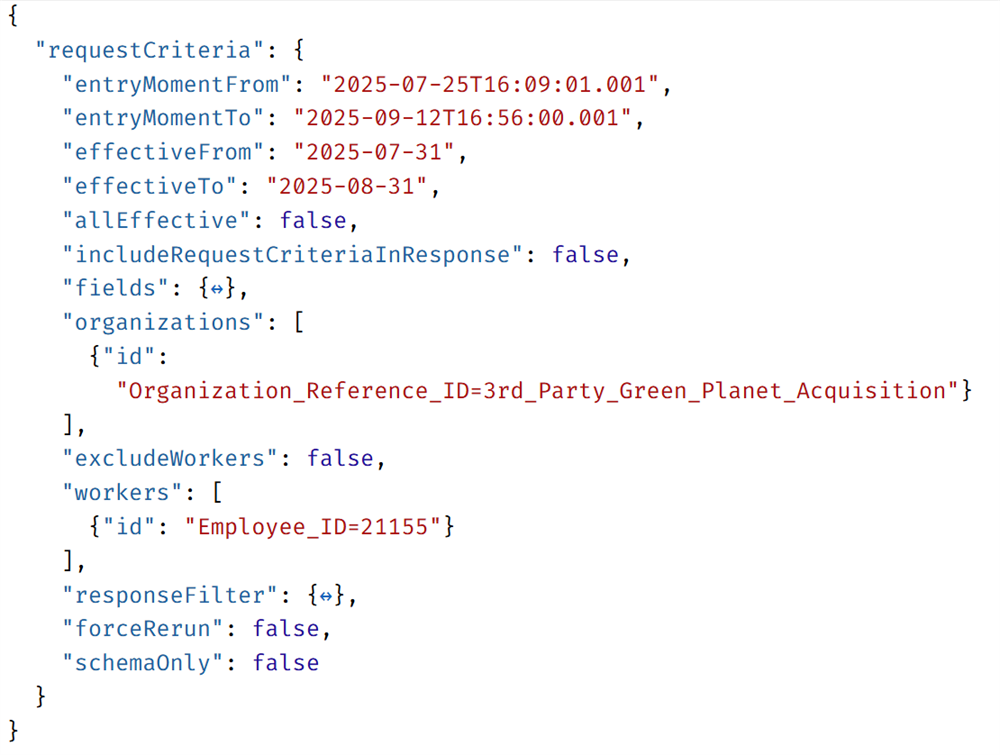
In the Fields section, the vendor specifies the data they would like to receive. To include all subfields in a data section, specify the field path ID with a period (.) and an asterisk (*) at the end. For example:
- Field_Path_ID=$.workers.personal.*
- Field_Path_ID=$.workers.positions.*
Events and Output Files
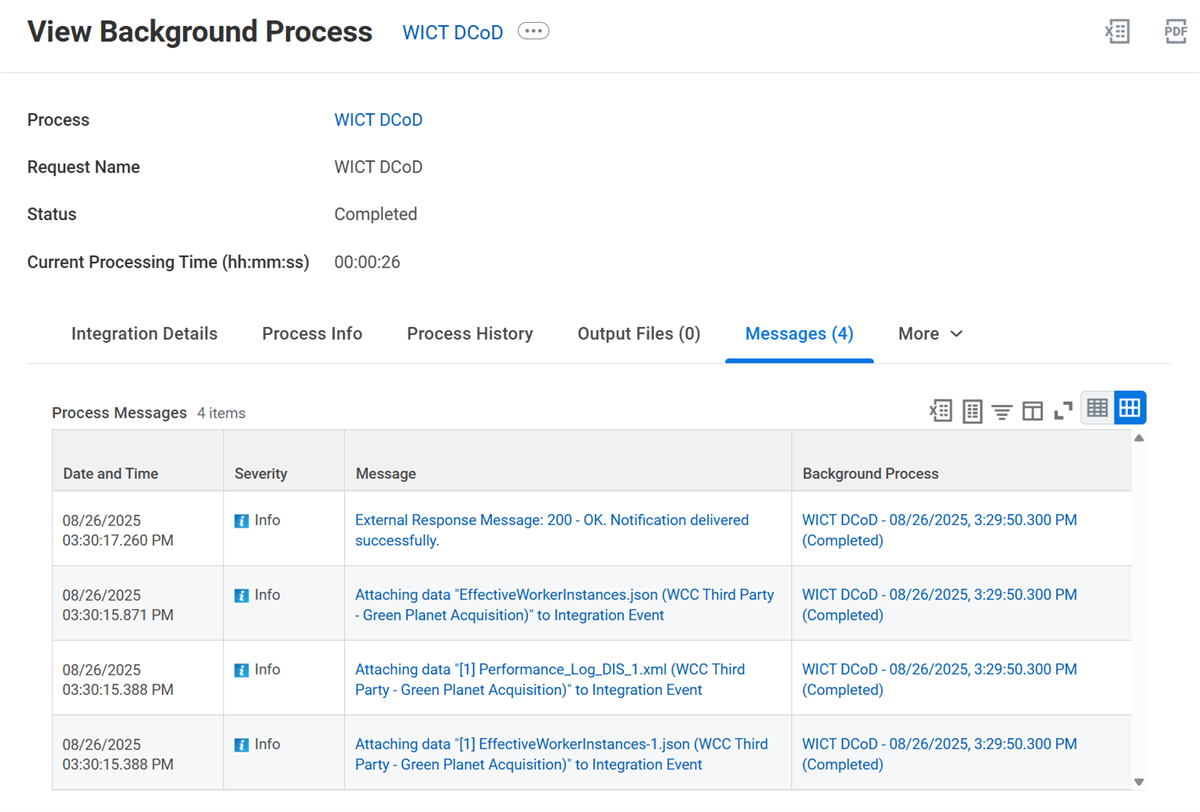
When the DCoD integration event is completed, Workday sends a notification to the vendor. Administrators in Workday do not receive a notification during this process. To locate DCoD events, run the Process Monitor task and search for events from your DCoD integration. From the event page, select the Messages tab and select a message to access the output file.
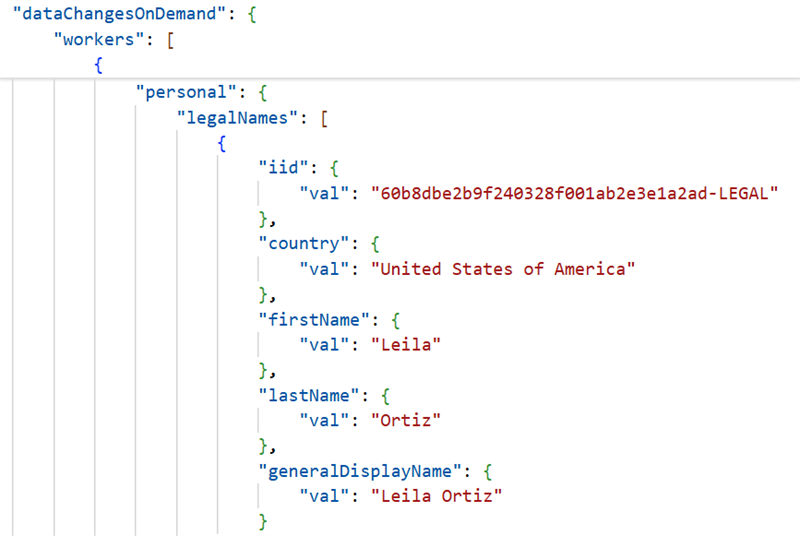
The integration outputs the data in raw JSON format. This allows different vendors to easily process and transform the data for their unique specifications. Notice the output file includes information based on the fields and workers the vendor requested.
Global Payroll Hub
The Global Payroll Hub (GPH) allows you to process payroll and perform time-sensitive actions for multiple countries in one central location. With GPH, payroll administrators can view all external pay groups they manage, regardless of the different third-party payroll vendors used. From the hub, you can quickly access an overview for each pay group including the processing status and any action items needed. With GPH, you can:
- View all the external pay groups you are responsible for.
- View payroll status for external pay groups even if you have separate third party vendors for different regions.
- View high-level information related to the pay period, including the processing status and any action items.
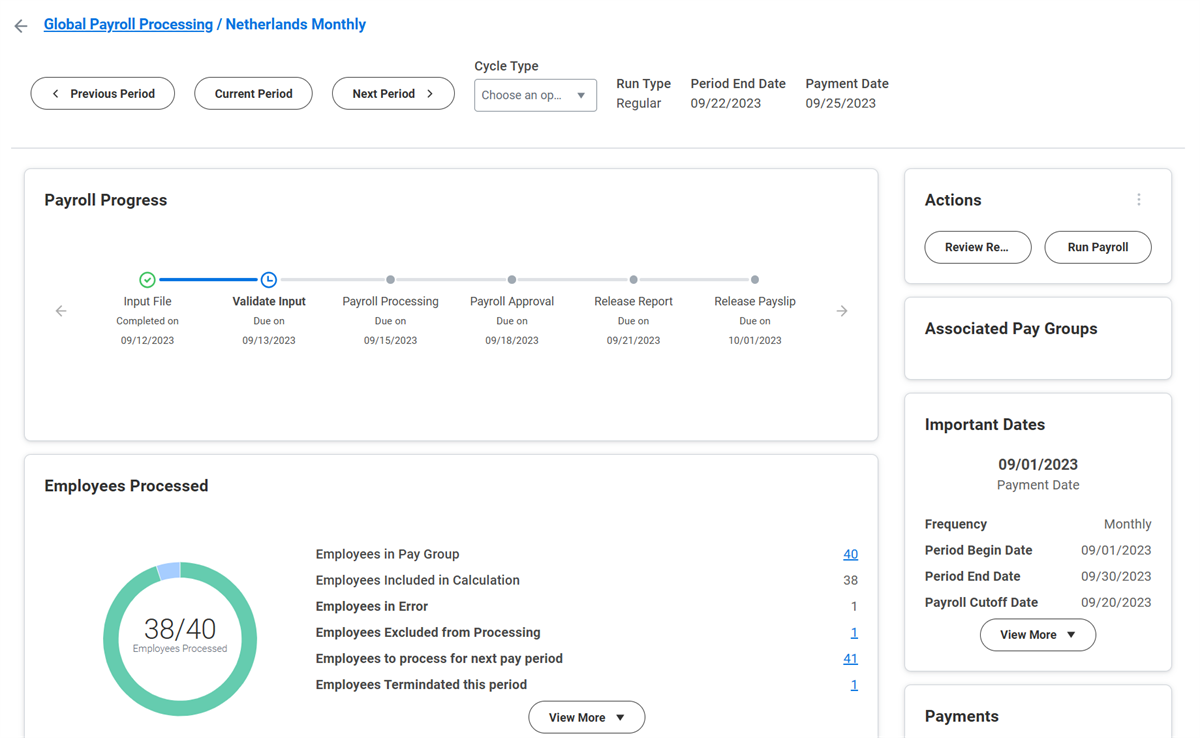
- Drill into payroll details to view more information for the current, previous, or next pay periods, as well as off-cycle pay runs to improve efficiency.
- Quickly view information related to important dates, employee counts, and total payment breakdowns.
- Analyze variances to visualize the difference between the amounts for the current and previous pay periods.
- Access third-party payroll tasks, such as running calculations, through Workday.
Workday retrieves information from the vendor using REST APIs to ensure that the data displayed in GPH is accurate and up-to-date.
Important
:
Your third-party payroll vendor must provide REST APIs that Workday can access to populate the data for the landing page and additional fields.Global Payroll Processing
To access the Global Payroll Hub, use the
Global Payroll Processing
task.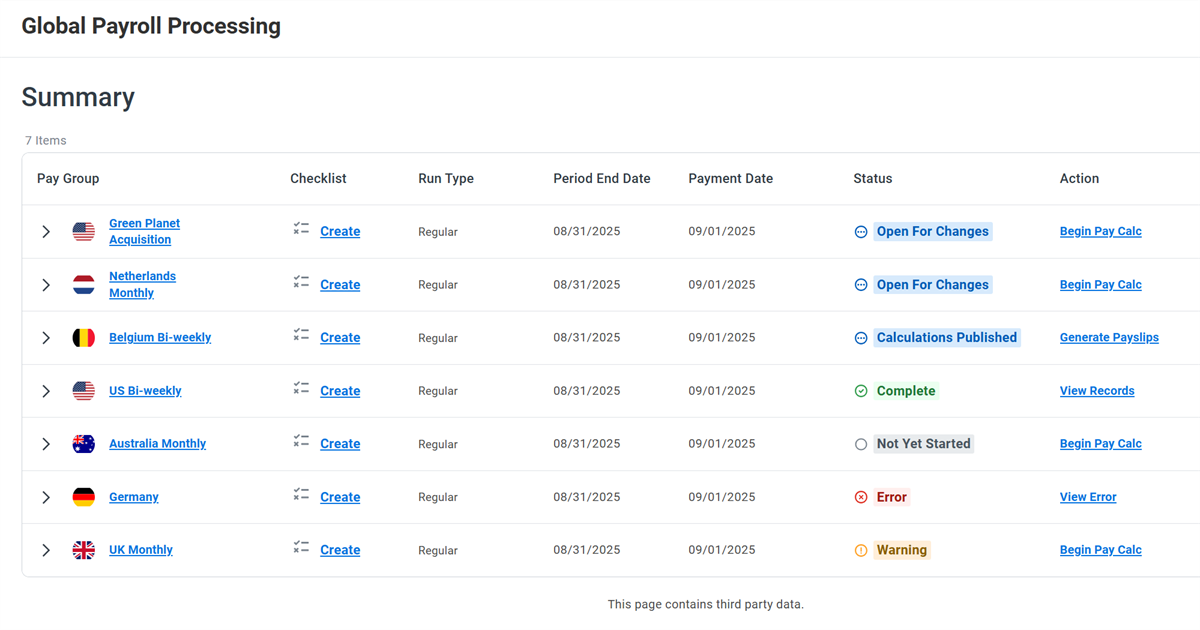
For each Pay Group, you can expand details to find more information about the current pay period.
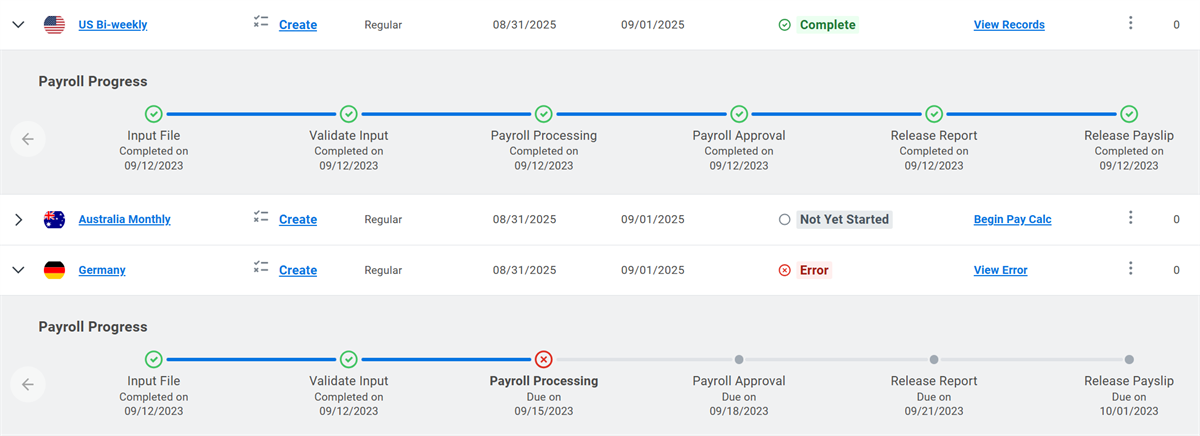
In addition to a centralized summary, GPH provides tools to improve efficiency and tracking. By selecting a pay group, you can access more details about previous and future periods, off-cycle pay runs, and analytics.
Setup
To set up GPH, configure access to the following domains in the Global Payroll Connect functional area.
Domain | Description |
|---|---|
Manage: Global Payroll Processing | Configure access for payroll administrators. |
View: Global Payroll Hub | Configure access for users. |
You will need to update your External Payroll Vendor Mapping and Pay Group Vendor Associations to include Global Payroll Hub and its required attributes.
Resource
:
For additional guidance, review the Steps: Set Up Global Payroll Hub page in the Workday Documentation.Additional Payroll Data
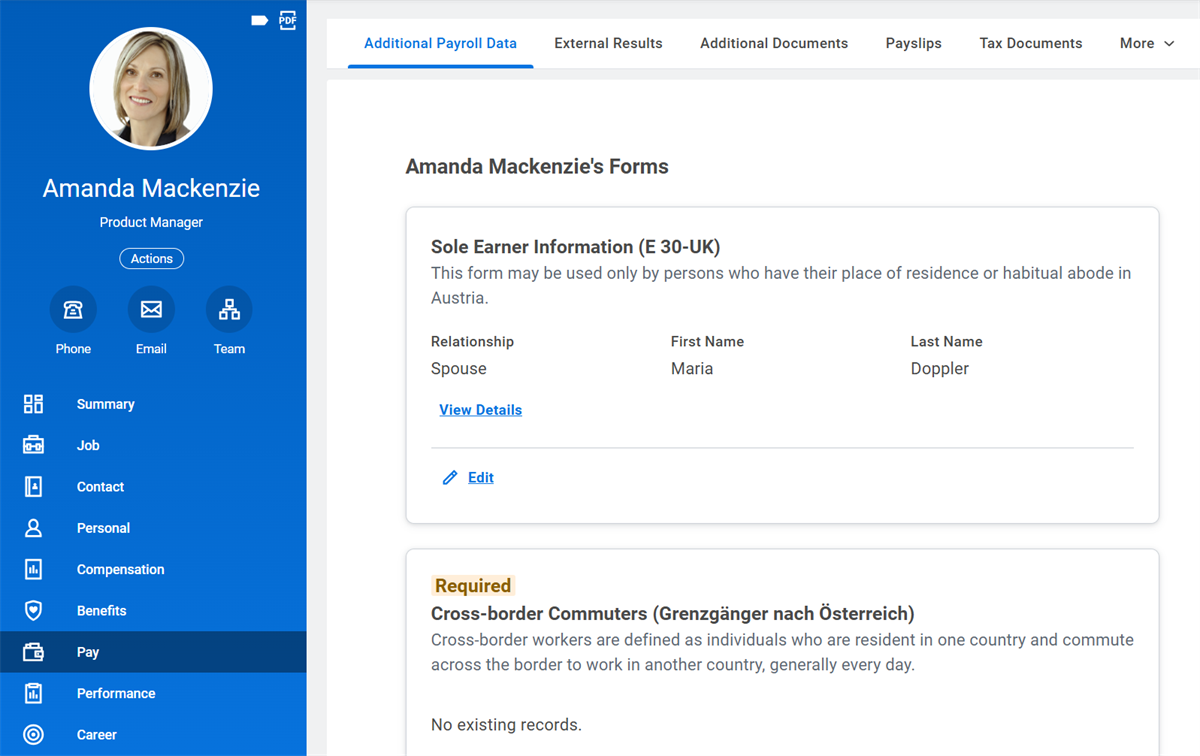
The Additional Payroll Data (APD) feature allows you to support country-specific data required for payroll processing. When you enable Additional Payroll Data, Workday can collect and transfer data from required country-specific payroll forms and fields to a third-party vendor. Workers can input this data through employee self-service. Payroll Administrators can also input data on behalf of a worker.
Workday does not store the additional data. Workday only displays the data, retrieving the available forms and fields from the external vendor. The vendor is responsible for storing and maintaining the data within their external payroll system.
Note
:
To successfully enter Additional Payroll Data, the worker must exist in both Workday and the external system.To access Additional Payroll Data, configure security policies for the following domains:
Domain | Description |
|---|---|
Self-Service: Payroll Interface (Additional Payroll Data) | Enables current and future workers, to input additional payroll data through ESS. |
Worker Data: Payroll Interface (Additional Payroll Data) | Enables payroll administrators to input additional payroll data for workers. |
You will need to update your External Payroll Vendor Mapping and Pay Group Vendor Associations to include Additional Payroll Data and its attributes.
Resource
:
For additional guidance, review the Steps: Set Up Additional Payroll Data page in the Workday Documentation.Inbound Notifications
Global Payroll Inbound Notifications allow you to notify specific workers or role groups in Workday with custom messages that include links or interactive elements. In the following example, an Inbound Notification alerts the payroll administrator that country-specific forms are ready for a worker.
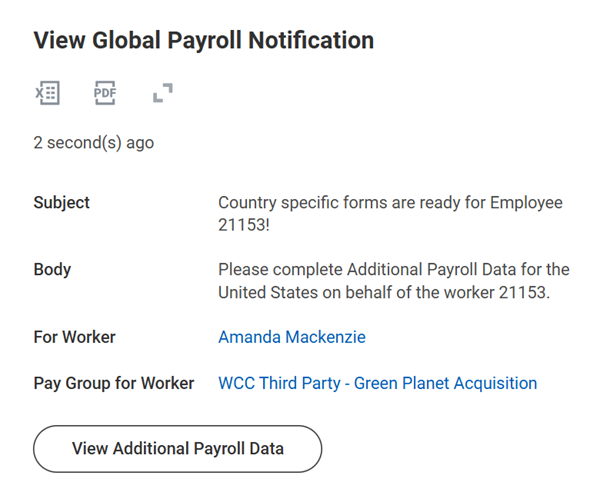
From the notification, the administrator can navigate to Amanda's profile, view the country-specific forms required by the vendor, and enter the additional data.