
Securing Connectors
Overview
In this chapter, you will secure our connector integration by evaluating the domains and business processes that secure the connector web service. You will also schedule an integration system and transfer ownership of the schedule to an ISU.
Objectives
By the end of this chapter, you will be able to:
- Configure and test ISU access to connector fields, field overrides, and population eligibility criteria.
- Secure connector integrations with and without the Data Initialization Service (DIS).
- Grant a security group access to perform a web service operation.
- Activate pending security policy changes.
- Transfer ownership of the schedule to the ISU.
Connector Documentation on Workday Community
Navigate to Workday Documentation on Workday Community and search for the Core Connector: Positions template. You will notice that the documentation has details about securing this connector.
The documentation is very generic. You may not need access to the:
- Integration Event domain.
- Job Information domain.
Additionally, since this use case is an outbound integration, you only need Get access. Put web services update data, and we do not need to do so in this use case.
The access we need for certain is to Worker Data: All Positions.
Review of the Integration Error
In a prior activity, you:
- Created an ISU.
- Created an ISSG.
- Assigned the ISU to the integration system account.
When running the integration system, it failed because a new ISSG is not associated with any security policies. Creating the ISU and the ISSG are easy. The harder task is to decide what security policies you need to assign your ISSG to.
The integration event displayed the message below when you ran the last activity. The generic message tells you that the integration could not get a page of data. When the integration system tried to get its first page of data, the process failed. It failed because you did not authorize the ISU to get that data.

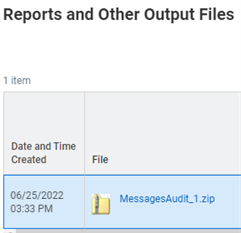
To find out more about why the integration failed, explore the MessagesAudit file. Find this file on the integration event.
The first file in MessagesAudit tells you that this integration was trying to execute the GetPositions web service operation.
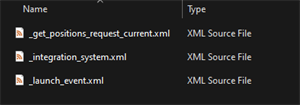
You need to figure out which security policy controls the GetPositions web service operation and assign the ISSG to that policy.
View Security for Securable Item
In running the activity after assigning the ISU to our connector, the integration system failed due to an error. Later, we determined that the integration system was using the Get Positions web service operation.
The
View Security for Securable Item
report shows how Workday secures a given item. Enter a string of text, with a minimum of three characters, in the Securable Item prompt.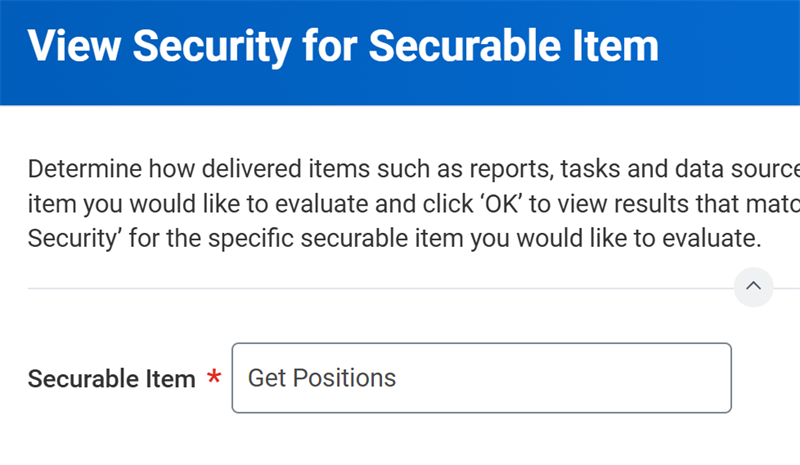
Tip
: Enter SECURA into the Workday search bar to easily find the View Security for Securable Item
report.The report returns items matching the text string. The report groups those items into sections (e.g., Tasks, Reports, Report Fields, Data Source Filters, Data Sources).
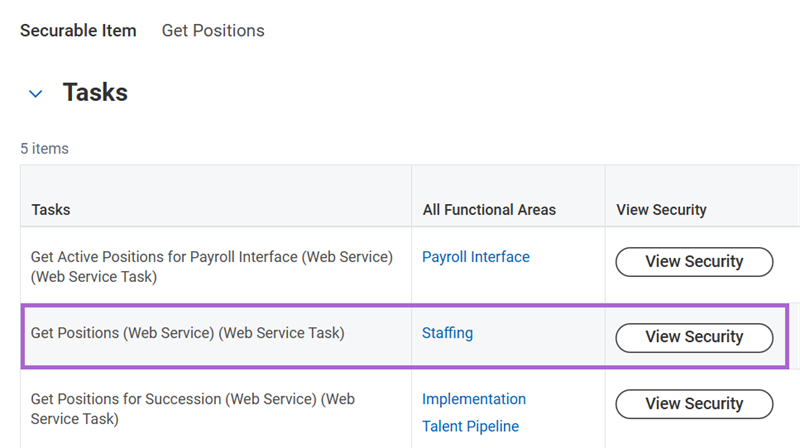
Select the View Security button to review the security policy for an item. You will also notice the security groups assigned to that policy.
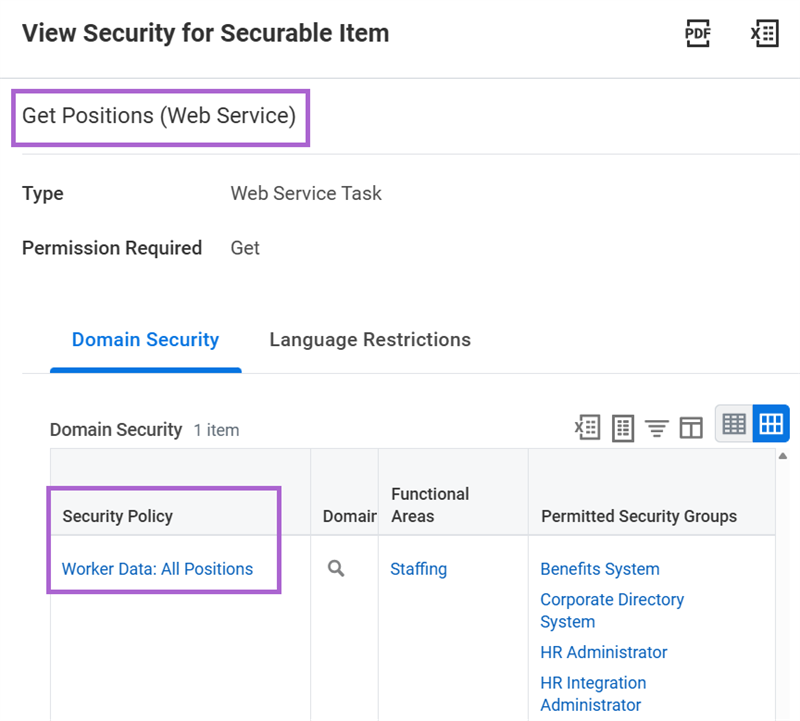
Note
: Domain security policies secure most web service operations. Business process security policies secure some Put web services if the web service triggers a business process. For example, the Assign Roles web service operation triggers the Assign Roles
business process.Adding the ISSG to the Security Policy
Using the Related Actions on the security policy, you can edit its permissions to include your connector ISSG.
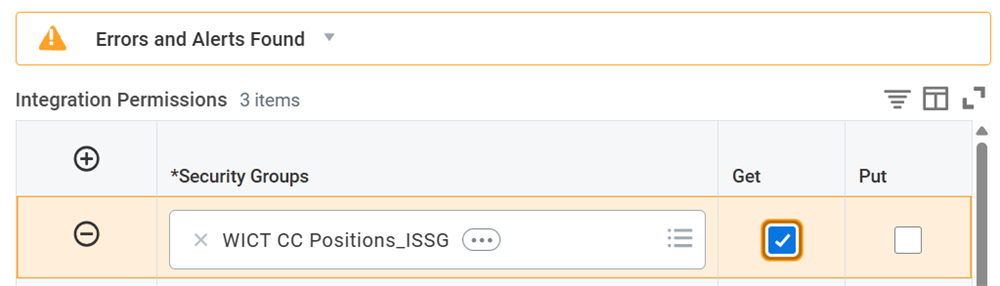
We added a new row to provide only Get access. An alert message will appear instructing you to activate your pending security policy changes.
Domain Security Policies with Pending Changes
Before any security configuration goes live, you must activate any changes. If you ignore the alert and launch the integration again, it will still fail. The
Domain Security Policies with Pending Changes
report will show you if there are any pending changes.Activate Pending Security Policy Changes
Security policy changes (e.g., adding or removing a security group, changing View to Modify permission) are pending until someone runs the
Activate Pending Security Policy Changes
task. Changes to security groups themselves (e.g., membership, security group definition) do not require activation.When activating pending security policy changes, there is a comment field. You need to enter the following details into the comment:
- Who made the change?
- What was the change?
- Why was the change made?
- Who signed off on the change?
- If using a change control system, you should also enter a change control reference number.
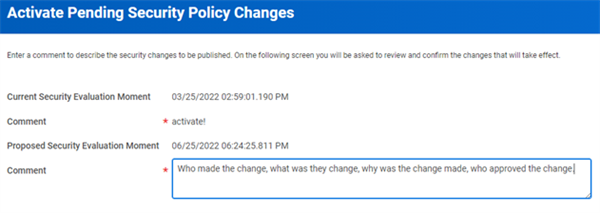
After you enter a comment, you must select the Confirm checkbox and select OK again to activate the changes.
Re-Testing the Integration
After configuring the ISSG with the proper security policy, and activating pending security policy changes, you are ready to launch the integration.
Now, the integration has successfully completed, still using the ISU account.
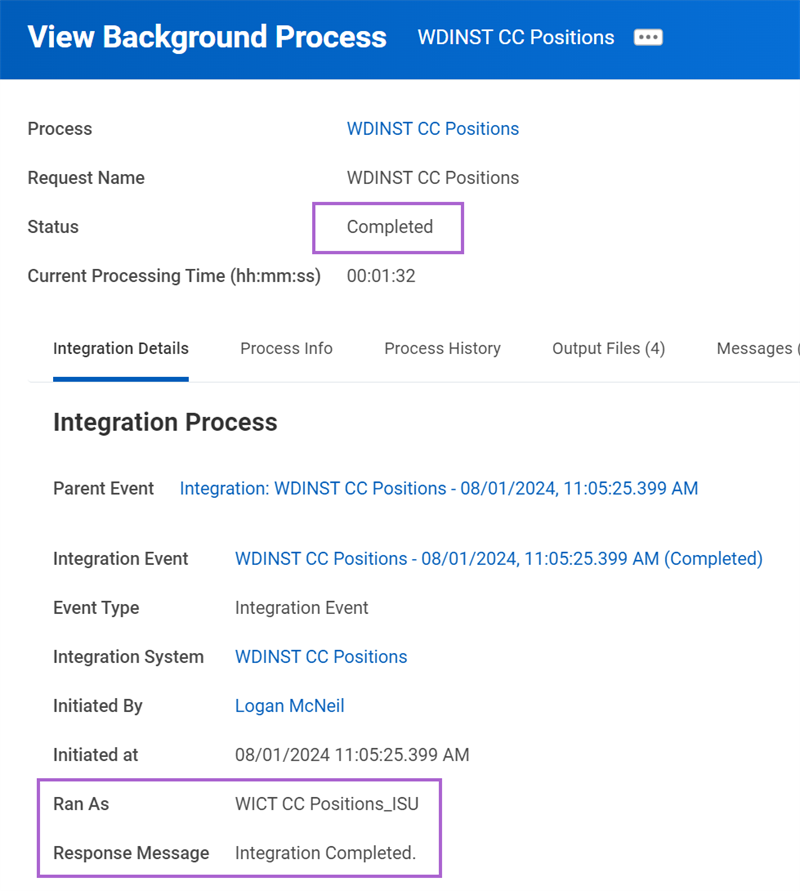
Additionally, when you review the details of the integration event, you will notice that a file was output containing positions for the HR Operations department.
Note
: To be certain that your security configuration was proper, you should compare the output before and after the security configuration. There are instances where you may have configured security, and the integration would be successful, but there are still data issues. We will discuss this use case next.Integration Scheduling and Security
When you run the
Launch / Schedule Integration
task, the user who configures the schedule automatically owns it. Transfer ownership of the schedule to the integration system's ISU so that the schedule persists, regardless of a changing workforce.Transfer Schedule Ownership
Associating your ISU with the integration system only matters when the integration runs. You can also configure security of the ISSG to launch the integration.
The person who created the schedule is the owner. You cannot leave the schedule assigned to this user. You must transfer schedule ownership.
Configuring Security Prior to Transferring Ownership
After scheduling an integration, use the
Scheduled Future Processes
report to view details like:- Run frequency
- Start and end dates
- Schedule owner
The
Scheduled Future Processes
report has a column named Scheduled Process. To transfer ownership of the schedule, from the Scheduled Process' Related Actions, select Scheduled Future Process > Transfer Ownership.Security Note
: The ISU must have modify access to the Launch / Schedule Integration task to own an integration schedule. The Integration Event domain secures the task.Run the View Security for Securable Item report and search for the
Launch / Schedule Integration
task. Select View Security for that task.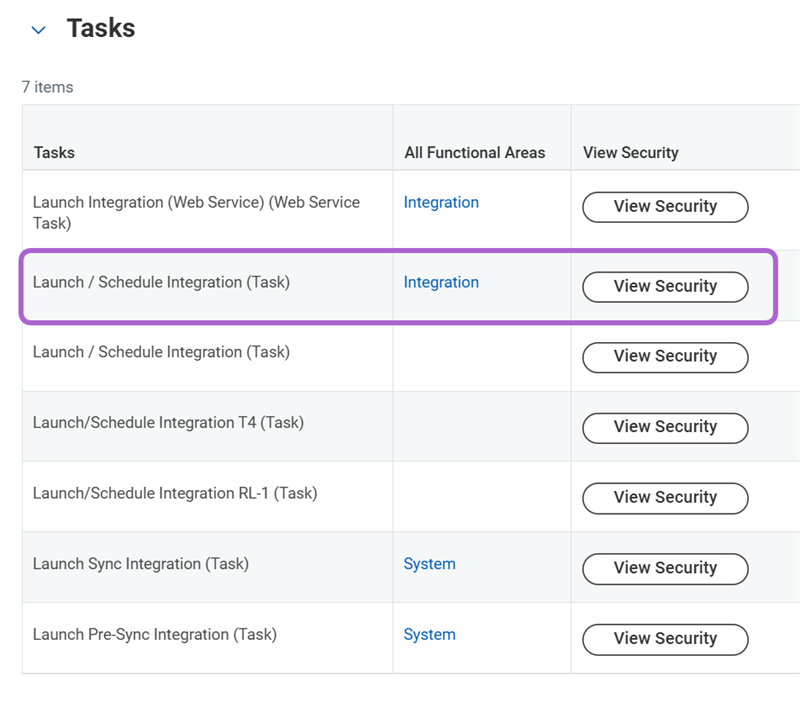
Once in the domain, eliminate the irrelevant security policies. Integration Build and Integration Debug would offer much more access than needed for simply launching an integration. Remember, you do not want to grant more access than is necessary.
Note
: Delivery Assurance will raise issues with integrations that offer more access than is necessary.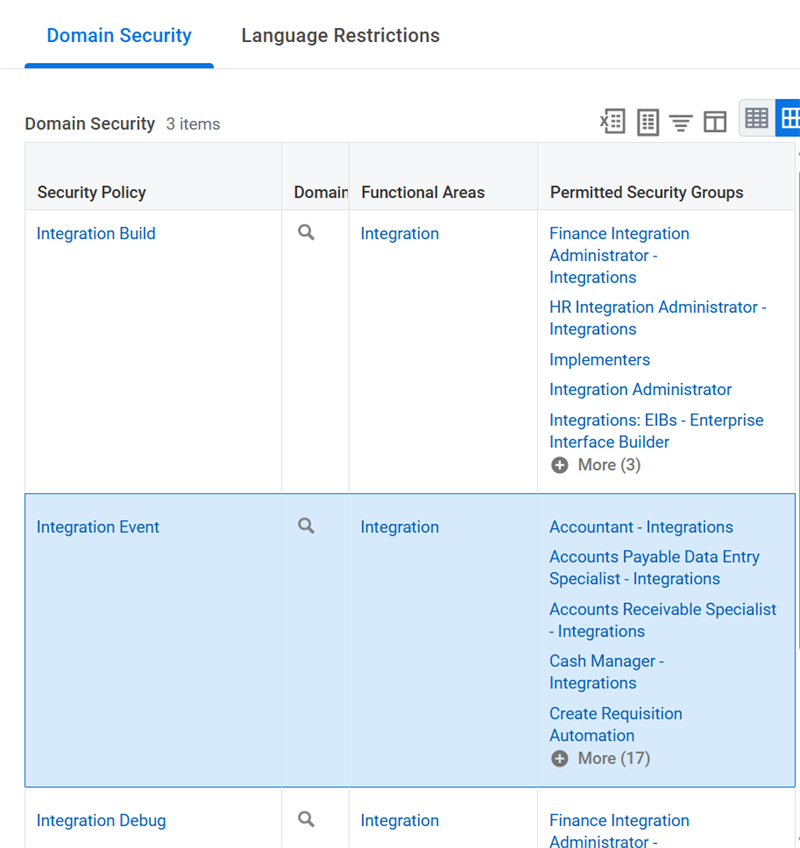
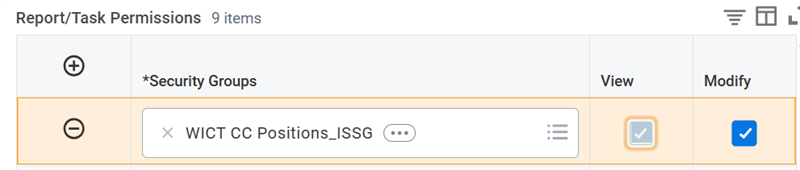
From the domain's Related Actions, select Domain > Edit Security Policy Permissions. Then, add the ISSG to the security policy. Notice that we granted Modify permission because launching the integration creates the integration event.
Transferring Integration Schedule Ownership
With security correctly configured, you are ready to transfer the integration ownership to the ISU. Run the
Scheduled Future Processes
report. From the schedule's Related Actions, select Scheduled Future Process > Transfer Ownership .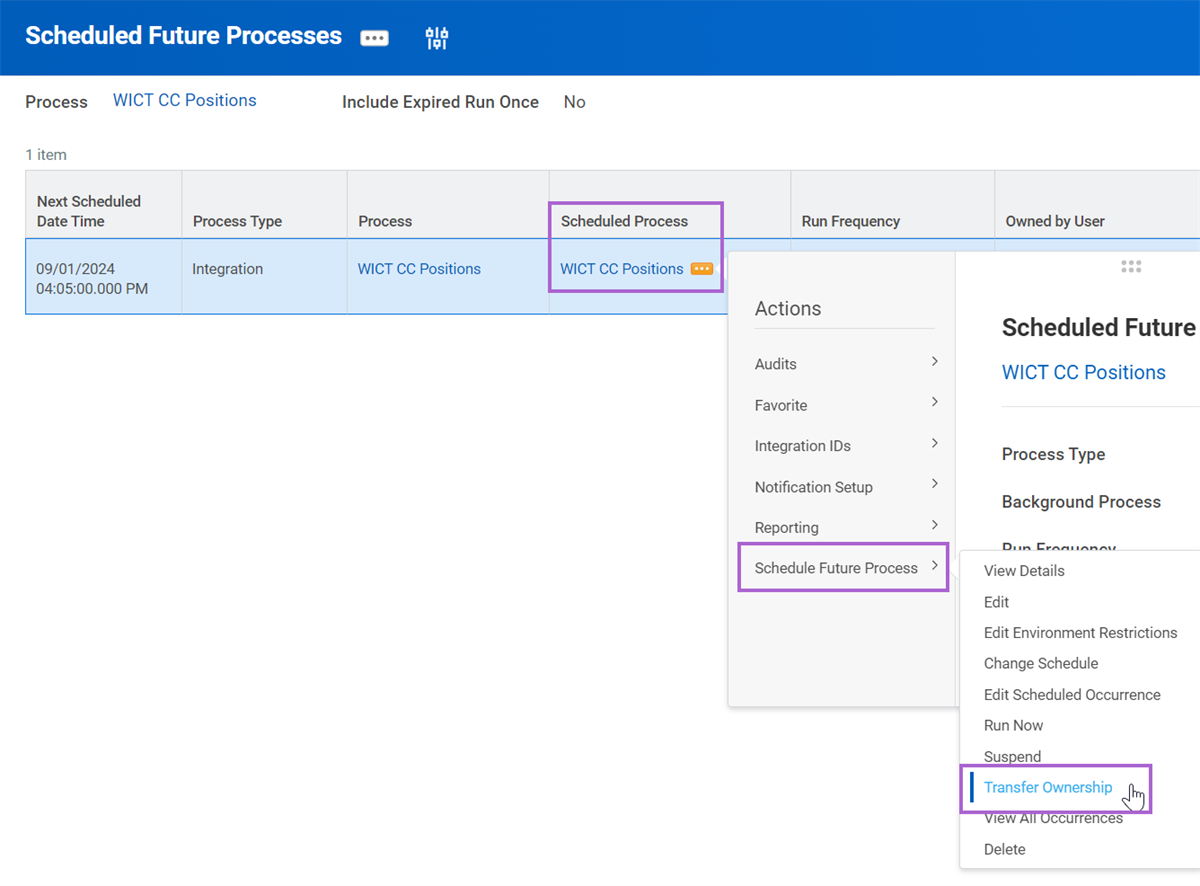
Select the ISU that will now own the scheduled integration.
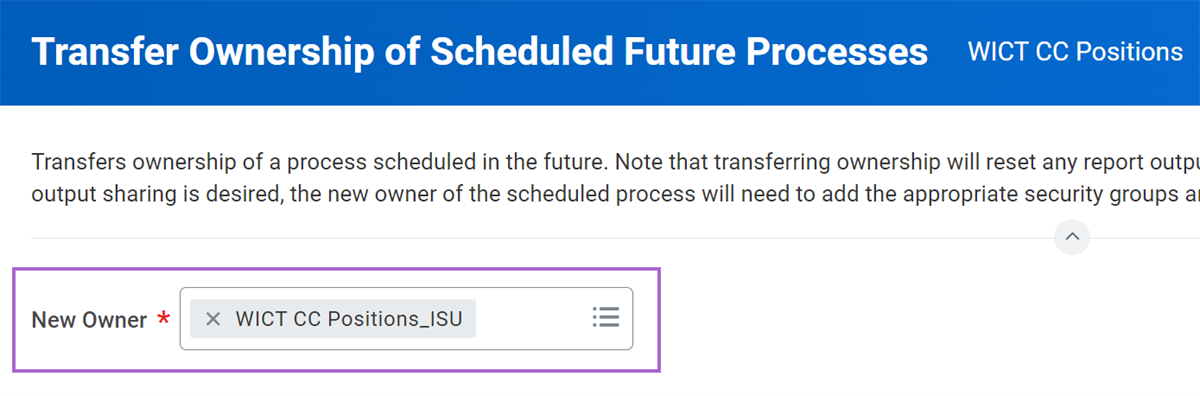
The next time this scheduled integration runs, you will notice that the ISU now initiated the integration.
Access to Calculated Fields
Security Permission to Create Calculated Fields
To create, edit, or delete system-wide calculated fields, you must belong to a security group authorized for the Custom Field Management domain. To ensure control and consistency, and avoid duplicate field definitions, limit access to that domain to key individuals in your organization.
The following domains control who can access and create calculated fields:
- Custom Field Management (for system-wide calculated fields)
- Private Calculated Fields Management (for report-specific calculated fields)
Access to Values for a Calculated Field
Users with access to the underlying secured fields can access the values for calculated fields. Underlying secured fields are Workday-delivered report fields or custom fields, not calculated fields.
Domains secure Workday-delivered report fields and custom fields. Users with access to a domain can access any calculated field built using the underlying fields in that domain. Therefore, underlying secured fields determine security access to a calculated field definition.
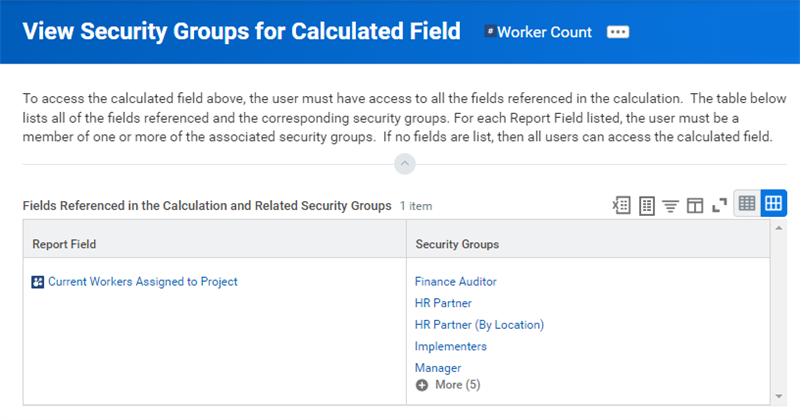
You can view the security for a calculated field along with the underlying secured fields and security configurations. Using the calculated field's Related Actions, select Calculated Field > View Security Groups to access the underlying secured fields and configured security groups.
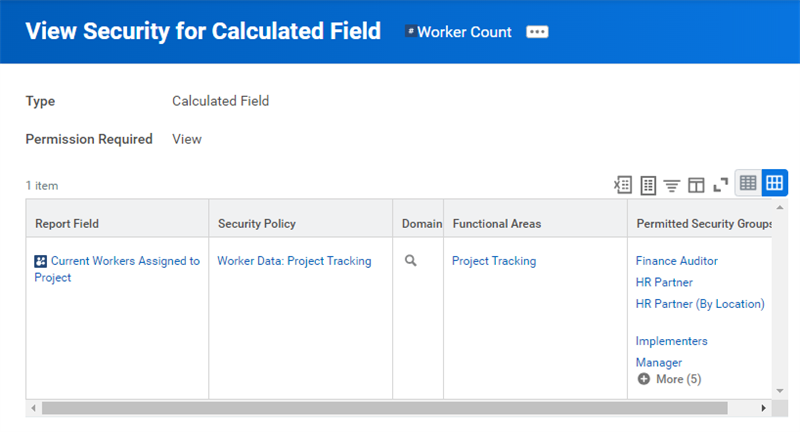
To determine which domain or domain security policies to configure, use the calculated field's Related Actions. Select Security > View Security to access the underlying domain's or domains' security policies.
Maintain Calculated Fields Report
You can use the
Maintain Calculated Fields
report as a control center for managing system-wide calculated fields. With this report you can:- View all the system-wide calculated fields in the tenant.
- Create a new calculated field using the Add New button.
- Edit a calculated field using the Edit button or using a field's Related Actions to select Calculated Field > Edit.
- Delete a calculated field using the Delete button or using the field's Related Actions to select Calculated Field > Delete. You cannot delete calculated fields already in use until you remove all references within Workday for that calculated field. View the Where Used tab in the calculated field definition to determine calculated field instances in your tenant.
- Copy a field using its Related Actions to select Calculated Field > Copy.
- Check all the security requirements to access a field by using its Related Actions to select Calculated Field > View Security Groups. The security of the Workday-delivered (or custom) fields determines the list of security groups that can access that field.
You can also run the following tasks directly from the search box to edit, create, and delete calculated fields:
- Create Calculated Field
- Edit Calculated Field
- Delete Calculated Field
Use the
cf:
prefix in the search box to locate a calculated field by name.Securing a Field Override
You will get specific data depending on what services you enable for a template and which field attributes you choose. Workday defined the services and field attributes in the connector template.
Field overrides allow you to map other Workday data and add custom values from report fields, calculated fields, and custom fields to better meet external endpoints' requirements.
Earlier, you added the Critical Job field override. If you review the output from the last launch of the connector, you'll notice Critical Job data for some positions. Workday supplies a tool to evaluate if the ISU can access field overrides. Use the Related Actions on the integration and select Integration Field Override > Test Security.
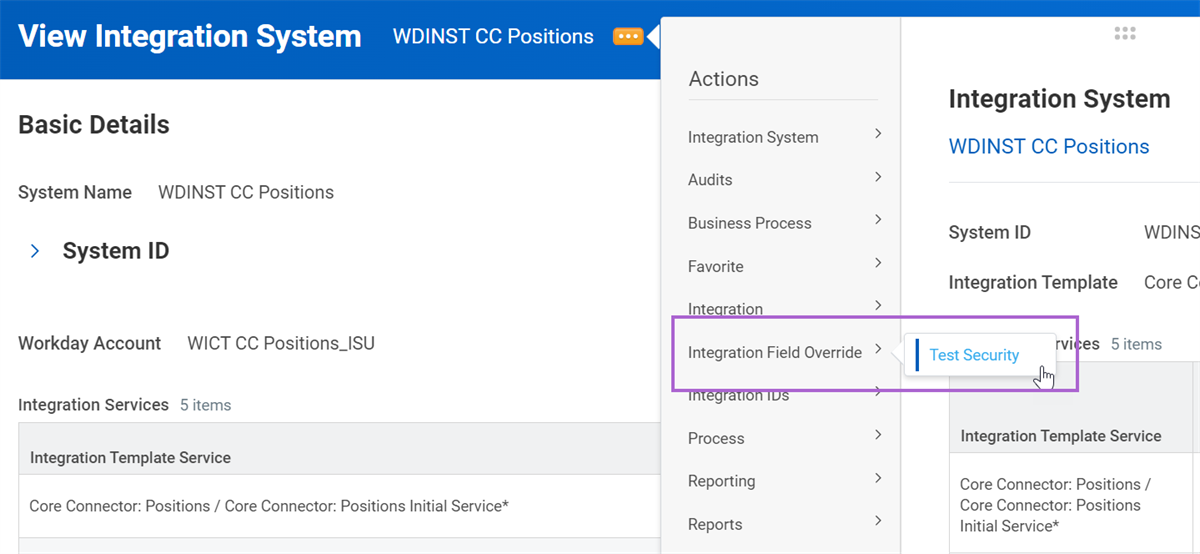
The result will show that the field override either is or is not available to the user, which in our case is the ISU. The Critical field was accessible by the user. This understanding tells us that the security for the field override uses the same domain as the Get Positions web service operation. It could also mean that the field is not a secured field and thus requires no security. This is rare. A field override will often require different security access.
Use the Related Actions of the field override to easily get to the
View Security for Securable Item
report. This will allow you to determine what security policy you will need to add.Note
: The documentation on connector security does not include the domains that secure a field override. The ISU likely needs more permissions to access the data in a field override.DIS Security
An ISU assigned to a Connector integration that uses DIS needs access to the Integration Event domain. The ISU also needs access to domain security policies securing any fields in a field override service or population eligibility criteria.
Important
: Some integration templates enable DIS by default, while others require you to enable it. Workday recommends enabling DIS, if available.To enable DIS on existing connectors, use the
Migrate Integration Configuration for Data Initialization Service
task. Note that you can only enable DIS on existing web-service based Core Connector: Worker integration systems.DIS Security Approach
Use an iterative approach to configure security for a connector. First test the integration as a user with full permissions to get a baseline of the data included in the output. Then run the integration as the ISU and identify missing data in the output. Grant permissions to the ISU until the integration output matches the output of the first run.
To follow the iterative approach, follow these steps:
- Launch the integration with a full extract as a user who has full permissions, such as an administrator or implementer.
- Create the ISU and ISSG and assign the ISU as the Workday account for the integration system.
- Grant the ISSG Modify permission to the Integration Event domain.
- Run theView Security for Securable Itemtask on any fields in the population eligibility or a field override service. Grant the ISSG view permission to the domains that secure the fields.
- Activate the security changes.
- Launch the integration system again with a full extract. It will use the ISU as the Workday account.
- If there is missing data in the integration output:
- Run theTest Security for Document Field Overridestask and evaluate if the ISU lacks access to field overrides.
- Check the Diagnostic Audit File on the integration event. If the audit is empty, the ISU may not have access to the population eligibility field.
- Repeat steps 5-7 until the output matches the full extract from step 1.
DIS and Security Permissions
When associating a security group (like an ISSG) to a domain, you have the ability to assign it either:
- Report/Task Permissions (View or Modify)
- Integration Permissions (Get or Put)
You may have been taught to always use the Get or Put Integration Permissions when associating a domain with an ISSG. The reason for that is because:
- An integration is performing the work.
- Internally, the integration will be calling a web service to access the data.
However, there is now an exception to the rule stating you must use Integration Get/Put permissions. The exception includes the following criteria:
- You are creating a DIS-based connector.
- Your DIS-based connector uses field overrides.
- You need to test the security of the field override using the Workday UI. Use the integration system's Related Actions > Integration Field Override > Test Security to check if your integration has access to a field override.
If the above conditions are true (specifically that you want to test your security using the UI), you need to assign your ISSG View Report/Task Permissions. Do not use Get Integration Permissions.
Why use Report/Task Permissions instead of Integration Permissions? DIS-based connectors do not use underlying web services. They use the report fields that have been defined in the DIS service. Therefore, there is a slight difference in how you secure these integrations. For non-DIS connectors, Integrations GET will allow the UI security testing to proceed as normal.
Consider the following example: The WICT CF EEB Comp Level calculated field requires access to the Worker Data: Compensation by Organization domain.
- If you assigned your ISSG Integrations Get permission, then when you test the field override security in the Workday UI, the Comp Level field would have an Accessible by User value of No instead of Yes.
- If instead you assigned your ISSG Report/Task View permission, then when you test the field override security in the Workday UI, the Comp Level field would have an Accessible by User value of Yes. This means the Integration System User (ISU)/ISSG has the proper security defined so that the field override can access the data.
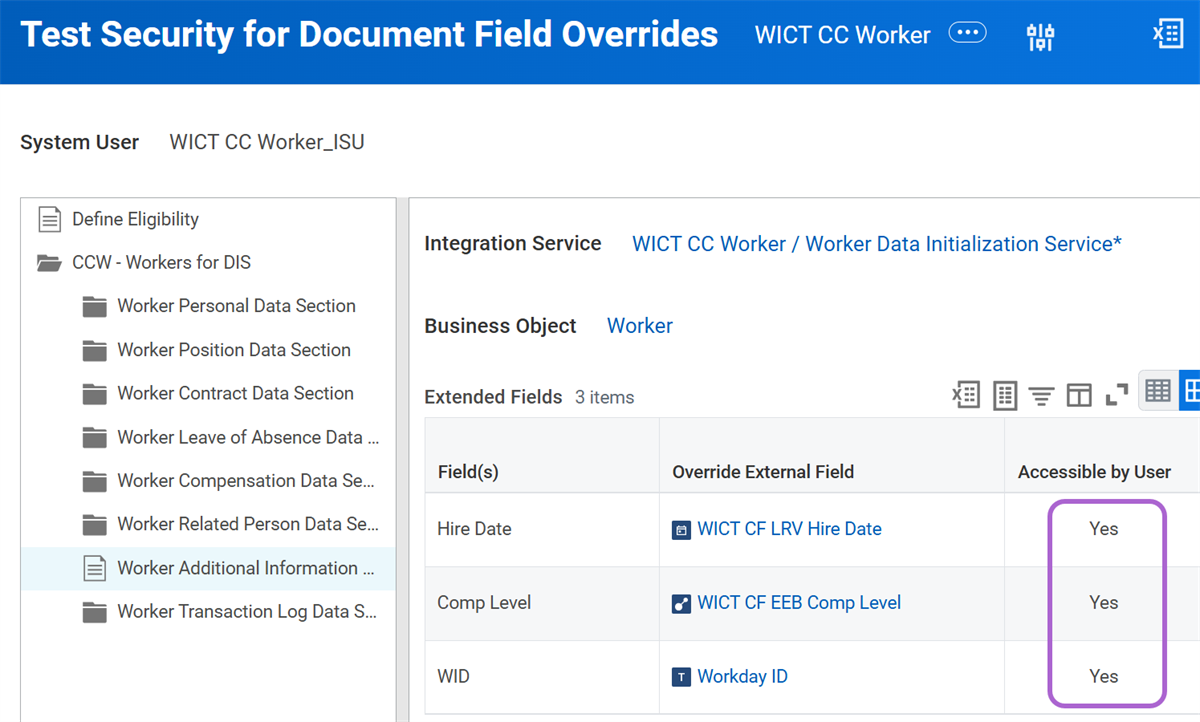
Note
: You only need to secure your integration in this way in order to test security in the UI. If your ISSG was secured using Integrations Get instead of Report/Task View, then when you ran your integration, your output file would still include a tag containing data. In other words, using Get or Put Integration Permissions will work for both non-DIS as well as DIS-based connectors. The data will appear in your output file if you use Get or Put.Troubleshooting DIS Security Exceptions
If your integration's security is not properly configured, when you launch the integration, you may receive a Completed with Warnings message.
Drill down into the warning message and you might notice a DIS Exception Detected message. The Detail field informs you to run the
Retrieve Technical Files
task on the integration event.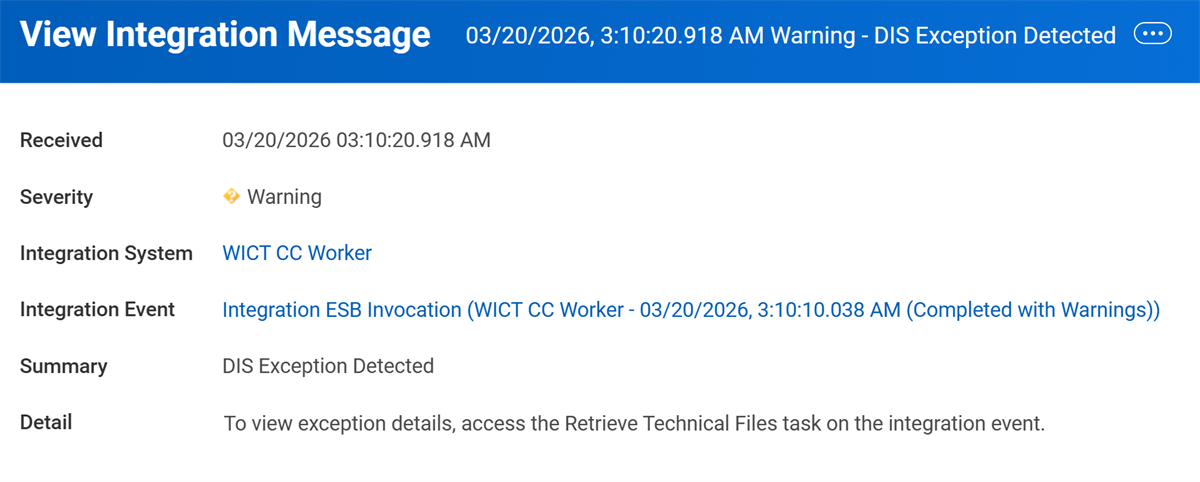
To retrieve the technical files, select the event's Related Actions, then select Integration Event > Retrieve Technical Files.
The technical files yield exception logs that contain more detail about the warning. Open the exception log to review the specific information you need to correct the warning.