
Other Workday Reporting and Analytics Tools
Overview
Workday offers additional tools to use to enhance your reporting needs. Workday Worksheets is an analysis tool that enables ad hoc data exploration, analysis, and collaboration with live data. Worksheets supports Array Formulas. This allows you to build an analysis that will remain true even when your data grows and shrinks.
Another tool is OfficeConnect. OfficeConnect is commercially available for Workday Financial Management. It enables accounting, finance, and Report Writers to quickly build reports with live journal line and plan line data directly within Microsoft Excel.
Lastly, Prism Analytics is a data hub that enables you to blend Workday data with high volumes of non-Workday data to uncover new insights in your Workday reports, dashboards, and Discovery Boards. It provides the ability to ingest, blend, and transform Workday data with external data and publish the output as a new Prism data source.
This chapter will briefly review each of these available tools.
Objectives
By the end of this chapter, you will be able to:
- Explain the benefits of Workday Worksheets.
- Create and organize workbooks.
- Insert a Workday report as live data in a workbook.
- Share a Workbook as a template.
- Explain the benefits of:
- OfficeConnect
- Prism Analytics
Worksheets
Worksheets Overview
Worksheets is a spreadsheet technology in Workday that enables ad hoc data exploration, analysis, visualization, and collaboration with live, transactional data.
Workday users-employees, managers, and executives-can collaborate in the tool using secure, live Workday data. They can create new Worksheets workbooks and import spreadsheets to blend data and perform ad hoc analysis. Users do not need to be experts in Workday Report Writer to use Worksheets and work with Workday data, which allows your enterprise to more readily share and perform analysis on data with a wider audience.
Benefits of Worksheets for the Enterprise
Traditional enterprise spreadsheet applications have benefits and challenges. These are go-to tools that are intuitive and familiar and allow infinite complexity. It is common for customers to export their essential Workday data into a spreadsheet application to perform additional analysis. However, this can present some issues:
- Data quickly becomes outdated.
- The process lacks security controls.
- Emailing and communicating is cumbersome for teams.
The Power of Worksheets
We will demonstrate how Worksheets will allow your enterprise to go further together, by providing real-time data to your team, an application where you can share and communicate, and flexible tools to allow quick, ad hoc analysis so you can work smarter, evolve, and grow.
- Know: Worksheets brings clarity to empower better decision-making. You can gain complete, global visibility to your most important data across functional areas.
- Change: Support change with flexibility and speed. You can continually optimize the workforce as business needs evolve and respond quickly.
- Grow: Gain a competitive advantage to chart long-term success and achieve unprecedented results.
Unlock Data Across Workday System
Worksheets brings the familiar features and functions of spreadsheets into the Workday environment, enabling you to unlock your Workday data for analysis in a familiar and intuitive format.
There are many advantages to this model, including:
- Providing the ability to work with live Workday data.
- Allowing you to leverage Workday security for your data.
- Enabling your team to communicate and act on data through collaborative tools.
- Enabling your team to work from anywhere through mobile.
Worksheets delivers your most important data to those who need it most. This allows your users to take that data, perform ad hoc analysis, collaborate, and answer essential business questions. This takes your reporting requirements beyond the Workday Report Writer model, allowing those who may not typically use or be trained on Workday Report Writer to participate and collaborate on data both within and outside of Workday.
Workbooks can also use data within or outside of Workday, and you can share them with executives, managers, and other employees on the team.
Security Overview
Manage security for the Worksheets application in two places: the Worksheets domain and the Drive domain. You will need to create a security policy for both Worksheets and Drive and provide access to your users via security groups in these policies.
Resource
: For more information, search for "Worksheets setup" in the Administrator Guide.Create Workbooks
There are four ways you can create a workbook.
- Creating a new, blank workbook.
- Uploading from an external file.
- Exporting from a Report Writer report.
- Create a workbork directly from a composite report.
From the Add New button, you will notice that you have the option to upload a file, add a new folder, or create a new (blank) workbook.
Tip
: You can also drag and drop spreadsheet files into Drive. This is especially helpful when adding multiple files to Drive.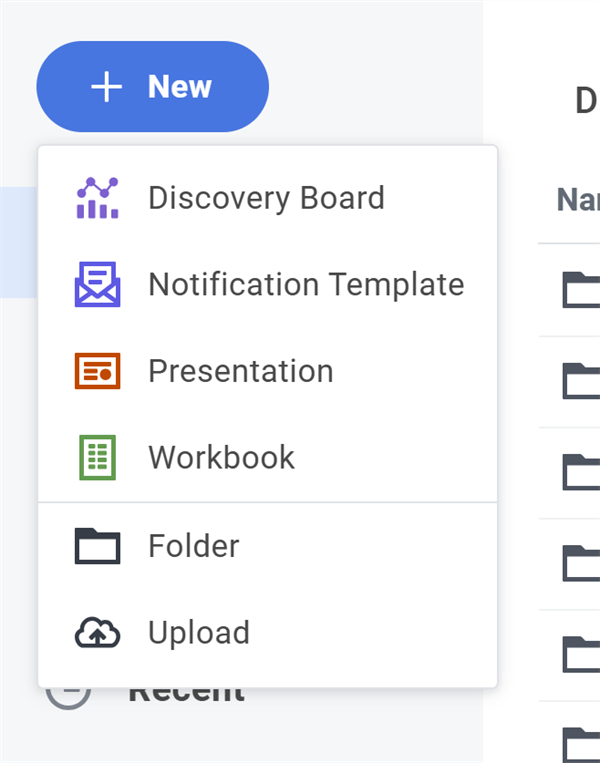
KeyTips are keyboard shortcuts that display a user interface overlay of action keys in a worksheet to provide easier access to Worksheets functionality.
Select the Alt key on either Windows or Mac to display the KeyTips overlay. Then, select the key corresponding to the overlay to perform the displayed action.
If the desired function is not highlighted by the Alt key, such as the formatting options on the toolbar, select an item on that row and use the arrow keys to navigate.
For details on all Worksheets keyboard shortcuts, access the Keyboard Shortcuts option under the Help tab.
Working with Folders
From the Add New button, you can create a new folder and drag-and-drop your workbooks into the folders to keep them organized. You can also create subfolders within these folders.
Merge Workbook
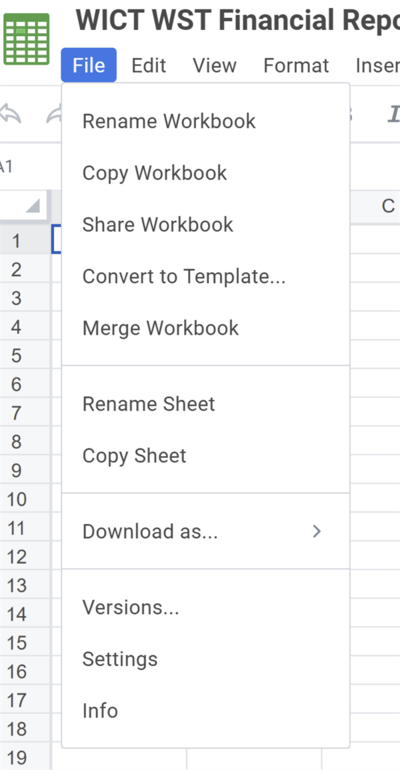
The workbook owner can merge a workbook into another workbook. From within the target workbook, select File > Merge Workbook. Select the workbook to merge into the target and select Merge. The merged workbook is added as an additional sheet or sheets in the target workbook.
Remove Workbooks or Folders
You can remove Workbooks and folders by selecting the file or folder and then selecting the Trash icon. You can also right-click the file or folder and select Remove. The file or folder is technically not removed permanently; it will stay in the owner's Trash folder. For users who have access to a file through sharing, removing a shared workbook only removes the user's access to the file (it will not appear in the Trash folder).
Restore a Workbook from Trash
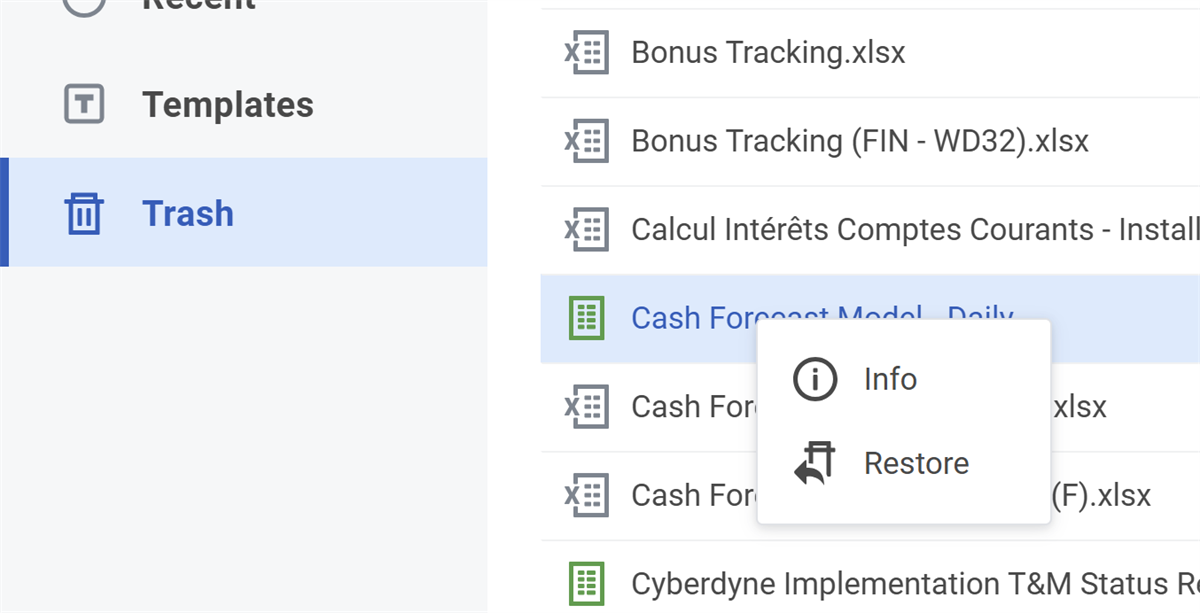
To restore a deleted workbook, navigate to Drive, and select Trash. Select the row containing the workbook and then select the Restore icon in the top right, or right-click and select Restore. Workday places restored workbooks back in the Drive view. The recovered file will display in the top-level Drive view and you can move it to other folders from there.
Tip
: If you delete a workbook that has been shared with you, you remove yourself from the list of shared users. The workbook disappears from your Drive but does not display in the Trash folder.Setting Up Workday Reports
Report Requirements
Worksheets allows users to access their data from Workday by using the Report Writer report output as a data source through a feature called the Data Wizard. You can use the Data Wizard to export data as values (similar to the export method we discussed earlier, which takes data directly from a Report Writer report) or as live data. When we use the Data Wizard to import live data, the system maintains a link to the data source and allows you to easily update the data as needed.
The Workday report must:
- Be an advanced, matrix, or composite report. Worksheets doesn't support inserting other report types, such as Simple, Standard, or Xpresso.
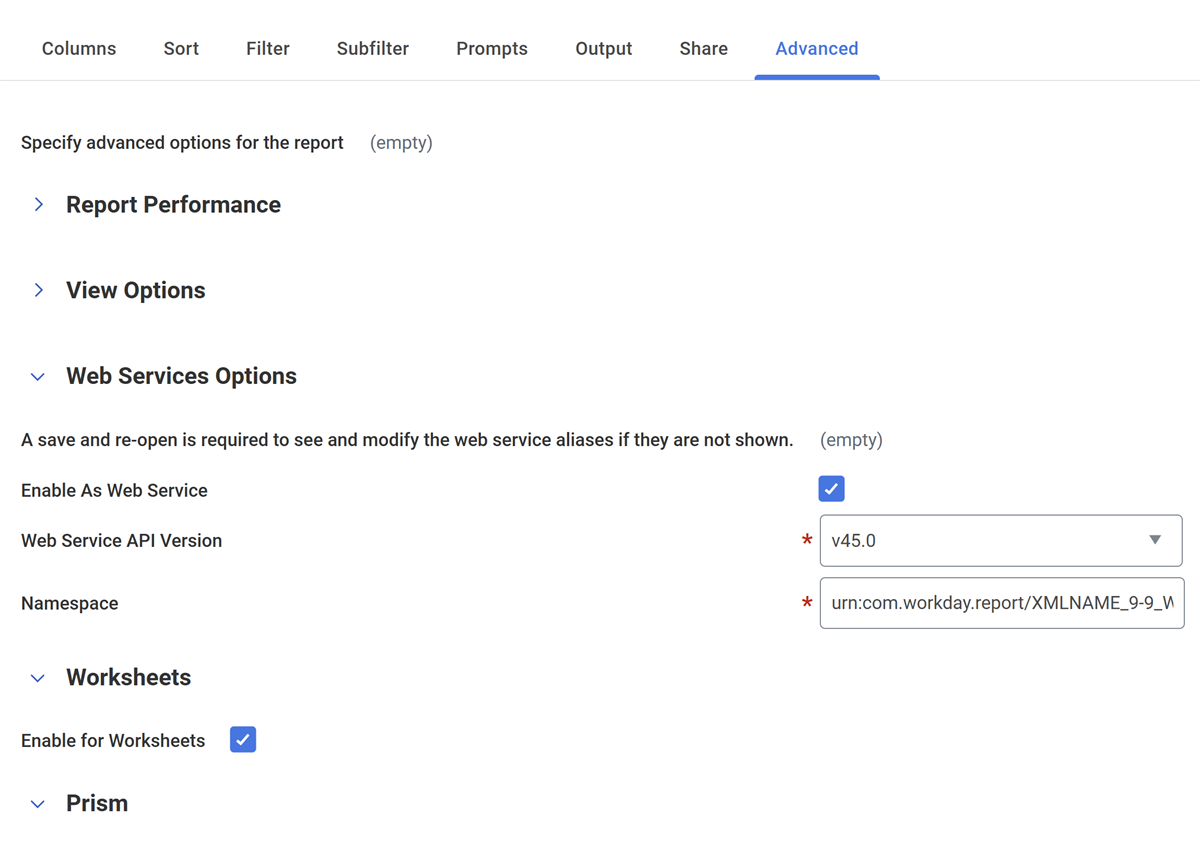
- Be enabled for Worksheets. Select Enable for Worksheets in the Advanced tab of the custom report. Enabling a report causes it to display in the list of available reports, when you start the Data Wizard.
- Be enabled as a web service (required only for advanced reports). Select Enable as Web Service in the Advanced tab of the custom report.
As a Worksheets user exporting live Workday data, you do not need to know how to design a Report Writer report. However, you may need to communicate with your reporting team (or other report creators) to coordinate how to set up your source reports so they can be used with Worksheets.
Consider the following when designing the Report Writer report:
- Report:The source report must be a custom advanced, matrix, or composite report.
- Fields:Columns can use a primary business object (PBO), a related business object (RBO), or calculated fields.
- Report Enabled:The report must be enabled as a web service and must be enabled for Worksheets.
Report Setup
Once you have verified the Report Writer report has the fields you need, enable the report for Worksheets. There are two checkboxes that enable your report to be used as a live data source with the Data Wizard. Navigate to Actions > Custom Report > Edit and select both Enable As Web Service and Enable for Worksheets in the Advanced tab.
Note
: This step is not necessary for matrix reports, as you can't expose matrix reports as a web service.Report Performance Recommendations
When using a Report Writer report as live data, it is essential to consider the report's design to ensure it runs quickly.
First, use indexed data sources when possible. Workday indexes certain data sources for performance, aggregation, and faceted filtering on large volumes of data. This is the most effective means to achieve optimal report performance.
Next, identify the smallest targeted data source that delivers the fields you need for your report. For instance, if you are interested in a report on compensation event business processes, use Employee Compensation Events instead of All Business Process Transactions with a filter applied.
Data sources with built-in prompts are also tuned for performance and run more efficiently than building a filter or prompt on a larger data source. For example, the Workers by Organization data source will run more quickly than All Workers with a filter or prompt on organization.
Finally, when using filters, consider that the number and conditions used may also impact performance. If you require multiple filters, Workday recommends including conditions that filter out the most instances first.
Resource
: For more information, search for "report performance" in Workday Community.Working with Live Data
Live Data Wizard and Security
Workday security affects the reports and data a workbook owner can access. When importing the live data, you can only view Report Writer reports that you have access to. When you identify a report in the Data Wizard, you will only view the report columns that correspond to your level of access. Similarly, you can only insert or preview the rows that align with your security access.
When sharing workbooks containing live data, report owners can set security permissions for individuals or security groups.
An important security consideration to be aware of is that the individuals or security groups with whom you share can view all the data that is available to the workbook owner, even if their security level would not normally grant them access to this data. Although the workbook owner is security constrained in what data they can pull into a workbook, the workbook can be shared with anyone, regardless of what their typical security permissions would allow them to view. Worksheet templates, which enable you to share a template that has connections to the data (rather than sharing the workbook itself) can be a helpful tool to address this concern.
Note
: The workbook owner may configure the workbook to only be refreshable by the workbook owner.Important
: When a report refreshes user data, their Workday security initiates, and may affect what columns and rows they can view.Running the Data Wizard
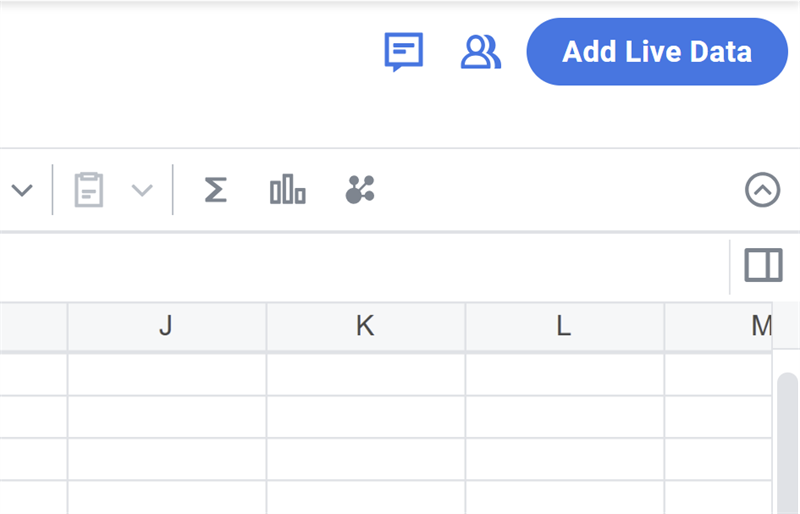
Once you enable the Report Writer report, you are ready to insert data from the report into your workbook. In a workbook, select the Add Live Data button as shown in the screenshot below.
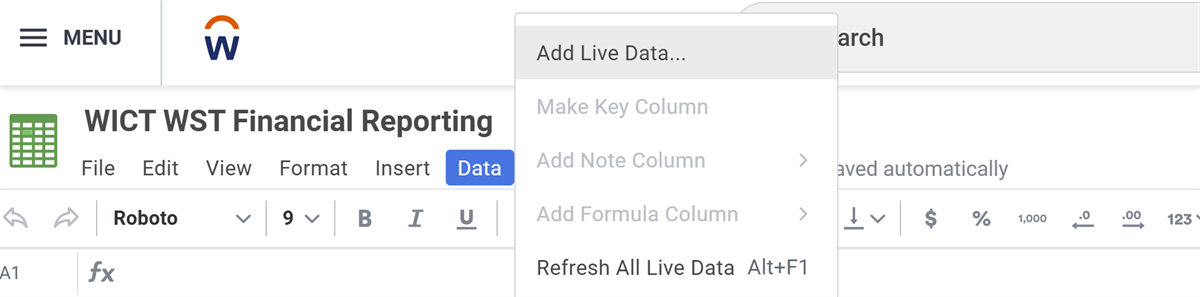
Alternatively, from the Data menu, select Add Live Data as shown in the screenshot below.
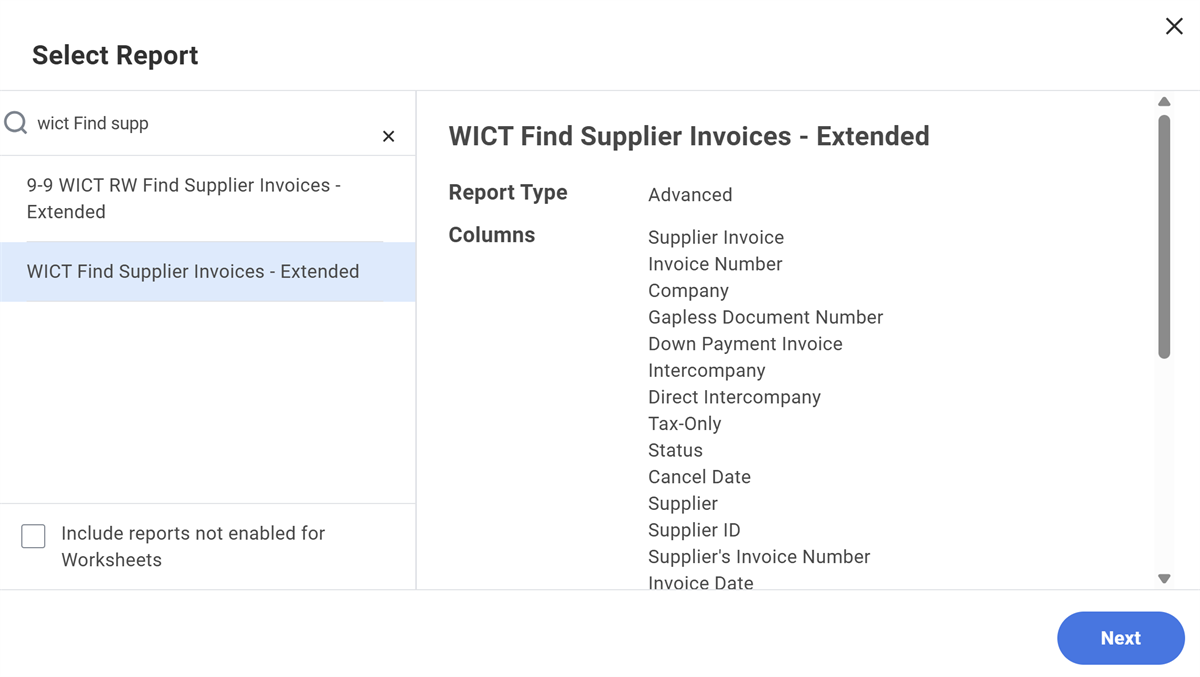
This opens the data wizard. On the first screen, reports enabled for Worksheets appear. You can also select the Include reports not enabled for Worksheets checkbox to view other report options. Locate the Report Writer report in the search box and select it.
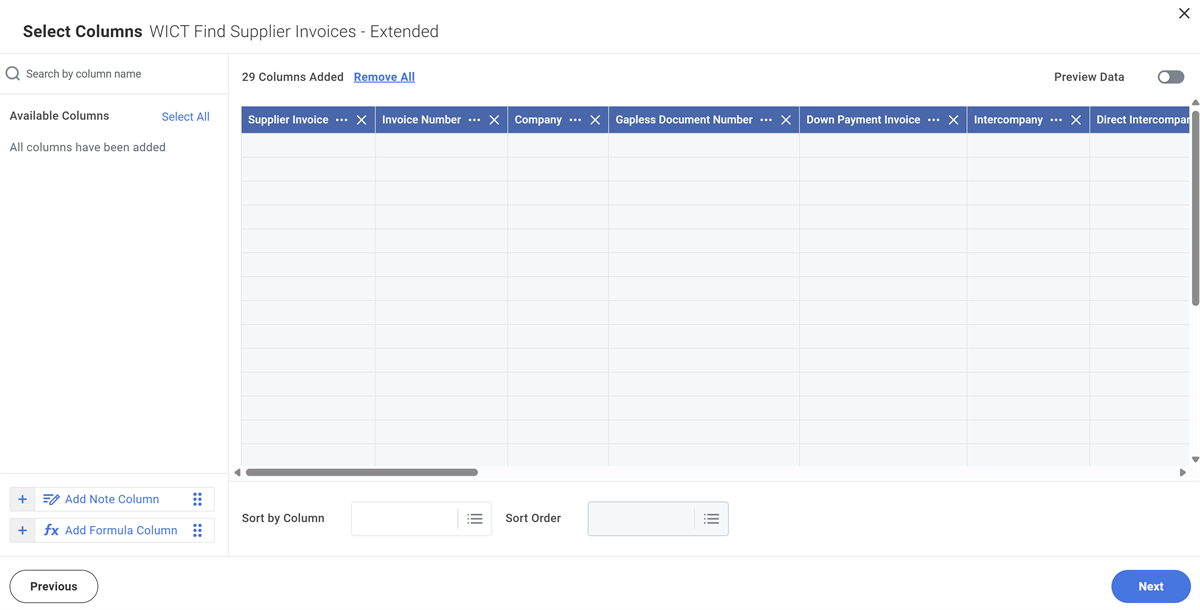
Then select Next to continue to select columns. This shows all the columns of data in the report that are available for your workbook. You can select all or drag-and-drop just the columns that you need. You can also decide in which order you want them to appear in the workbook. The Preview data toggle allows you to review the data provided before completing the import. You can add a note column and formula column, which will provide a working area that stays in line with your live data rows. Finally, you can set a sort order in the Order By field.
Tip
: Selecting Select All is a quick way to put all the columns of data in the workbook at once.Note and Formula Columns
As part of the live data import, you can add a note column and formula column to the live data array. The Add Note Column inserts a note column, which allows you to add notes associated with the live data. The note column associates to a key field in the data so the note row will match to live data rows. This key field must be unique and will not change over time, such as Employee IDs. If the key field is not unique, the notes will be lost when live data is refreshed. Once one note column is added when you first run the Data Wizard, more note columns can be added later within the sheet.
The Add Formula Column allows you to include a formula within the live data array to perform a calculation for data within the array. After you include at least one formula column, you can drag the formula column to a different location in the worksheet and create additional formula columns to the report.
Note
: There are more performant ways to ensure the formula applies to all rows of your dataset (i.e., unconstrained array formulas).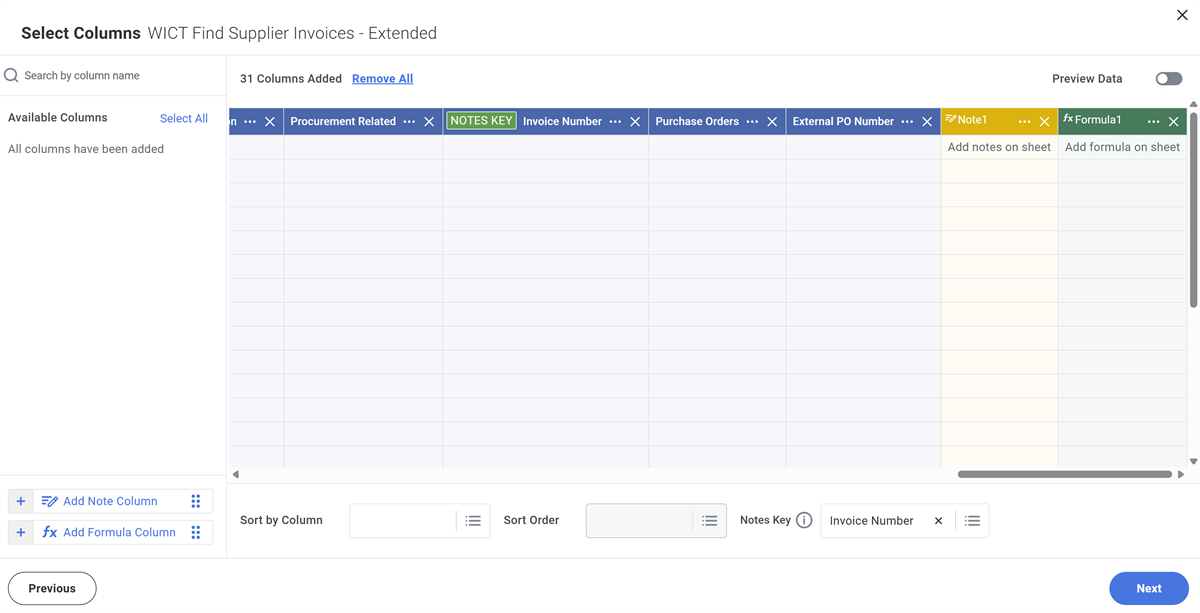
Working with the Notes Column
The benefit of adding a notes column when inserting live data into a workbook is that the notes will align with their respective rows on an ongoing basis. If rows are added during a live data refresh, Worksheets preserves the alignment of notes with their corresponding rows. For example, if you delete a prompt, any notes related to the deleted prompt are removed but the data is saved in Workday. If you add the prompt later, Worksheets will redisplay the notes in the corresponding rows.
When working with note columns in the live data area:
- You can enter notes as desired into individual notes cells. To paste text into a cell, double-click the cell first before pasting the text.
- You can double-click the notes column header cell to edit it.
- You can right-click the notes column header cell of any live data column to add a new notes column to the right or left. You must have already set up a key field using the Data Wizard to view this option in the menu.
Working with the Formulas Column
Similar to the notes column, the benefit of adding a formula column during the live data import is that the formulas will line up with their respective rows and change with your data. If the data grows, the formula column will grow. Likewise, if a row of data is removed after a live data refresh, the formulas adjust accordingly.
When working with formula columns in the live data area:
- Enter a formula into the cell below the formula header column and press Enter. Worksheets will apply the formula to all rows in the live data area.
- You can double-click the header cell to edit it.
- You can right-click the header of any live data column to add a new formula column to the right or left.
- If you enter a formula into the second row of a column next to the live data area and press Enter, Worksheets will automatically add the formula into the live data area and apply the formula to all rows in the live data area. (Skip a column if you do not want to add the formula to the live data as a formula column.)
Insert Options
After selecting Next, the last screen of the Data Wizard provides a few options. You can choose to insert as Live Data, or as Static Values. Live Data maintains a connection to the Workday data, allowing you to refresh the data. Choose the Static Values option if you only require a snapshot of the data as static values at the time of inserting the report.
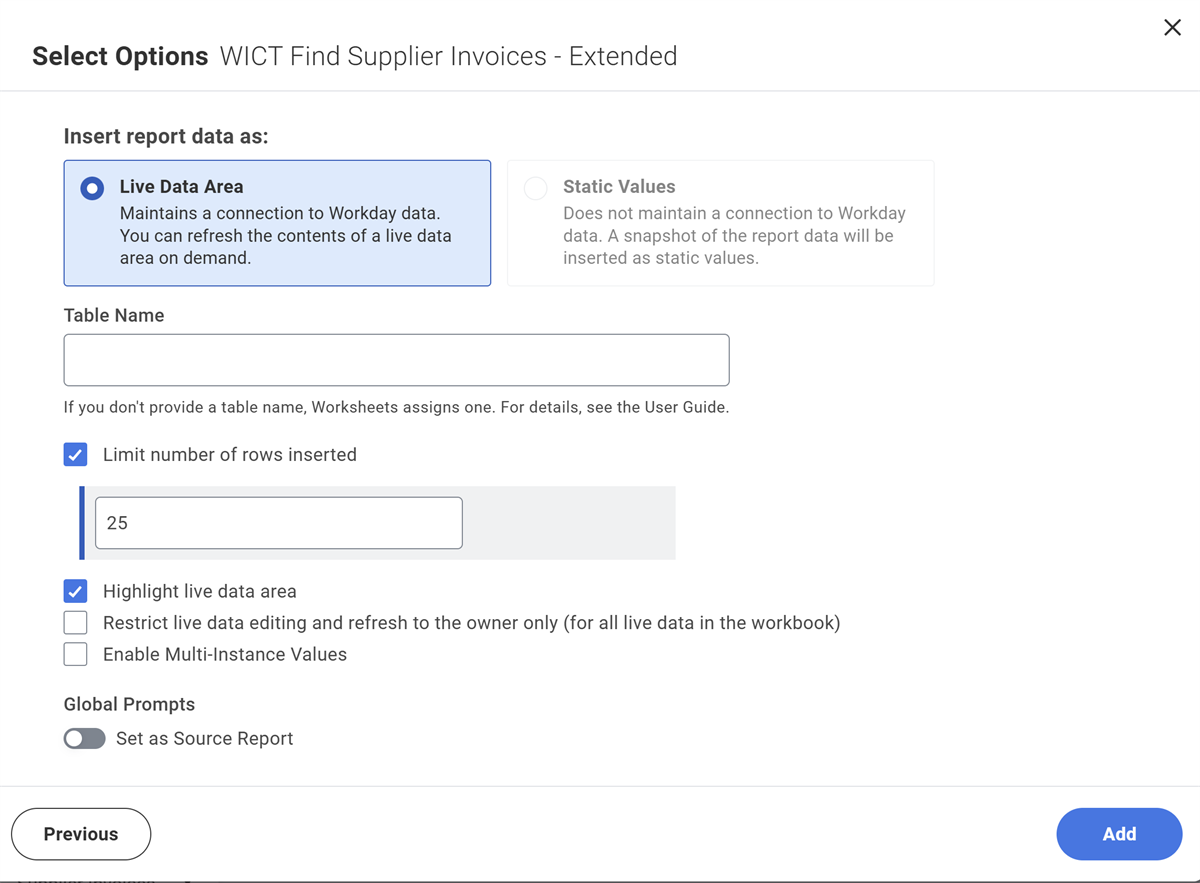
With both Live Data and Static Values, you have the option to limit the number of rows to insert. When inserting live data, you can also choose to highlight the live data area and control whether only the owner can refresh live data. When you select Insert, the option to insert as live data or as static values appears. If you use Static Values, you will retrieve the data effective the moment you insert, but the values will not be linked as live data. The Live Data option links the Report Writer report with the workbook.
Live Data Details
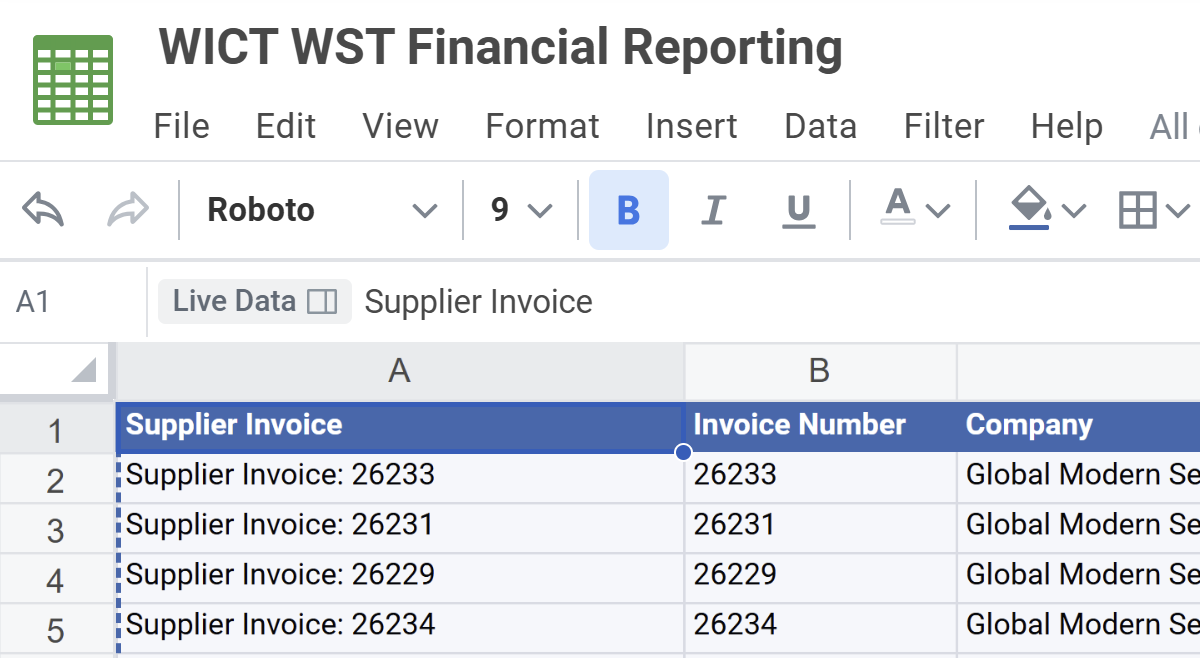
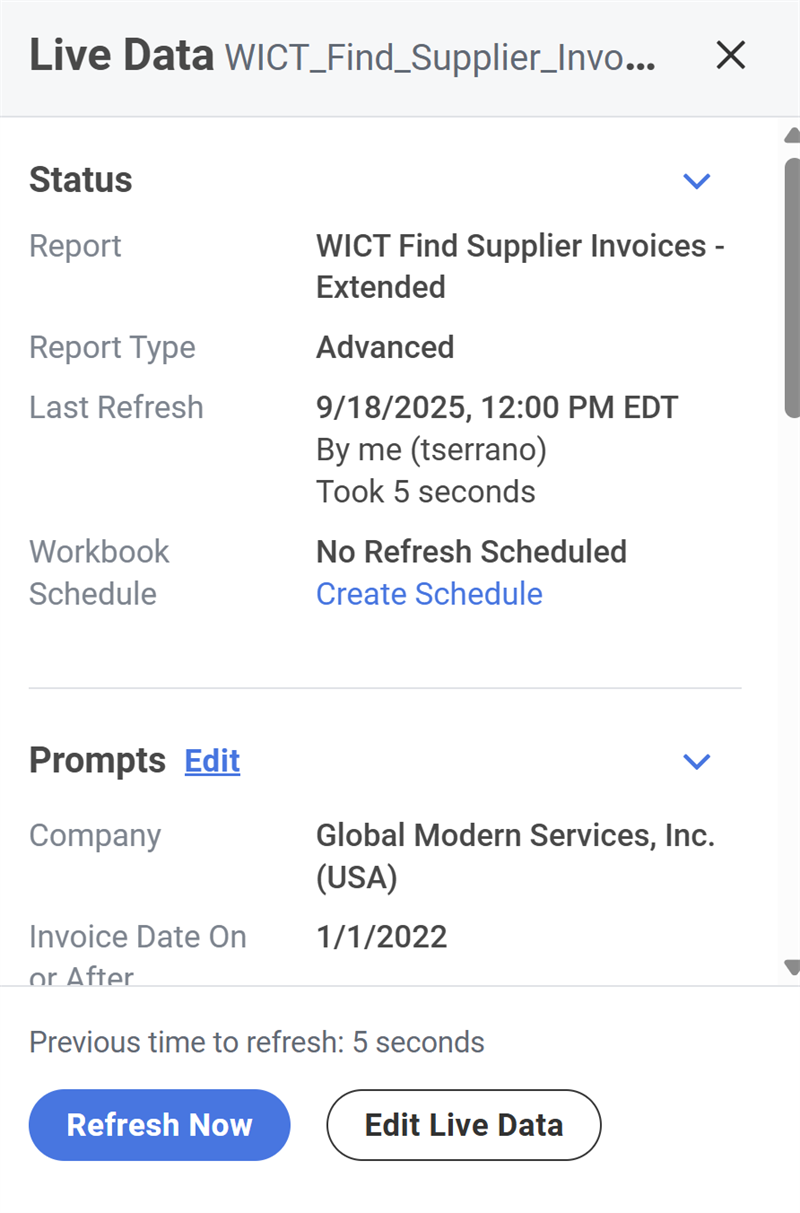
Live Data Details helps you manage the live data in your worksheet. Select the Live Data Details button in the formula bar to view details when the data was last refreshed. You have the option to do a one-time refresh or schedule a refresh.
Updating Live Data
A key benefit of Worksheets is that you can build a model or tool once, reference live data, and continue to draw new insights each time the data is refreshed in the workbook. Once the live data link has been established with your Report Writer report, you can update the data in your workbook based on any changes that occurred in the original report. This is a one-way update from the report to the workbook; the workbook does not write data back to the report. As shown in the screenshot, open Live Data Details and select Refresh Now.
Or, navigate to
Data
> Refresh All Live Data
, and select OK.
Note: The first-time data is inserted, users with whom the report has been shared can view the data regardless of security. If one of those users who does not own the report refreshes the data, Workday security is applied, and their view of the data may be altered.
Scheduling Live Data Refreshes
The Workbook owner can schedule live data refreshes for the workbook by selecting Data > Schedule Live Data Refresh. For workbooks already on a schedule, select Data > Edit Scheduled Refresh. From here, you can also edit or delete an existing schedule.
At the scheduled time, Workday automatically:
- Runs any associated Workday reports, acting as the workbook owner, and refreshes the workbook based on changes in the original data.
- Recalculates formulas affected by changed workbook data.
For any prompts in the Data Wizard where you selected the Use Report Default option, Worksheets uses the default values from the report definition when refreshing the data. Otherwise, Worksheets uses the current prompt values displayed in the Live Data Details panel.
You can create one schedule per workbook. When Worksheets runs a scheduled refresh, the updated data is available to users with shared access to the workbook.
Adding and Removing Fields with Live Data
The live data array is established from the Report Writer report. If you need to add additional columns to the worksheet, first update the Report Writer report with the additional column or columns that you require. Next, delete the existing live data and reinsert the live data to establish a new array.
To remove columns, clear the live data by deleting the formula in Cell A1 of the live data sheet. Then, reinsert the live data using the Data Wizard, selecting only the columns that you need in your worksheet.
Worksheet Templates
Workbook templates enable you to deliver robust data modeling and analysis that maintains the Workday security model. With templates, you can define a standardized layout and data model in a workbook, convert it to a template, and then distribute the template to other users. Templates will be a new file type in Drive and users will generate their own workbooks from the template. When you generate a workbook from a template, the system automatically inserts Workday data based on your security permissions.
Templates allow you to build a model with live Workday data and share it with other users while using the Workday security framework. When the users run the workbook from the template, it presents the data and model based on the users' security permissions.
The workbook owner is called the template author. The workbook author creates the data model in a workbook, converts that workbook to a template, and then shares that with a group of users. Once the template is shared, the template author has control to edit the template at any time and re-distribute any updates to anyone who has access to the template.
Capabilities and benefits of Workbook Templates include:
- Retaining workbook functionality.
- Allowing distribution to groups, individuals, or through a sharable link.
- Populating the recipient's live data, not the author's when the template is used.
Security Note
: It is important to note that only people who have access to the Worksheets domain or the underlying report can be on the distribution list. Once a workbook is shared, it will not be automatically distributed. The template author can make corrections or edits to the template before toggling on
Available to Run
from the action toolbar. Once the template is set to Available to Run,
Workday sends a notification to users on the distribution list, prompting them to run the template with their security settings.
To transfer ownership of a workbook template, you must first toggle the template to Not Available to Run and share the workbook with the desired user.
To transfer ownership:
- Select the Share button.
- Select the Who Has Access tab.
- From the Permission pull-down, select Transfer Ownership.
- Read through the terms and select the Transfer Ownership button to confirm.
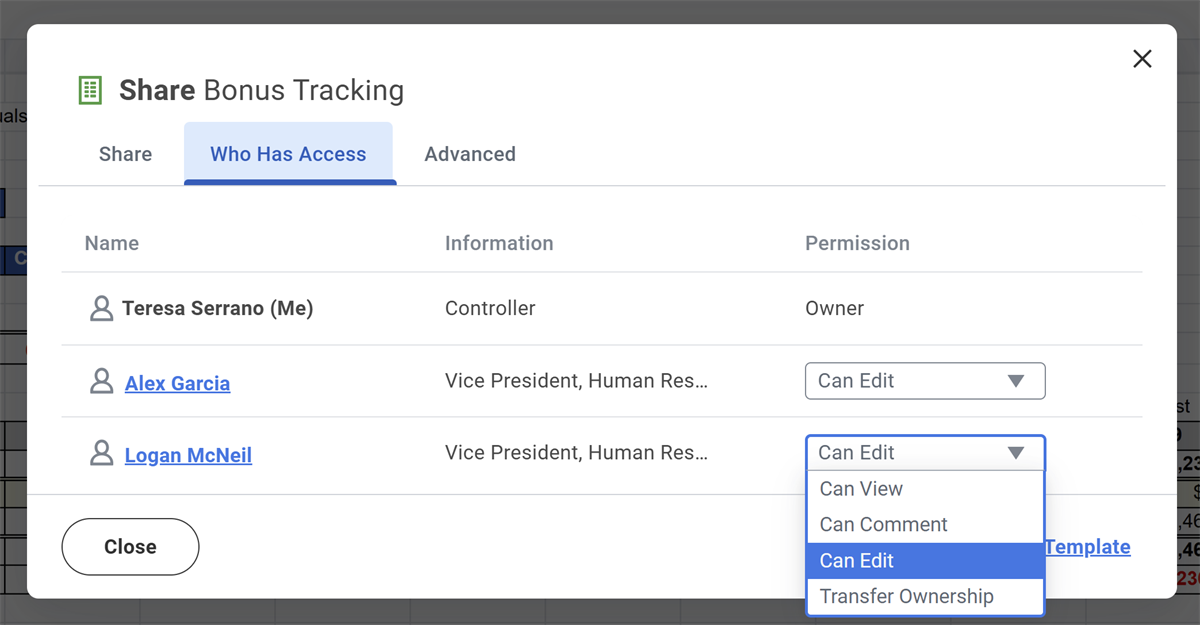
When you transfer ownership:
- Your permission level changes to Can Edit.
- The new owner has the ability to remove your access.
- If the transferred item is a Worksheets workbook:
- You will not be able to edit any protected ranges.
- Worksheets cancels any existing live data update schedules; the new owner must create a new schedule.
Note
: Some products that integrate with Drive do not allow ownership transfers. Only individual users (not groups) can own items in Drive.Create Workbooks from Composite Reports
Create Worksheets workbooks with live, refreshable data by clicking a new button on composite reports.
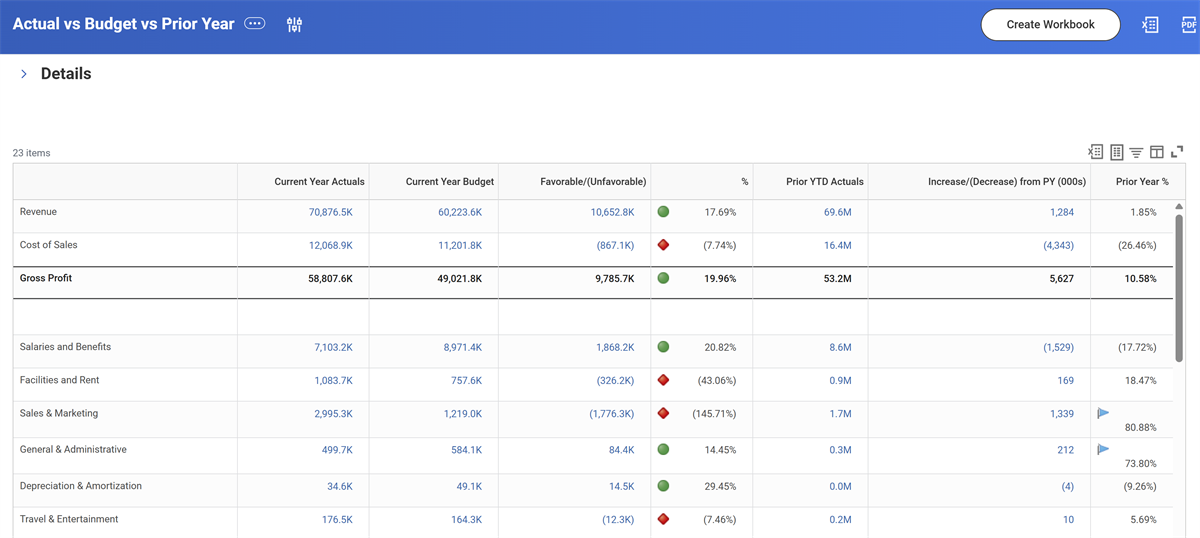
To access the Create Workbook button from a report:
- The report must be a composite report.
- The user needs to have access to the Worksheets domain.
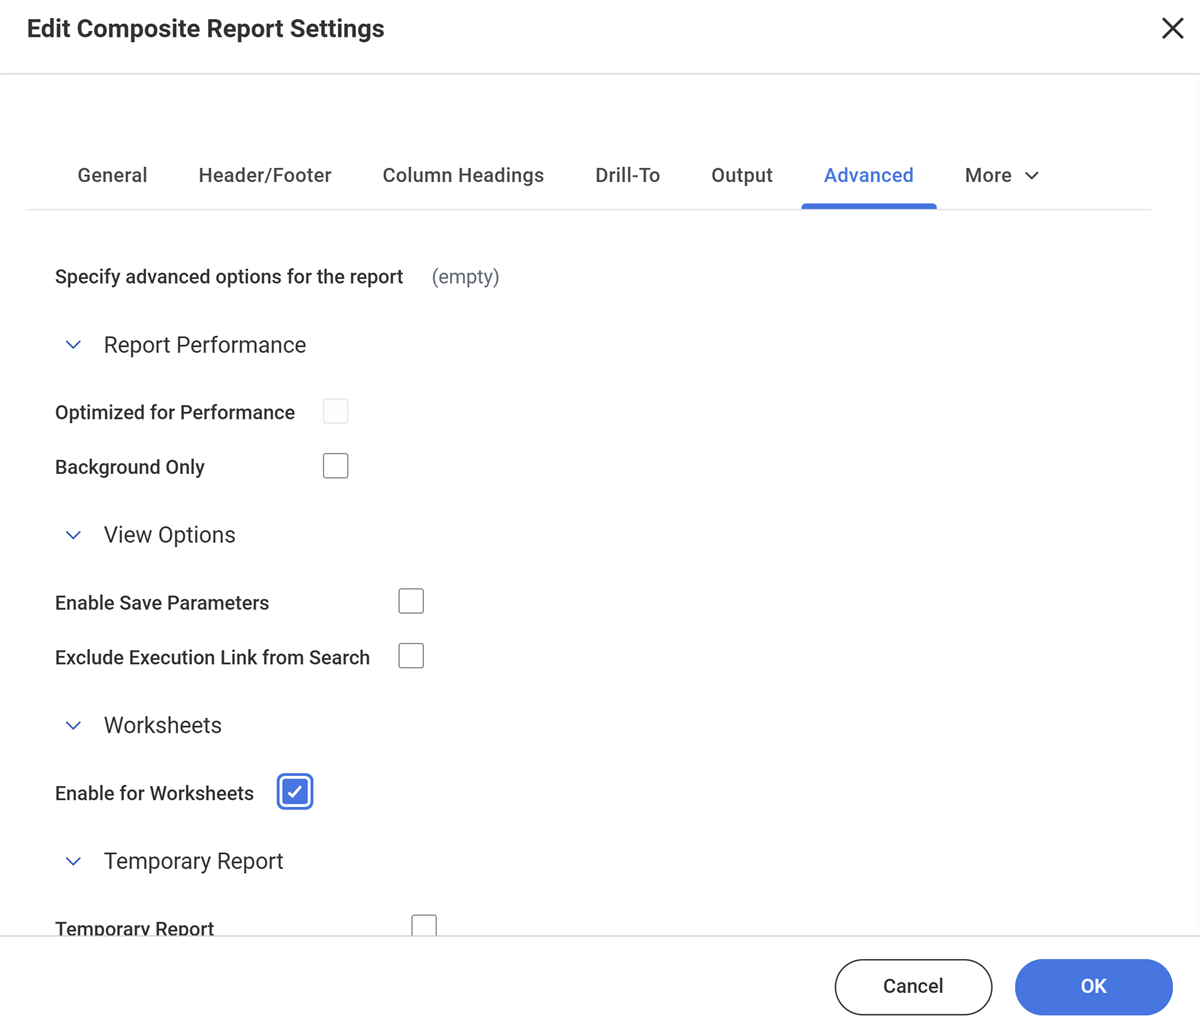
- The report definition needs to be enabled for Worksheets. Navigate to the composite report settings, advanced tab. Select the Enable for Worksheets checkbox.
OfficeConnect
OfficeConnect is an optional software that uses live data from the Financial Reporting and Analytics data model to create reports in Microsoft Excel. It connects your financial management data in the cloud to Microsoft Excel so it always reflects up-to-date information.
As a financial analyst, use OfficeConnect to create financial reports and perform ad hoc financial analysis that you can refresh in minutes.
All OfficeConnect reports and documents start with MS Excel. OfficeConnect for Excel lets you create reports by dragging and dropping elements, such as time periods and accounts, into rows and columns.
On Workday-enabled instances, when you first sign in to OfficeConnect, you can connect to a Workday tenant for the Financials data source. Based on your connection, OfficeConnect uses your configured data model to display elements and capabilities you can select for reporting and analysis.
Prism Analytics
Prism Analytics Overview
Prism Analytics is a data hub that enables you to blend Workday data with high volumes of non-Workday data to uncover new insights in your Workday reports, dashboards, and Discovery Boards. It provides the ability to ingest, blend, and transform Workday data with external data and publish the output as a new Prism data source. This functionality enables business leaders to gain a full perspective of their financial and people performance and effectively drive their business results. You can securely distribute these insights to executives and managers using existing Workday report, dashboard, or scorecard functionality.
Prism Analytics Use Cases
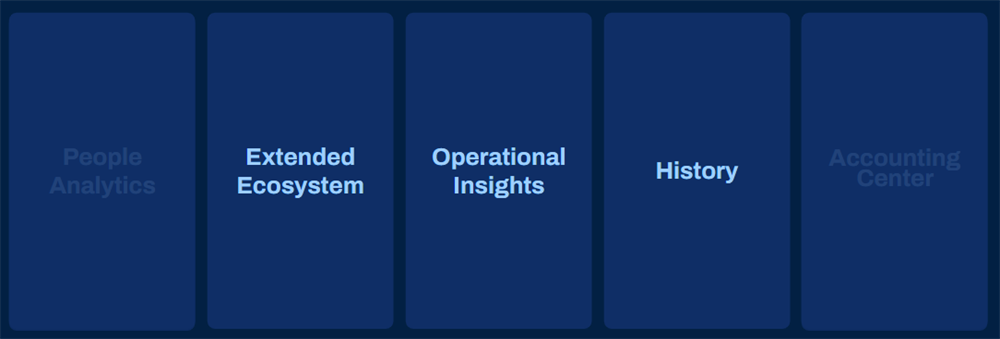
These three key categories commonly leverage Prism Analytics:
Category | Function | Common Examples |
|---|---|---|
Operational Insights
| Includes data from third party, industry, or home-grown applications for company-specific decision support on topics as wide ranging as capacity planning, sales performance, and deep profitability analysis. | Policies and claims data for insurance, point of sale data for hospitality, and loan data for banks |
Extended Ecosystem
| Includes pulling in data from subsidiary, contract labor, or third-party Finance and HR applications. | Contingent labor data, time tracking data, survey data, planning, or financial data, stock vesting data. Workday also uses Prism to power applications such as People Analytics and Accounting Center. |
History | Enables long-term historical trends by bringing in data from legacy applications such as PeopleSoft, ADP, SAP, or Oracle's E-Business Suite. | People history and financial history. Once you have the data you need from your legacy systems, you can retire them to reduce costs. |
You can identify potential use cases with careful consideration around data that needs to be aligned with reporting requirements.
- Evaluate your external systems to determine what data, when blended with Workday data, provides the greatest insight and decision support.
- Identify data or metrics used across your organization and define additional data points that would help make better decisions.
- Review the current effort performed to compile and analyze data for your organization. Explore external tools such as Excel or your data warehouse. Document the analysis that is the most complex, time-consuming, or fraught with errors.
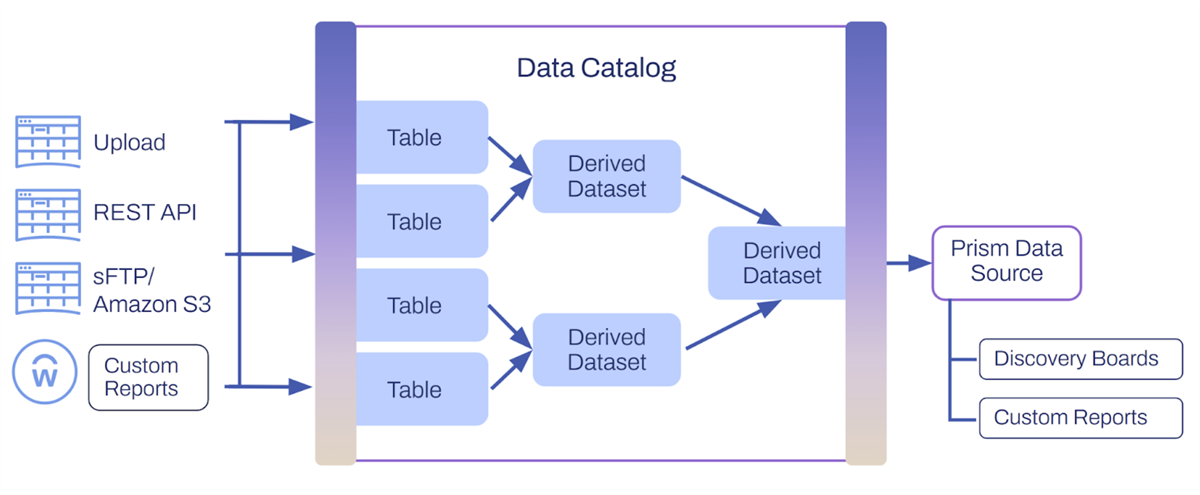
Prism Analytics Process Flow
The following summarizes the flow of ingesting data into Prism Analytics through publishing to Workday reports:
- Acquire data: Load external data via sFTP, REST API, file upload, or import Workday data from a custom report. You can schedule this step depending on your source.
- Transform data: Add transformation stages to manage fields, filter data, blend data using joins or unions, and aggregate data. Add Prism calculated fields to perform functions.
- Publish data source: Configure domain security for the Prism data source and publish it for use in Workday reports. Publishing is also schedulable.
- Report on Prism Analytics data: Create custom reports, dashboards, and discovery boards using the Prism data source.
Summary
- Worksheets provide a familiar interface with spreadsheet functions you are likely already familiar with, Workday proprietary functions, and the ability to collaborate with colleagues, all within the Workday security framework.
- OfficeConnect offers real-time reporting on Workday data using Excel.
- Prism Analytics is a data hub that allows you to blend Workday and non-Workday data together for analysis and reporting in Workday.
Resource
: Search in Workday Community
> The Next Level: Reporting and Analytics
to learn more about the different reporting tools offered.