
Example: Create and Use an Analytic Dimension
This example illustrates how to use analytic dimensions to more easily report on external dimension data using Workday's reporting tools. This example uses an analytic dimension business object together with an Instance Mapping stage in a Prism dataset to convert a Text field containing external dimension data into an Instance field.
You have an external CSV file that you want to bring into Prism Analytics to report on in Workday. The CSV file includes a text field with these unique values:
- no-size
- adult-small
- adult-medium
- adult-large
- adult-xlarge
- child-small
- child-medium
- child-large
You want to report on the data in this field as a dimension in one of Workday’s reporting tools, such as Report Writer.
- Create a Prism table containing external data. The table must have a Text field that represents dimensional data and contains unique text values for each dimension value.
- Create a derived dataset that imports the table.
- Security:
- Prism: Manage Analytic Dimensionsdomain in the Prism Analytics functional area (View and Modify permission).
- Prism: Tables Createdomain in the Prism Analytics functional area.
- Prism: Tables Managedomain in the Prism Analytics functional area.
- Prism Datasets: Createdomain in the Prism Analytics functional area.
- Prism Datasets: Managedomain in the Prism Analytics functional area.
- Prism Datasets: Publishdomain in the Prism Analytics functional area.
- Decide whether or not to organize the analytic dimension values into groups (hierarchies).In this example, we will organize the values into hierarchies. If the dimension field contains a large number of unique values, we recommend that you organize the values into hierarchies.
- Decide how to organize the hierarchies in the analytic dimension business object.You decide to organize the dimension values into hierarchies as shown in this image:
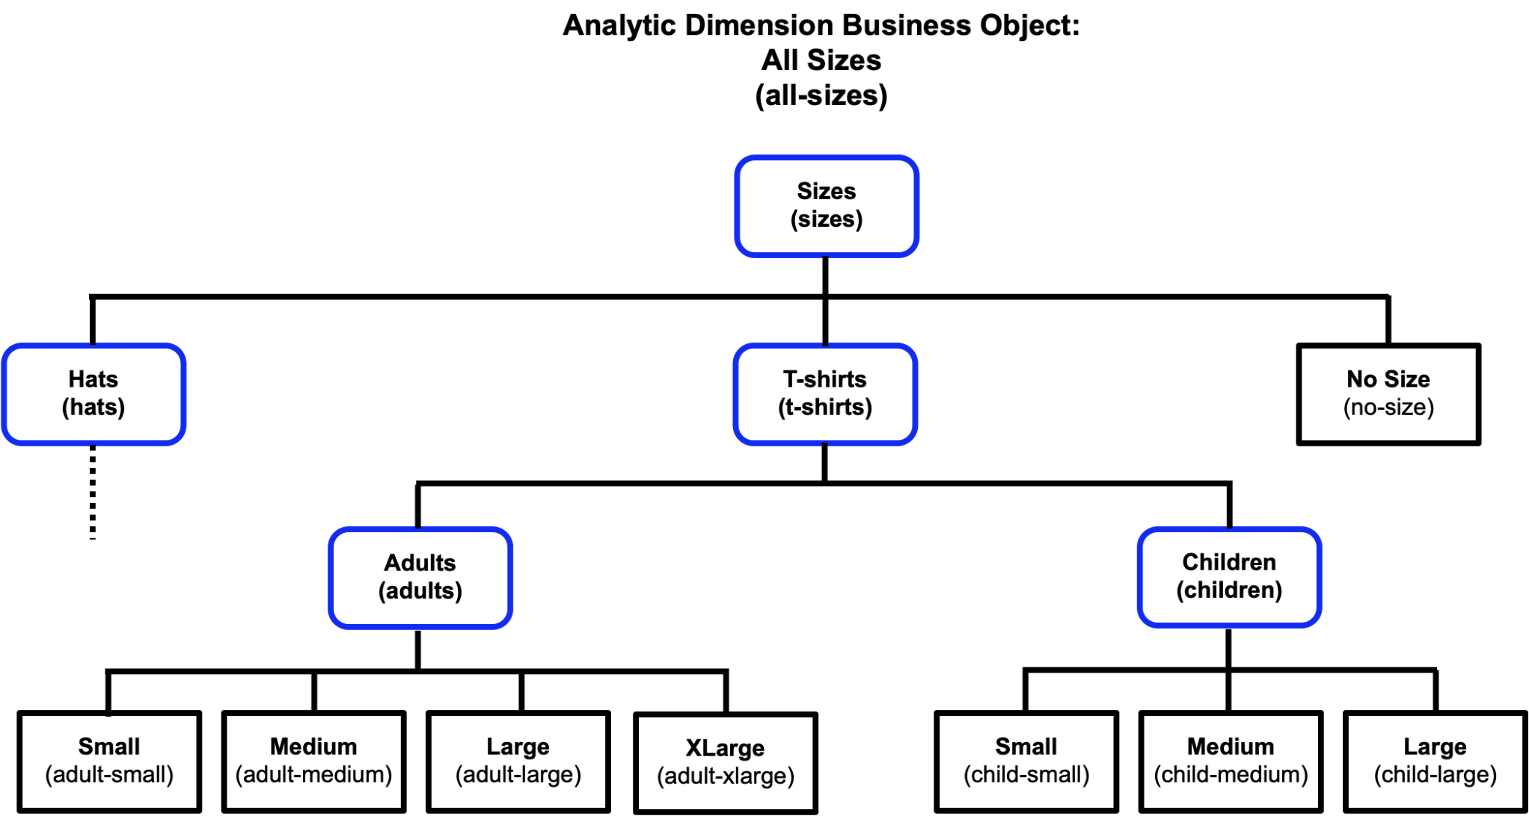 The blue rounded shapes represent hierarchies, and the black rectangular shapes represent values. For each artifact in the image, the first name is the display name, and the name in parentheses is the unique ID. The unique IDs for each value are defined by your external data, such as adult-medium.This table describes an example hierarchy, including the hierarchy name, hierarchy ID, the superior hierarchy, and any included dimension values:Hierarchy NameHierarchy IDSuperior HierarchyIncluded ValuesSizessizesNoneUnique dimension values from the external data:
- no-size
Display names for each dimension value:- No Size
T-shirtst-shirtsSizesNoneAdultsadultsT-shirtsUnique dimension values from the external data:- adult-small
- adult-medium
- adult-large
- adult-xlarge
Display names for each dimension value:- Small
- Medium
- Large
- XLarge
ChildrenchildrenT-shirtsUnique dimension values from the external data:- child-small
- child-medium
- child-large
Display names for each dimension value:- Small
- Medium
- Large
- Create an analytic dimension business object that contains the text values from your external CSV file as dimension values.
- Navigate to theCreate Analytic Dimension Business Objecttask.
- Complete these options and clickOK:OptionDescriptionNameAll SizesAnalytic Business Dimension Object IDall-sizesAllow HierarchiesEnableWorkday creates the business object and displays displays theView Analytic Dimension Business Objectreport.
- ClickMaintain Values.Workday displays theMaintain Analytic Dimension Valuestask where you can add, edit, and delete dimension values.
- Select the Add Row (+) icon to add a new dimension value, and enter these rows:Value NameValue IDNo Sizeno-sizeSmalladult-smallMediumadult-mediumLargeadult-largeXLargeadult-xlargeSmallchild-smallMediumchild-mediumLargechild-large
- ClickOK.Workday adds the dimension values to the business object and displays theView Analytic Dimension Valuesreport.
- Create the hierarchies in the analytic dimension business object and assign values.
- From the related actions of the All Sizes analytic dimension business object, select .
- In theCreate Analytic Dimension Hierarchytask, enter the Hierarchy Name, Hierarchy ID, Superior Hierarchy, and Included Values for one of the hierarchies you want to create in the business object, and clickOK.
- Repeat these steps until you create all hierarchies in this table:Hierarchy NameHierarchy IDSuperior HierarchyIncluded ValuesSizessizesNone
- No Size
T-shirtst-shirtsSizesNoneAdultsadultsT-shirts- Small
- Medium
- Large
- XLarge
Use the related actions menu for each dimension value to ensure that you select the value that uses the desired unique Value ID.ChildrenchildrenT-shirts- Small
- Medium
- Large
Use the related actions menu for each dimension value to ensure that you select the value that uses the desired unique Value ID.Workday updates the analytic dimension business object with the hierarchies you defined.
- Edit the Prism Analytics dataset that contains the external dimension data and use an Instance Mapping stage to convert the external text values to instance values.
- Access theData Catalogreport, right-click the derived dataset that contains the external dimension data, and selectEdit Transformations.
- ClickAdd Stageand selectInstance Mapping.
- InInput Field Name, select the text field that contains the dimension data.
- InOutput Field Name, enter the name of new Instance field: Custom T-shirt Sizes
- InBusiness Object, select the All Sizes analytic dimension business object.
- ClickDoneand clickSave.
- Publish the dataset to update the Prism data source so that it now contains the external dimension field as an Instance field.
- SelectView Datasetfrom the dataset related actions menu.
- On theView Dataset Detailsreport, select .
Workday updates the Prism data source with the fields defined in the dataset, including the new Custom T-shirt Sizes Instance field.
You can create a custom report or discovery board using the Prism data source and select the Custom T-shirt sizes field.