
Example: Set Up a HiredScore Open Tasks Template
This example illustrates:
- How to configure the template for the Open Tasks message that is triggered by the Hiring Manager Talent Advisor Collaborator (also known as HMTAC or the HM-TA Collaborator) functionality in Microsoft Teams.
- The impact of this configuration in MS Teams.
Your organization uses the HMTAC functionality to facilitate team communication about specific requisitions. It triggers the sending of messages in MS Teams at various stages throughout the process. You want to customize the Open Tasks message template, which prompts the hiring manager to review their open tasks across different hiring phases, such as new candidates to screen, assessments to review, or candidates awaiting interview.
The contents of the Open Tasks message updates in real time (without sending a new Open Tasks message) as the status of each candidate changes.
Customization needs to include:
- A schedule that triggers the message according to preferences. Example: Every Monday and Wednesday at 09:00AM.
- An introductory sentence.
- The specific job application steps in each phase that must be flagged in the message.
- A short description of each job application step.
- A button label that prompts an action for the hiring manager.
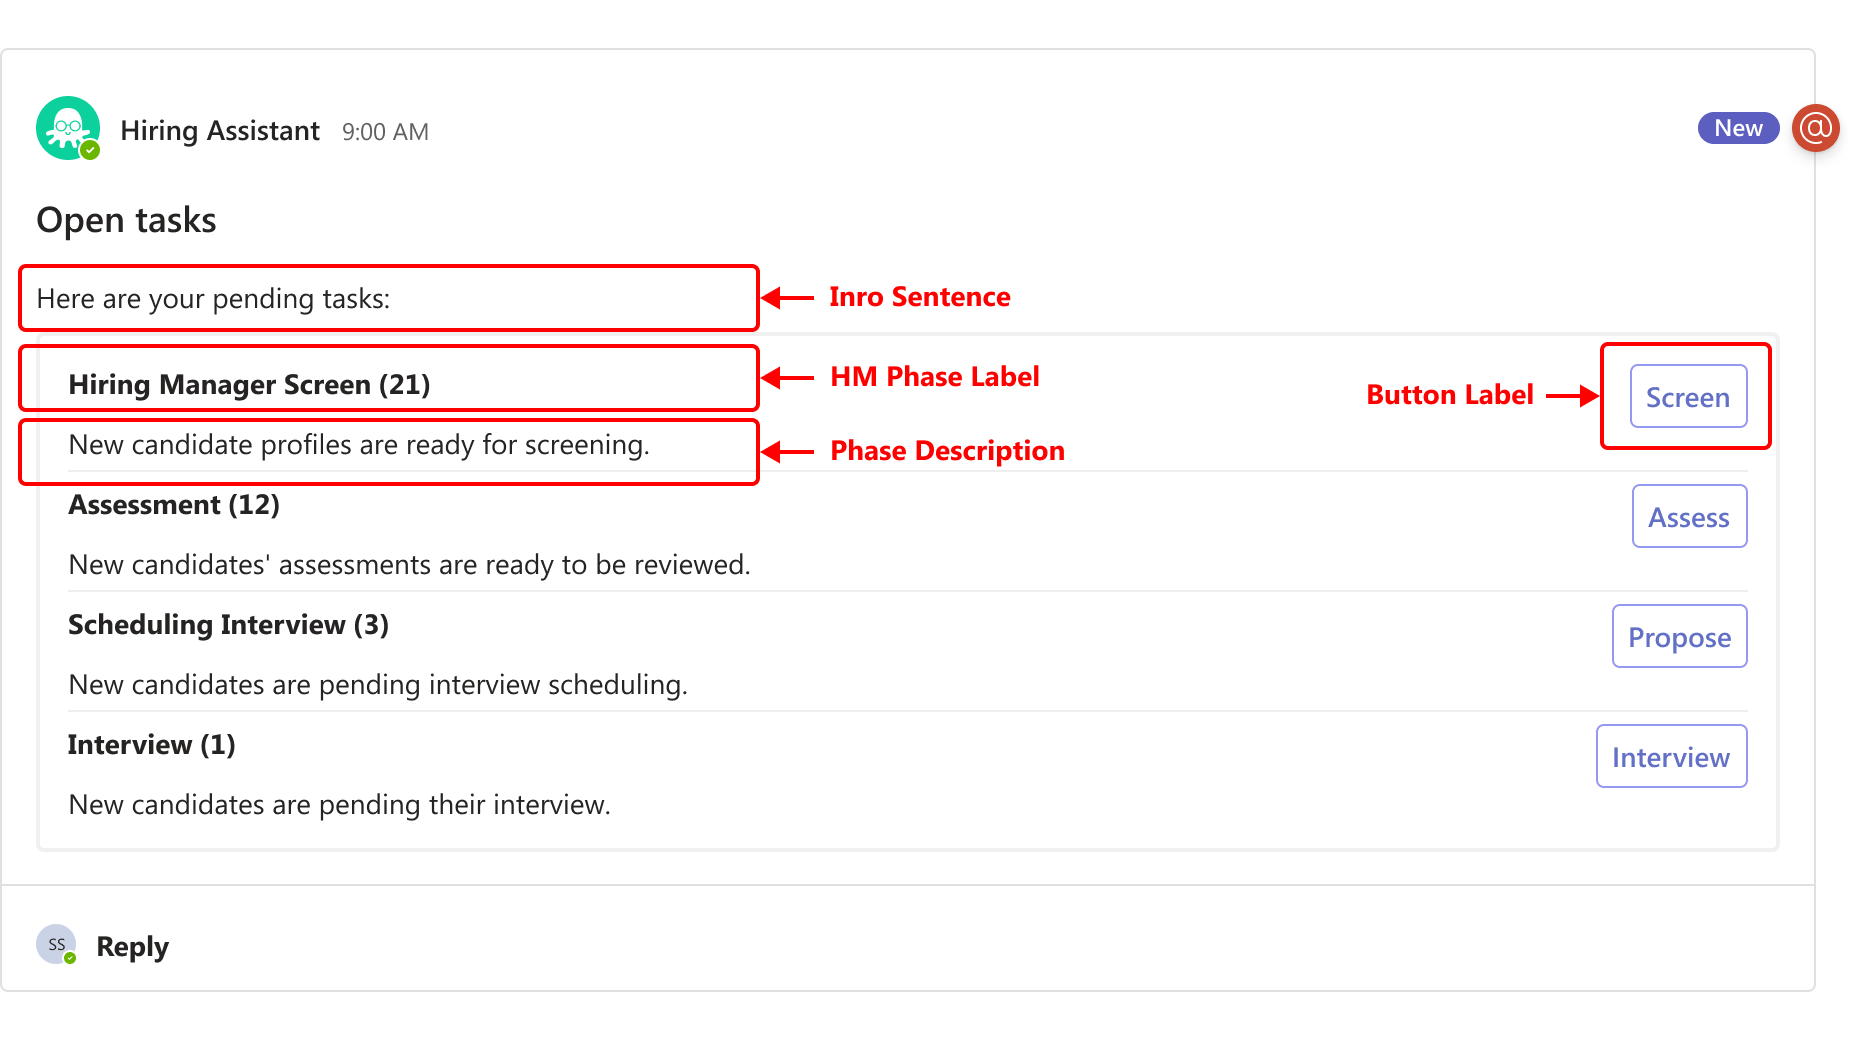
After configuration is complete, the message should display as follows in MS Teams:
Your implementer must complete the steps to configure and authenticate the HiredScore and MS Teams integrations in Workday.
Changes submitted on this tab impact your account's configuration in HiredScore and existing configurations (including custom rules or filters) are overridden. Changes can take up to 30 minutes to display in the HiredScore UI. In some cases, this may take longer.
- Access theHiredScore Tenant Setuptask in Workday.
- On theHM <> TA Collaboratortab, select theOpen Tasks Templatesub-tab.
- ClickEdit.
- Select theEnable in HM-TA Collaboratorcheck box to ensure that any changes you make on this task are effective in MS Teams after submitting them in Workday.
- Enter and select the desired values, for example:FieldValueScheduleMondayThursdayTime (In UTC)9:00 AMIntro SentenceHere are your pending tasks:
- In thePhase 1section, enter and select these these values:FieldValueHM Phase LabelHiring Manager ScreenJob Application StepsSelect theJob Application Stepsfor the Hiring Manager Dashboard phases to determine the hiring manager steps that trigger the action.Step DescriptionNew candidate profiles are ready for screening.Button LabelScreen
- In thePhase 2section, enter and select these these values:FieldValueHM Phase LabelAssessmentJob Application StepsSelect theJob Application Stepsfor the Hiring Manager Dashboard phases to determine the hiring manager steps that trigger the action.Step DescriptionNew candidates’ assessments are ready to be reviewed.Button LabelAssess
- In thePhase 3section, enter and select these these values:FieldValueHM Phase LabelScheduling InterviewJob Application StepsSelect theJob Application Stepsfor the Hiring Manager Dashboard phases to determine the hiring manager steps that trigger the action.Step DescriptionNew candidates are pending interview scheduling.Button LabelPropose
- In thePhase 4section, enter and select these these values:FieldValueHM Phase LabelInterviewJob Application StepsSelect theJob Application Stepsfor the Hiring Manager Dashboard phases to determine the hiring manager steps that trigger the action.Step DescriptionNew candidates are pending their interview.Button LabelInterview
- ClickOK.
- ClickDone.
- (Optional) You can add translations for supported languages by selectingAdd Translationin theTranslationssection.
- Select the language you want to add and provide the translated text for both theMessage TitleandMessage Bodyfields.
- Verify that any dynamic parameters in the original message are maintained in all translations.
- After you add translations, verify that the message renders correctly in the Adaptive Cards Designer and that all parameters and links are correct.
Hiring managers receive the message illustrated in the screengrab every Monday and Thursday at 09:00AM: