
Example: Set Up a HiredScore Candidate Offer Template
This example illustrates:
- How to configure the template for the Candidate Offer message that is triggered by the Hiring Manager Talent Advisor Collaborator (also known as HMTAC or the HM-TA Collaborator) functionality in MS Teams.
- The impact of this configuration in MS Teams.
Your organization uses the HMTAC functionality to facilitate team communication about specific requisitions. It triggers the sending of messages in MS Teams at various stages throughout the process. You want to customize the Candidate Offer message template, which notifies the hiring manager when a candidate (or every candidate who reaches this step) is identified for an offer. Customization needs to include:
- A specific message title.
- A tag that mentions and notifies the manager that handles the requisition.
- A specific message body.
- A link to best-practice guidance for recruiters and hiring managers at this stage.
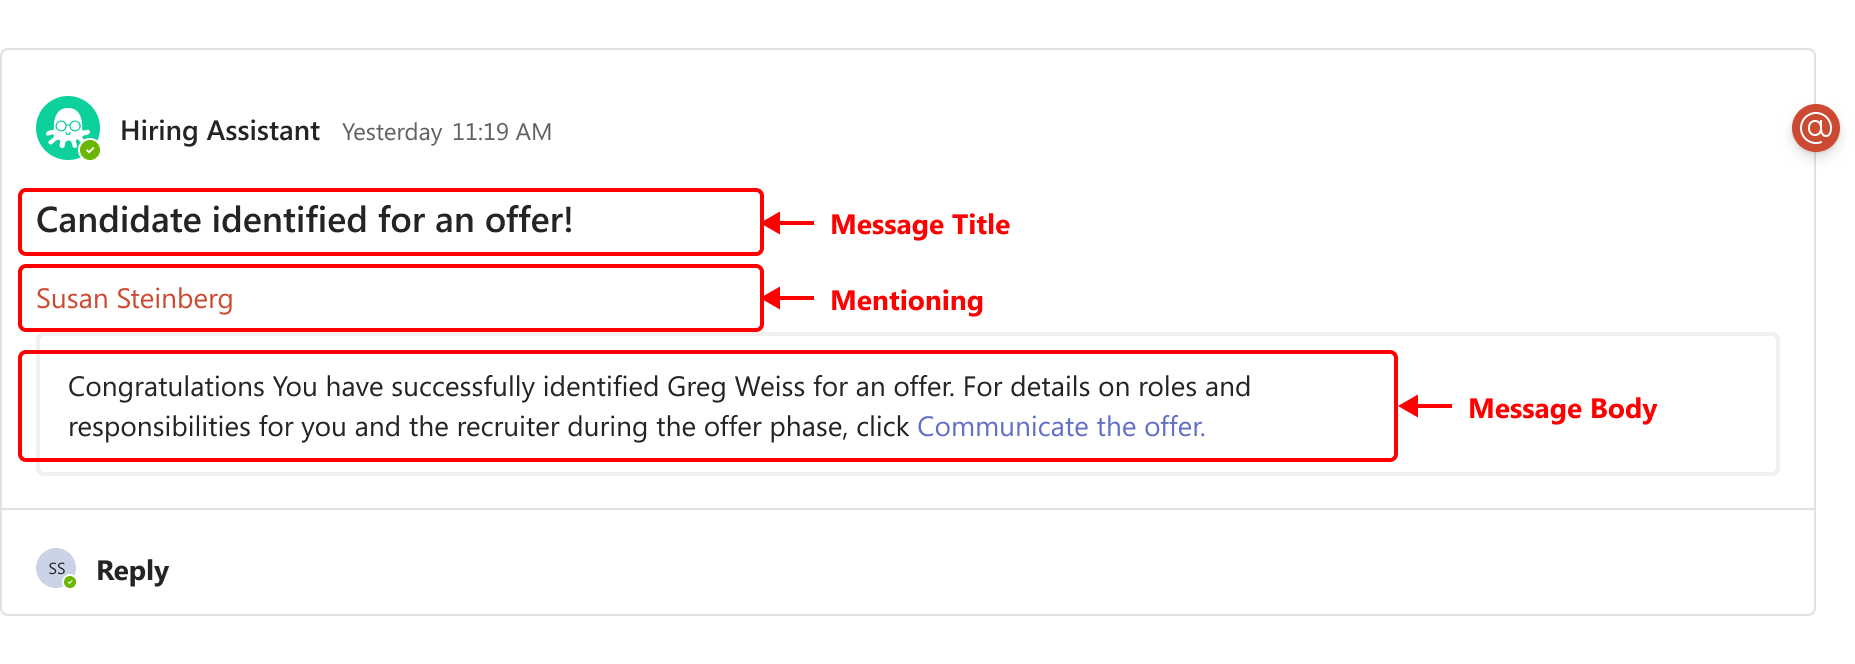
After configuration is complete, the message should display as follows in MS Teams:
Your implementer must complete the steps to configure and authenticate the HiredScore and MS Teams integrations in Workday.
Changes submitted on this tab impact your account's configuration in HiredScore and existing configurations (including custom rules or filters) are overridden. Changes can take up to 30 minutes to display in the HiredScore UI. In some cases, this may take longer.
- Access theHiredScore Tenant Setuptask in Workday.
- On theHM <> TA Collaboratortab, select theCandidate Offer Templatesub-tab.
- ClickEdit.
- Select theEnable in HM-TA Collaboratorcheck box to ensure that any changes you make on this task are effective in MS Teams after submitting them in Workday.
- In theTriggered Bysection, select theJob Application Stepsthat belong to the Hiring Manager Dashboard (Candidate Offer) phase.
- Enter and select these values:FieldValueMessage TitleCandidate identified for an offer!MentioningManager
- Customize the template’sMessage Body.
- Copy the default text in theMessage Bodyfield.This field is automatically populated with a default message in JSON format.
- Access the Microsoft Adaptive Cards Designer at https://adaptivecards.io/designer/.
- In the Adaptive Cards Designer, replace any existing content in theCard Payload Editorwith the JSON text that you copied in step a.The card preview updates in real time to display how the message card is currently configured.
- In theCard Payload Editor, customize the message using the parameters listed in theAvailable Paramssection in Workday, as well as custom links (see stepg).For the purpose of this example, include these parameters and a custom link to a Help Center article on sending offers.
- ${candidate_name}
- ${external_req_id}
- ${req_title}
- ${identify_candidate_offer_1}
The resulting JSON text in theCard Payload Editoris:{ "type": "AdaptiveCard", "$schema": "http://adaptivecards.io/schemas/adaptive-card.json", "version": "1.0", "body": [ { "type": "TextBlock", "wrap": true, "text": "Congratulations! You have successfully identified${candidate_name}for an offer for${external_req_id}${req_title}. For details on roles and responsibilities for you and the recruiter during the offer phase, click [Communicate the offer](${identify_candidate_offer_1})." } ] }TheversionJSON key is for internal reference purposes only and doesn’t impact JSON behaviour. - ClickCopy Card Payloadand return to theHiredScore Tenant Setuptask in Workday.
- Paste the copied JSON text into theMessage Bodyfield to replace the existing content.
- For the${identify_candidate_offer_1}parameter in theCustom Linkssection, enter the URL of the Help Center article in the corresponding Links field.Verify that the JSON syntax is correct to avoid JSON errors.
- ClickOK.
- ClickDone.
- (Optional) You can add translations for supported languages by selectingAdd Translationin theTranslationssection.
- Select the language you want to add and provide the translated text for both theMessage TitleandMessage Bodyfields.
- Verify that any dynamic parameters in the original message are maintained in all translations.
- After you add translations, verify that the message renders correctly in the Adaptive Cards Designer and that all parameters and links are correct.
When a candidate is identified and the HMTAC functionality triggers an automated MS Teams message to the hiring manager, it should display as illustrated in the screengrab.
Any users selected in the
Mentioning
field receive an MS Teams notification.