
步驟︰使用命名範圍
命名範圍
若要連結表格來源
OfficeConnect
用於 Excel OfficeConnect
對於 Word,您需要將表格定義為命名範圍。「命名範圍」
是 Excel 檔案中使用者定義的儲存格、列或欄區域。使用已命名範圍,您可以將該區域視為一個整體來執行運算。一項強大的用途是能夠從您在工作簿中的任何其他位置快速跳到指定範圍。您將在本節中討論的另一種用途是,您可以選取並插入中的命名範圍。 OfficeConnect
for Excel 轉換為您的 OfficeConnect
,以便在兩者之間建立連結。您可以在指定範圍內移動或變更資料,甚至新增或刪除列或欄,而指定範圍會像單一物件一樣保持完整性。在 Excel 中對已命名的範圍進行任何變更時,只要您重新整理簡報,這些變更就會立即反映在 PowerPoint 中。
當您使用
OfficeConnect
使用 Microsoft Word,您就是在建立源自實例且可輕鬆更新的資料管道,這些資料的格式會以您的 OfficeConnect
用於 Excel 工作簿,且以 OfficeConnect
適用於 Word 文件。連結表格或其他資料的流程
OfficeConnect
用於 Excel OfficeConnect
for Word 一律從定義一個或多個 Excel 儲存格的指定範圍開始,其中包含您要連結的資料。這些命名範圍可讓您在兩個應用程式之間連結資訊。事實上,除非 Excel 檔案至少有一個命名範圍,否則您甚至無法連結這兩個檔案。請在 Excel 線上說明中搜尋命名範圍,以取得更多資訊。
Create a Named Range
Use one of two methods to create a named range:
- Select an area on the grid
- Use the Define Name command
To create a named range by selecting an area:
- Select the area you want to include in the range such as set of cells, rows, or columns.
- Click in theName Boxmenu so that the current contents are selected.
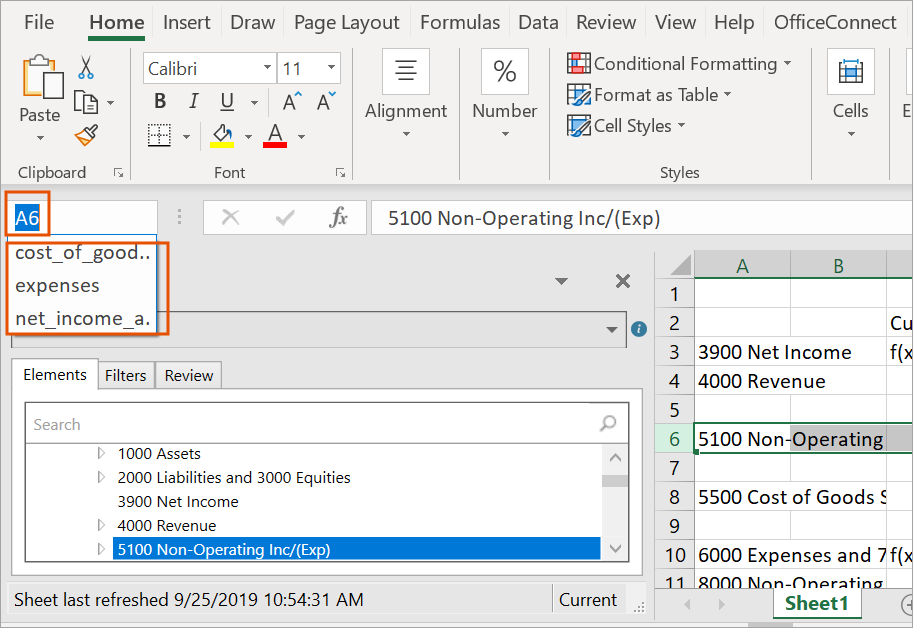
- Enter the name you want for this named range, and then press Enter. The named range is created. To see the named ranges in any sheet in this workbook, you can click the Name Box menu. Select a named range in the menu to goes to its location in the grid.
You can also create a named range by using the Define Name command.
To create a named range by using the Define Name command:
- Select the area you want to include in the named range such as set of cells, rows, or columns.
- Select theFormulastab in the ribbon.
- From theDefined Namesgroup, selectDefine Name.
- Enter the name you want for this named range.
- InScope, specify whether this named range is available from a particular worksheet in the workbook, or to the whole workbook.
- InComment, add a note if necessary.
- InRefers to, verify the code reflects the area you selected for this range. Make any corrections as needed, either by selecting in the grid or by changing the code.
- ClickOK. The named range is created as you specified. You can see the named range in theName Boxmenu.
Change a Named Range
You can change a named range to add or remove columns or rows. The named range adjusts automatically.
Use the Name Manager to:
- Change the scope of a name range.
- Change the name of the named range.
- Delete a named range.
To change or delete a named range:
- Select theFormulastab in the ribbon.
- From theDefined Namesgroup, selectName Manager. The Name Manager dialog appears, listing all named ranges in the workbook.
- Select the named range you want to change, and then clickEdit.To delete a named range, clickDelete.
- Change the name of the named range.
- InComment, add or change a note about the named range.
- InRefers to, change the area for this named range. When you click in the field, the range appears in the grid. Make your changes by either selecting in the grid or by changing the code.
- ClickOK.
- ClickClosein the Name Manager dialog box. The named range is modified as you specified.