
Reference: Transactions
Transactions are typically data related to time-stamped orders, invoices, sales process activities, or payments. They can come from a variety of external systems like NetSuite or Salesforce. You can define transaction fields so that you can then import transactions for:
- Planning instances, where you manage transaction field definitions for only one transaction table.
A transaction line item is typically represented by a set of data associated with the transaction such as type and date. A line item can sometimes be associated with individual lines such as customer name, item quantity, and total.
Adaptive Planning
doesn't distinguish between the transactions and these transaction lines. To handle them, you create transaction field definitions in the Transaction Builder.Prerequisites
- Transactions is an add-on. Contact us for more information.
- This article is for administrators who build or manage the model.
- Security:
- Access Transactionspermission.
- Modelpermission.
- Transactionspermission.
Navigation
 From the nav menu, select
 Modeling
. In the Others menu, choose Transactions
.Transaction Builder
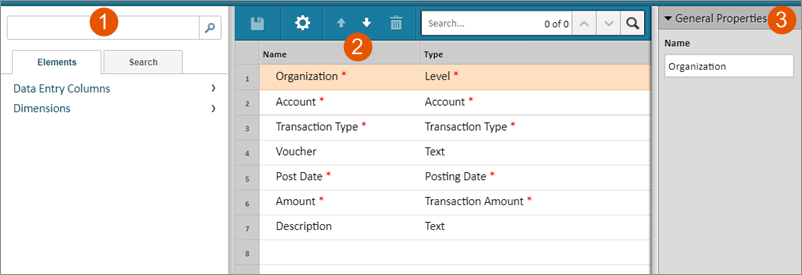
1 | Browse for data entry column fields or custom dimensions to drag them into the transaction definition list. |
2 | Add elements to the transaction definition list by dropping them off here. |
3 | Set properties for the selected field in the transaction definition list. |
In the Transaction Builder you can select specific elements from a list and drag and drop them into a design area. Required fields, indicated with a red asterix
*
,
are preset and already in the list. You can drag and drop the additional Data fields or Dimension fields you need from the Element Selector.You can include up to 200 fields in a transaction definition.
See Reference: Transaction Field Types for field options and descriptions.
Transaction Definition Toolbar
Icon | Description |
|---|---|

| Save all changes made to the Transaction Definition list. |

| Review and modify the message that appears on the Transaction Detail Report. |


| Moves the select field up or down in the list. |

| Remove the selected element from the definition. |
Define the Structure and Format of Transactions and Line Items
Below are the high-level steps for setting up a Transaction Definition:
- Determine the fields related to your transactions that you want to import.
- Review the default fields and adapt the definition to your needs. You can add new fields from the field panel as needed. For example, if you want to add Product, this is most likely a Dimension field. If you want to add a field to display Sales Tax, this would most likely be a Number field and if you want to add a Description field, this would be a Text field.
- For each field, you can modify the title. This title will appear on the transaction detail report when drilling through from sheets and Explore Cell. The title also appears in the transaction import template.
- SelectTransaction Definition Propertiesfrom the toolbar to edit. You can review and edit the default message that appears on detail reports when users drill into Transactions. SelectOkto apply the changes and close the dialog.
- Save.
Add Data Entry Columns
Data entry columns are data entry points for users working on sheets. For example, Employee ID is typical data entry column for a personnel model sheet. Typically, each data entry column appears as a single column on the sheet.
- SelectData Entry Columnsin the Elements panel.
- Drag the data entry type you want to the design area. See Reference: Transaction Field Types for details on the data entry types.
- In thePropertiespanel, enter the properties for this field.
- Save.
Add Dimensions
Custom dimension columns are used for selecting a value from a custom dimension. For example, Job Function can be a custom dimension on a personnel sheet, where users can associate a job function to an employee by picking a value.
- SelectDimensionsin the Elements panel.
- Drag the dimension you want to the design area.
- In thePropertiespanel, enter the properties for this field.
- Save.
Manage Field Definitions
You can update the Transaction Field Definitions at any time, add new fields, and delete non-required fields.
Deleting a field deletes all data that was previously imported to that field.
See Create Transaction Reports for more information.