
Report Writer and Custom Reports
Overview
Workday delivers standard reports that you can copy and modify to meet business requirements. You can also create custom reports and use reporting concepts, such as report data source, primary and related business objects, and class report fields.
In this section, you will explore more complex reporting configurations that will expand your knowledge of the Workday Report Writer tool and its capabilities.
Objectives
By the end of this chapter, you will be able to:
- Create a contextual report and an advanced report.
- Use both a primary and related business object in a custom report.
- Apply data management tools, such as filtering, sorting, and prompt logic to a custom report.
- Demonstrate how to schedule and share a custom report.
- Modify a basic matrix report that summarizes the data and uses drillable fields.
- Recognize the function of dashboards.
- Create a custom worklet.
Reporting Overview
Reports in Workday have an easy-to-use, consumer-friendly interface with the functional user in mind. Reports exist as built-in features in the application, which allow users to act on the report output directly from the user interface. Reports in Workday leverage your security configuration, allowing you to access real-time, relevant data.
You can build custom reports using the Report Writer tool. You can embed reports in your business process transactions to provide relevant data for decision-making at the time of decision. You can also enable reports as worklets and display them on dashboards. In addition, you can use scorecards to display a snapshot of important metrics for a specific organization for a particular period. These metrics are sometimes called Key Performance Indicators, or KPIs.
The Workday reporting ecosystem supports many features:
- You can use reports in outbound integrations (Reporting-as-a-Service).
- Mobile devices can access reports.
- Workday allows you to associate layouts with your custom reports, which it uses to generate PDF files. In Workday, these designs are business form layouts. You can define a business form layout using the Report Designer (BIRT) tool in Workday Studio.
- You can use Prism Analytics to analyze data from both Workday and external sources.
- Workday helps you automate your Excel processing and formatting when exporting a Workday custom report. Excel templates reduce the time and effort needed to deliver Excel workbooks based on Workday custom reports. This is especially valuable in cases where you export a report on a regular basis and then reformat the data in Excel. This feature supports any macros, calculations, and formatting defined in the associated workbook template.
Workday Standard Reports
Workday delivers standard reports that are available for all customers. If necessary, you can copy many of the Workday-delivered reports to create a custom report and modify it as needed.
You can use the
Workday Standard Reports
report to view Workday-delivered reports.The report displays the following columns:
Column | Description |
|---|---|
Category | The category for the standard report. |
Report | This contains the Related Actions you can take on the standard report. |
Name | Name of the standard report. |
Description | Description of what displays in the report. |
Type | The type of report, either XpressO or Report Writer. |
Schedulable | Indicates if you can schedule a report. |
Domain | Shows the name of the domain that secures the report. Users must have access to one of the security domains to run the report. |
Security Note
:- TheWorkday Standard Reportsreport shows all standard reports and categories, even if you do not have security permissions to access the menu category or the report.
- You must have access to the Custom Report Administration security domain to run theWorkday Standard Reportsreport.
Custom Reports
You can design and build custom reports using the Workday Report Writer tool. Create a new report or copy from another existing standard or custom report depending on report requirements.
Like standard reports, you can obtain additional information on report results and use related tasks to perform actions within a custom report. You can export report information to Excel, a PDF document, or a dashboard. You can also report information by enabling a worklet on a specified landing page. Additionally, you can use the advanced report type for web services.
Every custom report has a report owner, which is the user who originally created or copied the report. This user is the only person who can change the report definition or share the report with other users. The report owner and the setup administrator have permissions to transfer ownership of a report from one user to another.
The
All Custom Reports
report displays all custom reports in the tenant. You can use these custom reports as a starting point for new custom reports.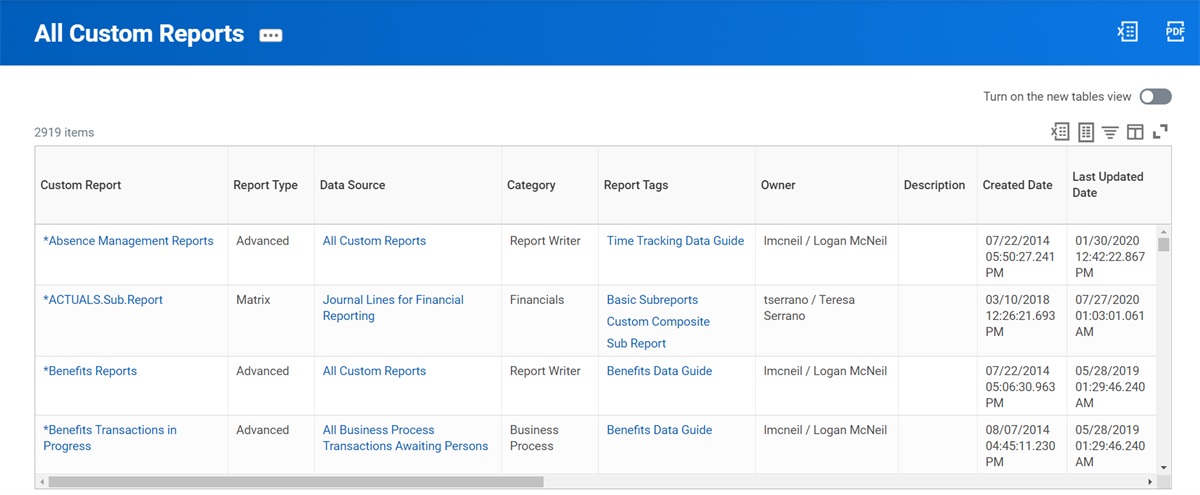
An example of All Custom Reports.
Contextual Reporting
You can use contextual reporting in Workday when you are not sure of the business object and report fields for the data you want to report on.
You can also use contextual reporting to view existing reports you may want to repurpose or customize.
From any object's Related Actions icon, select Reporting to access three choices:
Related Action | Definition |
|---|---|
Create Custom Report from Here | Create a custom Report Writer report with the selected object as the basis for the data available. Workday automatically restricts the data sources available for the report to those associated with the object. |
Related Reports | Displays all reports, whether custom or Workday-delivered, that use the selected business object as the primary object on the report. |
Report Fields and Values | Displays all the report fields and values related to the selected business object. This option only displays fields that you can access. You can sort, filter, and export the fields to Excel. This helps you become familiar with the Workday fields by viewing them within the context of your own data. |
Report Types
Workday Report Writer provides several report types for creating custom reports and custom analytic solutions. You use the advanced and matrix report types most commonly.
Report Type | Definition |
|---|---|
Simple
| Simple reports provide straightforward design options for the occasional user to create reports quickly and easily with limited options. You can display, sort, and filter data from a primary business object. These reports are not shareable. |
Advanced
| Advanced reports allow you to display data from the primary and related business objects. These reports are shareable. You can sort and filter the data, show groupings, and display sub- and grand totals. You can also add charts and enable the report as a worklet or web service. |
Matrix
| Matrix reports allow you to group data, summarize the metrics for each grouping, and drill into the summarizations for further analysis. In addition, matrix reports also provide for filtering, charts, worklets, and report sharing. |
Composite
| Composite reports enable you to combine data from multiple data sources into a single report by using advanced or matrix subreports. |
Search
| Search reports display search results based on facet-filter selection values. |
nBox
| nBox reports count data and display the results in a two-dimensional matrix. |
Trending
| Trending reports enable you to report on and analyze trends in worker data, such as headcount and attrition over a period of time. |
Transposed
| Transposed reports interchange the rows and corresponding columns on the report, allowing you to create reports that enable side-by-side comparisons. |
Reporting Terminology
To use Report Writer, you must understand the terminology involved, especially when it comes to business objects and data sources.
Workday stores your data in business objects, similar to database tables or worksheets in Excel. Just as a database table or worksheet has columns and rows, a Workday business object has fields and instances.
The report data source provides a view into the primary business object (PBO). This object gives you access to class report fields (CRFs) as well as links to related business objects (RBOs).
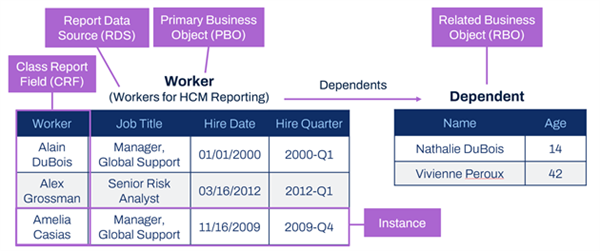
Term | Definition |
|---|---|
Primary Business Object | The main business object for the report. It holds the data that displays in your report. The primary business object determines what fields are initially available to include in the report. |
Related Business Object | Objects that have an association with the primary business object. These can have a 1:1 or 1:M relationship with the primary business object. A field on the primary business object links the two business objects together. |
Report Data Source | Workday delivers data sources for some business objects. You can think of the data source as the 'view' or 'starting filter' for reporting on the given primary business object. |
Class Report Fields | When working with Workday custom reports, you can select available fields (depending on your security). These fields can be Workday-delivered fields, calculated fields, or custom fields. |
Instances | Instances of a business object in Workday are like rows in a table or spreadsheet. Each instance represents a unique occurrence of that type of object, such as a given organization or worker. |
Class Reporting Fields
Each business object has many Class Report Fields (CRFs). When creating custom reports, you can display, sort, filter, and create prompts for Workday-delivered fields, calculated fields, and custom fields.
Class Report Fields (CRFs) can be simple types or object types. Simple types are not actionable and appear as black text. Object types are actionable and appear as blue text. System security controls access to class report fields.
A field type icon accompanies each Class Report Field (CRF).
Icon | Definition |
|---|---|

| Text - Represents a simple text field, such as First Name. |

| Numeric - Represents a numeric field, such as Employee Count. |

| Currency - Represents a currency field, such as Base Pay. |

| Date - Represents a date field, such as Hire Date. |

| Boolean - Represents a true/false field, such as Active Status. |

| Single instance - Represents a one-to-one (1:1) relationship between two objects. For example, one employee can have one pay group association. |

| Multi-instance - Represents a one-to-many (1:M) relationship between two objects. For example, one worker can have multiple dependents. |

| Self-referencing instance : A reference back to itself. For example, a self-referencing instance of a worker identifies the worker and allows you to drill into the details and access related actions. |
Business Object Details Report
The
Business Object Details
report can help you understand and navigate the Workday object model. Knowing how business objects relate to each other and which data sources are available is invaluable when building reports. We recommend starting with this report first to get an idea of what objects you might use in your custom report. You can also use this report to get a list of data sources.When you run this report, it will first prompt you to select which business object you want to view details for. Then, the report displays up to four tabs: Fields, Related Business Objects, Data Sources, and Reports. If the business object does not contain data for one of these tabs, the system hides the tab.
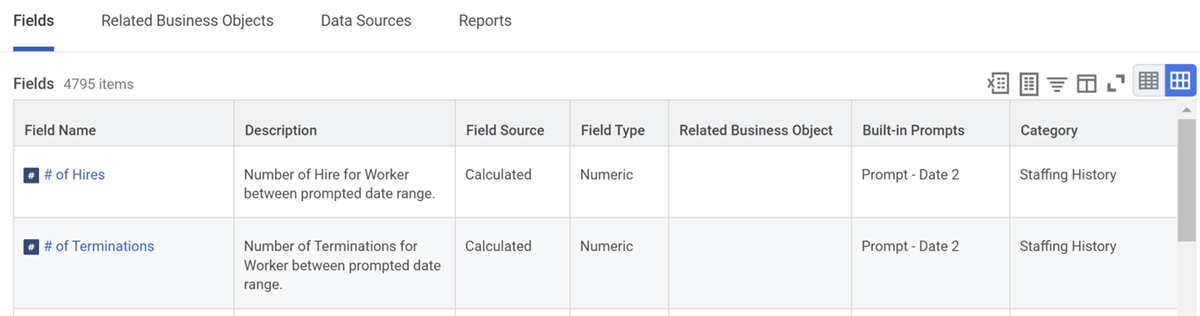
Fields Tab
The Fields tab in the image below shows all available delivered, calculated, and custom fields for the business object. You can filter by a column in the report to narrow down which fields display. For example, you might filter the Field Source field to only show calculated fields.
Related Business Objects Tab
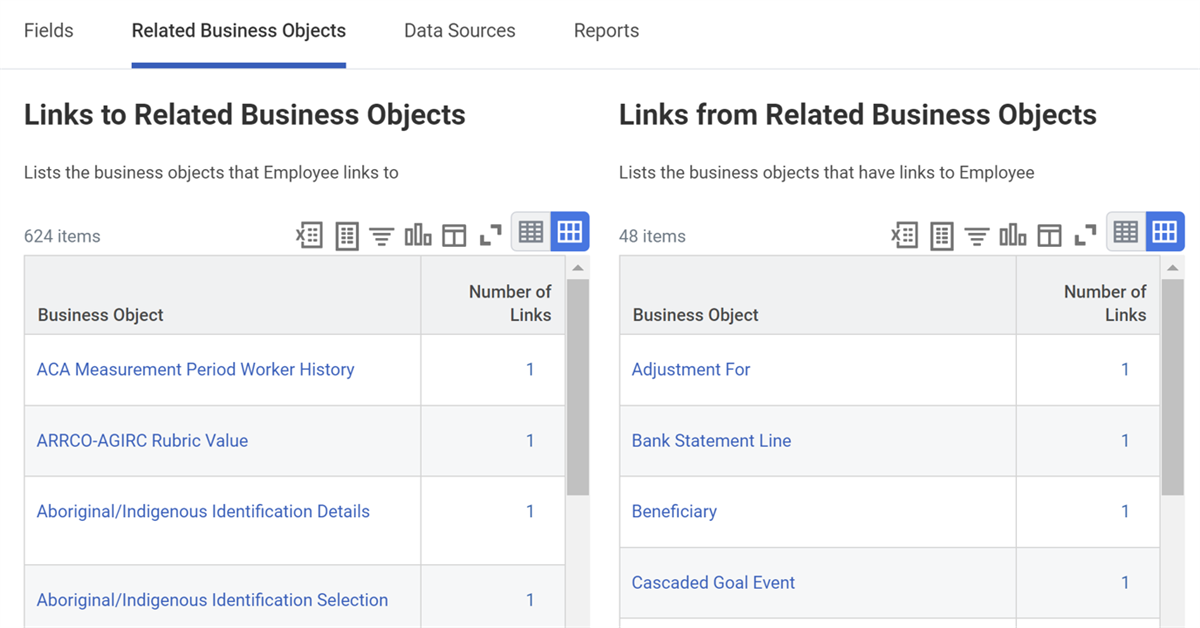
The Related Business Objects tab shows information about the relationships between this business object and other business objects. The tab displays two sections of information. On the left side, displays the list of business objects that this business object links to. On the right side, displays the list of business objects that link to this business object.
Note
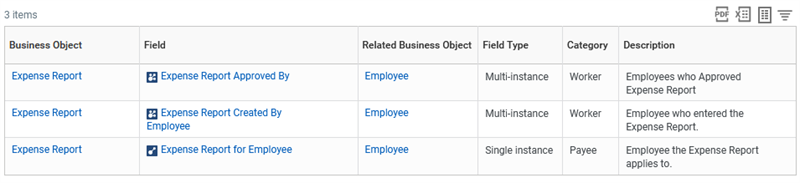
: Depending on your browser width, the Links to Related Business Objects grid may appear above the Links from Related Business Objects grid, instead of side by side.You can select the number in the Number of Links column to check which fields link the business objects together. In the following example, there are three fields that link from the Expense Report business object to the Employee business object.
Data Sources Tab
The Data Sources tab displays available data sources for the business object. You can view more general data sources as well as more specific data sources.
Note
: If the Data Sources tab does not display, then there are no delivered data sources for the business object. This means you cannot use the business object as the primary business object for a report. Consider using a related business object to access the data you need.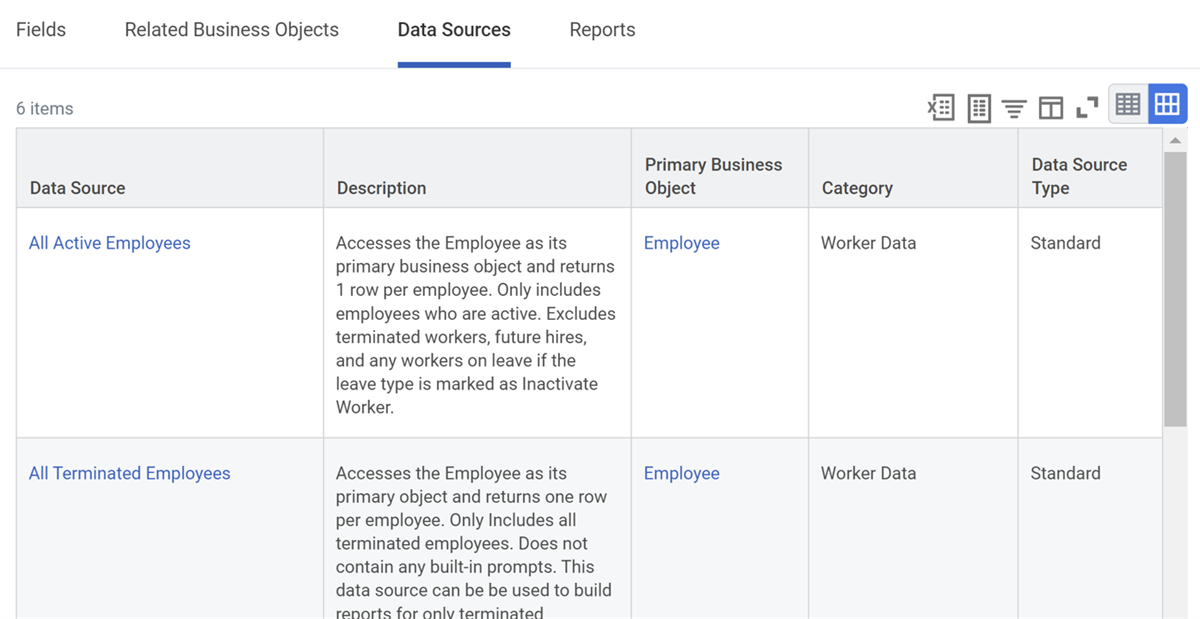
Reports Tab
The Reports tab displays reports in the tenant (both standard and custom) that use the given business object. You can use these reports as a reference when writing reports for this business object.
You can select the Reports Displaying Business Object at Second-Level button to display the reports that include this business object as a related object.
Determining the Primary Business Object and Data Source
To determine the primary business object and data source when creating a custom report, there are several questions to consider:
- Which business objects contain the fields needed in the report?
- If there are multiple business objects:
- Are these business objects related?
- Which should be the primary business object?
- Which should be the related business object?
- Which field links the two business objects together?
- Which data source should I use?
Data Sources
When creating a custom report, the most important decision is selecting your data source. The data source drives the primary business object and view of the data. Data sources provide the starting filter for your report. You can search for data sources by name, category, business object, or a combination of category and business object.
Workday defines and delivers one or more data sources for most business objects.
Standard Data Sources
Most data sources in Workday are standard data sources. A given Workday business object can have several standard data sources associated with it, each representing a different filter or selection into instances of that object. Think of the data source as a starting filter. Choose the data source that returns the smallest dataset that still includes all needed data. This is more efficient than using a data source that returns a larger dataset and applying filters to only display a subset of the data.
A data source can contain all instances of the primary business object (e.g., All Workers), or it can have built-in, Workday-defined filtering logic (e.g., All Active and Terminated Workers). If the data source has built-in filtering, the filter comparison value is either built into the data source (e.g., All Active Employees) or displays as a user prompt. In the prompt, the user enters the comparison value when running the report (e.g., Employees by Organization).
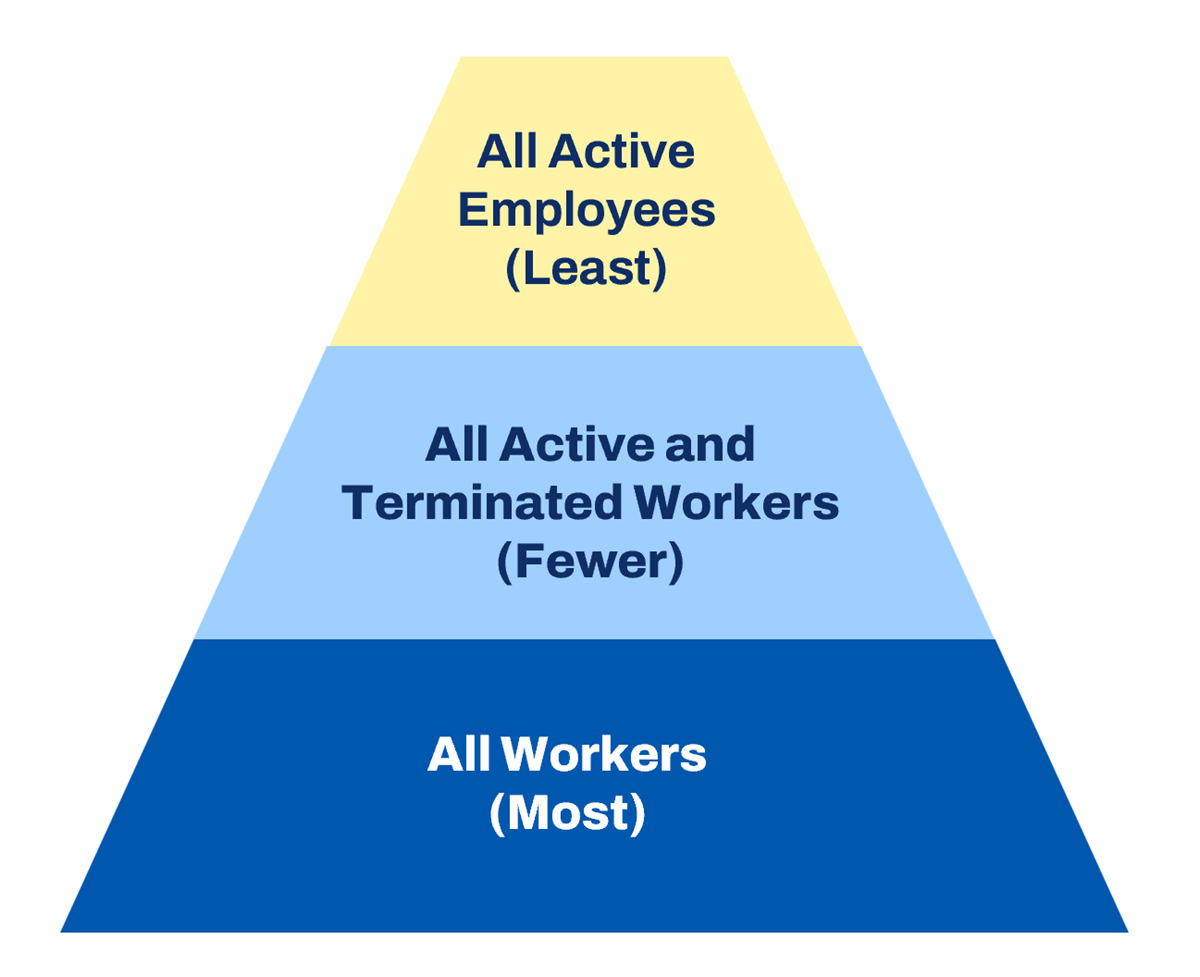
The following example shows different standard data sources for the Worker and Employee business objects. The All Workers data source returns all active, terminated, and future workers. The All Active and Terminated Workers data source returns active and terminated workers, but not future workers. The All Active Employees data source returns active employees, but not contingent, terminated, or future workers. For optimal performance, choose the data source that returns the smallest dataset that contains all needed data. If you only want to report on active employees, then choose the All Active Employees data source for a more efficient report.
Standard Data Source Performance Considerations
When selecting a data source for your report, be aware of your report's performance. There are a wide variety of standard data sources that range from very broad to very specific. However, all standard data sources cause your report to run slower than an indexed data source does. Therefore, try to select an indexed data source if it includes all the fields you need. This is especially true when reporting on large volumes of data, such as all workers in your organization.
Indexed Data Sources
Indexed data sources are a special type of data source optimized for performance, aggregation, and faceted filtering on large volumes of data. Try to use these whenever possible to get the best performing reports.
When you create a custom report using an indexed data source, a prompt enables you to select from a list of predefined filters (if available for that indexed data source). Data source filters are secured so users can only use filters they have access to.
To gain the performance benefits of indexed data sources, use indexed delivered fields. Nonindexed fields are usable but will not realize indexing benefits. Additionally, fields may be indexed for different purposes. The biggest impact to performance is using a field for grouping, aggregation, or filtering that is not indexed for those purposes. Nonindexed fields in detailed reports do not have as great an impact to the overall performance.
The following is a sample list of indexed data sources available in Workday:
|
|
Just like with standard data sources, a given Workday business object can have multiple indexed data sources associated with it. Each indexed data source provides a different filter into instances of that object. For example, the Journal Line business object has two indexed data sources: Journal Lines and Journal Lines for Financial Reporting. The Journal Lines data source returns more instances than the Journal Lines for Financial Reporting data source. For optimal performance, you should choose the data source that returns the smallest dataset that contains all needed data.
Indexed Report Fields
Reports that use indexed data sources typically perform faster than those using standard data sources. However, there are still some things to consider when trying to maximize your indexed report's performance. One example of this is the selection of fields for your report columns and filters. When selecting the fields for your report, you can use a field's Related Actions to display indexing information.
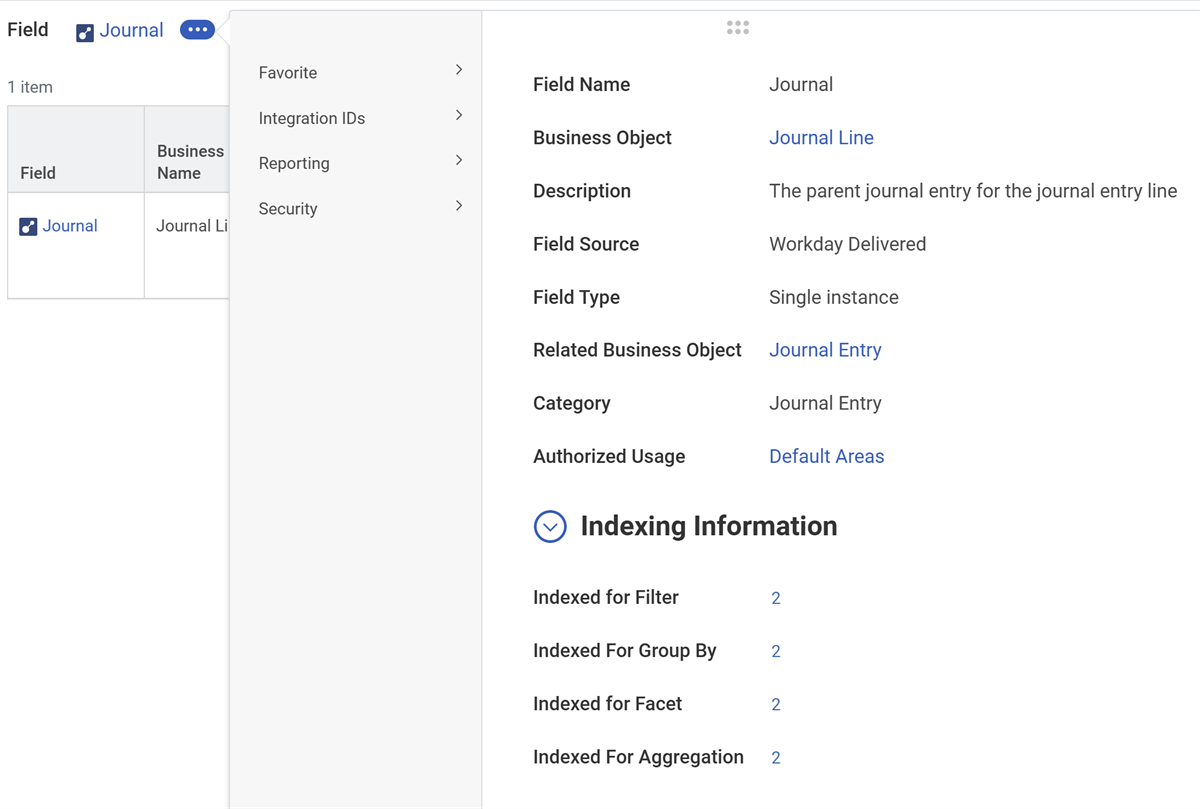
When creating a report with an indexed data source, try to use only fields indexed for that data source. Using nonindexed fields as columns or filters on your report hurts your report's performance and, in some cases, can cause significant slowdown.
Optimized for Performance Option
You may notice the Optimized for Performance checkbox when creating or copying a report with an indexed data source. This option appears on the following report types:
- Advanced
- Matrix
- Simple
- Transposed
- Trending
Selecting this option during report creation restricts you to adding only indexed data sources and fields to your report. This way, you can ensure that your custom report performs in the fastest way possible. Remember, even if you use an indexed data source, including nonindexed fields in your report causes the report to run in the slower hybrid mode.
When you create a custom report, the system enables this option by default. Note that leaving this default setting restricts the fields available for inclusion in your report. Use the
Business Object Details
or Report Fields
report to verify the indexed status of the fields you want to include in your report columns or filters.Adding Fields From Related Business Objects
You already know how to add fields from the primary business object. Depending on the report type, you can also add fields from related business objects. On the Columns tab, you specify the business object and field for the related data. A given custom report definition can include fields from more than one related business object. Additionally, you can select a field that links the PBO and RBO together.
In the following example, the Dependents field links a report using the Worker PBO to the Dependent RBO. This allows you to pull fields from the RBO into your report as well.
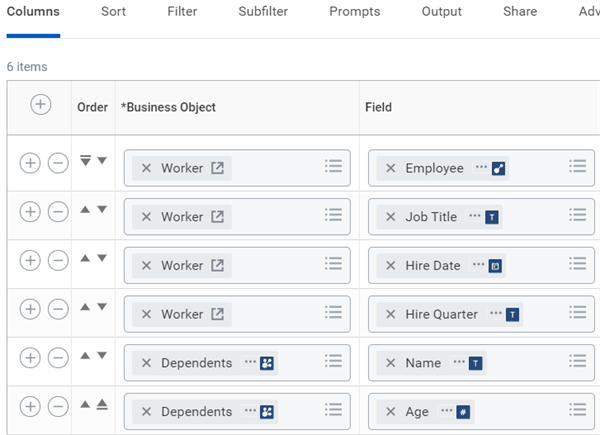
Adding fields from related business objects
Note
: When building a report using the Advanced report type, you can only access fields from related business objects that are one level deep. To access fields from RBOs that are more than one level deep, you need to create a calculated field.Custom Report Tabs
When creating a custom report using the Advanced Report type, configure the report using these tabs:
Option | Description |
|---|---|
Columns | Select the fields to include on the report and specify their sequence. The Columns grid contains one row for each column. In each row, define the business object, field, column heading overrides, and options for how the field should display. Security Note : You can only add fields that you have access to. |
Sort | Control the order to present and group data. This tab applies sorting for data on the primary business object and subsorting for data on related business objects. You can also specify options for displaying subtotals, grand totals, and outlines. Advanced reports sort data based on a unique ID for efficiency. In other report types, if you do not specify sorting or grouping criteria, sorting is based on the first (left-most) column associated with the primary business object. |
Filter | Add conditions to filter the primary business object. |
Subfilter | Add conditions to filter the related business objects. You can add subfilters for multiple related business objects. |
Prompts | Specify prompt-related data about your report, including populating undefined prompt values. You can set default values for prompts, so users do not have to enter values when running a report. You can also hide prompts that have default values, so that they do not appear to users at run time. |
Output | Override the default output options, including output type, worklet options, and help text. By default, a custom report renders as a table. You can change this to display the report as a chart, chart and table, or gauge. By default, the system does not enable custom reports for use as worklets, but you can change this setting. |
Share | Share the report with other users or groups. By default, only the report owner can view a custom report. You can only share a report with users who have access to the report data source. Sharing a report allows other users to run and copy the report. |
Advanced | Defines additional report options. Some include enabling save parameters, enabling a report as a web service, enabling a report for Worksheets, or changing the expiration information for temporary reports. |
Sorting
Logical Sort Order
You can only sort most fields in Workday alphabetically (either ascending or descending). However, certain fields in Workday can use logical sort order (either ascending or descending). These fields have a logical predefined order. By default, if a field is able to sort logically, the system does so.
The following example shows the Period field in a financial report. This field has a logical sort order of January, February, March, etc.
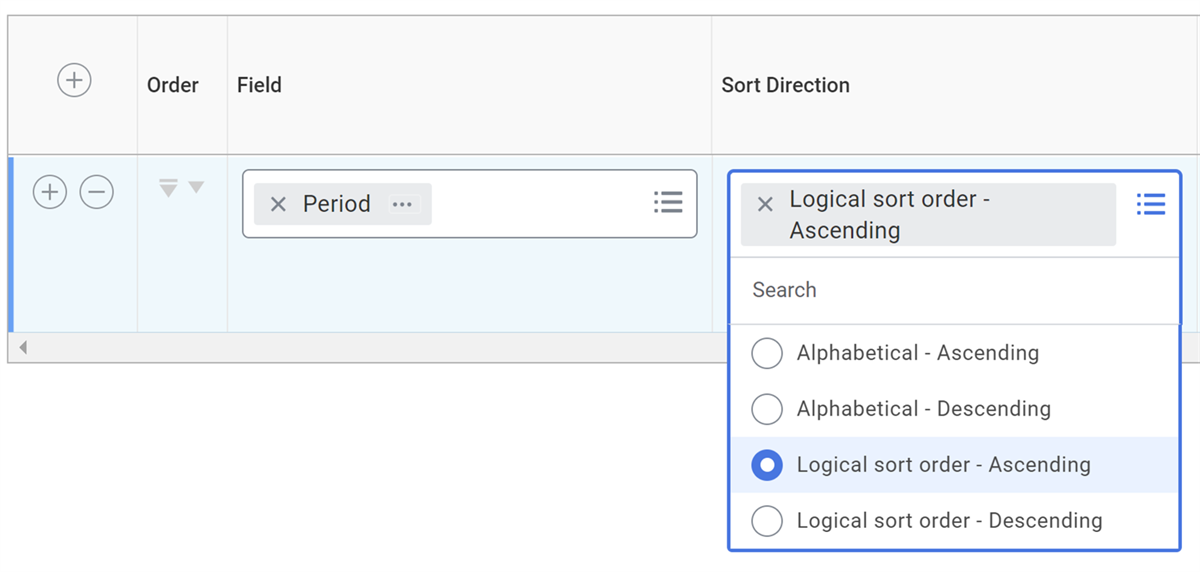
Sub Level Sorting
You can sort data from related business objects in addition to sorting data from the primary business object. In the Sub Level Sort section, specify which fields from a related business object should determine sort order for the related data. If you do not configure sub level sorting, related instances sort by the left-most column of the related business object by default. Related business objects and fields used for sub level sorting do not need to display on the report output.
In this example, the report sorts instances of the Expense Reports - All Statuses related business object by the Expense Report Total Amount field.
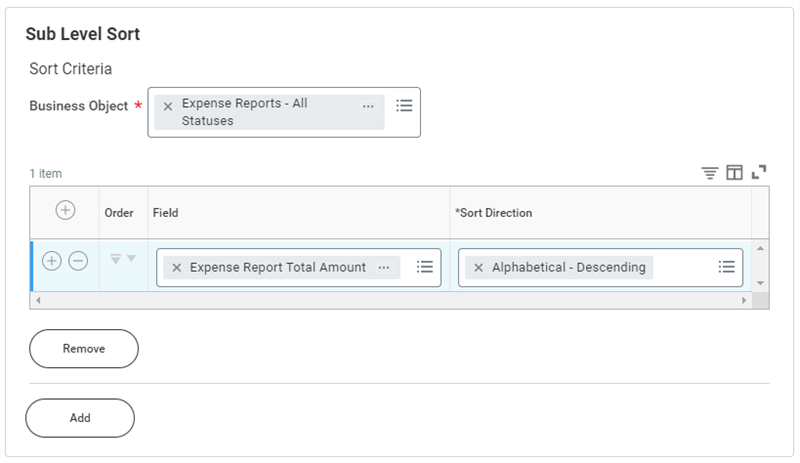
You can use the Add button to sort data from additional related business objects on your report.
Filtering
Select a data source that filters unnecessary data from the report. After the data source determines the data pool, you can apply filter criteria to further narrow the results. Keep in mind that filters can impact the runtime of a report. Both the number of filters and the order of filters can slow a report down. Whenever possible, use a data source with a built-in filter.
Place filters that exclude the greatest number of instances from the report at the top of the filter grid. This ensures that the system filters on progressively smaller amounts of instances as it runs through the ordered filters.
Lastly, remember to use indexed fields for your report's filters when using an indexed data source. Using nonindexed fields as filters on an indexed report causes your report to not run in indexed mode.
Subfiltering
In addition to filtering data from the primary business object, you can also filter data from related business objects. As shown in the image below, on the Subfilter tab, you can specify fields from a related business object to use in filter conditions for the related data. Related business objects and fields in subfilters do not need to display on the report output.
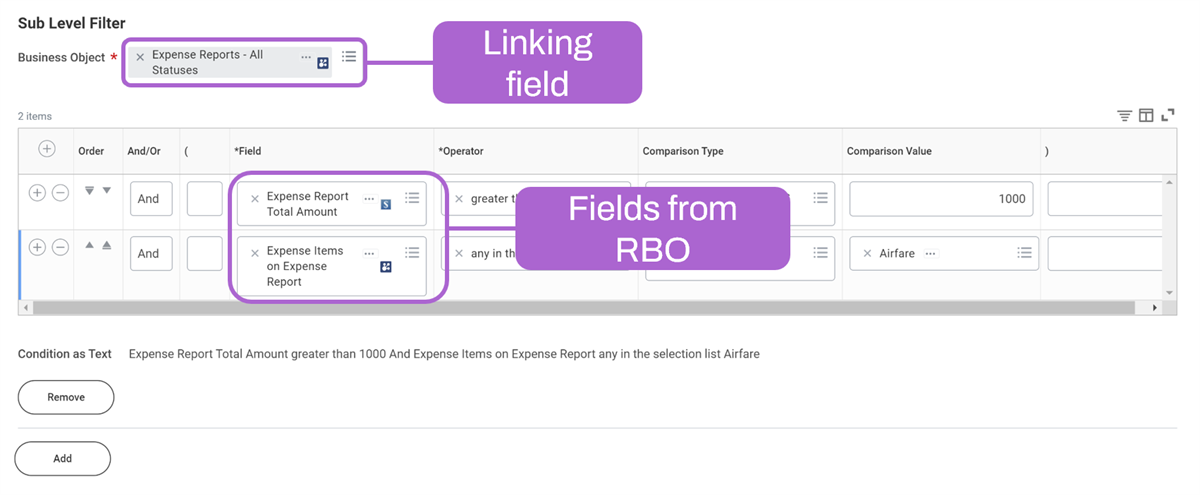
Filter Logic
It is important to understand how your report filter and subfilter interact. For a given instance of your primary business object, the subfilter logic executes first, then the filter logic.
For example, as shown in the image below take a report where Worker is the primary business object and Expense Report is the related business object:
- For a worker on the Worker primary business object, the subfilter looks on the Expense Report related business object to see if the worker has corresponding expense reports.
- If the worker has corresponding expense reports, the subfilter applies the "Amount > 1000" logic and returns expense reports that meet the criteria.
- Next, the process moves back to the primary business object.
- The filter determines if the worker lives in London and returns workers that meet the criteria.
- Note that workers who live in London but do not have expense reports will also display on the report.
Note
: If you include the condition " RBO not empty" in the filter, the system filters out instances of the primary business object that do not have related data.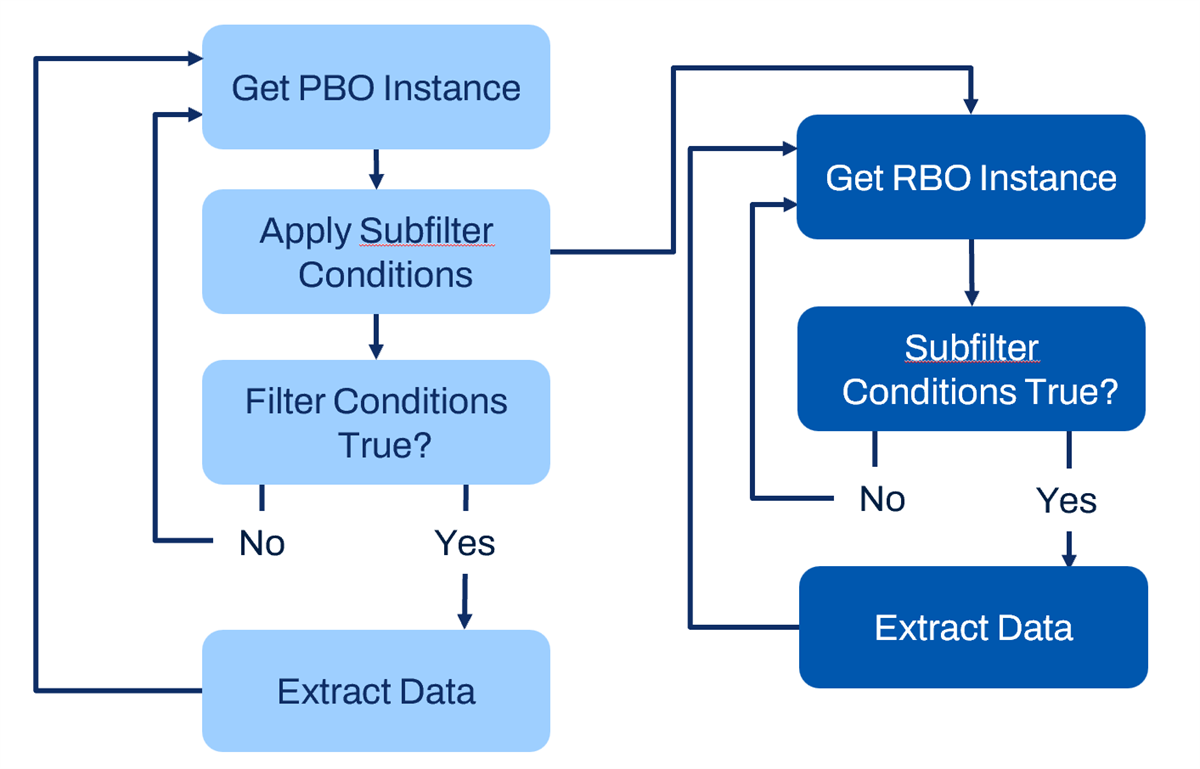
Prompting
You can use prompts in your filters and subfilters instead of hardcoding filter values. Prompts provide more flexibility because users can specify the criteria for the report each time it runs.
Using Prompts in Filters and Subfilters
You can use the Filter and Subfilter tabs to control which fields should prompt the user for a value at runtime. When defining a filter or subfilter condition, there are two comparison types that you can use to prompt the user for a value.
Comparison Type | Description |
|---|---|
Prompt the user for a value | Workday uses the entered prompt value to filter the report. If this prompt value is blank, the report filters by a blank value. |
Prompt the user for a value and ignore the filter condition if the value is blank | With this option, if the prompt value is blank, the report ignores the filter condition. |
Configuring Prompts
You can configure the prompt settings on the Prompts tab.
The Instructions field lets you specify information to display on the user prompt.
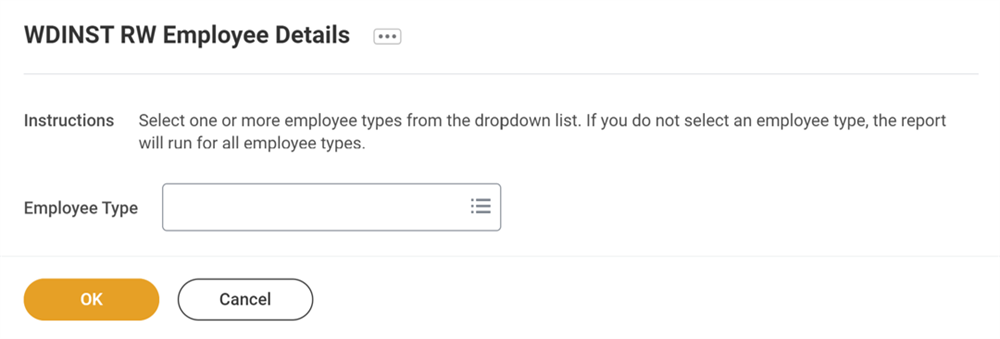
Some fields in Workday come with built-in prompts that automatically appear on your report if you add the field to your report definition. The Populate Undefined Prompt Defaults checkbox on the Prompt tab lets you quickly populate any prompt defaults. Select this checkbox to automatically add any undefined prompts to the Prompt Defaults grid.
The Display Prompt Values in Subtitle checkbox lets you show or hide the prompt values at the top of the report output. In the Prompt Defaults grid, you can use the Do Not Include in Subtitle setting to exclude specific prompt values from displaying in the subtitle.
You can specify options and default values for your prompt fields in the Prompt Defaults grid.
These are the options available when defining prompt defaults:
Option | Description |
|---|---|
Field | Specifies the field for which you want to enter prompt data. |
Prompt Qualifier | If you define a data range or a dataset prompt for this field, you must choose the Prompt Qualifier to identify which prompt you want to override. |
Label for Prompt | Overrides the label for this prompt when you run the report. |
Default Type | Determines the default values to use when the report runs. The options are:
|
Default Value | This specifies one or more default values or the field to use to determine the default prompt. This function goes with the Specify default value and Determine default value at runtime options. |
Required | Requires the user to enter a prompt field value. The field cannot be blank when the report runs. |
Do Not Prompt at Runtime | Suppresses the display of the prompt for this field. The system uses any default values automatically, skipping any interaction for the prompt for this field. |
Do Not Include in Subtitle | Suppresses the display of the prompt values from the final report output. Any values the user selects from prompts appear below the report title (above the detail data) by default when the report runs. |
Do Not Auto Fill for Related Tasks | Clears an incorrect prompt auto fill when running reports. Does not need to be selected unless a prompt is incorrectly auto filled. |
Control Prompt Values | Allows users to configure pop-ups to apply filtering criteria to prompt results and specify parent fields to create mapping between prompts. This feature enables control over the range of values a prompt allows at runtime, such as limiting prompts or filtering for date ranges. |
Resource
:
For more information on configuring the Control Prompt Values option please sign into Community and search for Report Prompt Control
. Select the release note.Where Can Prompts Come From
In addition to defining them in filters and subfilters, prompts can come from other places in the system. You can set the defaults for these prompts on the Prompts tab.
Location | Example |
|---|---|
Data Source | The Employees by Organization data source has these built-in prompts: Include Managers, Include Subordinate Organizations, and Organization. |
Data Source Filter | The Journal Lines for Company data source filter has nine built-in prompts, including Company, Year, and Period. |
Field | The Expense Report Total Amount in Reporting Currency field has a built-in prompt for Reporting Currency. |
Calculated Field | You can create a calculated field using the Prompt for Value function. |
Prompt Set | You can create a prompt set to group prompt field values. A prompt set allows you to enter the prompt field value once and then the system feeds the one value to the multiple uses of the field. An example is when a report group or a composite report contains multiple reports all prompting on the same field. |
Note
: Use a data source with built-in prompts when possible, rather than manually creating filters and prompts on a more generic data source. This results in a more efficient report.Sharing
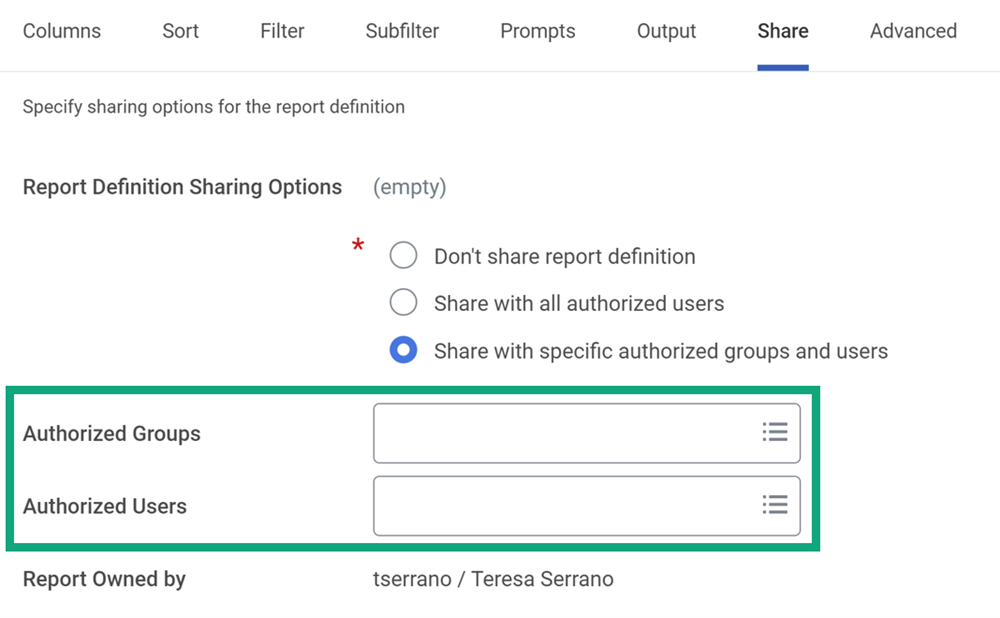
Custom reports are not shared by default. A custom report is visible only to its owner (and to users who have access to manage all custom reports). The Share tab lets you share a custom report with authorized users. You can share a custom report with all users who have access to the report data source and data source filter. You can also share a report with specific groups and users who have access to the report data source and data source filter. The domain securing the custom report's data source determines which security groups you can share the custom report with.
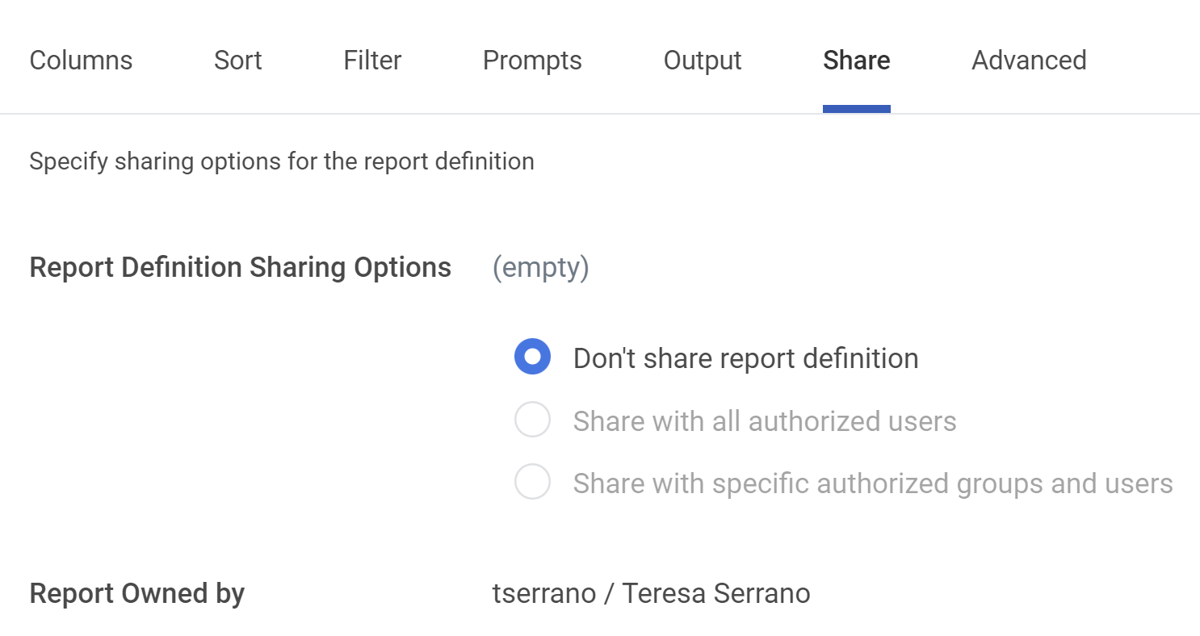
Sharing options
Security Note
: You can control if report writers can use the different sharing options. Report writers must have access to these security domains to use the sharing options:- Domain: Report Definition Sharing - All Authorized Users
- Domain: Report Definition Sharing - Specific Groups
- Domain: Report Definition Sharing - Specific Users
When you share a report, users can run the report, but they cannot edit it. Only the report owner (and those who can manage all custom reports) can edit custom reports. However, a shared user can view the report definition and copy the report definition if the shared user is also a report writer.
Note
: You can use the Start Proxy task to easily test the report as a shared user. This lets you verify that a user can view the appropriate data in the report.What Can Users View on a Shared Report?
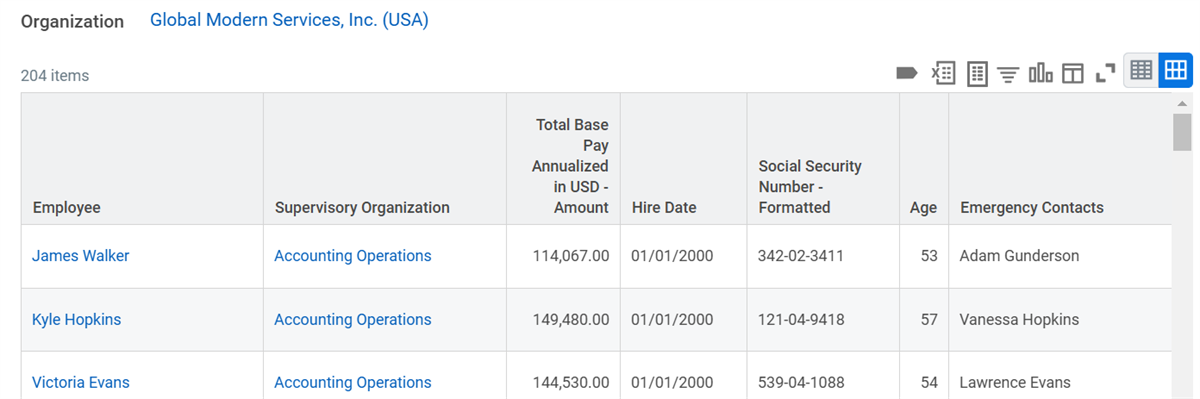
A user running a shared report can view the report results based on their security to the data source, data source filter, and report fields. The following example shows the report output when Jack Taylor runs a shared report.
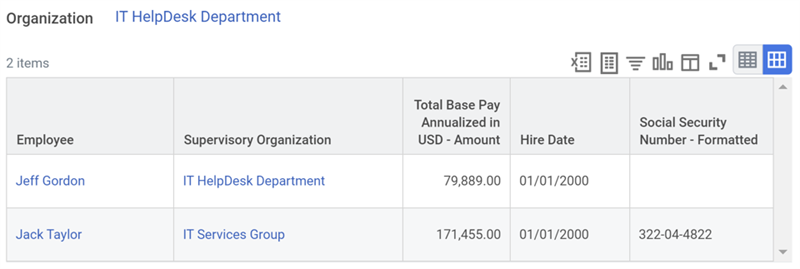
The Workday security model determines what Jack can view on the report:
- He can only view two instances (rows) based on his access to the data source. Jack can only view employees in his organization (IT HelpDesk Department).
- He cannot view the Social Security number for his employee Jeff Gordon. Jack has constrained access to this report field, so he can only view his own Social Security number.
- He cannot view the Age and Emergency Contacts report fields at all in the output. Jack does not have any access to these report fields.
The following example shows the report output when Logan McNeil runs a shared report. Logan McNeil has unconstrained access to the report.
Data Source and Data Source Filter Security
Security domains contain both report data sources and data source filters. You need to identify which domains contains a data source and data source filter in order to determine if a user has access to report data. Using that information, you can grant the user security access to the necessary domain to display the report data. You can use the
View Security for Securable Item
report to view the security configurations for any object in the Workday system. This includes data sources and data source filters.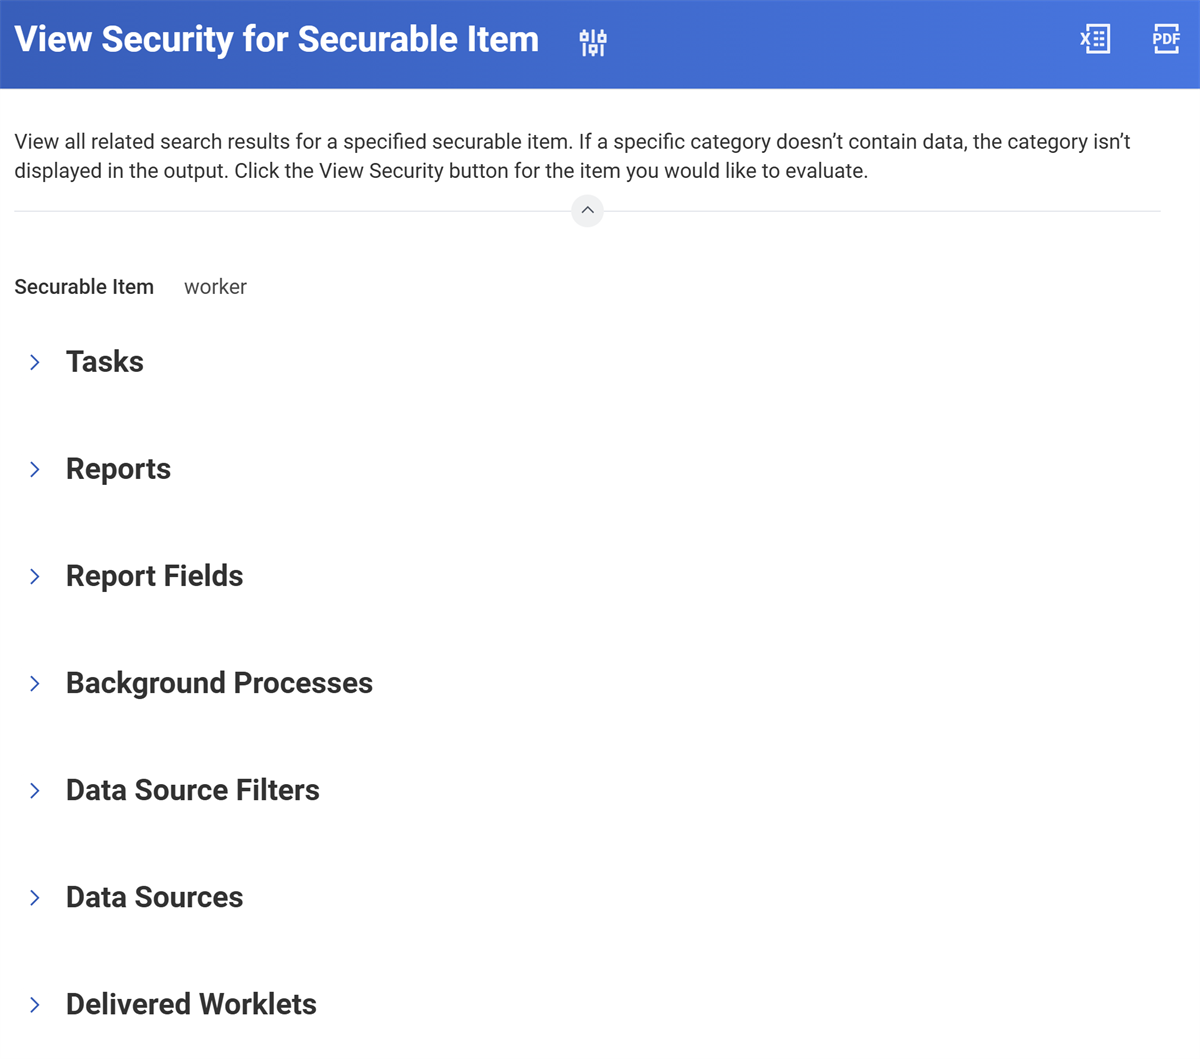
Remember, to share a report with a user, they must have security access to both the report data source and the data source filter used in the report. The "Share with specific authorized groups and users" option prompts you to select which authorized security groups or users you wish to share the report with. Only security groups and users authorized to access both the report's data source and data source filter are selectable from these prompts.
Note
: You may receive an error when sharing a report with an allowed security group if you later change the data source filter for the report. This happens when the security groups you have selected do not have access to the newly selected data source filter.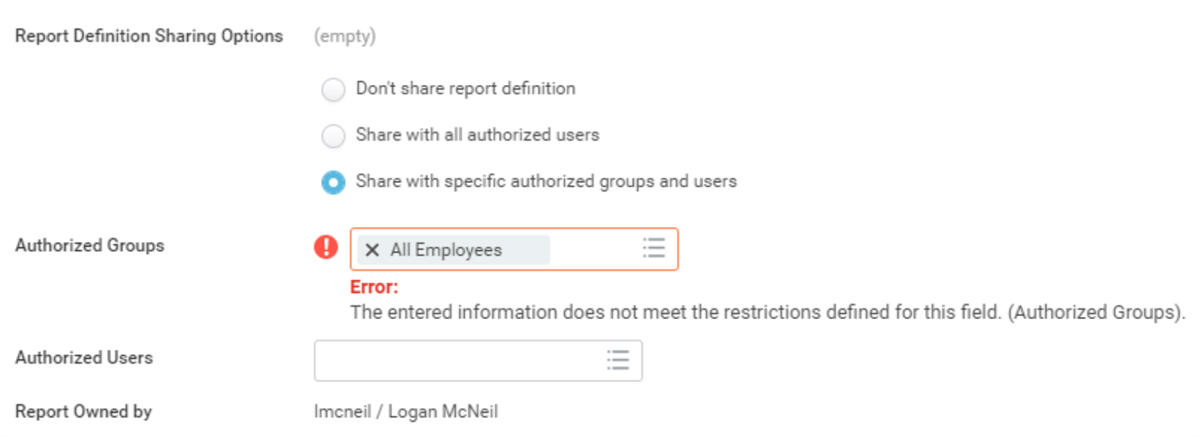
Scheduling a Report
Use the
Schedule a Report
task to schedule a report or report group to run. Report groups allow you to run multiple reports as a single unit.You can set the run frequency to run now, run once in the future, daily recurrence, weekly recurrence, monthly recurrence, dependent, or custom recurrence. Scheduled reports run in the background.
Note
: You can also get to this task from the report's Related Actions.Report Criteria
Define default values on the Report Criteria tab for prompts that are visible to users when running the report.
These are the report criteria options:
Option | Description |
|---|---|
Value Type | Select whether you want to specify a value for the prompt field or have the value calculated at runtime based on the value of another field. |
Value | When the Value Type field is Specify Value, select the prompt value to use when the report runs. When the Value Type field is Determine Value at Runtime, select the field that should determine the prompt value when the report runs. |
Schedule
Define the schedule on the Schedule tab if you are scheduling a report to run later.
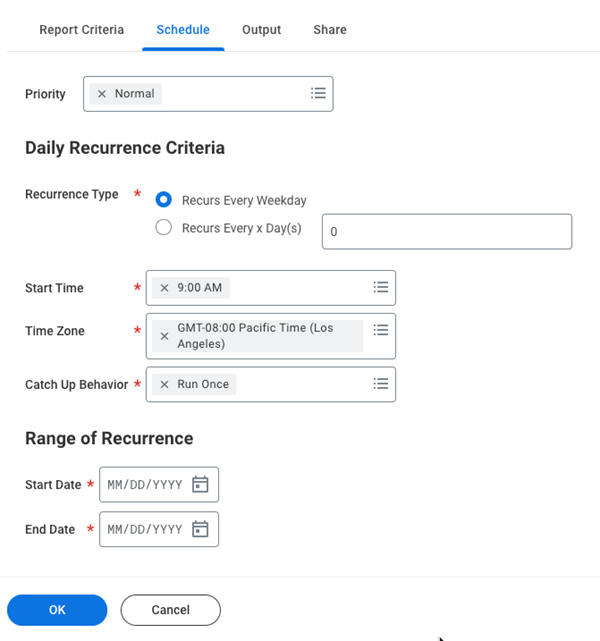
Schedule priority allows you to set the priority of schedules to run during periods of high system resource utilization. The schedule options themselves vary depending on the run frequency:
Run Frequency | Schedule Criteria |
|---|---|
Run Once in the Future | Specify the Start Date, Start Time, and Time Zone. |
Daily Recurrence | Set the Recurrence Type to Recurs Every Weekday or Recurs Every x Day(s). If you select Recurs Every x Day(s), enter a number between 1 and 366 to specify the number of days between recurrences. Specify the Start Time, Time Zone, Start Date, and End Date. |
Weekly Recurrence | In the Recurs Every x Weeks(s) field, enter a number between 1 and 52 to specify the weekly frequency. In the Day(s) of the Week field, select one or more days of the week to schedule each recurrence. Specify the Start Time, Time Zone, Start Date, and End Date. |
Monthly Recurrence | Set the monthly recurrence criteria to Every Month or Month(s). If you select Month(s), specify one or more months to schedule each recurrence. Set the Recurrence Type to Day(s) of the Month or Day of the Week. Specify the Start Time, Time Zone, Start Date, and End Date. |
Dependent | Runs the report based on a specified criteria based on conditional dependencies. Set the process type, and triggering status. You can also set additional time delays. |
Custom Criteria | Specify the Start Date and Custom Start Time of reports to recur at nonstandard intervals and for multiple recurrences. |
Note
: Workday lets you select an End Date that allows five executions of any recurring report beyond December 31 of the following
year.Output
Define the report output options on the Output tab.
These are the report output options:
Option | Description |
|---|---|
Output Type | Select Excel, Report (PDF), or Text (CSV). |
Report Tags | Associate report tags with the report output to make the file easy to find. |
File to be Deleted After (Days) | Specify how many days Workday should keep the report output before deleting it. |
Do Not Output an Empty Report | Select this option to suppress the creation of an empty file on the My Reports menu if there is no report output and eliminate the corresponding email notification. |
Hide Prompt Values | Hides the prompt values of the output type of Excel or Text (CSV). |
Share
Share the report output with authorized users and security groups from the Share tab.
These are the sharing options:
Option | Description |
|---|---|
Don't share report output | Report output is not shared. Only the user scheduling the report notices the report output file. |
Share report output with other users | Report output is shared with any of the authorized users and Security Groups that you specify. Select the "I agree to the statement above" checkbox to acknowledge that you understand the implications of sharing report output with other users. |
Important
: By sharing report output you specifically authorize the specified users to view the report and its data exactly as you view it, regardless of their Workday security.Security Note
: You must have access to the Report Output Sharing security domain to share scheduled output and bypass security.Users access the report output from their Notifications, from the My Reports menu, or by running the
My Report Output Files
report. Users are able to search for report output using report tags when running the My Report Output Files
report or viewing More Reports
on the My Reports menu.Scheduling Reports
Scheduled Future Processes
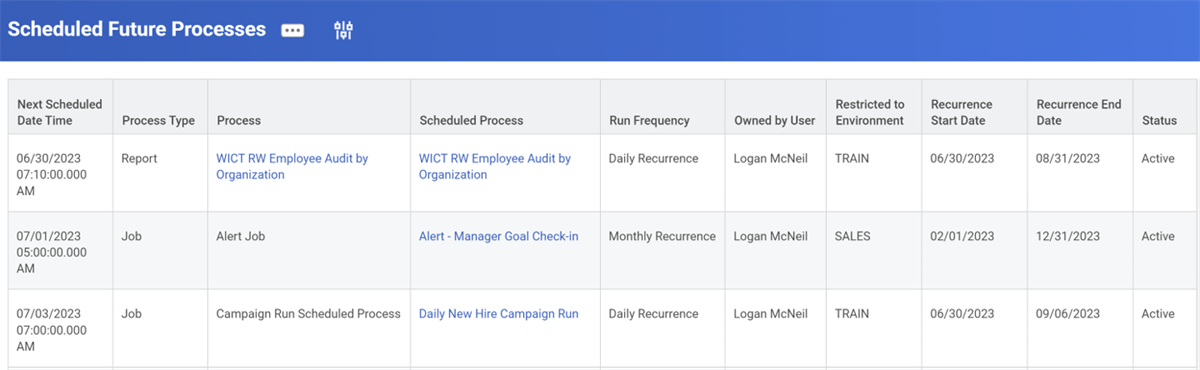
Use the
Scheduled Future Processes
report to view all background processes scheduled to run but have not yet done so. The report includes integrations, batch processes, and reports scheduled to run either once in the future or on a recurring basis.Select
Schedule Future Process
from the request name's Related Actions to:- Edit or delete a scheduled request.
- Suspend or activate a scheduled request.
- Transfer ownership of a scheduled request (if someone leaves the company).
Matrix Report Functionality
Matrix reports are the foundation for custom analytics and interactive reporting in Workday. Matrix reports provide grouping, aggregation, and interactive drilling across different dimensions, allowing users to gain insight into data and take action on results.
Matrix reports group data by row, and, optionally, by column. When you run the report, Workday builds the report matrix both horizontally and vertically, based on the report criteria. After building the matrix report, you can view the summarization data by different fields. You can drill into each cell value, group the results by another field (View By), or view the details (View Details) that comprise the value in the matrix cell.
Matrix reports are ideally suited for:
- Aggregating and summarizing numeric data
- Modifying rows and columns at run time for a different view
- Drilling into summaries and details
- Taking action on insights
The main construct of a matrix report involves:
- Grouping: Group instances of the primary business object by defining the row and column groupings.
- Summarizing: Define aggregations for each grouping.
- Drilling: Drill into the summarizations for further analysis. Report users can view the data by other fields and access detail data behind the summarizations.
Configuring a Matrix Report
When configuring a matrix report definition, you must first define the row groupings, column groupings, and summarizations under the Matrix tab.
Row Groupings
Specify at least one row grouping and one summarization. You can group by more than one dimension, which is referred to as nested levels. You can have a maximum of eight row groupings.
For each grouping, you can specify a sort option. By default, Workday sorts groupings based on totals in descending order. Alternatively, you can sort alphabetically based on a logical sort or on a defined field value group.
You can control the maximum number of row grouping values to display in the report output using the Maximum Number of Rows field. The report displays the number of rows defined in this field in the output. Any additional row grouping values are aggregated into a row labeled "Other" in the report output. The default maximum number of rows is 250. Keep this default number in mind and check for the "Other" row grouping if your report output is missing data.
The maximum number of rows is three. In the following example, the matrix report uses the Gender field for the row grouping. The report output will display a maximum of three Genders. If there are more than three, they will be aggregated as "Other."

An example of row group.
Column Groupings
Column groupings are optional. You can have a maximum of two column groupings.
You can control the maximum number of column grouping values to display in the report output. The defined maximum number displays in the output while any other column grouping values are aggregated as "Other." The default number of columns is 20.
For example, if the maximum number of columns is three, then the report output will display a maximum of three locations. If there are more than three locations, they will be aggregated as "Other."
Summarization Types
The Matrix tab allows you to configure summarizations for your report's numeric or currency data. The summarization type enables you to specify the aggregation method applied to the field. The results of the aggregation method are displayed in the matrix cells of the report output. The default summarization type is Count. Workday uses the first summarization to sort Group By Fields.

An example of the Define the Field(s) to Summarize.
Summarization options include:
Term | Definition |
|---|---|
Count | Counts the number of values, or instances for the defined grouping. |
Count Distinct | Counts the distinct, or unique, number of instances of an identified field. |
Sum | Sums the values of a field for the defined grouping. |
Average | Averages the values of a field for the defined grouping. |
Minimum | Displays the minimum value of a field for the defined grouping. |
Maximum | Displays the maximum value of a field for the defined grouping. |
Calculation | Creates an arithmetic calculation on the other summarizations generated in the report. For example, you can use a calculation to subtract the minimum summarization value generated from the maximum summarization value generated. Matrix report summary calculations are unique to the report. You can maintain and edit them like report-specific calculated fields. |
Note
: If you use an indexed data source, when choosing fields to summarize, use the View Indexed Fields for Data Source
report. This report will help you to identify if an indexed field is for aggregation. If not, you will receive a performance warning in the report. This warning is not an error.Security Note
: If you create a matrix report and share it with a user who has no authority to view the row grouping, column grouping, or summarization field, a run time error will trigger.Drillable Fields
A matrix report displays the data as an aggregate of the row and column groupings. Drillable fields let you view the data by additional dimensions. You can view the data by up to two additional dimensions to further define the data in each cell.
You can control what fields are drillable under the Drill Down tab. There are default drillable fields, but it is best practice to configure specific drillable fields so that the fields remain consistent.
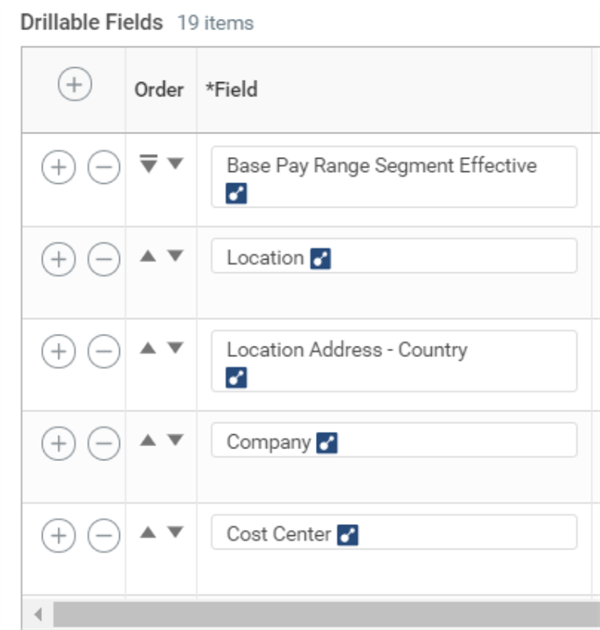
An example of drillable fields. | 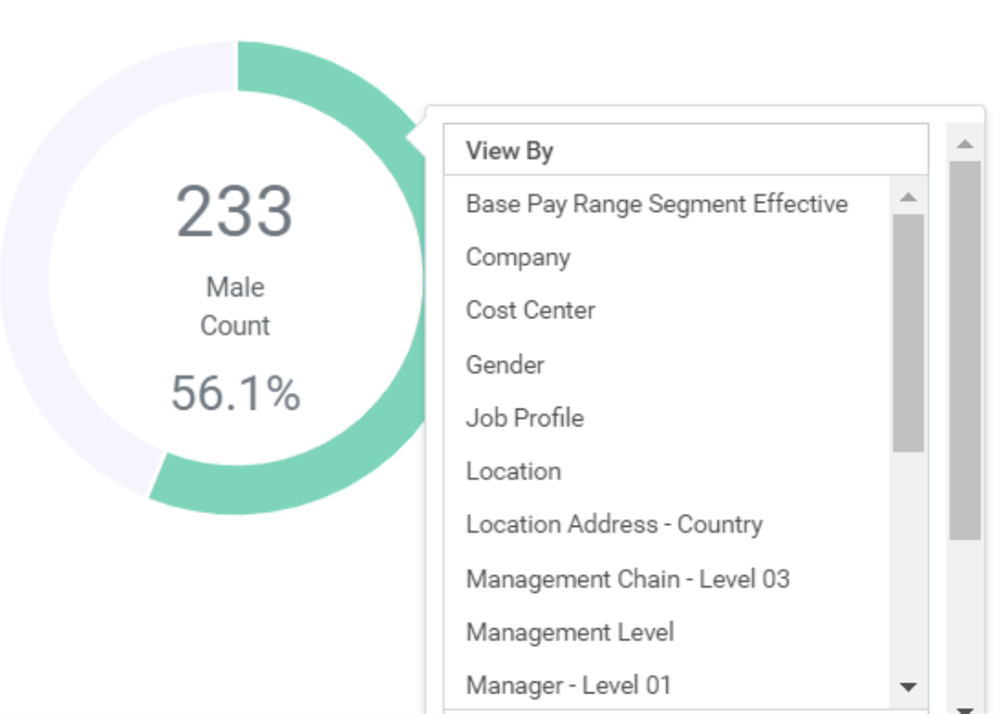
An example of a matrix report with drillable fields. |
When viewing the output of a matrix report, users can drill down on a summarization using a drillable field. Users will only view fields they have access to.
Detail Data
You can configure detail data on the Drill Down tab to allow users to view the details behind a summarization.
The images below provide an example:
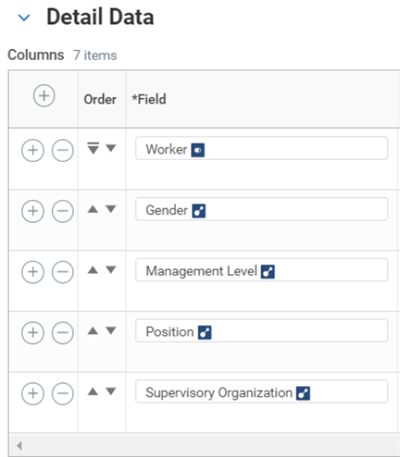
An example of the Drill Down tab.
When the user selects a summarization metric, they will view the detail data fields you defined, but only the fields to which they have access.
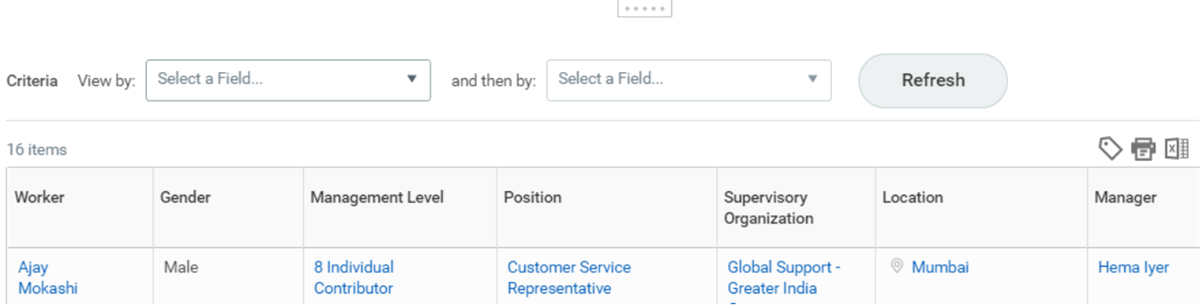
An example of the summarized, defined detail data fields. ( )
Dashboards and Worklets
Applications on a landing page provide quick access to dashboards.
Dashboards consolidate key reporting data and actionable items in one location. You can configure dashboards on the Home landing page as applications. Workday provides preconfigured dashboards for distinct functional areas, and you can also create custom dashboards.
Workday secures dashboards to specific domains. This association helps an organization determine access based on configurable security.
Workday-Delivered Dashboards
Workday delivers several dashboards with preconfigured applications that you can copy and modify to meet your unique requirements.
Additionally, you can configure some of the delivered dashboards to contain multiple tabs and organize information. Use the
Maintain Dashboards
report to identify dashboards that can have tabs. Then, select the Edit button to configure content.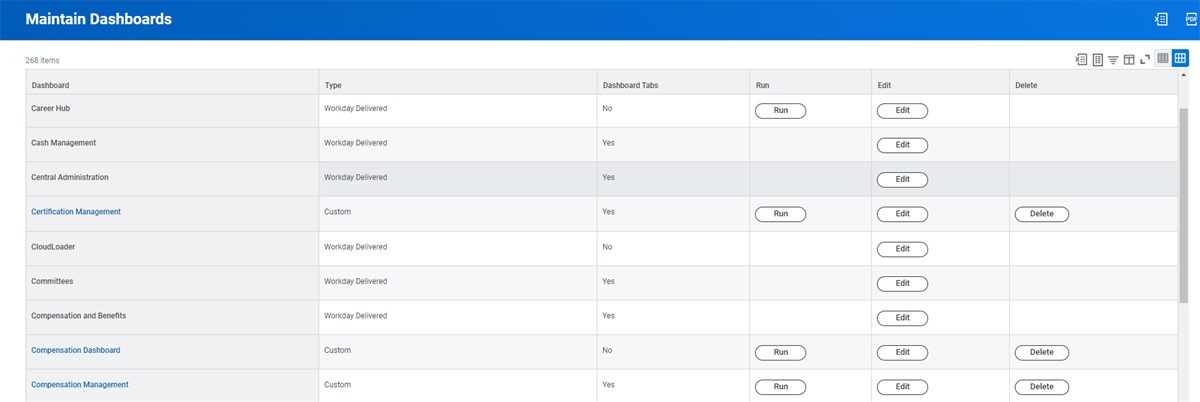
Maintain Dashboard Tabs
Access dashboards from the Dashboards application on the Home page. Using security configurations, you can select which security groups can access a specific dashboard. Dashboards commonly used as applications include:
- Compensation and Benefits
- Delegation Dashboard
- Management Reporting Dashboard
- Onboarding
- Recruiting
- Surveys Dashboard
- Talent Management
- Workforce Planning
For managers, Workday delivers dashboards in distinct functional areas, such as:
Delivered Dashboard | Description and Available Worklets |
|---|---|
Delegation | Enables delegates to easily view actions they can take on behalf of the delegated user. Use this dashboard only when you have an active delegation setup. |
Management Reporting Dashboard | Includes standard reports and scorecard worklets to assist first-line managers with historical and real-time visualizations. These display worker information, turnover percentages, business process updates and much more. Users can choose up to six out of 17 delivered worklets they wish to view on the dashboard. Some examples include:
|
My Dashboard | A personal dashboard of expanded worklets. |
Onboarding | The Onboarding dashboard contains bulletins, announcements, and tasks for onboarding workers. These tasks can include updating contact information, completing Form I-9, and enrolling in benefits. |
Report Administrator | Enables you to monitor report performance from a single location. Workday provides the following reports as worklets you can add to your Report Administrator dashboard:
|
Retention Analysis | Includes the following worklets:
|
Surveys Dashboard | Provides users with quick access to the Survey Home report and Create Survey task. You can configure the dashboard to include the Active Surveys and Draft Surveys report. |
System Health Dashboard | Provides visibility into system health and projected system load:
|
Talent and Performance | A configurable workspace that provides workers with current reports and tasks related to their own talent and performance. The worklets included on this dashboard are:
|
Team Performance | Provides managers with current reports and tasks related to the performance of their team members. You can customize the dashboard to include:
|
Custom Dashboards
In addition to standard dashboards, you can configure an unlimited number of custom dashboards. Each custom dashboard can have its own security domain in the System functional area. You can use the
Maintain Dashboards
report to view, configure, edit, and delete custom dashboards.Examples of custom dashboards include:
- Goals
- Headcount Analytics
- Headcount and Recruiting
- HR Operations and Compliance
- Sales Performance
- Talent Assessment
- Workday HCM Data Guide
- Workforce Scorecard
You can create a custom dashboard to group worklets for easy user access. As you create the dashboard, you can:
- Enable a prompt set for the dashboard. A prompt set provides flexibility when running reports.
- Set up domain security access.
- Allow users to configure worklets.
Each custom dashboard displays a set of custom reports. Workday allows you to have an unlimited number of types under dashboard, but only six worklets per type. The
Maintain Dashboards
task allows you to identify which dashboards you want to allow users to set up.Maintain Dashboards
You can use the
Maintain Dashboards
report to view the list of enabled dashboards, configure them, and change their descriptions. You can add worklets, menus, and announcements to any Workday-delivered or custom dashboard.The
Maintain Dashboards
task provides:- A list of both custom and Workday-delivered dashboards.
- Access to the tasks to manage custom dashboards.
You can use the
Remove Worklet from Dashboards
task to remove a selected worklet from:- All dashboards.
- Specific dashboards.
- User configurations.
- Administrator configurations.
The
Remove Worklet from Dashboards
task also includes a confirmation page that enables you to drill down on worklet usage details for user and administrator configurations. Remove a worklet from administrators and user configurations before you hide or delete it.Hiding Dashboards
You can delete custom dashboards but you cannot delete delivered dashboards. However, you can hide delivered dashboards if you do not plan on using them.
The
Hide Workday Delivered Report
task makes standard reports no longer searchable. By hiding, you can eliminate confusion with your users when you create a custom report rather than using the Workday-delivered report.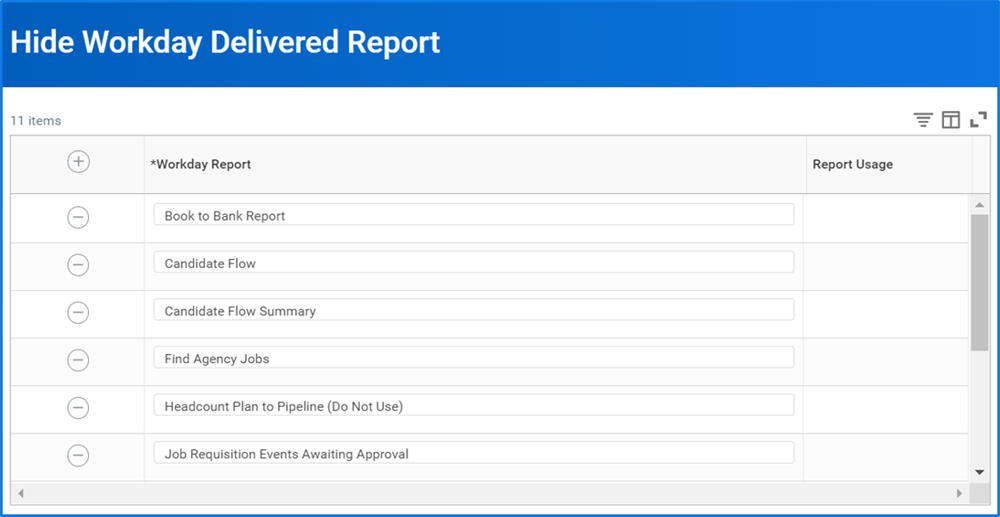
Hide Workday Delivered Reports.
When you hide a standard report, it is no longer available in search results, in menus, or as a Related Action. Someone at the central organization level should perform hiding standard reports. This person needs to understand the full impact of this change tenant-wide.
Security Note
: You must have security access to the Setup: Tenant Setup - General domain to hide standard reports. For example, in our tenant for this class, Logan McNeil has security access to this task while Teresa Serrano does not have security access.Note
: When moving reports from Sandbox to Production, Workday does not move the hidden report settings. You will need to use the Hide Workday Delivered Report
task in Production to hide any reports that you have hidden in the Sandbox environment.Delivered Worklets
Worklets provide quick access to frequently referenced data and tasks common to a specific functional area. You can display reports as applications on Workday landing pages or in dashboards. There are two types of worklets:
- Custom worklets: You can create custom reports for these report types and then enable them as worklets: Advanced, Composite, Matrix, nBox, Transposed and Trending
- Workday-delivered worklets: You cannot copy or modify Workday-delivered worklets.
If you share a worklet, it becomes available for authorized users to select when configuring dashboards available to them.
Custom Worklets
When creating custom worklets, you should consider the following:
- Select a data source with a built-in filter rather than configuring a filter in the report.
- Use a sort sequence and filter criteria to ensure that the most essential data displays in the provided rows in the worklet.
- Determine the maximum number of rows.
- Hide columns in a worklet using the Display When Maximized option.
- Configure the View More... link to launch the report with all required rows and columns.
- Limit the number of worklets on a dashboard. The more worklets included on a dashboard, the longer the dashboard takes to load.
Optional, Recommended, and Required Worklets
You can set up worklets to share. For example:
- Optional worklets will automatically display on the Home page. A user can add or remove optional worklets. If you do not specify during setup, a worklet is always optional.
- Recommended worklets will display automatically on the Home page or dashboard. A user can remove a recommended worklet.
- Required workletswill display automatically on the Home page or dashboard. A user cannot remove a required worklet.
The
Configure Dashboard Content
task enables you to:- Select the security groups for required and recommended worklets. You can only set up a worklet as required or recommended when you share it with all authorized groups or specific authorized groups. If you specify one or more authorized users in the report sharing options, you cannot set up the worklet as required or recommended. If the user is in one or more of the required security groups, a required worklet displays on the Home page. If there is a conflict between required and recommended options for a worklet, required takes precedence.
- Set up a worklet title that is different than the report title. The worklet title displays only when the worklet displays on a dashboard, not when you run a report independently.
Menus
You can use Workday-delivered or custom dashboards for more than worklets and analytics. Configure menus and announcements using the
Maintain Dashboards
report to allow users to access not only reports, but also key tasks, links, and announcements.Menus are available for dashboards (both delivered and custom), but not for landing pages such as Home or Workbench. Menus are configurable at the tab level. Workday allows announcements on dashboards and landing pages, and they are configurable at the dashboard level.
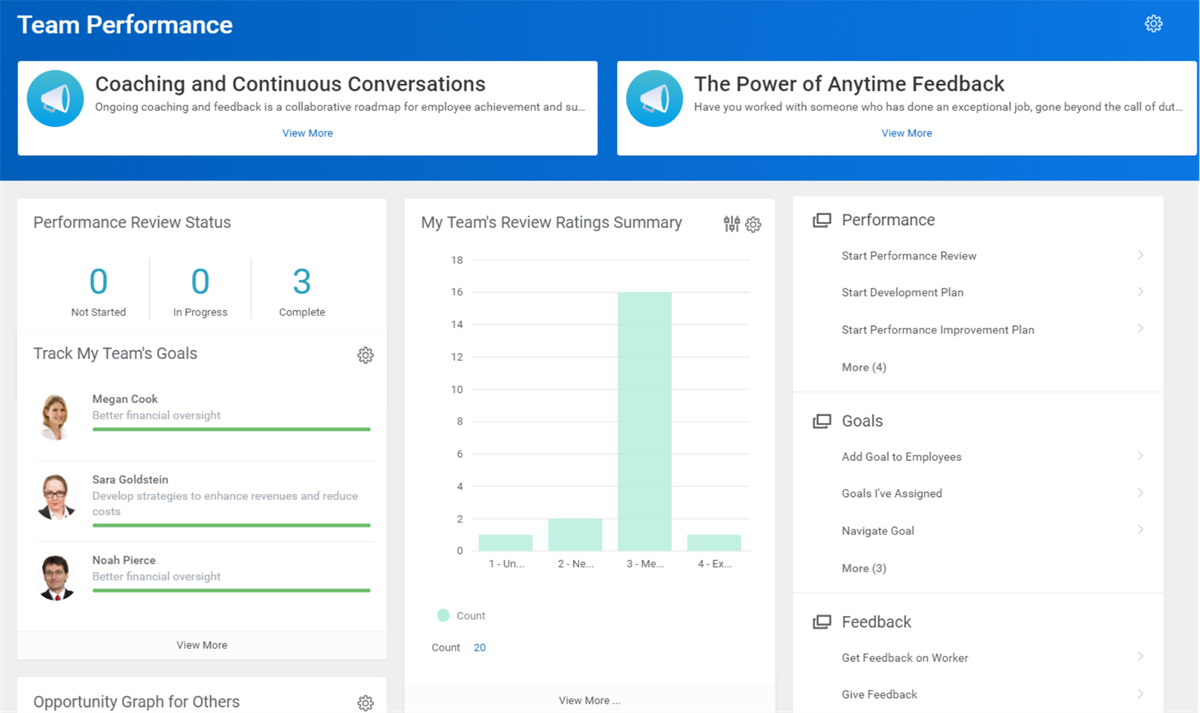
Dashboard showing configured menus and announcements
Chapter Review
Workday delivers standard reports. You can copy and edit most standard reports to meet customer-specific requirements. You can also create custom reports using the built-in Workday Report Writer tool.
Contextual reporting can aid in identifying business objects and report fields required for a custom report. Contextual reporting provides information about fields and values related to a specific object or transaction type. It also enables creating custom reports and viewing reports that relate to the object or transaction type.
Key reporting concepts include report data source, primary and related business objects, and class report fields. The report data source determines the primary business objects. The primary business object determines all possible related business objects. Both the primary and related business objects determine the class report fields available to use on a custom report.
The
Business Object Details
report can help you understand how business objects relate to each other and the class report fields available for each. The Workday Report Writer tool offers several report types including advanced, matrix, composite and trending. Specific functions of the custom reporting tool include: sort, filter, subfilter, prompt, and share.You can schedule reports and report groups to run on a schedulable basis. They can run once in the future or on a periodic basis as you define.
Workday does not automatically share reports when Report Writer initially creates them. Security generally determines the data that a user notices when running a report. However, when a report owner schedules and shares a report, they are specifically authorizing the user to display report data as the owner notices the data.
A report's design, including the data source, fields, sort, and filters, impacts report performance. It is critical to understand how Workday evaluates reports to assure the best possible performance.