
Spreadsheet Import
You can import data into standard, cube, and modeled sheets by filling in a downloaded spreadsheet template and uploading it to your instance. If your company has the transactions module, Adaptive Planning also lets you import transactions details from a spreadsheet. As part of the import process, you map accounts, levels, and dimensions from your source to what already exists in Adaptive Planning.
Disabled for modeled sheets managed by the workforce planning configuration manager.
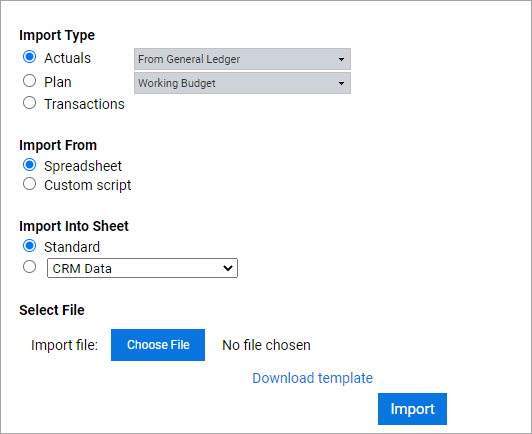
The Import Data interface lets you select import type, source, and destination. Your choices generate an import template spreadsheet you then download and fill in with your source system's data. Always review the instructions in the downloaded template file for the most up-to-date steps and requirements. After you fill in the spreadsheet template, you import it.
The user importing might not be able to validate their imports because of access rules. As a best practice, the importing user should have at least Full View access to all intersections.
To find out how to erase data from actuals versions in GL, custom, and cube accounts on sheets, see Erase Data from Integration Management.
Other Ways to Import: If your company purchased the NetSuite Integration option, you can also import actuals data directly from your NetSuite account.
Adaptive Planning Integration provides a complete data integration platform that lets you schedule automatic data imports and metadata imports from a variety of external systems. See Concept: Integration for more.
Prerequisites
Prerequisites
- Required permissions:
- Import Capabilities and edit access to the specific intersections you want to import data to.
- Or Import to All Locations, which enables import to all areas, regardless of location or level access.
- To validate imports, the importing user should have at least Full View access to all intersections where data imports.
- For transactions import, you must have the transactions module and Reference: Transactions.
- Know the sheet name and Concept: Sheet Types the data will import to.
- Have an export from your ERP or other source system in a CSV, XLSX, or other file you can copy data from.
- To make the process efficient, verify that the accounts, levels, and dimensions your data values need to load to already exist in Adaptive Planning.
Navigation
 From the nav menu click
 Integration > Import Data
. Basic Steps
- Select the import type and where you are importing from.
- Select where to import to.
- For spreadsheet imports, download and fill in a template for one of the following:
- Modeled Data
- Cube Data
- Standard Data
- Transactions Data
- Import the template and select your account, level, and dimension value mappings if applicable.
Select the Import Type
You can select
Import without Code and Name columns for display names
to import templates without columns for Code and Name fields. This option also allows importing from older templates created before the introduction of display names. When you turn on Enable Single Column Data Import/Export for Display Name
in General Setup
, we apply Import without Code and Name columns for display names
across the application and hide the option in the Import page.Actuals versions
contain your actual financial results for a given period of time, like your income or expenses from May 2020. Actuals are records of events that happened. You can view the history of actuals imports by navigating to
Integration > Import History
. You can view each actuals import request under File Name and its status or error messages under Action. Plan versions
, also referred to as planning versions, plans, and planning, may be budgets, what-if scenarios, or almost anything else you can imagine.Transactions are typically data related to time-stamped orders, invoices, sales process activities, or payments. Transaction data can only be imported if you have the transactions module.
Select Where to Import From
Select Spreadsheet
. Continue by selecting the sheet under Import into sheet and downloading the template for it as described in the sections that follow.
If you do not see a section called
Import From
, your organization does not use NetSuite Basic or Custom Scripts. Only the Import Type
and Import Into
sections would be visible.If your company has NetSuite Integration - Basic, you can select the NetSuite actuals option.
Select Where to Import To
Choose the destination for your import. After you select the destination, click Download Template
and fill out its columns.
The download template varies based on the sheet type.
Enter Template Columns and Date Formats for Spreadsheet Imports
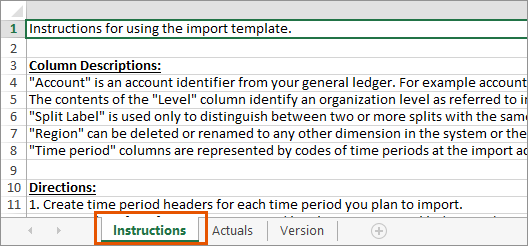
The columns you need to fill out in a spreadsheet template vary based on the sheet type you are importing to. Read the instructions on the first sheet of the downloaded template for more details about your template's individual requirements.
See Reference: Spreadsheet Import Options for more details.
Best Practice: After you fill in a template, save it. You can simply reopen your saved template to make edits and if you plan on loading from the same sheet, reuse it.
- Date Formats for Import
- The following legacy formats for dates are accepted within time period columns:
- Excel Date Format: Adaptive Planning will find the time period that contains this date at the appropriate time strata.
- Text strings in the format MMM-YYYY (e.g. jun-2016): If your organization configured a custom calendar, this format will not be accepted.
The preferred method of entering dates within imported files is to use time period codes. See Steps: Change Calendars.
Fill in a Standard Data Template
A
standard sheet
contains a simple grid of accounts and time periods. Common examples of standard sheets include expense sheets, revenue sheets, profit-and-loss sheets, balance sheets, and cash flow sheets. Standard data is data that resides in GL accounts, custom accounts, assumption accounts, and exchange rates but does not reside in a sheet. You do not select a sheet when you import standard data.
- Select Standard.
- ClickDownload templateand follow its instructions to create the columns and fill in the data you need to import.
- ClickChoose Fileand browse to the template you edited and clickImport.
- Select how you want Adaptive Planning to map account identifiers, levels or dimension values from your file.
- Standard Sheet Data Import Columns
- Account (Required): An account identifier from your external system such as an account name or account code. It cannot be empty. This column can also accept the header Account Code.
- Level Code (Required): Organization level codes from your general ledger. It cannot be empty.
- Split Label: Used to distinguish between two or more splits. It can be left blank if it isn't needed.
- Region Code: This is an example of a custom dimension column and can be renamed to any dimension in Adaptive Planning, or it, along with its dimension name column can be deleted. Add dimension code columns to specify more dimensions. Every dimension value must have a unique dimension value code.
- Region Name (Optional): This is an example of a custom dimension column and can be renamed to any dimension in Adaptive Planning, or it, along with its dimension code column, can be deleted. If the name column for a dimension doesn't exist, the dimension code is used for the dimension name. If the dimension name column exists, you must populate its cells. Duplicate dimension value names can exist only when their dimension value codes differ.
- Time Period: Represented by codes of time periods at the import accounts' time strata, or any date within the target time periods. Requires at least one time period of data.
Standard data templates come with a sample row of data to help you understand how to fill the template.- Standard Data Example Import Template
- The example below shows a standard data import template. Standard data templates come with a sample row of data to help you understand how to fill them out.ABCDEFGHI1AccountLevel CodeSplit LabelRegion CodeRegion Name01/201802/20182Accounts ReceivableWest CoastABCEUREUR229806.30227238.903Single Column Standard Data Import Template ExampleIf you selectImport without Code and Name columns for display nameson the Import page or if you turn onEnable Single Column Data Import/Export for Display NameinAdministration > General Setup, your import template will look like:ABCDEFGH1AccountLevelSplit LabelRegion01/201802/20182Accounts ReceivableWest CoastABCEUR229806.30227238.903
Fill in a Modeled Sheet Data Template
Modeled sheets
are for entering record-based data. The sheet has customized field names across the columns and records as rows. A modeled sheet contains the underlying business logic for modeling financial events, such as revenues generated from sales, monthly salaries of personnel, or the depreciation of capital purchases. - Select a sheet. You will know the selected sheet is a modeled sheet if you see Import Mode options.
- Select an import mode. If your instance uses access rules, some of the options are different. See Reference: Access Rules and Your Model.
- Add the imported rows to the sheet.
- Replace all data in the sheet, for all levels.
- Replace all the data in the sheet, but only for imported levels.
- Update existing rows. Only required column is Import Key. Sheets withAllow splitsselected do not support updates. Values in the Import Key column of your imported file must be unique.
- Update existing rows and add new rows. Only required columns are Import Key, Level, and any text selectors, even when not adding new rows. Sheets withAllow splitsselected do not support updates. Values in the Import Key column of your imported file must be unique.
- ClickDownload templateand follow its instructions to create the columns and fill in the data you need to import.
- ClickChoose Fileand browse to the template you edited and clickImport.
- Select anImport Keyfor import modes that update rows. Choose a custom dimension or level to indicate the rows in the modeled sheet your import will update. Any rows that match the import key will update. Values in the Import Key column of your imported file must be unique.
- Select how you wantAdaptive Planningto map account identifiers, levels or dimension values from your file.
- Modeled Sheet Import Columns
- Required fields and columns for modeled sheets vary depending on the model sheet definition.
Before you import, check that the sheet does not have duplicate column names. Only the Timespan column and one Display column can have the same name. All other duplicate names cause the import to fail. If you get a duplicate column name error message, you may have more duplicates than the error message indicates. You must find and remove the duplicate names from the sheet, not the template.
Modeled sheets allow columns of the following types of data:
- Level (required): Organization levels from your general ledger. It can't be empty.
- Data Entry
- Text: Any string value.
- Number: Any numeric value.
- Date: Any date value.
- Text selector: String value of corresponding text selector option.
- Initial Balance: Any numeric value.
- Checkbox: 0 for off. 1 for on.
- Timespan: Any numeric value. The order of the time span columns should match the one given in the template.
- Dimension: String value of the corresponding dimension value code.
- Attribute: String value of the corresponding attribute value code.
Modeled Sheet Example Import Template
The Services Revenue modeled sheet below only requires three columns:
- Level Code
- Rev Rec
- Invoicing
A | B | C | D | E | F | G | |
1
2 3 | Required | ||||||
4 | Level Code | Rev Rec | Invoicing | Customer Code | Customer Name | Service Code | Service Name |
5 | |||||||
6 | |||||||
Single Column Modeled Sheet Example Import Template
If you select
Import without Code and Name columns for display names
on the Import page or if you turn on Enable Single Column Data Import/Export for Display Name
in Administration > General Setup
, your import template will look like:
A | B | C | D | E | |
1
2 3 | Required | ||||
4 | Level | Rev Rec | Invoicing | Customer | Service |
5 | |||||
6 | |||||
Fill in a Cube Sheet Data Template
A
cube sheet
is a type of sheet that allows for multi-dimensional data input in a few accounts across a potentially large set of dimensions.- Select a sheet. You will know if the selected sheet is a cube sheet if you do not see Import Mode options.
- ClickDownload templateand follow its instructions to create the columns and fill in the data you need to import.
- ClickChoose Fileand browse to the template you edited and clickImport.
- Select how you wantAdaptive Planningto map account identifiers, levels or dimension values from your file.
- Cube Sheet Import Columns
- Level Code (required): Organization levels from your general ledger. It cannot be empty.
- Account (required): An account identifier from your external system such as an account name or account code. It cannot be empty.
- Custom Dimensions (required): All other labeled columns represent Custom Dimensions available on the cube. Each dimension requires a dimension code column. Enter codes of values in each dimension for each row.If the name column for a dimension doesn't exist, the dimension code is used for the dimension name. If the dimension name column exists, you must populate its cells. Duplicate dimension value names can exist only when their dimension value codes differ.
- The final columns represent time periods which contain the data. Values in these columns are the values which will import into the corresponding location in the cube. A value of 0 imports as a blank value to allow for erasing data in the cube. Titles of time period columns are codes of time periods at the import accounts' time strata, or any date within the target time periods.
- Cube Sheet Example Import Template
- A Product Revenue Cube Sheet may require columns for:
- Level Code
- Account
- Customer Code
- Customer Name
- Product Code
- Product Name
- and at least one time period
ABCDEGH1Level CodeAccount CodeCustomer CodeCustomer NameProduct CodeProduct Name01/201523Single Column Cube Sheet Example Import TemplateIf you selectImport without Code and Name columns for display nameson the Import page or if you turn onEnable Single Column Data Import/Export for Display NameinAdministration > General Setup, your import template will look like:ABCDE1LevelAccountCustomerProduct01/201523
Select or Add Mappings
View and edit the mappings you already created by navigating to
Integration > Import Account Mappings
, Level Mappings
, or Dimension Value Mappings
.When your file uploads,
Adaptive Planning
will attempt to match the accounts, levels, or dimensions values in that file to those already in Adaptive Planning
.If you already have mappings, you can choose the option that best fits them.
Click
Continue.
If you don't have accounts, levels, or dimension values already mapped from your sheet to
Adaptive Planning
, you can map them by continuing through a wizard-like process.
- Click the account in the table on the left to select it.
- Enter the exact account as it is named in the source you are importing from.
- Click the account withinAdaptive Planningthat you want to map to.
- ClickAccept.
- After you map all of the accounts, clickSave.
When accounts are already mapped, they appear grey on the right in the
Mapping Details
section.Accounts can only map to a leaf.
If all accounts are mapped, and they are all grey, you can still change the mappings. Select a different account in the Account selector in
Mapping Details
, then select Accept
.Follow the same mapping steps to map levels and dimension values, if needed. After you verify all of the mappings, click
Import
.Data Import to Locked Levels in Sheets
When importing data into any sheet for a specific version, the data import for rows associated with a locked level can fail. Based on their permissions and level access, users can receive an error message for the following Workflow statuses:
- Submitted for Review
- Approved
- Approved and Locked
The import in general succeeds but ignores updating the locked rows. Super users with the permission can continue to import data to all sheets regardless of Workflow status.
Import To All Locations
See Steps: Use Workflow.