
步骤:使用命名范围
命名范围
要从以下位置关联表格:
OfficeConnect
让 Excel 能够 OfficeConnect
对于 Word,您需要将表格定义为命名范围。命名范围
是 Excel 文件中用户定义的单元格、行或列区域。借助命名范围,您可以对该区域作为一个整体执行操作。一项强大的用途是,您可以从工作簿中的其他位置快速跳转到指定的范围。您将在本版块中使用的另一个用途是,您可以从以下位置选择并插入一个命名范围: OfficeConnect
将 Excel 导入到 OfficeConnect
来创建两者之间的链接。您可以移动或更改数据,甚至可以在命名范围内添加或删除行或列,并且命名范围将保持其作为单个对象的完整性。如果您对 Excel 中的命名范围进行任何更改,则在您刷新演示文稿后,所做的更改会立即反映在 PowerPoint 中。
当您使用
OfficeConnect
借助 Microsoft Word,您可以创建一个管道,用于存放源自您实例的可轻松更新的数据,这些数据在您的实例中进行格式化。 OfficeConnect
对于 Excel 工作簿,并以链接数据结尾 OfficeConnect
对于 Word 文档。用于链接表格或其他数据的流程
OfficeConnect
让 Excel 能够 OfficeConnect
对于 Word,始终首先定义一个或多个 Excel 单元格的命名范围,其中包含要关联的数据。通过这些命名范围,可以在两个应用程序之间链接信息。事实上,除非 Excel 文件至少具有一个命名范围,否则您甚至无法连接这两个文件。在 Excel 联机帮助中搜索“指定范围”,了解详细信息。
Create a Named Range
Use one of two methods to create a named range:
- Select an area on the grid
- Use the Define Name command
To create a named range by selecting an area:
- Select the area you want to include in the range such as set of cells, rows, or columns.
- Click in theName Boxmenu so that the current contents are selected.
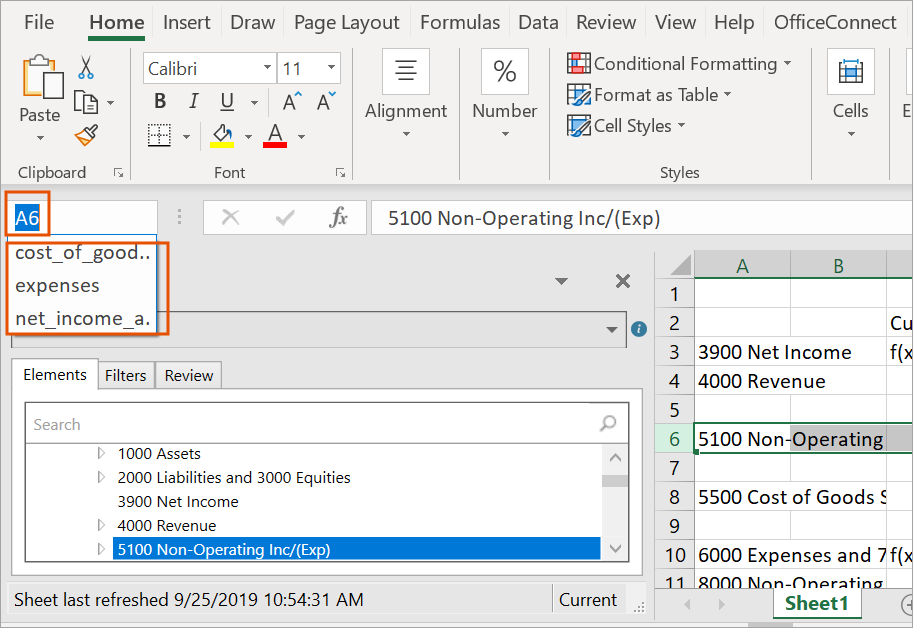
- Enter the name you want for this named range, and then press Enter. The named range is created. To see the named ranges in any sheet in this workbook, you can click the Name Box menu. Select a named range in the menu to goes to its location in the grid.
You can also create a named range by using the Define Name command.
To create a named range by using the Define Name command:
- Select the area you want to include in the named range such as set of cells, rows, or columns.
- Select theFormulastab in the ribbon.
- From theDefined Namesgroup, selectDefine Name.
- Enter the name you want for this named range.
- InScope, specify whether this named range is available from a particular worksheet in the workbook, or to the whole workbook.
- InComment, add a note if necessary.
- InRefers to, verify the code reflects the area you selected for this range. Make any corrections as needed, either by selecting in the grid or by changing the code.
- ClickOK. The named range is created as you specified. You can see the named range in theName Boxmenu.
Change a Named Range
You can change a named range to add or remove columns or rows. The named range adjusts automatically.
Use the Name Manager to:
- Change the scope of a name range.
- Change the name of the named range.
- Delete a named range.
To change or delete a named range:
- Select theFormulastab in the ribbon.
- From theDefined Namesgroup, selectName Manager. The Name Manager dialog appears, listing all named ranges in the workbook.
- Select the named range you want to change, and then clickEdit.To delete a named range, clickDelete.
- Change the name of the named range.
- InComment, add or change a note about the named range.
- InRefers to, change the area for this named range. When you click in the field, the range appears in the grid. Make your changes by either selecting in the grid or by changing the code.
- ClickOK.
- ClickClosein the Name Manager dialog box. The named range is modified as you specified.