
配置通过 PingOne 进行 SAML 单点登录
提供配置说明。
Adaptive Planning
接受来自 PingOne 实例的 SAML 单点登录令牌。您的 PingOne 实例是身份提供商,并且 Adaptive Planning
是服务提供商。先决条件
- 具有管理权限的 PingOne 账户
- 一个Adaptive Planning具有管理权限的帐户
- 来自的确认电子邮件Adaptive Planning指明已在您的实例上预配 SAML
添加 Adaptive Planning 发送给 PingOne
Adaptive Planning
发送给 PingOne- 登录到 PingOne。
- 转至“Applications”>“My Applications”。
- 单击“Add New Application”。
- 选择“Search Application Catalog”。
- 在搜索文本框中输入Adaptive Planning。
- 选择Adaptive Planning以开始设置应用程序。
- 从 PingOne 下载 SAML 元数据,并打开 SAML 元数据 XML 文档。
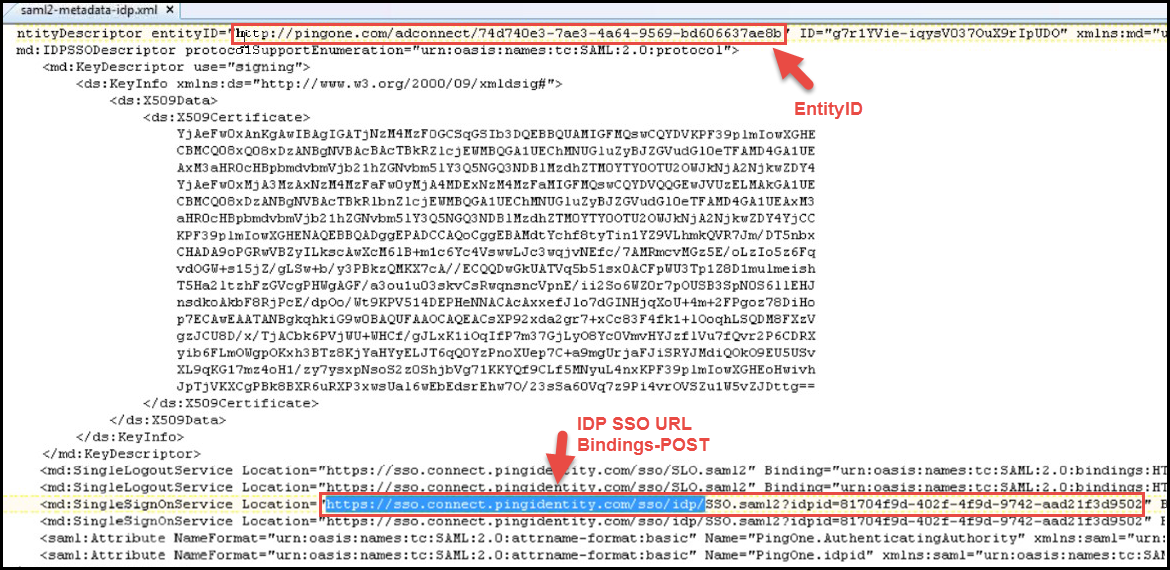
- 从下载的 SAML 元数据 XML 文档中复制身份提供商 EntityID,并将其用于Adaptive Planning“管理”>“SAML 单点登录设置”“身份提供商实体编号”字段。
- 从下载的 SAML 元数据 XML 文档中复制身份提供商单点登录 URL(使用 Bindings-POST)。您将在中使用此 URLAdaptive Planning设置“身份提供商单点登录 URL”字段时。
- 从 PingOne 下载“Signing Certificate”,并将证书保存在一个好记的位置。
- 起始日期Adaptive Planning,转至“管理”>“SAML 单点登录设置”页面,上传您下载的 PingOne 签字证书。
- 单击“保存”。
- 在 PingOne 中配置实体编号:
- 签入Adaptive Planning,复制Adaptive Planning单点登录 URL 位于“管理”>“SAML 单点登录设置”页面底部。
- 在 PingOne 中,转至“SAML Settings”,Adaptive Planning应用,然后将该 URL 粘贴到“ACS URLS”和“Entity ID”字段中。
- 从 PingOne 中复制“Initiate Single Sign-On (SSO) URL”,并将其粘贴到浏览器中,然后尝试进行单点登录。成功测试设置后,您便可以为用户启用 SAML 单点登录。请参见 为 Adaptive Planning 中的所有用户启用 SAML 单点登录。
SSO Into Excel Interface for Planning and OfficeConnect
After you've successfully configured and tested SAML SSO,
Excel Interface for Planning
and OfficeConnect
users can
sign in using only their usernames. They can leave the password field blank.PingOne SAML 单点登录限制
如果用户将 PingOne 配置为其身份提供商,则可能需要在每次连接到时重新输入登录凭据。
Adaptive Planning
,包括 OfficeConnect
和 Excel Interface for Planning
。