
Weergavevoorkeuren wijzigen
Gebruik weergavevoorkeuren om:
- Recente updates van de gebruikersinterface terug te draaien naar de vorige release.
- Hiermee kunt u validatieregels voor gemodelleerde bladen gebruiken voor bladen en bij het importeren van bladen.
- De zichtbaarheid van het geprojecteerde blad te verbeteren door rasterlijnen donkerder te maken en kleuren helderder te maken.
- Uw bedrijfslogo bovenaan in de navigatiebalk weer te geven. Als u Adaptive Planning en andere Workday-producten gebruikt, kunt u uw logo niet uploaden.
- Ervoor te zorgen dat uw team avatars kan gebruiken voor hun profielen.
Vooraf vereist
Beveiliging: machtiging
Algemene instellingen
.Afmelden voor de nieuwste interface-updates
De gebruikersinterface van Adaptive Planning wordt bij bijna elke release verbeterd. U kunt zich tijdelijk afmelden voor alle bijgewerkte functies.
De afmeldingsoptie is slechts voor één release van toepassing. In de volgende release wordt de nieuwe gebruikersinterface de standaard en kunt u deze niet langer uitschakelen.
De nieuwste updates tijdelijk uitschakelen:
- Ga in het navigatiemenu naarBeheer.
- Klik opWeergavevoorkeuren.
- Schakel het selectievakjeNieuwste updates gebruikersinterface toepassenuit voor deze functies:
- Bladen, rapporten, dashboards
- In-/uitschakelen van bladen optimaliseren voor dashboards
- De pagina Integratieoverzicht gebruiken
- Meldingen inschakelen
Validatieregels voor gemodelleerde bladen inschakelen
- Ga in het navigatiemenu naarBeheer.
- Klik opWeergavevoorkeuren.
- Schakel in de sectieGebruikersinterfacede volgende selectievakjes in:
- Gegevensvalidaties in bladen
- Gegevensvalidaties in importgegevens (gegevensvalidaties in bladen vereist)
Interface-updates voor beheerpagina's inschakelen
Als u de bijgewerkte interface wilt gebruiken voor landings- en gebruikerspagina's voor beheer, moet u deze eerst inschakelen.
- Ga in het navigatiemenu naarBeheer.
- Klik opWeergavevoorkeuren.
- Schakel in de sectieGebruikersinterfacede volgende selectievakjes in:
- Landingspagina voor beheer
- Beheergebruikers
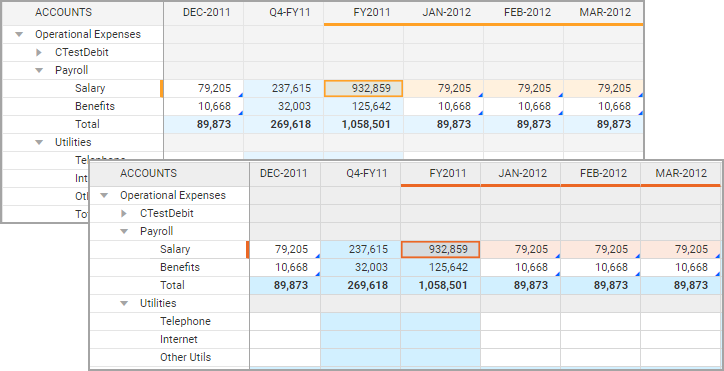
Zichtbaarheid van blad verbeteren
- Ga in het navigatiemenu naarBeheer.
- Klik opWeergavevoorkeuren.
- Schakel in de sectieWeergave-instellingenhet selectievakjeVisueel contrast in bladen verbeterenin.
Als u de optie selecteert, worden rasterlijnen donkerder en worden de kleuren van bladen helderder voor alle gebruikers van uw instance. Bladdetails zijn nu gemakkelijker weer te geven op projectoren:
Bedrijfslogo wijzigen
- Ga in het navigatiemenu naarBeheer.
- Klik opWeergavevoorkeuren.
- Selecteer in de sectieKlantlogode optieBestand importeren.
- Klik opBestand kiezen.
- Upload het logo van uw bedrijf als JPEG- of PNG-bestand van 40 MB of minder. Uw logo wordt in de bovenste navigatiebalk weergegeven.
Avatars inschakelen
- Ga in het navigatiemenu naarBeheer.
- Klik opWeergavevoorkeuren.
- Klik in de sectieAvatars gebruikeropAvatars toestaan.U en uw team kunnen afbeeldingen uploaden naar gebruikersprofielen. Zie Uw profiel, startpagina en e-mailgroepen wijzigen.