
단계: 명명된 범위 사용
명명된 범위
테이블을 링크하려면 다음을 수행합니다.
OfficeConnect
Excel의 경우 OfficeConnect
Word의 경우 테이블을 명명된 범위로 정의해야 합니다.명명된 범위
는 Excel 파일에서 셀, 행 또는 열의 사용자 정의 영역입니다. 명명된 범위를 사용하면 해당 영역에 대해 전체적으로 작업을 수행할 수 있습니다. 강력한 용도 중 하나는 워크북의 다른 위치에서 명명된 범위로 빠르게 이동할 수 있는 기능입니다. 이 섹션에서 사용할 또 다른 용도는 다음에서 명명된 범위를 선택하고 삽입할 수 있다는 것입니다. OfficeConnect
Excel의 경우 OfficeConnect
- Word 문서 간에 링크를 생성할 수 있습니다.데이터를 이동 또는 변경하고, 명명된 범위 내에서 행 또는 열을 추가하거나 삭제할 수도 있으며, 명명된 범위는 단일 오브젝트로서의 무결성을 유지합니다. Excel에서 명명된 범위를 변경하면 프레젠테이션을 새로 고치는 즉시 PowerPoint에 변경사항이 반영됩니다.
다음을 사용하는 경우
OfficeConnect
Microsoft Word를 사용하는 경우 인스턴스에서 발생하는 쉽게 업데이트할 수 있는 데이터의 경로를 생성하고, OfficeConnect
Excel 워크북의 경우 - 에서 링크된 데이터로 끝남 OfficeConnect
- Word 문서의 경우에서 테이블 또는 기타 데이터를 링크하는 프로세스
OfficeConnect
Excel의 경우 OfficeConnect
for Word는 항상 링크할 데이터가 포함된 하나 이상의 Excel 셀의 명명된 범위를 정의하는 것으로 시작합니다. 이러한 명명된 범위를 사용하면 두 어플리케이션 간에 정보를 연결할 수 있습니다. 실제로 Excel 파일에 하나 이상의 명명된 범위가 없으면 두 파일을 연결할 수도 없습니다.자세한 내용은 Excel 온라인 도움말에서 명명된 범위를 검색하십시오.
Create a Named Range
Use one of two methods to create a named range:
- Select an area on the grid
- Use the Define Name command
To create a named range by selecting an area:
- Select the area you want to include in the range such as set of cells, rows, or columns.
- Click in theName Boxmenu so that the current contents are selected.
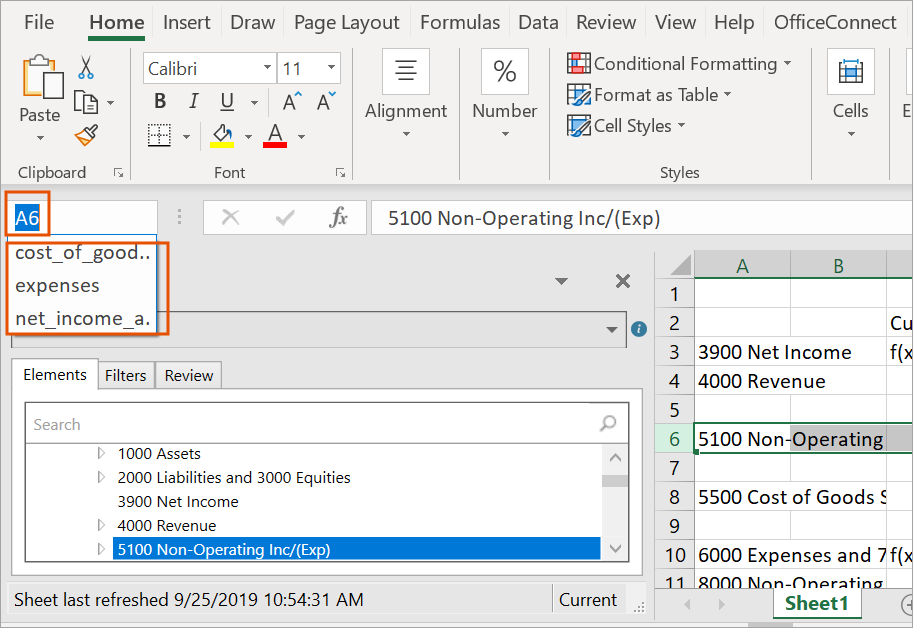
- Enter the name you want for this named range, and then press Enter. The named range is created. To see the named ranges in any sheet in this workbook, you can click the Name Box menu. Select a named range in the menu to goes to its location in the grid.
You can also create a named range by using the Define Name command.
To create a named range by using the Define Name command:
- Select the area you want to include in the named range such as set of cells, rows, or columns.
- Select theFormulastab in the ribbon.
- From theDefined Namesgroup, selectDefine Name.
- Enter the name you want for this named range.
- InScope, specify whether this named range is available from a particular worksheet in the workbook, or to the whole workbook.
- InComment, add a note if necessary.
- InRefers to, verify the code reflects the area you selected for this range. Make any corrections as needed, either by selecting in the grid or by changing the code.
- ClickOK. The named range is created as you specified. You can see the named range in theName Boxmenu.
Change a Named Range
You can change a named range to add or remove columns or rows. The named range adjusts automatically.
Use the Name Manager to:
- Change the scope of a name range.
- Change the name of the named range.
- Delete a named range.
To change or delete a named range:
- Select theFormulastab in the ribbon.
- From theDefined Namesgroup, selectName Manager. The Name Manager dialog appears, listing all named ranges in the workbook.
- Select the named range you want to change, and then clickEdit.To delete a named range, clickDelete.
- Change the name of the named range.
- InComment, add or change a note about the named range.
- InRefers to, change the area for this named range. When you click in the field, the range appears in the grid. Make your changes by either selecting in the grid or by changing the code.
- ClickOK.
- ClickClosein the Name Manager dialog box. The named range is modified as you specified.