
Pasos: uso de rangos con nombre
Rangos con nombre
Para vincular una tabla desde
OfficeConnect
para que Excel OfficeConnect
para Word, debe definir la tabla como un rango con nombre.Un
rango con nombre
es un área definida por el usuario de celdas, filas o columnas en un archivo de Excel. Con un rango con nombre, puede realizar operaciones en toda esa área. Un uso eficaz es la capacidad de saltar rápidamente al rango con nombre desde cualquier otro lugar del libro de trabajo en el que se encuentre. Otro uso, con el que trabajará en esta sección, es que puede seleccionar e insertar un rango con nombre de OfficeConnect
para Excel en su OfficeConnect
para que el documento de Word cree vínculos entre ambos.Puede mover o cambiar datos, e incluso añadir o eliminar filas o columnas dentro del rango con nombre, y el rango con nombre mantiene su integridad como un solo objeto. Cuando realiza cualquier cambio en el rango con nombre en Excel, el cambio se refleja en PowerPoint en cuanto actualiza la presentación.
Cuando utiliza
OfficeConnect
con Microsoft Word, está creando un conducto de datos fácilmente actualizables que se originan en su instancia y se les da formato en su OfficeConnect
para libro de Excel y finaliza con datos vinculados en un OfficeConnect
para documento de Word.El proceso para vincular una tabla u otros datos de
OfficeConnect
para que Excel OfficeConnect
para Word siempre comienza con la definición de un rango con nombre de una o varias celdas de Excel que incluyan los datos que desea vincular. Estos rangos con nombre permiten vincular información entre las dos aplicaciones. De hecho, ni siquiera puede conectar los dos archivos a menos que el archivo de Excel tenga al menos un rango con nombre.Busque Rangos con nombre en la ayuda en línea de Excel para obtener más información.
Create a Named Range
Use one of two methods to create a named range:
- Select an area on the grid
- Use the Define Name command
To create a named range by selecting an area:
- Select the area you want to include in the range such as set of cells, rows, or columns.
- Click in theName Boxmenu so that the current contents are selected.
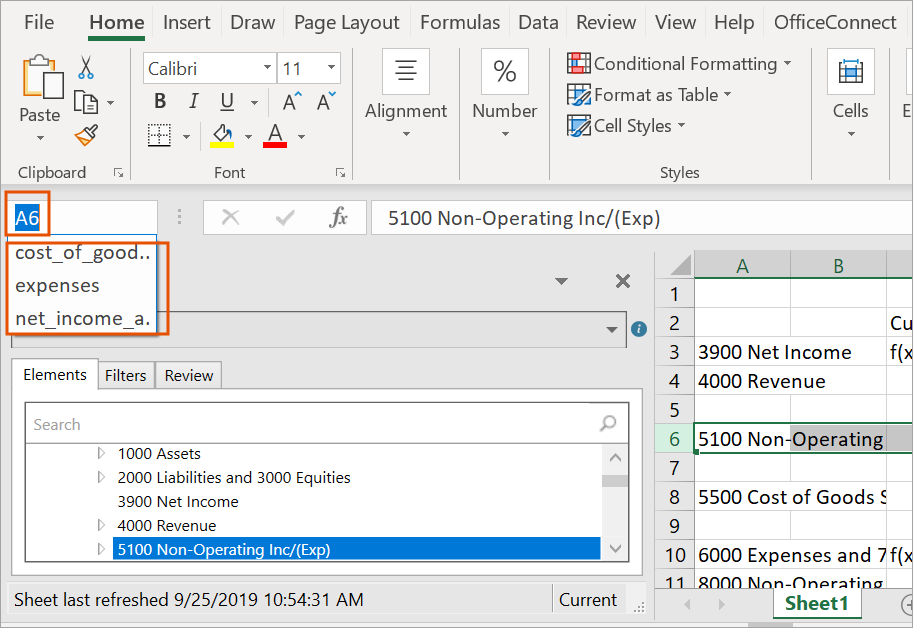
- Enter the name you want for this named range, and then press Enter. The named range is created. To see the named ranges in any sheet in this workbook, you can click the Name Box menu. Select a named range in the menu to goes to its location in the grid.
You can also create a named range by using the Define Name command.
To create a named range by using the Define Name command:
- Select the area you want to include in the named range such as set of cells, rows, or columns.
- Select theFormulastab in the ribbon.
- From theDefined Namesgroup, selectDefine Name.
- Enter the name you want for this named range.
- InScope, specify whether this named range is available from a particular worksheet in the workbook, or to the whole workbook.
- InComment, add a note if necessary.
- InRefers to, verify the code reflects the area you selected for this range. Make any corrections as needed, either by selecting in the grid or by changing the code.
- ClickOK. The named range is created as you specified. You can see the named range in theName Boxmenu.
Change a Named Range
You can change a named range to add or remove columns or rows. The named range adjusts automatically.
Use the Name Manager to:
- Change the scope of a name range.
- Change the name of the named range.
- Delete a named range.
To change or delete a named range:
- Select theFormulastab in the ribbon.
- From theDefined Namesgroup, selectName Manager. The Name Manager dialog appears, listing all named ranges in the workbook.
- Select the named range you want to change, and then clickEdit.To delete a named range, clickDelete.
- Change the name of the named range.
- InComment, add or change a note about the named range.
- InRefers to, change the area for this named range. When you click in the field, the range appears in the grid. Make your changes by either selecting in the grid or by changing the code.
- ClickOK.
- ClickClosein the Name Manager dialog box. The named range is modified as you specified.