
Import Accounts, Levels, or Dimension Values Mappings
When you import data, you must map accounts, levels, and dimension values from your source to their counterparts in
Adaptive Planning
. The first time you import mappings, the mapping process gets triggered for you. You can also start the mapping process separately from a data import using the Import Account Mappings, Import Level Mappings, and Dimension Value Mappings pages. Prerequisites
Prerequisites
- Required permissions: Import Capabilities
- You should have a CSV, XLSX, or other export file you can copy your external account, level, or dimension value names from.
- Although these have the same names, these mappings are not associated with mappings found inIntegration.
Navigation
 From the nav menu, go to
 Integration
> and select Import Account Mappings
, Import Level Mappings
, or Import Dimension Value Mappings
Download and Fill in the Template
- ClickImport Mappingin the top right corner of the page.
- Click the download template link in the pop-up.
- Open the downloaded template and follow the instructions to fill in the template.
- ClickChoose Filein the popup and select the file and clickUpload
- Review the mappings and mapping details, or add more mappings manually and clickAccept.
- ClickSave
- Template Columns for Import Mappings
- The instructions for filling out the template and an example appear in the first sheet of the template file.The templates for importing accounts, levels, and dimension values mappings only have two columns:
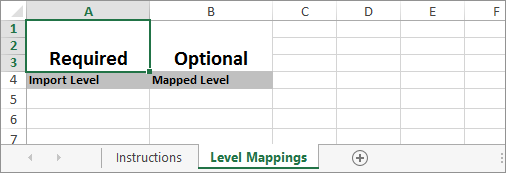
- Import (Required): Enter the name of the account, level, or dimension value from your external source.
- Mapped: Enter the account, level, or dimension value already inAdaptive Planning. If this column is left empty, you will be asked to complete the mappings after upload.
- Level Mapping Template Example
- The following example template is for level mappings. The required and optional columns are clearly marked.
Map an Import Manually
If you don't want to map automatically, or if you only want to add a few mappings, you can map items manually:
- ClickAdd Mapping
- Enter the exact name as it appears in the source you are importing from.
- Click the item withinAdaptive Planningthat you want to map to.
- ClickAccept.
- After you map all of the items you need, clickContinue.
When accounts are already mapped, they appear grey on the right in the
Mapping Details
section.Accounts can only map to a leaf.
If all accounts are mapped, and they are all grey, you can still change the mappings. Select a different account in the Account selector in
Mapping Details
, then select Accept
.