
Benannte Bereiche verwenden
Benannte Bereiche
Um eine Tabelle von zu verknüpfen
OfficeConnect
für Excel zu OfficeConnect
Für PowerPoint definieren Sie die Tabelle als benannten Bereich.Ein
benannter Bereich
ist ein benutzerdefinierter Bereich von Zellen, Zeilen oder Spalten in einer Excel-Datei. Mit einem benannten Bereich können Sie Vorgänge für diesen gesamten Bereich durchführen.Beispiel: Sie können von jeder Stelle in der Arbeitsmappe aus schnell zum benannten Bereich springen. Außerdem können Sie einen benannten Bereich aus kopieren
OfficeConnect
für Excel und verknüpfen Sie sie in einer PowerPoint-Folie.Innerhalb eines benannten Bereichs können Sie Daten verschieben oder ändern und Zeilen oder Spalten hinzufügen oder löschen. Der benannte Bereich behält seine Integrität als einzelnes Objekt bei. Alle Änderungen, die Sie am benannten Bereich in Excel vornehmen, werden in PowerPoint wiedergegeben, sobald Sie die Präsentation aktualisieren.
Suchen Sie in der Online-Hilfe von Excel nach
Benannten Bereichen,
um Informationen zu erhalten.Create a Named Range
Use one of two methods to create a named range:
- Select an area on the grid
- Use the Define Name command
To create a named range by selecting an area:
- Select the area you want to include in the range such as set of cells, rows, or columns.
- Click in theName Boxmenu so that the current contents are selected.
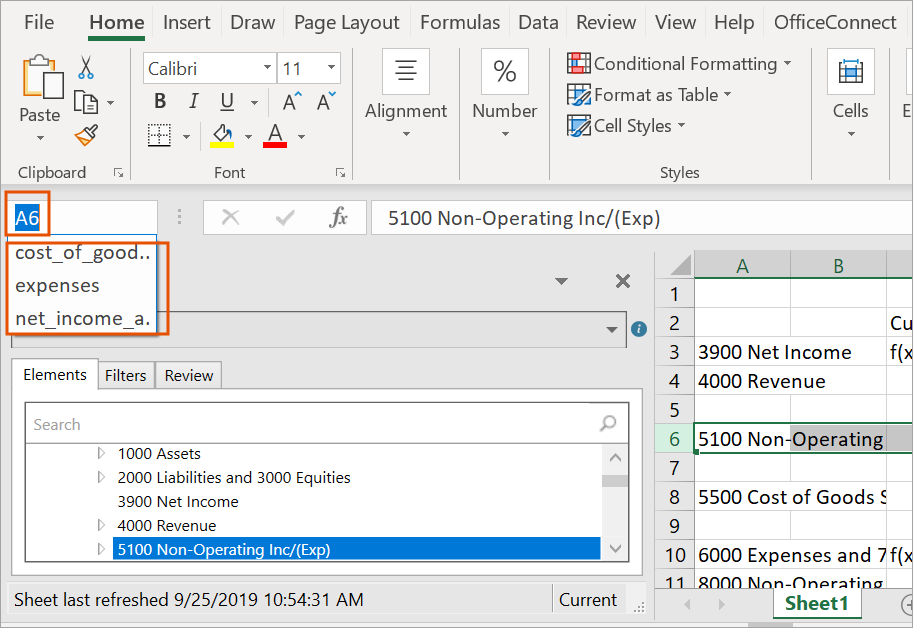
- Enter the name you want for this named range, and then press Enter. The named range is created. To see the named ranges in any sheet in this workbook, you can click the Name Box menu. Select a named range in the menu to goes to its location in the grid.
You can also create a named range by using the Define Name command.
To create a named range by using the Define Name command:
- Select the area you want to include in the named range such as set of cells, rows, or columns.
- Select theFormulastab in the ribbon.
- From theDefined Namesgroup, selectDefine Name.
- Enter the name you want for this named range.
- InScope, specify whether this named range is available from a particular worksheet in the workbook, or to the whole workbook.
- InComment, add a note if necessary.
- InRefers to, verify the code reflects the area you selected for this range. Make any corrections as needed, either by selecting in the grid or by changing the code.
- ClickOK. The named range is created as you specified. You can see the named range in theName Boxmenu.
Change a Named Range
You can change a named range to add or remove columns or rows. The named range adjusts automatically.
Use the Name Manager to:
- Change the scope of a name range.
- Change the name of the named range.
- Delete a named range.
To change or delete a named range:
- Select theFormulastab in the ribbon.
- From theDefined Namesgroup, selectName Manager. The Name Manager dialog appears, listing all named ranges in the workbook.
- Select the named range you want to change, and then clickEdit.To delete a named range, clickDelete.
- Change the name of the named range.
- InComment, add or change a note about the named range.
- InRefers to, change the area for this named range. When you click in the field, the range appears in the grid. Make your changes by either selecting in the grid or by changing the code.
- ClickOK.
- ClickClosein the Name Manager dialog box. The named range is modified as you specified.